A screenshot (screenshot) is an image taken on the screen of a computer monitor or laptop. In most cases, a screenshot is needed to capture an image. It is very useful to take a screenshot of all sorts of different open programs, browsers, you can capture funny pictures on social networks and simply send them to a friend by mail or instant messenger.
In this guide, we will look at many ways to take a screenshot on a computer or laptop using the keyboard and built-in Windows 10 tools.
Taking a screenshot using the keyboard
You can do this without saving the file, by immediately copying it to the clipboard and pasting it into social networks on a wall, in messages, or in a graphic editor like Paint. You can also select a specific area and capture a particular detail in the image.
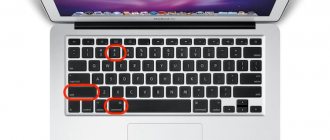
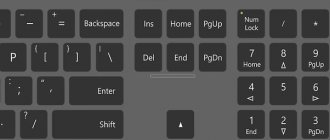
- A button on a computer keyboard may be variously labeled " PrtScn ", " PrntScrn " or " Print Scr ".
- On some laptops, you may need to press the Fn + "PrtScn", "PrntScrn", "Print Scr" button combination.
Print Screen buttons on computer keyboards and some laptops.
- Computer
- Laptop
Button combinations for taking a screenshot
| Devices: | Computer | Laptop |
| Copy and paste immediately | PrtScn | Fn+PrtScn |
| Convert directly to JPG | Win+PrntScrn | Fn+win+PrntScrn |
| Snapshot of only one window to the buffer | Alt+PrtScn | Alt+Fn+PrtScn |
| A snapshot of one window in JPG | Win+Alt+PrtScn | Win+Alt+PrtScn+Fn |
| Specific area of the screen | Win+Shift+S | Win+Shift+S |
Take a screenshot by copying to the clipboard
Press the " PrtScn " key. Your screenshot has now been copied to your clipboard. On some laptops and other devices, you may need to press Alt+Fn+PrtScn or simply Fn+PrtScn . Next, open your favorite editor, word, paint or social network, and paste the screenshot by pressing the Ctrl+V .
Take a screenshot and save a JPG file
Press the Win+PrintScrn (Win - the button is indicated by the windows logo). If you are using a tablet, then Win+Volume Down . On some laptops Win+Fn+PrtScn . After clicking, the screen will go dark a little and you will see the image appear as a JPG file.
Screenshots are saved in JPG format along the path: “This PC”>”Images”>”Screenshots”.
Take a screenshot with only one window
If you have many windows open and you don't want to close and minimize them, but you only need to take a screenshot of one window, then highlight the window first by clicking on its title. Next, press the button combination “ Alt+PrtScn ” to copy the image to the clipboard and paste it into any editor by pressing Ctrl+V . Don't forget, on some laptops you may need to press Alt+Fn+PrtScn .
Screenshot of the active window saved as PNG
By pressing the key combination on the Win+Alt+PrtScn , we will create a screenshot of the first active window on the screen and it will be automatically saved in .PNG format to the path C:\Users\Your username\Videos\Captures.
Take a screenshot of a specific area on the screen
Press " Win+Shift+S " and capture the area of the screen that you need. A snapshot of the area you selected will be copied to the clipboard. You can paste it into any application, social networks or Paint by pressing Ctrl+V . This method only works on Windows 10.
Scissors
This program is only available on Windows Vista, Windows 7, Windows 8 and Windows 10.
Snipping Tool is a program for creating screenshots from specific areas of the screen. It first appeared in Windows Vista, and existed until Windows 10, where, as a result of one of the updates, it is planned to be replaced by the Sketch on a Screen Fragment program.
- Working with this program is very easy - just launch it by finding it by searching in the Start menu.
- In the window that opens, click on the “Create” button.
- After this, using the mouse, you can select the area on the screen that needs to be saved, including the desired window. Upon completion of the selection, the “Scissors” program will show the resulting image, which you can either save (by clicking the floppy disk button) or try again (by clicking the “Create” button).
Screenshot using Screen Snippet in Windows 10
If you use Windows 10, then there is a special convenient function to take a screenshot of the entire area of the screen, or circle a specific area.
- Click the notification center in the very bottom right corner (square icon) and select “ Screen snippet ”.
- Next, circle the entire screen or a specific area, after which the screenshot will be ready and shown in the same editor.
- You can immediately crop, save locally to your computer or laptop, or immediately share on social networks.
Scan the screen with Gamepad Win+G
The Win+G keyboard shortcut enables Game Bar in Windows 10. The panel allows you to record videos and take pictures in programs and games that occupy the full screen. Press both keys at the same time. First you will have to confirm that the screenshot will be taken in game mode.
In this example, the screenshot is taken not in game mode, but from the Windows 10 Photos application, meanwhile, everything works. Everything works the same way in browser windows, I tested it on Chrom and Opera, screenshots are also successfully taken in text editors and spreadsheets.
The panel looks like this:
All that remains is to press the corresponding button or the key combination Win+Alt+PrtScrn. The created screenshot is saved automatically. You can find it in the “Videos” -> “Clips” folder.
Screenshot using the Snipping Tool in Windows 10
Snipping Tool lets you take a screenshot of an open window, a rectangular area, a free-form area, or the entire screen. After taking a photo, you can edit it with different colored pens or markers, save it as an image or MHTML file and send it to a friend.
- To launch the application, type in the start menu search, the word “scissors”
Free built-in macOS tool
To create a screenshot on macOs, hold down the key combination Shift + Command + 5. A small menu will open. Here you can set up a screenshot:
- full screenshot;
- snapshot of the selected window;
- snapshot of the selected area;
- Full screen recording;
- recording of the selected area.
There are additional parameters: save location, timer (so that the screen is taken with a delay), cursor display, and so on.
To take a screenshot of a specific size, select “Snapshot of selected area.” Hold any of the sliders with the left mouse button and stretch the image. to increase or decrease the future screen. The screen resolution will be displayed next to the cursor - you can manually adjust it to the desired size.
By the way, when the screen is ready, you can select the desired area of the picture in the built-in photo editor.
Three selection options are possible: with darkening an unnecessary area, with a color outline, or with an enlargement of a specified area.
To do this, go to the image editor and select a graphic shape:
How to read books on iPhone and save: 3 civilized ways and 1 condemned
Screenshot in Windows 10 using Game Bar
Windows 10 comes with Game Bar capabilities to record video footage of the game and take screenshots of the currently running window. The game panel generates a snapshot in PNG format and saves them to C:\Users\[your username]\Videos\Clips.
- To open such a panel you just need to press Win + G.
- Next, select the camera icon and the screenshot will be saved.
Note : Quick combination of Win+Alt+PrtScn buttons.
If you want to change the button combination, go to Settings > Games > Games Menu. On the right you will see empty rectangles in which you can enter your button combinations. These are the standard methods you can use to take a screenshot on a computer or laptop running Windows 10.
See also:
- How to trim videos in Windows 10 without third-party programs
- How to Backup Windows 10 Drivers
- Reset BIOS password on laptop
- How to calibrate your monitor in Windows 10
Channel Chat
Screenshot is...
Screenshot is a snapshot of a computer screen or part of it. When might it be needed? When you need to save or transfer to someone a picture showing the state of your computer screen. For example, you play the popular game “ World of tanks” and wanted to record a bright episode of the game. Or maybe you need a still from your favorite video or an image from Instagram. As you know, this social network does not allow direct photo downloading. So, one of several ways is to take a screenshot. You can take a screenshot on your computer using programs , and there are also tools built into browsers to instantly scan and save website pages . However, in this article we will tell you exactly how to take a screenshot on Windows 10, that is, using the built-in tools of the operating system itself:
- PrtScn button .
- Key combination Win+Shift+S .
- Application "Scissors" .
- Key combination Win+G .
- Hot buttons Win+PrtScn .
Monosnap (Google Chrome extension)
Monosnap is a popular screen capture tool. In addition to the browser extension, there is also a stand-alone version that works not only on Windows, but also on macOS.
In Monosnap, only Spartan capabilities are available: you can take a screenshot of the full screen or a separate area of it. There is also support for tags + you can transfer files to the cloud.
Let's take a closer look at how to take a screenshot of the required size in Monosnap.
Download the extension in Google Chrome. Let's launch. Immediately pay attention to the icon in the extensions:
Right-click on it and select “Snapshot of page area”:
To speed up your work when capturing a selected area of the screen, use the hotkey combination Shift+Alt+5.
A new window will open where you will need to select the area of the screen to capture:
Select the correct area and release the key. A new window will open where you need to click “Save” at the top of the screen:
Pay attention to the good graphics editor that Monosnap has. It will allow you to immediately edit the screenshot. For example, remove any elements from it, blur a section of the image, draw lines and other shapes.
Monosnap is a completely free tool.
To turn off notifications in your browser, all you need to do is... Full instructions inside
How to adjust a picture to the desired size in Photoshop
It’s not difficult to take a screenshot of a given size, and it saves a lot of time: you don’t need to go into the graphics editor and change the image there.
If you still prefer to take a photo of the entire screen and then crop it, get ready to open Photoshop and resize the picture there. Here's how to do it.
How to resize a photo in Photoshop
Launch Photoshop and open the required screenshot. In the “Images” section, select “Image Size”:
The image size can be displayed in any convenient units, for example, in pixels:
As you can see, you can adjust the current image to ready-made print formats (if you plan to print the screenshot in the future):
Or manually set the width/height/resolution:
If you need an image of a specific size, carefully adjust your image to fit it. If the proportions of your screen do not match the specified ones, the picture will be distorted.
How to fit an image to specified proportions in Photoshop
Select the Frame Tool from the Photoshop toolbar on the left:
Now let's clarify the proportions. We indicate those that the new version of the screenshot should correspond to:
Confirm the selected option by pressing Enter. We save the modified screenshot as usual - using the “Save As” function:
If necessary, specify the format, quality of the exported image and other parameters.