LifePC 11/17/2018 0 Comments
Problem solving
laptop, screenshot
The ability to take a screenshot is a useful skill for any user. A screenshot in the form of a picture can be useful for correcting an error, serve as a visual addition when forwarding it to a friend, and even help out when trying to save an image of a web page. But in some laptop models, the creation principle has its own algorithm. On an Asus laptop, you can take a screenshot of the screen using several methods - from built-in programs and keyboard shortcuts to third-party programs. Which option is most convenient?
What buttons should you use?
Taking a screenshot without third-party software is possible on any Windows operating system. First of all, it’s worth capturing the photo itself. You can perform this operation using the following keyboard shortcuts:
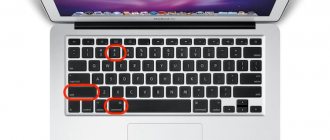
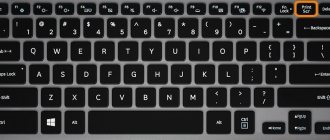
- “win” + “PrtSc” (on some laptops, the “win” key is shaped like a button with a drawn flag, which is located in the bottom row of the keyboard (at the same level as the space bar);
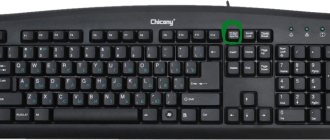
- “Print Screen/Sys Rq” (it can be found next to the F12 key, but there is no automatic saving here, you must save the screen in some editor);
Reference! If you need a picture of only a single element, then press Alt together with the Print Screen/Sys Rq key. Then you will not receive a screenshot of the entire Asus screen, but only the window you are currently working with.
- “Print Screen/Sys Rq” + “Fn” (serves as an additional method if the above schemes do not work or are blocked by site settings).
Next, you need to move on to the next stage - look for a suitable place to save it, because so far the screenshot has not actually been left anywhere among the documents.
What to do if Print Screen does not work?
How to fix when the Print Screen button does not work
- Close third-party programs Closing certain programs may solve the problem. The fact is that some programs have built-in functions for creating screenshots, which can interfere with the operation of the main one. ...
- Keyboard driver Press Win+R and enter devmgmt.
17 Jan
2022 Interesting materials:
How to close open applications? How to close all open applications on iPhone? How does rosemary winter in open ground? What keyboard shortcut is used to quickly navigate between open windows? What borders has Russia opened? What borders are open to Ukraine? What criteria does the customer have the right to use when holding an open tender? What destinations are open to Russians? Which ports should I open for a network printer? Which countries are open to MIA 2022?
Where to find the screenshot
The image is currently on the clipboard. To display it on the screen as a separate file, you need to use a graphic editor. You can use Photoshop or Paint, where the picture is inserted using the Ctrl-V key combination or the corresponding button in the program interface (“Editing” - “Paste”). When saving the screen as an image, do not forget to set it to a specific format. The standard settings offer png with an initial extension, but it is better to choose ipeg - this way, the picture can be viewed as media without third-party resources. Decide on the storage location on Asus: initially the file is located in the “My Computer” tab (“Pictures” in the “Screenshots” folder), unless you specify a different path.
Prt Sc+Shift=elementary screen
The most common way to take a screenshot is the Prt Sc+Shift key combination.
- Simultaneously hold down both Prt Sc+Shift keys, while the screen should display what you want to see in the photograph;
- Open the standard drawing program Paint through Start;
- In the upper left corner, select the “Insert” tool. After which your photo will open in the window. Then you can perform various operations, for example, cutting off what is not necessary or covering it up;
- In the top panel, select “Save” and select a save location;
How to do it on Windows 7 and 10
In most versions of Windows, further manipulation of the screenshot invariably leads to the built-in Paint program. This simple graphic editor can be found as follows:
- Click on “Start”.
- Select the stanza “All programs”.
- In the general list, look for the “Standard” section and go there.
- Click on the “Paint” icon.
In the panel that opens, paste the screen using the combination “Ctrl” + “V”. The displayed image can be edited as desired. In Windows 10 for Asus, the Snipping Tool feature is especially popular. By selecting this tool, you can correct an existing screen, leaving only a fragment of the entire screen:
- In the menu that appears, click on the “Create” column.
- Wait for the cursor to change to a cross.
- Now draw a rectangle around the area you want to screen.
- Next, select the address to save the photo.
- Go to the “File” section and select “Save As”, specifying the name of the screenshot and the desired format.
In the latest versions of Photoshop, the principle of inserting and saving a picture is similar, the only difference being that there is no scissors function. Instead, you can use regular selection and cropping.
Printscreen on Android: other options
How to take and send a screenshot (screenshot)? 5 ways for windows
You can take pictures of pictures and correspondence on your phone display using various devices. Taking a screenshot of the screen on a smartphone using connected accessories is very simple:
- Connect the device to the headphone output. If there is no port, you will need an adapter for a USB cable.
- Download instant photo management software.
- Go to the application and configure the type of click for the screen.
This method is distinguished by its simplicity and accessibility, and if there is no other way to take photos of correspondence, pictures on the phone display, then it is quite suitable for all owners of mobile phones and tablets.
You can make a print screen of notes and correspondence on Android in various ways. Many owners of modern gadgets use the simplest options, where you just need to know several combinations. But advanced users prefer special snapshot programs. In any case, taking a photo of a mobile phone display is no more difficult than on Windows and iOS.
When you type articles, abstracts, reports and the like, you almost always need to capture the information on the screen so that you can then insert this image or part of it into any document you are working on. The process of capturing a monitor screen (taking a photograph) is called Print Screen. It reads like a print screen or screenshot. In any case, taking such a screenshot is incredibly simple.
All laptop models: ASUS, Acer, HP, Compaq, Toshiba, Samsung, Lenovo, Dell and others, as well as computer keyboards, have a “Print Screen” button for print screen.
How to not install additional software on a laptop and use only those standard programs that are in Windows, you need to learn just two steps.
First, to take a photo of the screen, you need to press the “Print Screen” button, or “PrtSc” for short. You can find it in the upper right corner of the keyboard. Basically it is located next to the “Delete” button.
It should be taken into account that on some laptops on some keyboards this button combines two functions – “Print Screen” and “Insert”. In this case, “Print Screen” is highlighted in blue, and only works in combination with pressing the “Fn” button.
After you have completed these manipulations, the photo will be on the clipboard as an image.
Secondly, any graphic editor opens: Paint, Photoshop. After this, the image is inserted into the editor using the Paint menu, or using the combination of two buttons “Ctrl + V”.
Once the image is inserted, you can edit it or simply save it to any folder.
If you have the skills to use Paint, then you can do a lot of things with the image. For example, write any inscription in a different font, change the size of the image itself, add different elements and save in the desired format.
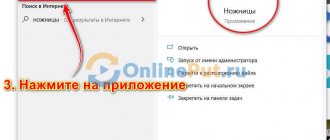
When you press a key to get a screenshot, the entire screen will be shown in the image. If you only need part of the image, you can use scissors. To find them, go to the “Start” menu, find the line “All Programs” - “Accessories” - “Snivers”.
Using scissors, you can create the desired photo of any part of your screen.
By the way, by simultaneously pressing the “Alt+Print screen” buttons, you can make a print screen of the application’s working window. Then you won't waste time editing the image in Paint.
Other popular programs
The desire to take a high-quality screenshot on a laptop sometimes goes beyond the boundaries of built-in editors, because it will be no less convenient to use third-party software. Now there are many special programs for creating screenshots, where the most practical are considered:
- DuckCapture
The program has the ability to create snapshots of windows with scrolling content and manage settings using hotkeys that can be configured independently. The final version of the pictures can be copied to the clipboard for subsequent insertion and editing. You can also give screenshots names and select a folder online for automatic saving.
Attention! Only the most popular formats are presented here - bmp, png and ipg.
- PicPick
A free option for capturing and processing images from the screen, a separate window or area. The final image can be edited directly in the program window using built-in tools. In its functions, the program is very similar to the classic Paint editor. The saving function supports the most popular bmp, ipg, gif, png and pdf formats.
Important! One of the main features is the ability to transfer files to other programs (Word, Excel or Skype) and social networks (Facebook, Twitter).
- FastStone Capture
Paid replacement, where there is a special floating toolbar. With its help you can rotate, crop and perform other standard operations with images. A characteristic bonus is a very wide selection of formats: bmp, ipeg, gif, ipeg 2000, wmf, png, tiff, pcx, ico and tga.
Reference! Previously, FastStone Capture was free, but the latest versions of the program cost about $20.
- Clip2Net
In addition to the ability to edit and save a screenshot, the advantage of this version is the download function and receiving a code for further publication of materials. In addition, the program provides the ability to view your own statistics, publish comments, share files with friends on the system, and create private folders for limited viewing.
Important! The program itself is free, but you will have to pay for a subscription with more advanced features (more data capacity and storage without time limits).
- SSmaker
Free version, which can be downloaded as a full-fledged program with installation on an Asus laptop, or as a portable utility. The proposed functions allow you to take a screenshot, edit it in the built-in editor menu, upload it to the server and have at your disposal a link for publishing on the network.
- Ashampoo Snap
A more advanced version compared to other offers. In addition to creating the clearest pictures possible, the program allows you to recognize text on a taken screenshot and edit the picture. It is noteworthy that you can screenshot not only a fragment of an open page, but its full version - from the top to the bottom, along the entire scroll. It is also possible to shoot video online.
Reference! Such convenient software is paid: it has a short trial period with a fixed number of functions, and the full set can only be obtained after purchasing the official product.
Summarizing all of the above methods, we can conclude that operating systems for modern Asus laptops have convenient functionality for creating screenshots. Rarely using such features, you can limit yourself to standard editors. But if you often exchange ready-made screenshots on the Internet, it would be logical to master several additional programs.
Download the entire site
Sometimes there is a need. This is often necessary to access the necessary information when there is no Internet connection at some point. Let's look at several ways to create a copy of a site.
Page saving
This feature is present in every browser. We discussed this method in detail a little higher. But saving a site using this method can take quite a lot of time if the site contains a large number of pages.
Using online services
There are now many online resources that transcode and edit files. You just need to go to this resource and enter the address of the site you are interested in in the required line. Then we press the start button and the download process will begin to transfer the information to a specific location for saving it.
Unfortunately, there are few such free online resources and their functional range is often limited. But if there is a great need for a complete set, you can use the paid resources of such services. Here are some of them:
- Site2Zip.com is one of the few free Russian-language resources. The download process is not very fast. But if everything goes well, you will receive an archive with the site.
- Webparse.ru - you can use it once for free. You will have to pay for the rest. With the free option, the parsing depth is not adjustable. Therefore, you will have to independently check the original and the copy to make sure that the site has been fully downloaded.
- Web2pdfconvert works entirely on a paid basis.
Specialized programs
The most functional option for downloading the necessary information from the Internet is special utilities. They can also be free or paid. But sometimes free programs are almost as good as their paid counterparts in terms of capabilities. Although each operating system requires a suitable version of this software.
Let's take a look at these programs:
- WinHTTrack WebSite Copier is a fairly popular program. It has virtually no free analogues. Has a wide range of settings. The folder with the project is downloaded to any medium, where it can then be easily viewed.
- Cyotek WebCopy is an English-language program. Solid interface and great options for customizing site downloads. You need to enter the address of interest, specify the folder to save and click “Copy Website”. It has no localization and works only with Windows OS.
- Teleport Pro is a time-tested, but paid program. After all the settings for downloading, click the “Start” button in the control panel and the process of saving the site will start.
- Offline Explorer is a very functional, but paid program.
- Webcopier - trial period is 15 days (paid).
There are a lot of possibilities for creating a collection of the necessary sites or web pages. Each of the options considered has its own advantages and disadvantages. And let everyone decide for themselves whether to pay or use free services or programs to achieve their ultimate goals.
Third Party Applications
Many users prefer to use external programs to create screenshots due to the functionality and simple interface of the latter.
LongShot
An advanced utility for Android, focused on saving long snapshots of web pages. The English version of the program is suitable for Asus smartphones and tablets. Distinctive features:
- “Gluing” screens in the vertical and horizontal directions with the inclusion of additional effects.
- The image is captured automatically after scrolling the entire web page.
- System of “hot keys” for quick access (they greatly simplify working with the application).
- Marks indicating the beginning and end of the page to be captured.
- LongShot functionality is provided free of charge.
- Minimum advertising.
Apowersoft Screen Recorder
One of the most “advanced” programs today. The utility is capable of creating high-resolution screenshots. An additional arsenal is video recording in 1280p format. Other advantages:
- 1) video recording of what is happening on the display with an integrated window broadcasting the visibility range of the front and main cameras;
- 2) a full-fledged graphic editor for pixel screenshots;
- 3) connecting a microphone;
- 4) extended timer.
ScreenShot Snap
The most intuitive utility focused on capturing images via any smartphone. During operation, the application opens a wide range of tools for creating Screenshots on Asus:
- A powerful editor for processing images.
- Scaling and cropping.
- Resize the picture.
- Free drawing.
- Adding texts, arrows, watermarks.
- Integration into social media applications.
Snipping Tool
In Windows 10, you can select and copy an arbitrary area of the screen to RAM. This allows you to reduce the size of the picture, as well as the time required for its subsequent cropping in the editor. The program is located in the "Accessories - Windows" category of the "Start" menu. After launch, you must complete the following steps:
- Click on the “Create” button in the application window.
- Select a rectangular fragment of the screen with the mouse (the cursor will look like a cross).
- Select the path to save the image.
- Set the name and format of the image.
Then the created screenshot can be opened in the previously specified directory for viewing or editing using a convenient program for working with images.
The method is convenient in cases where you need to capture only part of the desktop or application window, for example, a separate message in the messenger, or an interesting detail of the image.
Problem #5. Broken/loose handle
Repairing plastic windows involves not only troubleshooting technical problems, but also replacing some elements with your own hands. If the handle begins to loosen or bursts, you need to replace it at home.
1. Locate the plastic plate covering the base. Turn it so that the screws begin to show.
Arm yourself with a screwdriver and unscrew them. Now there is nothing holding the handle, so you need to remove it. Install a new one in place of the old one, insert the removed screws and tighten them.
2. If you have set a goal for yourself - to replace the opening limiter together with the handle, then before installing a new handle, attach a comb (a plate that controls ventilation) to its base. Next, the handle is placed in its original position and screwed on.
How to change the resulting image
In today's material it has been repeatedly noted that the resulting screenshot is not always needed in its original form. Sometimes the user needs a separate piece. To get it, you just need to change the picture. Our specialist will tell you how to do this.
GermanExpert in the field of digital technologies and the activities of mobile operators. I am constantly monitoring industry changes in Russia and abroad. Question to an expert Do I need a special application for editing? No. To change the size or other parameters of the image, the built-in functions of the ASUS phone are enough. How to change the picture? Open the image through the “Gallery” and click the “Change” button at the bottom of the screen. Next, you will be able to adjust the frame, as well as apply a certain effect. What to do if you can’t edit the photo? Use one of the previously mentioned applications that were discussed in this material. All of them have a built-in editor that allows you to perform the necessary operation. AuthorGermanExpert in the field of digital technologies and the activities of mobile operators. I am engaged in constant monitoring of industry changes in Russia and abroad.
Understanding this issue is not so difficult, since there are three convenient and effective ways to take a high-quality screenshot and use it immediately.
Content
Setting up quick access to a function
Before moving on to directly capturing a picture using a special button, you need to set up the quick screenshot function:
- Open the top toolbar (swipe from top to bottom).
- Click "Edit".
- Go to the “Selecting displayed tools” section.
- Enable the Screenshot function.
This panel houses four “quick functions”, so some Asus features will have to be abandoned.
Using a keyboard shortcut
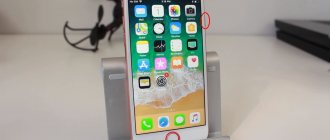
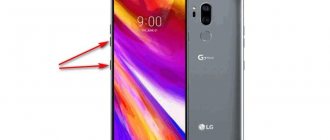
There are several ways to take a screenshot on an Asus Zenfone. The first is traditional: using keyboard shortcuts, users can save a screenshot at maximum resolution. To do this you need:
- Prepare the Asus workspace - remove extraneous widgets, advertising banners, launch a full-screen application (if necessary).
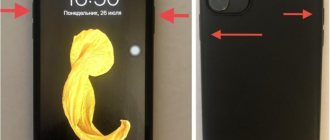
- Press and hold the backlight and volume down buttons.
- Wait for audio and visual confirmation from Asus.
Using third party software
The capabilities of standard tools are limited, so to create high-quality screenshots with advanced options, it is better to use applications from other developers. Listed below are the most popular and convenient programs for Windows 7 and later versions of this OS.
When running an outdated operating system, the utility will not start or will work with errors and failures.
- UVScreenCamera. A simple utility with many functions that takes pictures, records everything that happens on the screen, allows you to edit videos and works with many common file formats.
- DuckCapture. Here, when taking screenshots, you can scroll the contents of the open window so that a long page appears in the picture (taking a series of screenshots of an application that occupies several screens is much more difficult, as is looking at scattered or collaged pictures), configure hotkeys for convenient work, and set parameters picture. Only the most popular files are supported: bmp, jpg and png, which will suit ordinary users.
- PicPick. Captures the entire screen, a single window or a selected fragment. Equipped with an image editor, the functionality is similar to the one familiar to Paint users. Can transfer images to other programs (Skype, software from the MS Office package) and publish on social networks. Saves screenshots in bmp, gif, jpg, png and pdf formats.
- SSmaker. To create a snapshot, you will need to click PrtSc SysRq or double-click the program icon in the system tray. The software allows you to select an area for shooting with the mouse, work with the image in the built-in editor, save it, upload it to the server and receive a link with an address for pasting on a website or sending by email. You can take a screenshot on an Asus laptop in 3 seconds.
- Ashampoo Snap. You will have to pay to use this application after the end of the trial period, but its capabilities are wider than those of other similar programs. In addition to high-quality pictures, the user can recognize text in a picture, edit an image, shoot a video online, and scroll a window to create a long picture.
- LightShot. The free program launches by default when you boot your PC, making your work easier. Takes pictures by pressing the “print screen” button, allows you to select an area using the cursor. The picture can be saved to your hard drive or uploaded to the server and then insert a link to the file.
- FastStone Capture. Paid software with a convenient toolbar, a photo editor, the ability to select a rectangular or free area, as well as scroll the page. Supports automatic saving of images, naming them, using hot keys, uploading files to an FTP server, interacting with a scanner, and batch scanning.
The listed programs are easy to use, they are launched by pressing the PrtSc button familiar to users, but they have a wider range of functions, although in some cases you need to pay for useful options. This kind of software will be useful to those who create instructions for working with software, website descriptions, videos, and test laptops and applications. The screenshot of the screen on an Asus laptop will be clear, with accurate colors, the right size, and even with special effects.
Problem solving
before—>
The ability to take a screenshot is a useful skill for any user. A screenshot in the form of a picture can be useful for correcting an error, serve as a visual addition when forwarding it to a friend, and even help out when trying to save an image of a web page. But in some laptop models, the creation principle has its own algorithm. On an Asus laptop, you can take a screenshot of the screen using several methods - from built-in programs and keyboard shortcuts to third-party programs. Which option is most convenient?
p, blockquote1,0,0,0,0—>