In this PowerShell for Beginners article, we'll look at how to write scripts that help optimize your management of your Windows environment.
PowerShell is an object-oriented programming engine and scripting language with a command line interface that provides extensive configuration capabilities for operating systems of the MS Windows family. It offers both a pure console interface and a full-fledged PowerShell ISE (Integrated Scripting Environment) development environment for scripts.
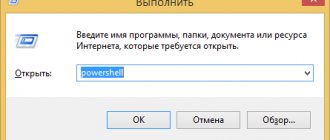
To launch the command line interface, type powershell in the Run menu (WinKey + R). PowerShell ISE is launched using the "PowerShell ISE" command in the same menu. ISE is preferable as it provides greater flexibility to the developer thanks to syntax highlighting, code auto-completion, and other features found in many “big” IDEs.
Windows PowerShell ISE development environment
What contributed to the emergence of Windows PowerShell?
Before the advent of PowerShell, the following tools existed (and still exist) for automating and administering services: Windows command line and Windows Script Host. But these technologies have disadvantages.
The Windows command line also has the ability to perform some administrative tasks and the ability to record an algorithm of actions, saving it as a script (bat file), while you can use certain programming elements, for example, use variables, conditional constructs, and even something like cycles.
Most software products have a console interface, i.e. we can control the program using the command line, while saving resources due to the absence of the cost of running a graphical interface. Microsoft even releases editions for the server operating system Windows Server without a graphical interface (Server Core, in Windows Server 2019), but all this is not enough, since the command line capabilities are limited, i.e. We won’t be able to write some complex logic to automate something, and even if we can, it will take time and knowledge.
Also, a disadvantage of the command line is that to fully manage the server we use various console utilities of software products, and therefore using the command line for administration is actually difficult, from the point of view of the fact that all these utilities have different syntax, parameters, methods of use and in order to perform typical tasks, i.e. everyday, you have to keep all this in memory, and to perform atypical tasks you have to first read the help or documentation.
Windows Script Host technology allows you to perform all administrative tasks as the command line, including their automation by writing WSH scripts, but here we can already use full-fledged programming languages ( VBScript and JScript ), i.e. complex logic and algorithms can be implemented. In addition, with the help of WSH we manage software products through an object interface, in other words, Windows Script Host is much “cooler” than the command line. But this technology also did not become the ideal tool for administering and automating this administration for system administrators, since Windows Script Host required knowledge of the above programming languages, which is actually superfluous for system administrators. Administrators only need a simple administration tool with the ability to program some actions, and they do not want to delve into the object models of software products in the VBScript and JScript programming languages.
As a result, Microsoft needed to develop an administration tool for system administrators that would 100 percent satisfy all the needs of system administrators, both in terms of administration and automation capabilities, and in terms of convenience and ease of use, thus Windows PowerShell appeared.
The note! SQL courses for beginners using Microsoft SQL Server as an example.
From the File menu in Explorer
If you need to open an instance of PowerShell from a specific folder on your computer, you can use File Explorer to launch it in the currently selected directory.
To do this, open File Explorer and navigate to the folder from which you want to open the PowerShell window.
Once there, click File, hover over Open Windows PowerShell, and select one of the following options:
- "Open Windows PowerShell": A PowerShell window will open in the current folder with standard permissions.
- “Open Windows PowerShell as Administrator”: Opens a PowerShell window in the current folder with administrator rights.
Please note that this method does not work from the Quick Access directory. You will find the option to open PowerShell greyed out when you click File.
What is Windows PowerShell?
Windows PowerShell is a Windows scripting language and command shell designed for administering and configuring Windows operating systems.
PowerShell is built on top of the CRL framework and the .NET Framework, and unlike the command line, which accepts and returns text, Windows PowerShell works with objects. Each object in PowerShell has properties and methods that you can use to manipulate those objects.
In Windows PowerShell, Microsoft developed the concept of cmdlets, which is a Verb-Noun command naming system. This system allows system administrators to quickly master and simplify work with PowerShell.
With Windows PowerShell you can:
- Access the file system;
- Manage the registry;
- Manage services;
- Manage processes;
- Configure the operating system;
- Install software;
- Install server roles and components;
- Administer and configure server roles and components;
- Write and use scripts to automate management and administration;
- Perform other system administrator tasks.
Windows PowerShell contains many commonly used utilities and commands that you can run from the command line, such as ipconfig, ping, and others. This was done in order to facilitate the transition of system administrators from the command line to PowerShell.
Also, for convenience, many frequently used commands and utilities in PowerShell have synonyms (Alias), for example, cls is a synonym for the Clear-Host cmdlet, dir is a synonym for Get-ChildItem (the full list of synonyms can be viewed by running the Get-Alias cmdlet).
To simplify the search for the desired command, PowerShell has a special cmdlet Get-Command, with which you can search by both verb and noun. All commands in Windows PowerShell are grouped into modules (for example, Hyper-V, NetTCPIP), which also makes it easier to find the command you need.
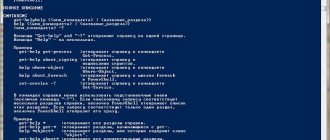
Once the required command has been found, you can look at the instructions for working with this command, i.e. help, for these purposes there is a special Get-Help cmdlet, for example the following command will show help for the Get-Command cmdlet:
Get-Help Get-Command
Help in Windows PowerShell can be short, detailed (the -Detailed parameter), full (the -Full parameter), and you can also display only examples (the Examples parameter). The following command will only show examples of using the Get-Command cmdlet:
Get-Help Get-Command -Examples
PowerShell help is updatable, i.e. it can be updated with the Update-Help command.
The note! Free IT infrastructure monitoring system.
Nicknames
The shell has a built-in mechanism for command aliases. On the one hand, aliases are used to simplify command entry. Typically, in this case, the abbreviated name of the cmdlet is used as the alias (for example, gc for Get-Content or fl for Format-List). On the other hand, this mechanism ensures compatibility of interfaces of different command interpreters. For example, having experience with cmd.exe, you are used to displaying the contents of a folder using the dir command. Running this command in PowerShell will produce the same result, although the shell will actually run the Get-ChildItem cmdlet instead of the dir alias. A list of all available aliases can be obtained using the Get-Alias command. The user can create their own aliases using the Set-Alias command.
Windows PowerShell Versions
The first version of PowerShell 1.0 appeared on November 14, 2006 and was released as a separate distribution that could be installed on the following versions of Windows operating systems: Windows XP Service Pack 2, Windows Server 2003 Service Pack 1 and Windows Vista.
In Windows Server 2008, PowerShell 1.0 came as a component that also had to be installed.
Starting with Windows 7 and Windows Server 2008 R2, PowerShell comes as an integral component of the system (that is, pre-installed, no need to install it). Below is a table of correspondence between the version of PowerShell and the version of the Windows operating system (i.e., which version of PowerShell is installed by default in a particular version of Windows):
| PowerShell version | Windows versions |
| PowerShell 2.0 | Windows 7, Windows Server 2008 R2 |
| PowerShell 3.0 | Windows 8, Windows Server 2012 |
| PowerShell 4.0 | Windows 8.1, Windows Server 2012 R2 |
| PowerShell 5.0 | Windows 10, Windows Server 2016 |
With each new version, PowerShell becomes an increasingly powerful administration tool; for comparison, the first PowerShell had about 130 cmdlets, and in PowerShell 5.0 there are already more than 600!
You can find out the current version of PowerShell using the PSVersion property of the $PSVersionTable built-in variable, for example, run the following command:
$PSVersionTable.PSVersion
Or run the cmdlet
Get-Variable -Name PSVersionTable –ValueOnly
where, the PSVersion value will be the PowerShell version.
From the Explorer address bar
To open PowerShell from the Explorer address bar, open File Explorer. Click on the address bar, type "powershell" and press Enter.
PowerShell will open with the path to the current folder already set.
PowerShell language
PowerShell is an object-oriented scripting programming language.
It is used to write commands to control all components of the Windows operating system in Windows PowerShell, and to write scripts to automate administrative tasks in the Windows PowerShell Integrated Scripting Environment (ISE). Although the PowerShell language was created for administration tasks, it is a full-fledged scripting programming language, since it has program constructs that are present in every programming language, such as: conditions, loops, error handling, working with variables, objects, and arrays.
The PowerShell language has a uniform syntax for writing commands and a naming structure for these commands based on the “Verb-Noun” principle, which makes this language intuitive for both programmers and system administrators.
For more information about programming in this language, see the material - Programming in PowerShell.
Windows PowerShell
Windows PowerShell is an environment for executing commands and scripts in the PowerShell language.
This shell has the same capabilities as the command line, such as: storing the history of command execution, customizing the appearance of the shell, completing command execution with the Ctrl+C key combination, as well as many other features that are not in the command line shell, for example such a wonderful feature as “syntax highlighting” (introduced in PowerShell 5.0).
There are several ways to launch PowerShell, for example:
- From the command line by typing PowerShell;
- Through the Run dialog box (Win + R key combination), also by typing PowerShell;
- In Windows 7 - Start->All Programs -> Accessories -> Windows PowerShell -> Windows PowerShell;
- In Windows 8.1 or Windows Server 2012 R2 - Start->All Programs -> System Tools -> Windows PowerShell;
- In Windows 10 or Windows Server 2016 - Start->All Programs -> Windows PowerShell Directory (in group W) -> Windows PowerShell.
Example of running PowerShell in Windows Server 2016
The note! TOP 7 popular programming languages.
Screenshot of PowerShell in Windows Server 2016
Methods for opening a PowerShell snap-in
Powershell is developing very well and with the release of Windows 10 it has already received version 5, but our topic is different. So how to open powershell? Everything is simple if in Windows XP, then nothing. Since it is delivered separately, in all subsequent releases it comes as a built-in component. The most universal way to open powershell is to click
Win+R and enter powershell
By pressing enter, the PowerShell console will launch, the only problem is that it will not open as administrator. And as a result, many commands will not be executed; below we will see how to do this on behalf of the administrator.
Cmdlets in PowerShell
A cmdlet is a Windows PowerShell command that can be used to interact with operating system objects to manage them.
These commands are part of the PowerShell language. Cmdlets are built using the Verb-Noun principle, separated by a hyphen (-); in other words, we first indicate what to do, and with a hyphen we indicate what to do. For example, the cmdlet Get-Help, where Get is a verb meaning “Get” and Help is the noun “Help” in the context of PowerShell “Show - Help”. PowerShell cmdlets return results as objects, which is one of the main differences from the Windows Command Prompt, in which commands return only text to the screen.
In addition to cmdlets for obtaining data (Get), there are also types of cmdlets such as:
- Add – adding data;
- Clear – clear;
- Enable – enable;
- Disable – turn off;
- New – create;
- Remove – remove;
- Set – set;
- Start - start;
- Stop – stop;
- Export – export;
- Import – import;
- And many more.
A complete list of cmdlets in Windows PowerShell can be viewed using the special Get-Command cmdlet. For example, run it with the -CommandType cmdlet parameter, as a result, a list of cmdlets will be displayed on your screen.
Get-Command -CommandType cmdlet
As you already understood, cmdlets have parameters with which we can specify the actions of the cmdlet. Parameters can be required or optional; for example, the Get-Command cmdlet has no required parameters.
The picture below shows a way to search for a cmdlet by verb (Verb parameter). In this case, we displayed a list of cmdlets that can restart something.
Team
Get-Command -Verb Restart
To search for a cmdlet by noun, you must use the Noun parameter. For example, below we have a list of cmdlets that work with services.
Team
Get-Command -Noun Service
If you do not find the desired cmdlet by its full name, you can use a mask in the *Text* format.
From Task Manager
To open the task manager, press Ctrl + Shift + Esc. In the window that appears, click “Details”.
Now click File > Run New Task.
Type "powershell" into the text box and click "OK" to continue.
If you want to run PowerShell with administrative rights, make sure the "Create this task with administrative rights" option is selected.
Pipeline in PowerShell
One of the main features of Windows PowerShell is the ability to use a pipeline when executing commands.
A pipeline is the transfer of the result of a cmdlet via a vertical bar (|) to another cmdlet.
At the same time, as you remember, in PowerShell cmdlets work with objects and return objects; accordingly, objects are also transferred along the pipeline.
Using a pipeline, you can perform complex tasks in a simple and convenient way without the need to write complex algorithms and scripts.
For example, let's find out the name of the largest file in the "C:\Windows\System32" directory (a simple example of a pipeline).
Team
Get-ChildItem -Path "C:\Windows\System32" -File | Sort-Object length -Descending | Select-Object -First 1
Where,
- Get-ChildItem – cmdlet for getting objects in the specified directory;
- Sort-Object – cmdlet for sorting objects, in our case we sort by file size (length -Descending);
- Select-Object is a cmdlet for selecting the desired properties of an object; in our case, we display standard fields and only the very first object, i.e. large file (parameter -First 1).
All cmdlets are separated from each other by a vertical bar. The result of each cmdlet is passed as input to another cmdlet, i.e. first we get all the objects in the specified directory, then we sort the result and finally select the very first object.
Getting information about objects
Perhaps the reader has already had a question - how, generally speaking, can you find out what information can be obtained as a result of executing a particular command? What actions can be performed with the received data? For example, in the above case, how would we know that we would be able to get the creation date of the file? One simple way to analyze the object returned by a command is to pass that object as input to the Get-Member cmdlet. This cmdlet displays information about the type of an object and all its elements. As a rule, objects have a large number of different properties and the result of Get-Member can be very voluminous text that is not very convenient to view. In this case, you can either divide the information into parts or filter it. An example of obtaining information about an object returned by the Get-Process cmdlet, which can be viewed page by page:
Get-Process | Get-Member | Out-Host-Paging
When the page is full, the user can choose one of the options - display another page, display another line, or stop displaying data. Data filtering is performed using the MemberType parameter, which determines what type of information should be displayed. For example, the command
Get-Process | Get-Member -MemberType Properties
will display only the properties of the object, and
Get-Process | Get-Member -MemberType Methods
- only his methods. Another way to view the properties of an object is to assign an object to a variable, then type the name of the variable into the console, put a period and press the Tab key. With each keystroke, PowerShell will iterate and substitute the object's methods and properties. Iteration in the opposite direction is possible using the key combination Shift+Tab.
Background execution of tasks
Windows PowerShell has a background execution feature, which is a mechanism by which you can run a command (for example, one that takes a long time to execute) in the background, i.e. after launch, you return to the current session and can continue working without waiting for the command to finish. You will need this feature when you need to run a command that takes quite a long time to complete, and as you know, during this time the PowerShell session is blocked until the command completes, and you need to continue working.
You can manage all the tasks that are running in the background, for example, view the list of tasks, stop the task, delete the task, and, of course, view the result of the task.
Windows PowerShell has the following cmdlets for working with background jobs:
- Start-Job – start a background task;
- Stop-Job – stop a background task
- Get-Job – view the list of background tasks;
- Receive-Job – view the result of a background task;
- Remove-Job – remove a background task;
- Wait-Job – move a background task to the foreground in order to wait for it to finish.
To run in the background, you need to write the Start-Job command, and in curly braces {} a command or set of commands that need to be executed in the background.
For example, let's run some task (show list of services) in the background, then look at the list of background jobs and display the result of our task (i.e. list of services).
Run a task in the background
Start-Job{Get-Service}
We look at the list of tasks running in the background
Get-Job
Displaying the result of Job1
Receive-Job Job1
As you can see, we now have a task with the “Completed” status, i.e. it has already completed (Get-Service just works quickly).
In order to see the result of the background task, i.e. cmdlet Get-Service, we executed the Receive-Job command and passed it the job name (an identifier value is also possible). As a result, we displayed a list of services.
The note! Popularity rating of antiviruses for home computers.
Remote control using PowerShell
Windows PowerShell is designed not only for local use, but also for remote command execution. This feature is necessary so that you can control remote computers from your workplace, i.e. run PowerShell commands.
There are several methods of remote control:
- Using the –ComputerName (many commands have it). In other words, you pass the name of the computer on which you want to execute the command as a parameter. The method has the disadvantage of being limited to the execution of one command;
- Using sessions. Enter-PSSession cmdlet (interactive session). In this way, you connect to a remote computer and all the commands that you type in PowerShell will be executed on the remote computer in the same way as if you typed the commands directly on the remote computer. The method also has the disadvantage that the session is limited to one computer;
- Using the Invoke-Command . Using this method, you can run commands or scripts on one computer or on several.
For example, to connect to a remote computer (in the example below ServerName) with an interactive session, run the following command:
Enter-PSSession ServerName
Working with WMI Objects
WMI (Windows Management Interface, Windows Management Interface) is a set of interfaces for managing Windows OS using special components. It is possible to control a local computer and one located on the network. WMI is a subset of Web-Based Enterprise Management (WBEM) and Common Information Model (CIM) developed by Microsoft. Included in Windows Vista, Windows Server 2003, Windows XP, Windows Me and Windows 2000. Available as a separately installed component for Windows 95 and Windows 98. Supports the use of scripting languages such as VBScript or Windows PowerShell to manage personal computers and servers running Microsoft Windows.
WMI objects are quite native to PowerShell. Just run the command:
Get-WmiObject -List
to see the large number of classes that provide access to WMI objects in the wrapper. If you connect to WMI on a remote computer, the composition of the classes will depend on the OS and the WMI extensions installed on it. To obtain information about available classes on a remote machine, you must specify its IP address or name as a parameter:
Get-WmiObject -List -ComputerName Server
For a successful connection, WMI must be running on the remote computer, and the account used must be a member of the local administrators group.
If you do not use a special instruction, some information is not displayed, apparently for reasons of “not cluttering the screen.” To obtain more detailed information, you can use the formatting and data selection commands.
PS C: \ Documents and Settings \ Administrator> Get -Wmiobject -class Win32_OPERATINGSYSTEM SYSTEMDIRECTORY: \ Windows \ System32 Organization: NRESST BUILDNUMBER: 3790 Registered User: Sergey Serialnumber: 69889-650-3137304-45684 Version: 5.2.3790 PS C: \Documents and Settings\Administrator> Get-WmiObject -Class Win32_OperatingSystem | Format-List Locale, Version, CurrentTimeZone, OSLanguage, InstallDate Locale: 0419 Version: 5.2.3790 CurrentTimeZone: 180 OSLanguage: 1049 InstallDate: 20081022233211.000000+240
And here is a small example of polling all computers on a local network with an address of 192.168.1.0 and a subnet mask of 255.255.255.0:
1..254| ForEach-Object -Process { Get-WmiObject -Class Win32_PingStatus -Filter("Address='192.168.1." + $_ + "'") -ComputerName . } | Select-Object -Property Address,ResponseTime,StatusCode
In the first element of the pipeline, an array of numbers from 1 to 254 is generated. At the second stage, each number from the array is substituted into an IP address that will be pinged using WMI tools. The results will be displayed in a table with three columns - host address, response time and response status. If the host responds, the status code “0” is returned.
Scripts, functions, and modules in Windows PowerShell
If you have written an algorithm, most likely you will want to save it in order to use it in the future. Windows PowerShell has a scripting mechanism for this purpose.
The essence of this mechanism is as follows: you write the set of commands you need and save it as a script - this is a simple text file with a .PS1 extension.
Then, to run this script, you simply run it in PowerShell. In this case, you need to either specify the full path to the script file, or go to the directory with the script and call it by name.
Important!
By default, running scripts on Windows is prohibited! To view the script execution policy, run the Get-ExecutionPolicy . As a result, it will return the current policy, for example:
- Restricted – execution of any scripts is blocked (default value);
- AllSigned – execution of scripts that have a digital signature is allowed;
- RemoteSigned – execution of local scripts is allowed, all downloaded scripts must have a digital signature;
- Unrestricted - execution of any scripts is allowed (not recommended, as it is unsafe!).
To enable script execution, you must use the Set-ExecutionPolicy with one of the above parameters.
For example, to allow local scripts to run, run the following command and accept the changes by pressing Y.
Set-ExecutionPolicy RemoteSigned
You can pass parameters to a script, make them mandatory, or set a default value.
Windows PowerShell provides a mechanism for creating your own functions, which, like built-in cmdlets, can be used in the PowerShell shell.
To do this, you need to specify the Function keyword and then write the algorithm for this function in curly braces {}, i.e. a set of commands (for example, some frequently used procedure: create a user with certain rights, clean up certain directories, and so on). Then you need to save all this into a script, but only with the .psm1 extension, since this file will already be a module.
That's not all, this file must be placed in the directory where PowerShell looks for modules. There are several such directories (a special directory in the user profile, the directory where PowerShell is installed), they can be viewed in the PowerShell environment variables. To do this, run the following command
Get-ChildItem Env:\PSModulePath | Format-Table -AutoSize
Once you place the module you wrote in a special directory, you can access your functions as normal PowerShell commands.
Launching PowerShell via keyboard shortcut
One of the convenient methods for launching PowerShell, if used very often, is to assign a hotkey combination to it, which, when pressed, launches the shell. It's done, it's very simple. Open the PowerShell properties Shortcut ” tab, find the “ Shortcut ” item, by default it has the status no.
Select it and press the Shift or Ctrl, or CTRL+SHIFT key, as a result of which you will substitute the construction for the future combination and also press any key from the letter range, in my example it turned out CTRL + SHFT + C. This is the combination I will call your PowerShell. Save the settings. I also note that you can easily cancel it or change it to another.
I'm trying to enter the shortcut combination CTRL + SHFT + C, as I see everything works great.