04/17/2017 windows | for beginners
Even if you know perfectly well how screenshots are taken, I’m almost sure that in this article you will find some new ways for you to take a screenshot in Windows 10, without using third-party programs: only with the tools offered by Microsoft.
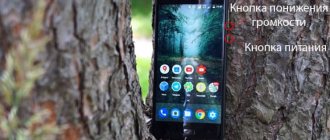
For complete beginners: a screenshot of the screen or its area can be useful if you need to show someone something depicted on it. It is an image (snapshot) that you can save on your disk, send by email, share on social networks, use in documents, etc. Note: To take a screenshot on a Windows 10 tablet without a physical keyboard, you can use the Win key + Volume Down button combination.
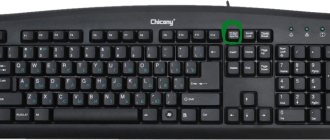
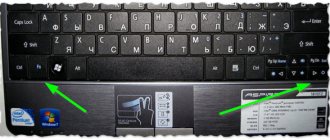
Win+PrtScr
In the first method, we use the Windows + PrtScr key combination; this is the easiest way to take a screenshot and save it without editing. To take a screenshot using it, follow these steps.
- Press the Win + PrtScr keys simultaneously and get an instant snapshot of the entire screen in PNG format, which will be saved in a separate folder.
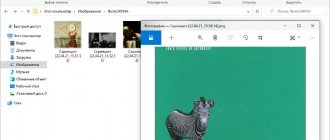
- To view the resulting screenshot, go to “This computer
" Next we follow to “
Images
" and select "
Screenshots
" All screenshots taken this way will continue to be stored in this folder.
Where to look for a screenshot after saving
The Windows 10 screenshot will be stored in different places depending on the method you choose. Most applications allow you to specify the desired location on the disk, but some tools automatically save:
- When using the Win + Print Screen combination, the material will be saved to the “Images” folder.
- Xbox Game Bar saves video clips and photos in one place. The path to it: “This computer” - “Video” - “Clips”.
PrtScr+Paint
Let's consider the second method, where we use one key on the keyboard and the standard Windows image editor - Paint.
- Press the PrtScr key at the desired moment of interaction with the computer to take a screenshot.
- Then go to the program Paint
, for example, through search. - Using the hotkeys Ctrl + V, paste the image into the window. You can immediately save the file or edit it slightly. For example, add guide lines, directional arrows, explanatory notes and even sketches.
In the same way, in addition to standard Paint, you can use any graphic editor to correct the image. This could also be Photoshop, where you can cut out the desired fragment or add inscriptions.
Taking screenshots using third-party programs
If the methods described above do not suit you for some reason, use third-party utilities that have a clear interface and a variety of functions.
To take a screenshot in the programs described below, you need to do the following:
- Press and hold the button on the keyboard assigned to call the program.
- Stretch the rectangle that appears on the screen to the desired size.
Select an area using a rectangle and save the screenshot
- Save the selection.
Snip Editor
This is a third party program developed by Microsoft. You can download it for free from the company's official website. Snip Editor contains all the standard functions previously seen in the Snips application: creating a screenshot of the full screen or part of it, in-line editing of the resulting image and saving it to the computer's memory, clipboard or sending by mail.
The only disadvantage of Snip Editor is the lack of Russian localization
But there are also new functions: voice marking and creating a screenshot using the Print Screen key, which was previously reserved for moving the screenshot to the clipboard. Another positive aspect is the pleasant modern interface, and the negative side is the lack of Russian language. But controlling the program is intuitive, so English tips should be enough.
Gyazo
Gyazo is a third-party program that allows you to create and edit screenshots with the press of a single key. After selecting the desired area, it allows you to add text, notes, and a gradient. The selected area can be moved even after you have drawn something over the screenshot. All standard functions, various types of saving and editing screenshots are also present in the program.
Gyazo creates screenshots and uploads them to cloud storage
Video: how to use the Gyazo program
Lightshot
The minimalistic interface contains the entire set of necessary functions: saving, editing and changing the image area. The program allows the user to independently configure a hotkey for creating a screenshot, and also has built-in combinations for quickly saving and editing a file.
Lightshot allows the user to customize their own hotkey for taking screenshots
Alt + PrtScr
There is a similar method that uses two hotkeys and a graphic editor. Using a key combination such as Alt + PrtScr, a snapshot of not the entire desktop is created, but only the active window, and copied to the clipboard.
- Press Alt + PrtScr while the window whose image you want to save is active on the screen. The example shows a screenshot of a browser window.
- To save, open Paint
and paste the finished screenshot using Ctrl + V. Edit the image and save it to the desktop or to any folder in the desired format using “
File
» — «
Save as
».
Screenshot of Windows boot screen:
If you've ever tried to do anything on your PC screen before booting into Windows, you've learned that it's nearly impossible. The only way is to film everything on your phone or video camera. Keyboard shortcuts do not work during loading, so taking a screenshot is useless.
But how then do some people get great images without using cameras? It's simple. Pictures are taken using a virtual machine . It boots into the host operating system and therefore sees the entire boot process. The most popular VMs are VirtualBox, Hyper-V and VMWare. Personally, I recommend using VirtualBox because it is free and open source. Hyper-V is also free but a little more difficult to use, and VMWare arguably has better tools but costs a pretty penny.
"Scissors"
Windows 10 will delight its owners with a simple and useful program for working with screenshots, which will help save any fragment of the screen as a snapshot. You can take a full-screen screenshot, a single area or selected windows.
- We open the application through the system search, it is called “Scissors
». - Go to "Mode
", where we select a tool to create a snapshot of the display area. Suitable for screenshots:
- Rectangle
– allows you to select an arbitrary area of the screen;
Window
– to save a snapshot of one of the open windows; - Rectangle
- Whole screen
– accordingly, it will take a snapshot of the entire screen. - After selecting the mode, the program will automatically go into a state of readiness to take a screenshot, for which you just need to click on the desired area or select an arbitrary fragment. The finished photo will be shown in the application window. Now you can correct it, add inscriptions, send it by mail or save it to the desired folder. The program is very simple and convenient for regular use.
- To take a new photo, you need to click “ Create
” in the program menu.
Microsoft Snip Editor
Snip Editor is a new program from Microsoft that allows you to take a screenshot in Windows 10 and edit it. The program itself seems to be designed as a replacement for the standard “Scissors” (which I wrote about above). True, Snip Editor is more functional, and the interface is optimized for touch screens.
You can download the program from the link: https://mix.office.com/Snip. She is not big. After downloading, run the installation file and install the program.
The icon will be in the notification bar, and a small panel will be stuck to the edge of the screen (it can be moved). We move the mouse over this panel and see three large buttons: create a screenshot, open the editor, and launch the web camera.
Select the required area, or press Enter to take a screenshot of the entire screen. The program will also be called by the Print Screen button. The created image will immediately open in the editor.
The first “Record” button allows you to record an annotation. When you explain something and show it in a generated screenshot. So you can draw something, then save it, or share a fragment.
In the settings, you can disable the socket itself (if it bothers you), launch at Windows startup, assign keys, and set the delay before taking a picture.
Despite the fact that the program is still in English, it is very easy to work with. Nice and clear interface. I recommend!
Capture the entire screen via Win + G – Game Bar in Windows 10
Pressing the Win + G key combination in Windows 10 will open the Game Bar. It is designed to record videos and take screenshots in games and applications that are open in full screen.
Just click on the “Screenshot” button. Or press the key combination Win + Alt + Print Screen.
Pictures created through the game panel are saved in the “Video” - “Clips” folder.
I think you’ll figure out what to do with them next.
Win + Shift + S or “Snip and Sketch”
All Windows 10 users have another built-in program that is designed to work with screenshots. She is an improved version of " Scissors"
"and will soon replace the latter.
Snap & Sketch
app makes it easy to take a snapshot of your entire screen, a selected window, or a selected area.
- Call the application by pressing the hot keys: Win + Shift + S.
- Controls for selecting the type of screen fragment will appear at the top of the screen; by default, “Rectangular fragment
" The fragment selection modes are completely identical to the “
Scissors
». - Select the desired mode and take a screenshot. The image will be saved to the clipboard and Windows will show a notification.
- Click on the notification, after which the image will open in the built-in editor of the application "Fragment and sketch
", where it can be modified or saved to a file. Another option is to paste the screenshot using the Ctrl + V keys into any other image editor and perform further processing there.
Choose a method for yourself
Now you know how to take a screenshot on Windows 10 PC in various ways. System applications, of course, are a faster tool, but their functionality is limited, so you will not be able to highlight the desired place on the photo or write a signature. Therefore, to accurately and correctly indicate the shooting area, as well as image editing, we recommend using PhotoSCREEN. It is the optimal solution because it contains functions for correcting frames, outputting files to a computer, or copying data to the clipboard. The software also offers a server that will store files for 6 months. Download the screenshot for free right now and try the suggested features!
Save this article so you don’t lose it: