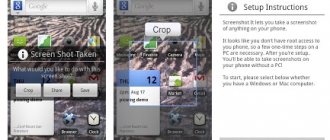
How to crop a screenshot on Android?
By clicking on the edit button with a pencil image, you will be taken to the mode of working with the resulting screenshot, where you can select the part you need, and then crop the screenshot according to the boundaries you specify.
Interesting materials:
How to revive gel polish? How to edit PDF in Adobe Reader for free? How to edit OTF font? How to advertise your website on Facebook? How to solve multiple comparison problems? How to solve the Android 10 Easter egg? How is a mink coat restored? How do newlyweds cut a cake? How to apply regular varnish evenly? How to glue a sticker evenly?
What is a screenshot
Let's look at the definitions:
Screenshot , from English screenshot : screen – screen, shot – snapshot; that is, literally, this is a screenshot .
A screenshot is a computer-generated image that replicates what you see on your monitor screen.
You can take a screenshot in all popular operating systems: Windows, Linux, Android and iOS.
In this tutorial we will learn how to take a screenshot in Windows.
Easily take a screenshot with LightShot
If you need to quickly resolve issues with website improvements, there is a much more convenient tool. And as I noticed, many web developers and programmers use it. layout designers and web designers. It's called LightShot. The name fully justifies itself. Once you try it, you will no longer want to use the heavy Photoshop method.
The vast majority of screenshots are sent over the Internet. Therefore, methods for such a popular action must already be invented. And they are!
How to take a screenshot and send it?
- taking a screenshot of a full window
- take a screenshot of the selected area
- create a screenshot of the active window
- built-in editor to immediately add some inscription, for example
- create animation or video
Well, there are other possibilities that you can read about on the official websites. Speaking of websites and programs. Here they are:There are also sites where you can immediately perform all the necessary actions by going to them. Principle: click the “Print Screen” button, go to the site, insert the screenshot directly there, edit it as necessary and give the link to others. Cool? Yeah... Here is such a bourgeois site and its Russian-language analogue -
Whether or not to use programs for taking screenshots and then posting them on the Internet is up to you. On the one hand, it’s a little faster, and on the other hand, the usual method is somehow safer, although... it depends on you.
Hi all. It turns out that many people don’t even imagine how to send a screenshot to VK through a computer and phone, but this seemingly small feature is needed in many cases. And today I will tell you how to do this faster and easier, using several proven methods.
I won’t go on and on about how to take a screenshot, since I described this in more detail in my . But if you don’t know this, then be sure to read it.
There are a whole bunch of ways to do this, both built-in and software. But I wouldn't recommend doing this through good old Paint. With all due respect, this method is already as relevant as the Nokia 3310 or Siemens A35 is now, if you know what I'm talking about. Use special programs to take screenshots. LightShot program the most in this regard.
and
Joxi
.
Programs
Programs that take screenshots are especially popular. The thing is that these solutions have advanced functionality for editing a screenshot. Adding various elements in the form of arrows, quotes and shapes gives emphasis to individual elements of the screen.
This is very helpful in the field of training and presentations. And in chats and forums, this is an irreplaceable thing.
Scissors
Scissors is a standard Windows application that will help you take a screenshot of the screen without installing programs, widgets and online services. Called using the search string from the system panel.
To create a screenshot in the Scissors program, you need to select the desired mode in the menu or click the scissors icon labeled “Create”.
This video shows how to take a step-by-step screenshot using the Windows 10 system as an example.
The scissors program is great for creating a photo with minimal effort and without installing unnecessary applications and is carried out using standard system solutions. But the program has poor functionality for editing ready-made graphic files.
Joxi
Joxi is a set of universal programs and plugins for creating screenshots with the ability to edit and change screenshots.
Download joxi program
The Joxi program has a Russian-language interface and works with all popular systems and browsers.
- Windows.
- MacOs.
- Linux.
- Chrome.
- Yandex.
- Opera.
To take a screenshot in Joxi, you need to do the following.
- Go to the website JOXI.RU and register. Despite the fact that this procedure is not mandatory, it is necessary. Since after registration the user has the opportunity to view saved images in his personal account.
- Download the joxi program to your computer or laptop, depending on the installed system. In addition, it is recommended to install browser extensions.
- Find the program shortcut at the bottom (near the clock) and click.
- Select the desired part of the screen to take a screenshot.
- Edit the resulting screenshot using editing tools.
- Save to your device or get a link.
Editing elements and controls in the Joxi program
This video contains a complete overview of the Joxi program with detailed step-by-step instructions for creating and editing a screenshot in real time.
LightShot
LightShot is a program for creating screenshots on a computer or laptop with the ability to edit and save the screenshot as a link or file. In addition, the program allows you to share the screenshot on social networks and email.
The service and software have a Russian-language interface and its own file storage. It is worth highlighting the search mode for similar photos. For example, you can circle the desired area of the screen, save and search for similar screenshots on the Internet using special LightShot algorithms.
LightShot is compatible with Windows and Mac systems. It has its own browser extensions for Chrome, Firefox, IE and Opera.
This video describes detailed features and step-by-step instructions that will answer the question of how to take a screenshot in LighShot.
Screenshot
Screenshot is an all-in-one software for taking screenshot and recording video. The project is completely Russian-language and has the ability to edit and save screenshots in several formats.
The program is compatible with the Windows system. But a special browser extension that works in Google Chrome makes Screenshoter universal.
If, when installing the program, you do not want to install third-party applications that are not related to the screenshot program. Select not “Full installation”, but “Setting parameters” and uncheck all the boxes. Then click “Install” and continue the installation. See screenshot below.
After installing and launching the Screenshoter program, several settings modes appear.
The “General” mode allows you to select keys for creating a screenshot in the options:
- screen areas;
- active window;
- entire screen;
- show or disable the cursor;
- play sound
- open the screenshot in the browser.
- A direct link to the screenshot can only be obtained in the paid version.
Saving settings allow you to specify the path to save the screenshot, quality and format (JPEG or PNG).
The “Drawing” mode allows you to configure the editor activation button and the ability to disable it.
The video saving mode settings options allow you to specify the location and path for saving the video, and the buttons to start video recording. Additional options include setting the recording quality, controlling the panel display and turning on the microphone.
In the paid "PRO" mode, it is possible to disable opening a video in the browser and enable a direct link to the saved video.
The video review below will help you learn more about the functionality of the program for creating a screenshot “Screenshot” from an active user.
Currently reading: How to create an online proposal outline: 5+ ready-made services
FastStone Screen Capture
The FastStone Screen Capture screenshot creation program is a powerful software package that has an excellent graphic editor and a Russian interface.
With FastStone Screen Capture you can record screencasts (video of the screen) with or without sound. There are many settings in video mode.
What can FastStone Screen Capture do?
- snapshots of pictures, folders, files, browser contents;
- various types of screenshots in random, full or partial screen capture (website screenshots);
- more than 20 elements in the editor (arrows, circles, rectangles, text, straight lines and markers);
- tools (focus, blur, ruler, screen colors, cropping;
- capturing the screen at a specified time by the user;
- support for monitors with 4K resolution;
- saving output files in formats (BMP, GIF, JPEG, PCX, PNG, TGA, TIFF, FSC and PDF);
- ability to support multiple monitors;
- printing multiple images
The program has an easy and intuitive interface, which is divided into tools for working with files, screenshot and video options. The largest section of the program is settings.
Watch a full review of FastStone Capture in this video.
FastStone Capture website
How to take a screenshot in Word
Word is a program from the Windows office suite that is designed to work with text and graphic documents.
Despite this, you can take a screenshot in Word using its own panel. Next, we will look at a step-by-step algorithm for creating screenshots in Word.
In order to take a screenshot in Word you need.
Instructions
- Open files or folders for which you need to take a screenshot.
- Create a Word file or open an existing one. It is in these documents that the screenshots will be saved.
- Go to the top menu and click the Insert tab.
- Click the camera icon. Snapshot.
- Edit the resulting screen.
We made our own video where we showed how to take a screenshot of a photo. This way you can take a screenshot of any document, the main thing is to open it first.
Video instruction from a professional
Below is a free video that describes in detail all the methods for taking screenshots in Word in training mode:
- how to take a screenshot of a website;
- methods to take a screenshot of part of the screen;
- the secret of editing a screenshot in Word;
- additional work functions.
Click on the open button and watch the full version of the free training video.
Snagit
Snagit is a paid professional software application with maximum functionality that allows you to make various types of screenshots.
The program allows you not only to save a screenshot, but also to record a video, edit the screenshot by adding various elements (arrows, squares, circles and abrupt edges).
The main advantage of the program is the ability to recognize text in pictures into text.
The cost of the program is approximately fifty US dollars, but there is a trial version of the program with a time limit.
This application is mainly used by testers in their professional activities. See a review of the program Snaget, one of the professionals.
Go to Snaget
Send via Cloud
Of course, this is far from the most convenient way, but it also has a right to life. The only advantage here is probably that the screenshots can be placed in one link. It's true that this is not a cool feature. Let's look at it using the example of Yandex disk.
- First, we take screenshots using any of the known methods, after which we go to the Yandex disk itself.
- Next, create a folder if you don’t want the image files to be in the heap. To do this, as you probably already guessed, you need to click on the “Create” button and then select “Folder”. After that, just call it something, for example, “Pictures,” and go into it.
- Next, click “Upload” and select one or more image files to place them all in one folder.
Now everything will depend on the number of image files. If there is only one picture, then right-click on it and select share. And even here you will have two choices:
- Copy the link and send it to a dialogue, chat or to the wall in VK
- Click on the “Vkontakte” item. This item works on the repost principle. That is, you can share a screenshot in a private message, on your wall or in one of your public pages or groups.
If suddenly there are several images, then you will need to do the same, only on a folder. To do this, go to the folder we created, right-click on it and click the exact same “Share” item. Well, then everything goes according to plan: either copy the link or share it with friends using the repost principle.
What is a screenshot for?
There are situations when you need to share the contents of your screen with another person or save an image for yourself for later. There may be several reasons:
- There is something incomprehensible on the screen (you can send a screenshot to a specialist so that he can explain what it is);
- Error in the program or on the website (send a screenshot to the developer so that he corrects the error);
- As evidence of any event (payment via the Internet, comments in chat, etc.);
- It is necessary to share an image of a program or website (as I do in IT lessons);
- You need to save the image of the window with the program settings... etc.
If you need to take a screenshot, the instructions below will help you with this.
Bottom line
I don’t see the point in writing five more ways to send your screenshot to VK via a computer, since these three are enough for you. Personally, I liked the second method the most, with simple copy and paste, as it is the fastest and most convenient. But it is possible that you will not agree with me, so I would like to find out from you which method you liked best.
Well, with this I say goodbye to you. I hope that my article was interesting to you. Do you want to keep up to date with everything new and interesting on the blog? Be sure to subscribe to my notifications and posts on social networks. I'll be waiting for you again. Good luck to you. Bye bye!
Best regards, Dmitry Kostin
Using the Snipping Tool
Now let's look at how to send a screenshot by email using a more rational method. A tool called Snipping Tool can be used to do this in Windows. Its advantage is that this applet can not only quickly create pictures and save them in the right place, but also instantly send them by e-mail. To do this, first select the creation of a snapshot, then set the shape for selection, and after that the desired area is selected.
The content is copied automatically, and then in the result preview window you can choose to either save or send by mail. It is noteworthy that you can send a photo both in the body of the letter and as an attachment, which makes this tool the most preferable to use, however, to perform the transfer you can only use an email client “linked” to the user’s registration record.
Editing and saving a photo
In theory, there will be no problems with creating a photo. But “photographing” the active contents of the screen on computer devices initially comes down only to the fact that the picture is placed on the clipboard, and not automatically saved on the hard drive or connected removable storage device. Thus, the next step will be to insert the contents of the buffer into any graphic editor, edit it and then save it in the desired format. Since many of these programs can be too difficult for the average user to master, we can recommend the most common Paint editor, which is available in absolutely all versions of Windows, as a simple tool.
In it you just need to use the insert command. Please note that the standard image size offered by the application when you first open it or when you start it again, when by default the size that was used when working previously is saved, may be too large. Therefore, you can set a deliberately shorter side length using the menu called up with the combination Ctrl + W, or cut out the necessary part of the image, copy it to the clipboard, reduce the size, and then paste the image. After this, all that remains is to save the document in the desired format, selecting in the file type field the format with the most reduced file size (for example, JPG or PNG). You should not save the file in the BMP format, since the file will be too large, and your email client or online service may set a limit on the size of sent messages.
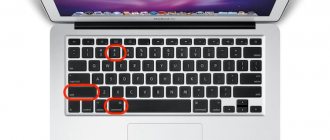
What buttons can you use to take a screenshot?
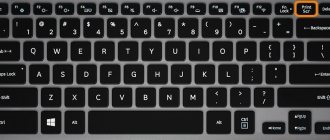
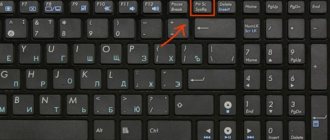
There is a special key on the keyboard, which is labeled Prt Scr or Print Scrn .
This button was once used to instantly print the contents of the screen (hence the name: print - print, screen - screen), now it is used to save a copy of the screen image to the clipboard.
Print Screen key on keyboard to take screenshot
So, here are the keys that will help you take a screenshot:
PrtScr – a snapshot of the entire screen (except the cursor) is created.
Alt+ PrtScr – creates a screenshot of the active window
Win+PrtScr - a snapshot of the entire screen is created and automatically saved to the “Images\Screenshots” folder (only in Windows 8 and 8.1).
Three buttons that can be used to take a screenshot (screenshot)
Most often, you need to take a screenshot of only the active window of a running program, therefore, remember the combination Alt+PrtScr (you need to press the Alt and, without releasing it, press the PrtScr ).