01/30/2018 iOS and MacOS | for beginners
If you need to take a screenshot (screenshot) on your iPhone for sharing with someone or other purposes, it is not difficult to do and, moreover, there is more than one way to take such a photo.
This instruction provides details on how to take a screenshot on all Apple iPhone models, including iPhone 12, 11, XS, XR and X. The same methods are also suitable for taking a screenshot on iPad tablets. See also: 3 ways to record video from iPhone and iPad screen.
- Screenshot on iPhone XS, XR and iPhone X
- iPhone 8, 7, 6s and previous
- Screenshot on iPhone by double tapping from behind
- AssistiveTouch
How to take a screenshot on iPhone 12 mini, 12 and 12 Pro
On any screen, press the Volume Up button and the Side button (Lock button) at the same time. You should see an animation for the screenshot you took. You'll see a preview in the bottom left corner—tap it to make changes, or tap and hold to instantly send the screenshot to an app, AirDrop, or other resource. If you choose to edit or markup your screenshot, you will see the following screens. Click "Done" in the top right corner and you'll be given the option to either "Save to Photo" or delete the screenshot(s).
How to take a screenshot on iPhone 8 and below
In order to take a screenshot of the screen in older Apple phone models, when there was still a Home button, just press the combination of the Power + Home buttons on it, hold for a second and release.
This way you capture the entire screen. If you need to take a screenshot of part of the screen, use a basic photo editor for this purpose:
- Find the desired picture in the gallery;
- In the upper right corner, click the "Edit" button;
- Select the “Crop” tool – usually the last one on the bottom panel;
- After processing, click the “Save” button.
What is important: do not hold down the button combination for too long, otherwise you will perform a “hard” reboot of your device.
How to take a screenshot / Tech Advisor
How to Use Screenshot Markup on iPhone 12
If you choose to edit or markup your screenshot, you will be shown the following screens. From left to right: the screen you want to take a screenshot of, the editing/layout display, and the option to save or delete screenshots.
The tools here are pretty self-explanatory, but here's a quick tutorial if you're unfamiliar: The top shows the undo and redo buttons, and the bottom shows the various layout styles and tools, as well as the color picker. If you click the "+" icon, you will also see options to add text, signature, magnifying glass, transparency, etc.
If the page you're taking a screenshot of supports it (as in this example, I'm taking a pageshot in the Safari app), you can also switch between "Screen" and "Full Page". In the case of Safari, this feature allows you to quickly save a screenshot of an entire Safari page - as if you had scrolled to the bottom and taken a screenshot of the entire page. This can be useful in design or web development.
As mentioned, simply click "Done" in the top right corner to save your screenshots. Or, if you don't need them at all, you can just as easily remove them and save the headache of having to clean up your camera roll later.
see also
iPadMac
Samsung begins development of a possible OLED panel for 2024 iPad models
Method one: zoom out with your fingers
You can take a long screenshot on iPhone using the screen's touch feature, which allows you to zoom in or out with your fingers. You need to “pull” the image or text by touch, then hold down the top right button and the “Home” button on the opposite side on the smartphone body. If the image is not being captured properly and is “jerky”, you can simplify the process using “Accessibility”, which is located in the iPhone settings.
You will need a "Touch" folder in which you need to select the AssistiveTouch feature. You need to activate it by dragging the slider to the right, then open the “Top Level Menu” and click on any icon. In the catalog that opens, select “Spread fingers and rotate.” After this, a separate button will appear on the screen of your iPhone; it will call up a small menu in which the function is located. With its help, you can use just one finger to zoom out an image or page, and then take a screenshot.
Quick commands
Shortcuts are one of those options that are used only by a small circle of enthusiasts, but for taking a long screenshot, one of them is quite suitable. If you have not downloaded this application, you can install it from the AppStore. Note : If you haven’t used Shortcuts up to this point, first you need to install at least something from their official list. To do this, open the application and go to the Gallery tab. We select at least something from here and run the command. This is a kind of preparatory stage, after which you will be able to install commands from third-party sources. Also check whether permission to install them is set in Settings. You can download the command using the link on the developer page, after which we return to the Quick Commands - My Commands . Select the installed shortcut command - Start Long Screenchot and in the window that opens, select the images that need to be merged, click “ Done ”, then select No, start a new crop . Next you will see a preview of the created images. At this stage, you can cut off unnecessary elements, for example, fields, keyboard. Edit your photo by choosing the number of pixels you want to crop and save the result when you're happy. Next, the program will ask whether to cut off the top and bottom margins on the first and last images; it’s better to agree. Now you can view the resulting screenshot and save it, or start the process all over again.
How to take a screenshot of an entire page on an iPhone with iOS 11-13
Yes, there are plenty of ways to take a screenshot of an entire page on an iPhone. Their choice depends on the size of the required image.
Simple screenshot
First, let's figure out how to make a simple screenshot on an iPhone. To do this, use the Face ID, Touch ID or top button of the smartphone.
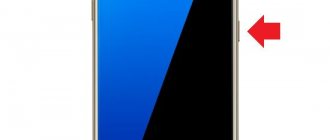
With the Face ID function, a simple screenshot is taken like this: two buttons are pressed simultaneously: side (power) and volume up. The finished photo can be saved or deleted immediately by simply swiping it off the screen.
In the case of Touch ID, you should press the side and “Home”. The actions with the thumbnail are the same - you can save it or swipe it from the screen. If your device has a top button, then to take a screenshot you need to hold it down while simultaneously pressing the Home button.
Saved screenshots will be displayed in the Screenshots folder. And to get there, you need to go to “Photos” and go to the “Albums” section.
Scrolling full page snapshot
In this case, there are also several options. Let's start with Safari.
In order to take a complex screenshot from an iPhone screen, you will have to perform the following steps:
- Go to the Safari browser, minimize the window and go to the page you want to take a photo of.
- Take a simple screenshot (the methods are described in detail above).
- Click on the “Preview” button.
- Select the line “Full page” at the top.
- Click "Done".
This method has one big drawback - this option is only available for web pages opened in Safari.
And if you need to screenshot something else, then you should use third-party applications, like “Tailor”.
And for this you need:
- Download "Tailor" in AppStor.
- Allow the application to access the photo.
- By taking simple screenshots, screenshot the entire required area of the screen so that part of the previous image overlaps the new one. That is, the end of screenshot No. 1 must be duplicated at the very beginning of screenshot No. 2. The application itself will “understand” that it needs to be trimmed and “blind” the parts into one whole.
- Go directly to "Tailor". In this case, you do not need to select anything - the program automatically recognizes fresh screenshots.
- Click on the “Share” and “Save image” buttons to export the screenshot to the “Photos” folder.
In this case, the screenshot will be detected by the iPhone as a panorama.
Screen recording
The latest models with iOS 11 and higher already have a video capture option. This function allows you to record everything that happens on the iPhone screen and then save the recording in the device’s gallery. In essence, this is a video screenshot.
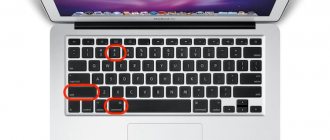
To add this option to the quick menu, you need to:
- Go to “Settings”.
- Go to the “Control Center” section.
- Select the line “Customize controls”.
- In the list that appears, find “Screen Recording”.
- Click on the green plus sign opposite.
Now about how to record directly from the screen:
- Call the express menu (swipe the screen from bottom to top or swipe down from the top right corner).
- Click Screen Recording.
- To complete the recording process, you need to touch the status bar or clock.
If you hold down the “Screen Record” button, you will be able to make a video screen with sound - you just need to turn on the microphone.
Basic method
In many matters, Apple is firmly rooted in tradition. As a result, users receive a familiar set of functions in each device.
- Screenshots are taken the same way on iPhone 7, 8 and earlier models. You need to press the Home and Power buttons at the same time. Up to 5S inclusive, it was located on the upper end of the device, but with an increase in the screen diagonal, it “moved” to the right side.
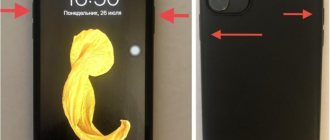
The latest model that allows you to make a print screen in this way is the 8 Plus. The iPhone X doesn't have a Home button. Its owners need to remember a different combination. A photo from the display is taken by simultaneously pressing the power button and volume up button.
Method Three: Screen Recording
Using this method, you can record a video in which you can show correspondence of any size that interests you. It is especially suitable in cases where, in addition to messages, you need to transmit information from voice messages.
To do this, you need “Control Center”, which is located in the iPhone settings. If you do not have the Screen Recording function activated, you can enable it by clicking on the green plus next to it. Then it will appear in the “Control Center”, which can be called up by swiping your finger along the right side of the screen from top to bottom.
In the window that opens, you need to select the icon with two white circles and start shooting. This way you can record on video the passage of correspondence you need or your actions. The video will be saved in “Photos”, from where you can send it to both email and messenger messages.
Assistive touch
iOS has a little-used feature that allows you to create a virtual Home button. It's called Assistive Touch, which translates as “Assistive Touch”. It was developed specifically for people with disabilities and allows you to operate your smartphone with one hand, completely simulating complex gestures and pressing control buttons.
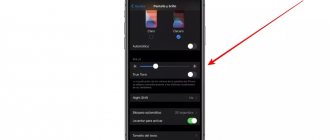
- By default, this feature is disabled and can be activated in the settings. In the general menu, select “Basic” and go to the item indicated in the screenshot.
- Having opened the “Universal Access” section, scroll down the list of settings to get to the desired option. In the screenshot it is highlighted with a frame.
- Move the slider marked with the arrow to activate Assistive Touch on the device. By default, the button that allows you to take a screenshot is located in the third nested action level. To make this feature easier to access and useful, open the boxed setting.
Working with a screenshot
With the release of iOS 11, Apple added the ability to quickly edit. The screenshot thumbnail remains in the left corner of the screen for a few seconds. If during this time the user makes no attempt to correct it, the photo is moved to the album in the Photos program. By opening it after saving, you can use filters and other enhancement mechanisms provided in the operating system for processing photographs.
Quick Edit
In fact, the Quick Menu is one of the implementations of the “Markup” option, which appeared in previous versions of iOS.
- The screenshot shows the moment a small copy of the screenshot appears and where it is placed on the smartphone screen.
- After clicking on the thumbnail, the photo opens in the editing panel. The number “1” shows the size trimming frame and the result of its action. The block, highlighted in color and marked with a two, contains a set of brushes for handwriting or simple drawings. The three indicates the Share menu. The plus symbol, above which the number 4 is placed, expands additional options.
By system means
Some standard iOS applications support the ability to take long screenshots on an iPhone. This can be done in the Mail , Notes , as well as in web browsers. To do this, take a screenshot as usual (power + volume or Home + volume, depending on your device), click on the thumbnail in the lower left corner and go to the “ Entire page ” tab. Here the resulting screenshot can be edited or cropped to the desired size. The most interesting thing in this scenario is that the resulting screenshot can be saved both as a picture (use the Photo ) and as a PDF document, for this we select the Files . You can work with the last version of the screenshot as with any other files of this type, including copying text from them. Please note that this screenshot cannot be created in split screen mode.