Some users are faced with the need to work in parallel with both the Word and Excel text editor. Sometimes you may need to transfer a table into a document, which often poses difficulties, because it is not clear how to implement cells and ensure correct display of the contents.
I'll show you three different methods that solve this problem, and all you have to do is choose the one that suits you.
Let me immediately draw your attention to the fact that a wide table in Excel must first be narrowed or deleted, since the workspace in Word is not so wide and all the cells may simply not fit. Of course, you can first check how the table will appear in its current state, and then edit it if necessary.
How to transfer a sheet from an Excel workbook to a Word document?
To transfer the data of the entire worksheet of an Excel workbook into a Word document, you need to go to the “Insert” tab and in the “Text” button group click the “Object” button. On the Create from File tab of the Insert Object dialog box,
Using the “Browse” button, you need to find the workbook with the data to be transferred. It is worth noting that the active sheet in the workbook must be the one that contains the data to be transferred to the Word document. This inserts file data into a document so that it can be edited using the application in which it was created. In other words, an Excel application area appears in the Word document, which is activated by double-clicking the left mouse button. This replaces the Word ribbon with the Excel ribbon, and you can make changes in this area of the Word document using Excel tools.
In the "Insert Object" dialog box, if you select the "Link to File" checkbox, the changes made to the source file will be automatically displayed in the Word document.
Configuring how links are updated and working with the Link Manager
Inserted links can be updated in several ways. For example, if you right-click on an inserted object, the menu will contain an “Update Link” button, clicking which will update the selected link.
You can set update parameters for all objects at once. To do this, you need to call the Document Link Manager. We follow the path “File” - “Information” - “Change links with files”
(this command is available when the document has at least one link and the document itself is saved).
The manager shows all the connections of the file. In the “Link updating method” group, you can select the option that is more preferable or disable link updating altogether. You can also set the “Keep format when updating” setting for each connection. It is responsible for ensuring that the formatting you choose does not disappear when you update the connection.
In the same manager you can break connections, open or change the source.
How to transfer a table or range of cells from Excel to Word?
To transfer a table or any arbitrary range of cells with data from an Excel workbook to a Word document, you need to copy the range of cells in Excel, go to the Word application and on the “Home” tab in the “Clipboard” button group, open the “Paste” button menu and Select one of the available paste options, such as, keep source formatting, use destination styles, save as picture, save text only, and some others.
In addition to the listed options, the “Paste Special” item is available, with which you can paste a copied table or range as an object, as well as select other paste options.
Special insert
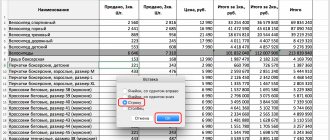
After you copy the table (not as an image), go to the “Home” tab in Word, then click on the “triangle” under the “Paste” button and select “Paste Special”.
You will then be presented with the following options:
- Microsoft Excel sheet (the insertion will take place in the form of a picture, that is, you will no longer be able to edit the table);
- text in RTF format (everything will be inserted unchanged);
- unformatted text (nothing will remain from the table);
- bitmap (you will get the same image as in the first point, but its appearance will be much more beautiful and neat);
- Windows metafile (almost the same picture as in the first case, but with neater borders);
- HTML format (a regular table that can be created in hypertext markup language, that is, various visual effects from Microsoft Excel will disappear);
- Unicode text.
How to selectively transfer data from Excel to Word (automatically)?
In some cases, when there is a need to fill individual rows/columns of a table in a Word document with data from Excel, an add-in for Word that automatically fills Word tables with data from Excel will help you avoid performing multiple “Copy/Paste” actions.
For example, when filling out specifications for design documentation, you need to selectively transfer information from the Excel workbook database to a Word document. In this case, you do not need to transfer the entire Excel table, but only some of its rows, despite the fact that they are not located in the same range, which could be copied and pasted in one action. The add-in allows you to automate the process of selectively transferring data from an Excel table to a Word table.
After selecting the Excel workbook (database) and the worksheet containing the data to transfer to the table in the Word document, the dialog box displays the cell values from the first two columns of the database worksheet. The user can regulate the number of displayed columns independently by changing the numbers of the first and last column. Depending on this, the contents of the dialog box change. The first row of the database file worksheet serves as headings for the columns in the dialog box. In order to transfer data from the dialog box, you need to select the desired lines using the left mouse button and the Ctrl and/or Shift keys on the keyboard.
After starting the program, the values of all the lines selected in the dialog box are transferred to the table cells of the Word document, starting from the cell in which the mouse cursor is located. The add-in allows you to selectively fill tables in the Word editor with data from Excel. An example of using this add-in is filling out specifications of equipment and materials for project documentation, when in order to fill out documents by section it is necessary to selectively transfer data from databases created on the basis of Excel workbooks to a table in a Word document.
For users using widescreen monitors, it is possible to resize the dialog box to fit the width of the Word application window.
How to transfer individual values from Excel to Word?
To autofill Word documents with data from Excel, you can use ready-made solutions (add-ins) for both Word and Excel. These solutions allow you to automatically generate Word documents based on data contained in an Excel workbook sheet. These solutions provide the ability to batch fill out documents (for cases when, based on one set of initial data, you need to fill out several different documents, for example, a contract, additional agreement, power of attorney, and so on).
Add-in for Word
Excel add-in
Both add-ons have approximately the same functionality and differ slightly.
The popular spreadsheet processor Excel is just one of several applications included in the Microsoft Office suite. All its components are closely interconnected and have a number of common functions and capabilities. Thus, the Word text editor also allows you to work with tables, create them from scratch and edit them. But sometimes the task arises of transferring elements of a given type from one program to another. We will tell you how this is done today.
Second way
You can transfer a table from Excel to Word as an object. This makes it possible to obtain an exact match with the source. To do this, you should use Special Insert , which also offers different options. Select the first one – Microsoft Office Excel Sheet (object). There is a choice here: simply insert an object or link it to the source. In the first case, it becomes possible to edit data as in an Excel sheet; the second method is mainly used if communication between programs is needed. That is, so that when you change data in Excel, they are updated in Word.
Transferring a table from Excel to Word
As mentioned above, there is quite close integration between Excel and Word applications. This provides the ability to conveniently import and export compatible objects and files, exchange them, and use the functions of one program in another. Transferring tables from an application specifically designed for creating them into something that is primarily focused on working with text is one of the tasks that can be solved in several ways at once, and we will consider each of them in detail below.
Method 1: Copy and Paste
The optimal and most obvious solution would be to simply copy the table from Excel to Word.
- Using the mouse, select the table that you want to transfer to a text editor.
Note: Before you start moving the table, you should decide on its size, or rather, make sure that it will not go beyond the margins of the text document. If absolutely necessary, you can not only reduce (or, conversely, increase) it directly in Excel, but also adjust the margins in Word and even change the page orientation from the usual portrait to landscape.
Read more: How to change the size of a table in Excel Setting fields in Word How to make a landscape sheet in Word Copy the prepared table using the buttons on the ribbon, the context menu or the “CTRL+C” hotkeys.
- Now go to MS Word. Open the document into which you want to move the table, place the cursor (caret) where you want it on the page, and do one of the following:
- Expand the “Insert” button menu (the “Home” tab) and click on the first icon in the list – “Keep source formatting”;
- Right-click (RMB) where the table is inserted, and in the context menu that appears, select the button similar to the above with the image of a tablet and a brush;
- Use the keys “CTRL+V” or, better yet, “SHIFT+INSERT”.
The table copied from Excel will be pasted into Word in its original form, after which you can continue to work with it - fill out, format, edit.
As you may have noticed, there are other options in the text editor's insert menu. Let's briefly look at each of them.
Use target document styles. The table will be inserted without its original formatting and in the style that you currently use in MS Word. That is, if, for example, you have the Tahoma font with size 12 set as your main font, it is in it that the contents of the table will be written.
Link and retain original formatting. The table is inserted in the same form in which it was created in Excel and maintains a connection with the spreadsheet processor - changes made in it will be displayed in Word and vice versa.
Link and use end styles. This option is a synthesis of the two previous ones - the table adopts the design style of the current Word document, but retains its connection with Excel.
Save text only. The table is inserted as text, but retains its original shape (no visible borders, columns, or cells).
Performing an insert from a file
There is a copying method in which you do not need to open an Excel document; the transfer occurs in a slightly different way. The main task is to accurately determine the location in the system where the file you are interested in is located.
Additional Information. Another important point is the need for the absence of any unnecessary components on sheets in Excel. Only the table that will be copied should be located. If all conditions are met, you can proceed directly to the process.
The algorithm that answers the question of how to transfer a table from Excel to Word looks like this:
- You need to open a text editor document in order to place the cursor in the place where the copied table should appear. After that, go to the tab called “Insert”, it is located at the top of the window.
- Pay attention to the tool group, which is labeled “Text”. There are several different buttons, select “Object” among all the contents.
- You will see a window called “Insert Object”. The task at this point in time is only to open a tab called “File Creation” and select the “Browse...” option.
- In the operating system explorer that appears in front of you, find the folder with the Excel document. Select it with the left mouse button and click on “Insert” at the bottom.
- Now in the settings window you can click on “OK” in order to get the desired result in the form of an added object. But it is worth noting that this option does not imply the ability to edit the table in the future. All you can do is change the size, but nothing more. Below is information about alternative settings.
Additional Information. If you check the box next to the “Link to file” element, you can create conditions under which the table will be linked to Excel. Consequently, you will gain the ability to edit, both in Word and in a spreadsheet processor. Changes made in one place or another will appear everywhere after you update the connections. Another item “As an icon” allows you to add a shortcut to an Excel file. In a situation where the “Link to file” option is not checked, when you open it, you will be able to see the table in the form that it had at the time of insertion. By checking both boxes, editing capabilities will be provided, but only through Excel.
As a result of all the described actions, you will be able to see an object in front of you that can be edited without any problems. In this case, it will have a form that is identical to the original source.
Simple table copy
There are several ways to instantly transfer data without losing further editing capabilities.
Using hot keys
- First you need to select all the contents and copy it. To do this, press the Ctrl + C buttons on your keyboard.
- As a result of this, you should see a dotted frame appear around the table. This means you are doing everything right.
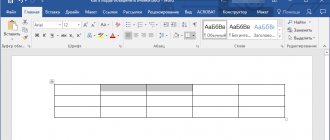
- Open a Word document.
- In order to paste the selected data, you need to press the key combination Ctrl + V. Thanks to these actions, you will have a table, not a picture.
Using the menu
The same can be done using the context menu. This method is used by those who cannot remember hotkeys. To do this you need to do the following.
- Select the table.
- Right-click on it.
- In the menu that appears, select “Copy”.
- The table will be highlighted with a dotted frame.
- Open the file into which you want to insert this table.
- Go to the “Home” tab and click on the corresponding button.
- The result will be exactly the same.
In both cases described above, the ability to edit the content is retained in full. You won't notice the difference.
Online converters
In addition, there are various sites that can convert your document into any format you need for free. To do this, just enter the desired query into the search engine.
In our case, it will be “Converter xlsx to doc”, since Excel files have the xlsx extension, and Word files have the extension doc.
The result will be as follows.
It is important to understand that not all sites can cope with the task due to various reasons.
In this case, you will see similar errors.
The English-language service ZamZar shows good results.
In addition, this service can convert the following formats for free.
In order to convert a file, you need to take the following steps.
- Click on the “Choose Files...” button. In the window that appears, select the desired document and click on the “Open” button.
Or simply drag the desired file into the browser window, since it says “or drag and drop files”.
- As a result of this, you will see your document in the “Files to convert” section. After that, click on the drop-down list in the second step (Step 2).
- A large list of formats will appear. Select doc.
- Next, you need to specify the email address to which a letter with a link to the result will be sent. To start the conversion, click on the “Convert” button.
- After a short wait, you will see the following message.
- Go to your mail and open the desired letter. Below you will see a link to the file with the result. You need to click on it.
- After this, you will again find yourself on the ZamZar website. But this time you will see a link to download the document. Click on the "Download Now" button.
- Immediately after this, a window will open in which you will need to specify the name and location of the saved file. To start downloading, click on the “Save” button.
- Run the downloaded file to check the result.
When you open the document, you will see the following.
The quality is quite acceptable. Please note that if the table size is small, you will receive the corresponding page scale.
Conversion using apps
Users who work with large volumes of text and tabular data should install a special application for converting documents on their PC. The converter programs presented below take up minimal space on your hard drive and are very easy to use.
Total Doc Converter
The Total Doc Converter application is designed to convert large files. One of its advantages is a simple and understandable menu in Russian.
To convert a Word document to Excel using Total Doc Converter:
- Select the Word file in Explorer.
- Check the box for its type.
- Specify the destination file type.
After this, an additional window will open where you should select a folder to save the Excel file.
After clicking on the “Start” button, the conversion process begins.
Abex Word to Excel Converter
The Abex Word to Excel Converter application has a menu in English, but its interface is intuitive. This compact converter allows you to convert multiple documents at once. However, its free version is designed to work only with .doc files (supported by Word versions 2003/2007/2010).
Conversion procedure:
- Select the file to convert in the main program window.
- Determine where to save the final document.
- At the bottom left of the window, select one of three possible formats for the resulting Excel file.
- After all the settings are set, click “Convert”.
Attention! For correct operation, the application automatically closes all open text documents.
The conversion process takes from a few seconds to several minutes depending on the size of the source file.