There was a time when DVDs were a trend in the market for burning ISO images onto bootable media. Time passes and computer technology develops along with it. Now optical disks are being replaced by Flash drives , as they are faster, more compact and more convenient for installing an operating system.
You can find many applications on the Internet that will help you create a bootable USB flash drive. However, users often overlook a method that does not require the installation of third-party software, the safety of which is always in question. All you need is the command line.
Creating a bootable USB flash drive using the Windows 10 command line
Use the instructions below:
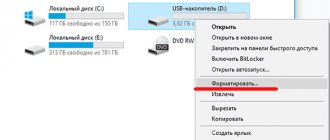
1. Connect the Flash drive to your computer.
2. Open the Start and enter cmd . Right-click on the found application and run it as administrator.
3. Once Command Prompt is running, type diskpart and press Enter . Wait until the utility starts in a new window.
4. In the window that appears, enter list disk and press Enter . This action will help identify all active drives on your computer.
Most likely, as can be seen from the previous screenshot, two types of disk will appear in front of you:
- Disk 0 is your hard drive.
- Disk 1 is the installed flash drive.
Since we are creating a boot disk, we will only have to work with “Disk 1”.
5. Type select disk 1 and press Enter . The system will respond that Disk 1 is selected and further operations will be performed only on it.
6. Type clean and press Enter to delete any information stored on the disk. This command formats the device, upon completion of which the system will respond “DiskPart: disk cleanup completed successfully.”
7. Type create partition primary and press Enter . You will receive a message from the system indicating the successful creation of the partition.
8. Type select partition 1 and press Enter . DiskPart will select the first partition as active.
9. Type active and press Enter . This action will activate the section.
10. Type format fs=ntfs quick and press Enter . The partition will be quickly formatted to the NTFS file system.
11. Type exit and press Enter . This command will close the DiskPart application, but you shouldn’t disable the command line just yet (it will come in handy later). If you have already closed it, it's not a problem.
Commands to restore Windows XP
A functional failure may prevent the system from starting correctly.
A system rollback is possible only after the OS has been fully loaded.
But what if this process does not happen?
In this case, we need to use the Windows command line functionality.
The Recovery Console contains most of the most commonly used system commands.
They allow you to fix the problem and get your computer working again in a matter of minutes.
Error message
First, you need to have on hand an installation disk or flash drive with the version of Windows that was installed on your PC.
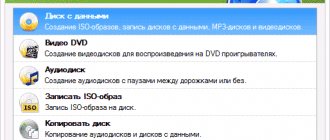
Using a special utility Rufus , we can create such a drive in a couple of clicks.
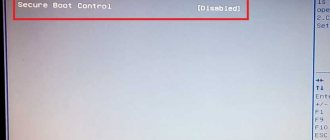
If the BIOS subsystem supports booting from a removable drive, we need to insert our flash drive into the appropriate slot.
Next, you need to restart your computer (or turn it on).
Open the boot menu using the BIOS key.
Typically this is the Delete or F1 key , but other options are possible.
During loading, a hint with the name of the desired button will appear in the lower corner of the screen.
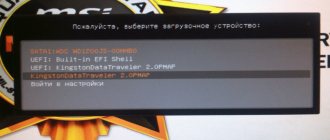
Then we select the location from which the system will install the files. In our case, this is a USB device .
Next, the bootloader asks us to press any key to start the file copying process.
Like the picture below:
Press any key
We press, say, the space bar and move on.
The installation process of our Windows XP will open; you need to wait until all the boot files are unpacked.
After unpacking is completed, the following window will open.
In it, press the R to open the recovery console.
Now you need to enter the number that corresponds to the desired copy of Windows.
In most cases, only one OS is installed, click on the button 1 .
If you have a password set, you need to enter it and click Ok . Or just press Enter .
We can enter any command we are interested in in a text line.
A complete list of them can be obtained by writing.
Enter - this command will help restore the boot partition of the system.
To confirm any action, press the Latin letter Y and press Enter .
We write and confirm the command to begin the process of writing the OS to the system disk.
After the process is completed , to close the unnecessary console.
Then we restart the computer.
VIDEO: MBR recovery on Windows XP, all commands in the recovery console
Recovering MBR on Windows XP, all commands in the recovery console
10 Ways to Restore Windows Using the Command Line
Copy files directly from DVD to USB using CMD
Let's say that the letter of your flash drive is F: and, coincidentally, the letter of the DVD installer also happens to be F:. By default, the active directory of the command line is located along the path C:\Windows\System32 and we will operate with it when working with DVD (F:). A prerequisite is the installed DVD installer .
1. Type F: and press Enter . The active directory will be changed to F.
2. Type cd boot and press Enter . The active directory will change to F:\boot> .
3. Type bootsect /nt60 g: and press Enter . This action will create a boot sector on the G: drive (USB drive). In our case, from the screenshots, drive E:.
4. Type exit , press Enter and close the command prompt.
To start installing Windows, all you have to do is copy all the installation files from the DVD to a USB drive.
- Open a command prompt as described in the previous steps.
- Type copy e:\*.* /s/e/fg: and press Enter . Wait until all files have been moved. Double check the USB and DVD letters. Here E: is the letter of the DVD drive, and G: is the letter of the USB drive.
Now your USB drive has become a bootable flash drive and is ready for full use.
Just in case, if the bootable USB flash drive did not help revive your Windows and you need to recover information from your hard drive, Starus Recovery . and you can try programs for recovering deleted data completely free of charge!
DISKPART problem in Windows XP
ATTENTION : if you are preparing a flash drive to install Windows 7 from Windows XP, be prepared that nothing will work out right away - because DISKPART with the list disk simply will not see the flash drive at all! This DISKPART limitation is present specifically in Windows XP, but in Windows Vista and Windows 7 everything is fine.
Therefore, to prepare a flash drive in Windows XP for installing Windows 7, you will need some cunning street magic that allows you to turn a flash drive into a hard drive. You can find out about this in the following article:
Without this technique, we repeat, it will be impossible to use DISKPART to prepare a bootable USB flash drive with Windows 7 from Windows XP!
Setting up BIOS to boot from a flash drive
After completing the preparatory stage, turn off your computer, insert the drive into it and turn it on again.
Now you need to do the second step when installing Windows from a flash drive via BIOS on a PC:
- First, go to the PC BIOS; to do this, when you turn on the computer, press F2, Escape or Delete;
- A blue window should open in front of you;
- find in this window the option that determines the boot order of devices (usually the word BOOT is in the name);
- Now install your flash drive in the first place in the downloads, there should be a window like this.
Manually fixing problems
If the automatic mode is powerless, we proceed to manually eliminating bugs.
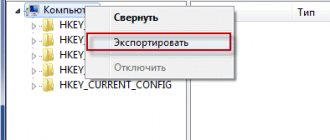
To do this, in the “ Advanced Options ” mode, select the “Command Line” tab.
Command line selection
Let's start working with the command line.
First, enter - to correct the boot record.
Then we write to fix the new boot sector.
Then we enter . This command will help you find previously installed versions of Windows.
It is designed to provide information about installed OS versions in the download repository.
To complete, enter the Latin Y to confirm all our actions.
As a result, you should have a picture like this:
The order of the required commands
Now you just need to restart your computer for the changes to take effect.
If all previous actions were unsuccessful, then we will use one more method.
Open the command line again from the installation media (as described above).
We write an action. The system utility starts.
Then enter an action that will open a list of all installed disks.
We are looking for the disk on which our operating system is installed.
You just need to look at the volume.
Next we write a command to leave the diskpart utility.
After that, enter and execute, where “ E :” is the name of the system drive.
It may differ for you, be careful.
As a result, you should get the following:
Console with disk management actions
This action will fix the incorrectly working file - “bootmgr”.
The boot storage configuration will also restore its functionality, which will help the OS start correctly.
After this, we will create a new one, with the correct configurations.
Open the diskpart as described above.
Next we enter . This action will display a list of drives connected to the device.
Using the command , we select a volume with a reserved system.
Its size should be 350MB. The ego must be removed through action . After this , to display a list of the required sections.
In it, select “Disk 0” and write
Next you need to recreate the deleted disk, with an exact repetition of its dimensions.
For it you need to install the desired format, namely NTFS .
To do this, enter the next action
Then you need to activate it by clicking on the inscription
As a result, everything should look like this:
New partition configuration
Using the command, we give our new size a name.
To check the action, we write the familiar action again
Find a disk with a capacity of 350MB - remember its letter.
We can complete work with the utility by writing an action
New disk configuration
The last thing to do is write the final command
Instead of " D :" should be the letter assigned to the drive you created.
Interesting videos that will help further understand the problem:
VIDEO: Working with the command line in Windows 8
Working with the command line in Windows 8
VIDEO: How to restore Windows 8.1 and 8. The second method worked
How to restore Windows 8.1 and 8. The second method worked
Commands to restore Windows 8
The easiest way to start the recovery process is through bootable media.
Similar to the previous option, this can be a regular SD disk or a USB drive.
We insert our system file transferr into the desired connector and reboot the computer.
During startup, press the Delete to enter the BIOS subsystem.
“ boot ” tab and install our media in first place.
This is done in order to boot the system from it.
Now press the F 10 and click on the Y in the Latin keyboard layout.
The BIOS configuration was successfully saved. After this, the Windows 8 Installation Wizard .
“System Restore” item and click on it.
Installing Windows 8
From the list provided, select the desired operating system:
List of available OS
Now go to the “Diagnostics” and enter “Advanced parameters” :
Advanced options section
Click on “Automatic recovery” and wait for the process to complete.