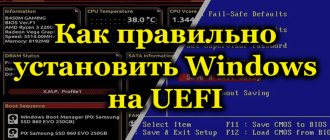
In this instruction we will show in detail how to create a bootable USB flash drive for a UEFI computer with Windows 10 or Windows 7 distribution.
We will need:
- USB flash drive (v 2.0 or v 3.0) with a capacity of at least 4 GB for Windows 7 or 8 GB for Windows 10;
- 64-bit installation image with Windows distribution (32 bit versions of Windows cannot be installed on a UEFI computer). The distribution can be in the form of an installation DVD or an ISO file with an image.
An important feature of a bootable USB flash drive for a UEFI system is that it must be formatted in the FAT32 file system.
Let's look at some of the most popular methods that allow you to create a bootable UEFI flash drive for installing Windows 10.
How to make a bootable USB flash drive without a program?
The easiest way to create an installation USB flash drive for Windows 10 and Windows 8.1
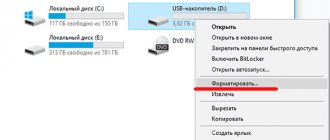
- Right-click on the drive in Explorer and select “Format.”
- Set the file system to FAT32 and format.
Interesting materials:
How long does it take to cook smoked horse meat? How long to cook celery root in soup? How long does it take to cook a goat? How long does it take to cook goat meat? How long to cook red lentils? How long to cook red peas? How long does it take to cook large couscous? How long to cook corn porridge for a baby? How long to cook boneless chicken thigh? How long to cook chicken breast with bone?
Using the Media Creation Tool to burn a Windows 10 image to a USB flash drive
Officially, Microsoft's tool for creating installation media and ISO images with Windows 10 is Media Creation Tool . You can download the latest version here: https://www.microsoft.com/en-us/software-download/windows10
The old version of Windows USB / DVD download tool for recording a Windows 7 image formatted the USB drive only in the NTFS file system. A computer with UEFI in native mode will not be able to boot from such media. Therefore, this utility is not suitable for creating an installation flash drive with Windows 7.
- Run the file MediaCreationTool2004.exe;
- Select that you want to create installation media − Create installation media (USB flash drive, DVD, or ISO file) for another PC);
- Select the language, bitness and architecture of the Windows 10 image that you want to burn to the USB drive;
- Then indicate that you want to burn the image to a USB flash drive;
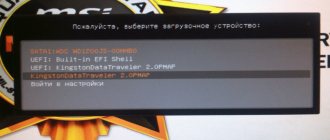
- Select your flash drive in the list of removable devices and USB drives;
That's all. Click Next -> Next -> Finish and wait until the installation image is written to the USB drive.
In this case, all data from the flash drive will be deleted during formatting.
This USB flash drive can be used to boot on both UEFI and BIOS computers.
How to switch to BIOS mode to install an unsupported OS
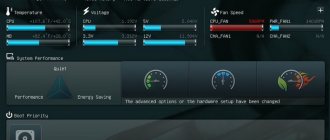
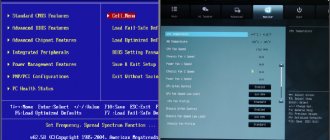
To install an old or 32-bit version of Windows that is not supported by the new standard on a PC with UEFI, you will need to switch to BIOS emulation mode. It is called differently in different firmware versions. To change settings, you can use the built-in Asrock UEFI setup utility or Advanced mode for advanced settings.
To activate the Boot or Legacy boot functions, the user will need to move them to the “Enable” position or select “Disable UEFI Boot” and save the changes. Boot priority can be configured through the UEFI interface or using the UEFI Shell.
Recommendations
- You can’t just take and manually transfer the downloaded image to a flash drive. After such actions, it will not become bootable, and attempts to install the system will fail.
- Before writing an image to a flash drive through any program, you need to make sure that the flash drive does not contain important files, since they will be erased in the process.
- To create an installation flash drive for Windows 10, the same methods are suitable as for earlier versions. Therefore, if you have such experience, use the algorithm you are already familiar with.
- To install Windows 10 correctly, you must have a license key.
The process of creating a bootable USB flash drive does not take much time and does not require any special skills from you. Just follow the instructions. As a result, you will receive your media with the Windows 10 operating system, ready to use at any time.
- Author: Marina Kardopolova
Beginner copywriter and translator. Rate this article:
- 5
- 4
- 3
- 2
- 1
(1 vote, average: 4 out of 5)
Share with your friends!
How to disable Secure Boot
The main purpose of the option is to block the launch of unauthorized OS and software. Disabling the utility is performed in the only case - when booting the computer from a flash card does not work.
To disable it you will need:
- Go to UEFI BIOS settings.
- Click and go to the Boot tab.
in UEFI-BIOS. Press F7 to go to “Advanced Mode”
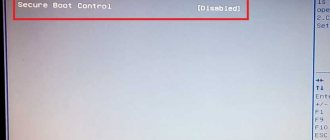
- Then tap on Secure Boot.
- In the “OS Type” item, set: “Other OS” (other OS).
- Save the settings by pressing the F key.
On some motherboard models, the tab is set to “Disabled” instead of another system.
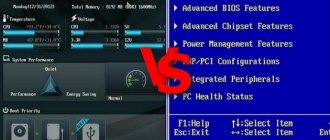
Advantages and disadvantages of UEFI compared to BIOS
The low-level BIOS utility has not developed very rapidly during its existence, unable to keep up with device updates. This led to the creation by developers of new software - UEFI, which is a more advanced BIOS firmware.
It is not possible to update from an outdated version to a modern UEFI mode, as special equipment is required. But the reverse is possible: with UEFI it is possible to emulate the BIOS if the user installs an older version of Windows.
The BIOS I/O system can use disks up to 2.2 TB. Although most gadgets now have disks with large amounts of memory. The number of physical partitions on a BIOS disk is only four. UEFI has 128 of them. Improved technology significantly reduces boot time, increasing computer operating time.
In addition to these advantages, the UEFI structure has additional capabilities:
- there is a graphical interface in different languages;
- there is a system boot manager that allows you to boot from drives;
- the presence of a network driver that helps update the operating system without starting it;
- advanced functionality;
- the presence of a UEFI Shell command shell;
- OS protection using the Secure Boot algorithm;
- the ability to adjust settings remotely.
Different device models have slightly different interfaces, as well as UEFI functionality.
Among the disadvantages of the improved mode are:
- there is no support for 32-bit systems; you can install them if you switch the software to BIOS mode, but most of the firmware functions will be lost;
- There is no support for MBR hard drives.
There are many versions of UEFI, all of them are different from each other. Accordingly, their functionality is also different.
What to do if an error occurs
It happens that the Secure boot function produces an error, which does not allow you to boot Windows from a flash drive. How to set up your computer to work properly? In this situation, it is recommended to disable this function by changing the BIOS settings:
- Once in the BIOS, select “Security Boot Options”.
- In the OS type option, select Windows 8 UEFI.
- Make the necessary changes to the BIOS settings.
- In safe “boot” mode, select the Custom version.
- In the “Key Management” option, you should disable “Prepare” and enable the secure loading mode.
- After inserting the USB flash drive, you need to set boot priorities and save the settings.
Having studied the recommendations, we can conclude that to create a flash drive for installing Windows 10, you can use any of the methods that work for previous versions of the OS, including the same method “via the command line” and numerous other programs.
Diskpart: creating a UEFI installation flash drive with Windows 10 manually
You can create a bootable UEFI flash drive with the desired Windows distribution manually. The procedure below is suitable for advanced users, performed from the command line and allows you complete control (and understanding) of all stages of the process of creating a bootable USB flash drive.
- Insert the USB flash drive into the appropriate port on the computer;
- Launch a command prompt with administrator rights;
- Launch the DISKPART utility by typing at the command line: Diskpart
- List all disks on the system: list disk
- Find the disk corresponding to your USB flash drive (in our example it is Disk 2) and select it: Select Disk 2
- Warning. The following command will completely destroy all information and partitions on the USB flash drive, so it is advisable to once again make sure that in the previous step you selected your removable USB device, and not one of the computer’s hard drives.
Delete all data from this disk with the command: clean
- Create a primary partition on the disk: create partition primary
- Make the created partition active (system volume): active
- List the partitions in the system with the command: list volume
- Select the partition you created (in our example it is Volume 3): select volume 3
- Format the selected partition in the Fat32 file system: format fs=fat32 quick
Note . Unlike systems with BIOS, which allow you to boot from boot partitions with the FAT, FAT32, exFAT or NTFS file systems, UEFI only allows you to boot from the boot loader located on the boot disk formatted in the FAT32 file system. - Assign a drive letter to the formatted partition (if Windows does not automatically assign a letter to the flash drive - see the article): assign
- Quit DISKPART: exit
All that remains is to copy all the files from the mounted installation ISO disk image with Windows x64 to the USB flash drive you prepared. You can do this using Windows Explorer, your favorite file manager, or from the command line, for example, like this:
xcopy d:\* f:\ /s /e
(where d:\ is the installation DVD disk or mounted iso image with the Windows distribution, f:\ is the letter assigned to the flash drive)
Note Because The maximum file size on a FAT32 file system should not exceed 4 GB; you will not be able to copy a large install.wim system image file (this problem most often occurs with modified Windows images). The size of the install.wim file can be more than 4 GB if you have integrated updates, drivers, etc. into it. In this case, the install.wim file will have to be split into several files up to 4 GB in size (for example, 3 GB files). To do this, you can use the command Dism /Split-Image: Dism /Split-Image /ImageFile:D:\sources\install.wim /SWMFile:c:\tmp\install.swm /FileSize:3000 Or using the imagex utility: imagex / split D:\sources\install.wim c:\tmp\install.swm 3000 The resulting files install.swm, install2.swm, install3.swm ... need to be copied to a flash drive in the F:\sources directory. During the system installation process, the Windows installer will itself collect the swm files and apply the full wim image to the disk.
This completes the process of creating a bootable UEFI USB flash drive with Windows 10.
Rufus – a utility for creating a bootable UEFI GPT flash drive for installing Windows
It is much easier for novice users to create their own bootable UEFI USB flash drive for installing Windows using the graphical interface of the popular Rufus . At the moment, the third version of the utility is available on the developer’s website https://rufus.ie - Rufus 3.10. The utility is quite compact (about 1 MB), does not require installation and is completely free. In addition, it works noticeably faster than analogues.
Run the Rufus utility with administrator rights and specify the following settings:
- Device: select your USB flash drive;
- Download method: specify a file with an ISO image of Windows (you can create an ISO image with the latest build of Windows 10 using the same Media Creation Tool, see example);
- Partition scheme: GPT;
- Target system: UEFI (non-CSM);
- File system: FAT32
Click START to start burning the Windows image to the USB flash drive. After 10-15 minutes, your bootable USB will accumulate with a Windows image for installation on the UEFI computer
Possible installation problems
If the installer generates an error and the system does not install, there are a number of reasons for this. The main ones include:
- Bit system mismatch. If Windows 10 is installed on top of the seventh version, then it will not be possible to increase the bit depth at the same time. It is advisable to install “ten” with the correct bit depth in its “pure” form, having studied the properties of the system in advance.
- The installation flash media was not created correctly. After setting the parameters in Rufus or another utility, you need to carefully double-check the data. Otherwise the flash drive will not work correctly. It is important to follow the instructions and set the parameters indicated in the description.
- The hard drive has been converted to the wrong format. When setting partition styles, you need to make sure that the parameters match Windows. In this case, you must take into account the physical capabilities of the PC.
UEFI software has become widespread, relegating the BIOS input/output system to the background. The release of hard drives with more memory will eventually replace the completely outdated BIOS. Therefore, it is better for users to start learning the improved UEFI now to avoid problems in the future.