12/12/2017 windows | for beginners
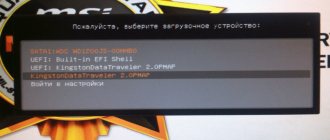
Guides for installing Windows from a flash drive or simply booting a computer from it include simple steps: set boot from a flash drive in the BIOS (UEFI) or select a bootable flash drive in the Boot Menu, but in some cases the USB drive is not displayed there.
This instruction details the reasons why the BIOS does not see the bootable USB flash drive or does not show it in the boot menu and how to fix it. See also: How to use Boot Menu on a computer or laptop.
Errors when creating a bootable USB drive
Most often, a bootable USB device does not appear in the BIOS for this reason. In other words, the source of the problem is the human factor. An inexperienced user can simply copy files from a hard drive or DVD to a flash drive, confident that he has created bootable media. In this case, most likely, nothing will download. Even if the download is successful, further work may fail because the bootable flash drive was not written correctly.
In the example discussed, the user simply copied the files. In order to be able to boot from a flash drive, you need to perform a number of important operations:
- delete all files on the media from the media
- format the flash drive
- create boot area
All this can be done using applications for working with flash drives. They contain all the necessary tools to prepare the media. Such programs as have proven themselves well:
- Rufus
- Windows USB/DVD Download Tool (this application is offered by Microsoft)
- WintoFlash
- Ultra ISO
Summing up
So, the author of this article is confident that after you have read the material in the presented article, you will certainly succeed. And yet, I would like to note one important fact: most users make mistakes only because they misunderstand the problem and resort to sometimes meaningless advice from “kind Internet GURU”. At the same time, exposing your car to the critical danger of “complete failure.” Be wise when choosing one or another solution to your computer problems and your experience will always be productive!
It happens that the BIOS does not see the bootable USB flash drive. This can happen on any personal computer with absolutely any operating system, be it Windows XP, “seven” or “eight”. What to do if BIOS This is a very popular question among all users. In addition, any owner of a personal computer or laptop has encountered such a problem at least once in their life. Some people in such a situation immediately contact service centers. And some even go to the store where they bought the flash drive, indignant and complaining that it doesn’t work.
Of course, it may also be that the whole issue is really a faulty device. But sometimes BOIS does not see the flash drive for a number of other reasons. And even if everything was fine before, the problems that have arisen now can be caused by various malfunctions that simply “accumulated” in the system. Or the flash drive may not have enough power of your system unit. Or... Below are the most popular reasons why problems arise with identifying flash drives and other USB devices, as well as ways to solve these problems.
Let's look at creating a bootable USB drive using the Rufus utility.
For everything to go smoothly, you must adhere to the following procedure:
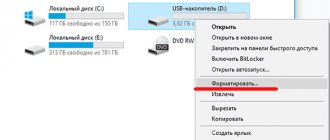
Insert the flash drive into the USB . If it contains the data you need, you should copy it to a hard drive or other USB drive.
Then it is recommended to format the USB drive.
There are 2 formatting methods - quick and complete . Using the first method, only the file system table headers are cleared, and using the second method, all sectors of the storage medium are cleared. For most situations, a quick format is sufficient. If you are unable to format the drive, it may be physically damaged.
Now you can launch the Rufus . In order for her to have full access to the media, the operation must be performed as an administrator.
To run a program in administrative mode, you need to right-click on its icon and find the corresponding command in the menu that opens.
After the application window opens, you can begin setting the operation parameters:
In the “Device” , you need to select the flash drive from which you want to make bootable media. You need to be especially careful if you have multiple USB devices connected to your computer.
In the “Boot method” there is a button “Select” , with which you can specify the program image file with the operating system that needs to be written. This file must be in ISO .
GPT as the partition scheme and UEFI .
If you are creating a bootable Windows disk, in the “Image Options” you should leave the item “Standard Windows Installation” .
The file system can be left as default – FAT32 . Although if you format the device in NTFS , everything should also work without problems. The cluster size does not need to be changed. If necessary, you can edit the volume label. This is the user-defined drive name that will be displayed in Explorer.
After pressing the “Start” , a warning will appear on the screen that all information from the USB drive will be erased.
If you forgot to copy your data to a safe place, you can do it now. After clicking the “OK” , formatting the media and recording the image will begin.
The method given here should work with all machines with a UEFI BIOS version. This means that the flash drive will be visible on any modern computer.
Storage device hardware incompatibility
In some situations, the system BIOS does not see the flash drive due to the outdated interface of the memory device itself. Make sure your USB drive is not an "ancient" 1.1 drive. However, new flash drives with 3.0 technological characteristics may also not be perceived by outdated computer systems.
So, the detailed characteristics of your storage device can be found on the official technical support website - enter the model of the flash drive and read the information you are interested in. By the way, this action can help in solving problematic situations related to any malfunction of your USB device (meaning the presence of a specific recovery utility on the website).
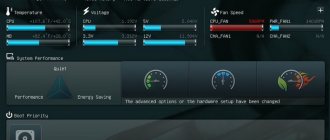
The user has not specified boot priority in BIOS/UEFI
You can set the boot priority in the BIOS It determines in what order boot records will be searched on different media connected to the system. To be able to start installing Windows from a bootable flash drive, it is necessary that the computer first looks for the boot area on the flash drive, and only then on the hard drive.
If the BIOS does not allow booting from a flash drive, you will not be able to install the operating system from it. In this case, the user must add it to the list of boot devices and put it in 1st place. The corresponding settings can be found in the bios in the “Boot” .
If the problem persists, the BIOS/UEFI be set to an inappropriate boot mode. Most modern motherboards support 2 of these modes: EFI and Legacy . The problem will arise if the flash drive is written in Legacy mode and EFI is enabled in the BIOS, and vice versa. In this case, it will not appear in the boot menu.
You can cope with this difficulty using one of two ways:
Activate the required mode in the BIOS.
Rewrite the USB drive in a different mode. For recording images with older versions of operating systems, only Legacy .
You can enable Legacy mode on the “Boot” of the BIOS. If the image you want to burn to a USB drive supports both modes, you do not need to change the BIOS settings. It is convenient to select the image recording mode using the Rufus utility.
How to configure UEFI so that the computer sees a bootable USB flash drive
There are some quirks to installing Windows 7 or XP on a PC running Windows 8 or 10. The latest versions (8 and 10) are configured with UEFI and GPT partition table, while the previous ones used MBR disk partition.
UEFI has a new “ Safe boot ” feature that ensures the system boots safely. A new level of security blocks booting from external devices such as USB flash drives and CD drives.
Therefore, even if you make an exclusively correct bootable USB flash drive, it still will not appear in the boot menu when you restart your PC or laptop.
To eliminate this reason, you can do the following:
- Make sure that your USB bootable flash drive is configured to work with UEFI (how to properly make such a flash drive was described above).
- Disable “Safe boot”, and change “Boot Mode” to “CSM/Legacy BIOS Mode”.
Working with bootloader settings requires experience; we do not recommend beginners to perform such actions. We also recommend that you save all important data first, as it may be lost.
To disable "Safe boot" follow these steps:
- Restart your computer or laptop and go into BIOS.
- Go to the " BIOS Settings " page.
- In the BIOS security settings, set the “ Safe boot ” option to “ Disable ”.
- the “ Boot Mode ” option to “ CSM(Compability Support Mode)/Legacy BIOS ” or “ CSM Boot” - different options are possible.
- Make sure USB is listed first in the Boot Order .
- Exit the BIOS and save the changes “ Save and exit” .
The system has Secure Boot enabled
All new motherboard models include the Secure Boot . Its active use began in 2013. The purpose of the innovation is to prevent the launch of malicious and other unwanted programs while the computer is booting.
But there may be situations when Secure Boot will only get in the way. So, if disk booting is only supported in Legacy , this feature will need to be disabled. To do this, you will need to enter the BIOS and find the BOOT (on some motherboard models, the necessary parameters may be in the “Advanced” menu). For the corresponding setting, you need to select the “Disabled” and save the changes.
Flash drive and USB port version do not match
USB 3.0 format has become widespread . Previously, the 2.0 . Now system units and laptops are being produced that have USB ports of both versions. If you simply copy information to a flash drive, it does not matter which port is used (the only difference will be in the speed of writing and reading data).
But when you need to create a boot disk, you need to take into account the versions of the drive and port. Thus, Windows 7 cannot be installed via a USB 3.0 port.
USB 3.0 can be distinguished from USB 2.0 by its external design. This applies to both flash drive plugs and ports in the computer case. USB 3.0 ports and plugs are blue, while USB 2.0 is white.
Solving a problem when using a PS/2 keyboard and mouse
Failures in these devices occur quite rarely and are mainly associated with BIOS and hardware failures. Before performing the following steps, be sure to turn off the power to your computer. This precaution is due to the fact that it PS /2 while the system is running. e If you are using standard PS /2 peripherals, you should:
- Check and clean the connector/port of the keyboard and mouse from various types of dirt;
- Try similar USB equipment;
- Swap the mouse and keyboard connectors;
- Update the motherboard BIOS to the latest version.
If all of the above does not help, try using another copy of Windows 7. The lack of support for PS / 2 devices may be due to the fact that a particular assembly does not contain, in fact, outdated drivers for these devices (they may be cut from the final image).
Software problems
The cause of the problem may be a faulty build of Windows or other software recorded on a flash drive. The set of files on it may differ from the original developer image, or their contents have been incorrectly modified. To avoid troubles, it is better to work with a licensed copy of Windows.
Something can also go wrong as a result of a failure in the system. The reasons are different: viruses entered the computer, incorrect installation of updates, changes in utility program settings, etc. The solution to the problem depends on the situation. If there is reason to believe that something is broken in the operating system, you should try recording the image on another computer.
Certain difficulties often arise when using pirated programs to record an image. The same can happen if the program does not work correctly for some reason. In this case, a well-established application can help the user.
Windows USB/DVD Download Tool
This is proprietary software from Microsoft. It is ideal for recording Windows 7 images. It doesn’t always work with Windows 10 - on one of my PCs it gives an error, on the other - no problem.
Download here (click on the Download button)
Here are the instructions for use:
You can also try creating a bootable drive using the free Rufus utility.