Often, users buy a USB flash drive pre-divided into two or more sectors and do not know how to make a single partition out of this mixture. There are also often cases when the user would like to independently divide the flash drive into several parts. In this article we will look at both problems and figure out how to combine or partition a flash drive.
A technique for dividing or merging partitions on a flash drive.
Let's try to make do with WIndows
It is important to know that a split USB drive in this way will only be visible on the computer where the manipulations that will be described below directly took place. Other computers will only see the first partition of the media. An extra piece of knowledge will never hurt us.
So, we have a flash drive, there is a lot of free space on it, let’s say it’s a multiboot drive, and we can, if necessary, install any of the provided operating systems from it.
It is problematic to partition the drive using internal Windows tools, let's go to the Disk Management snap-in. To do this, right-click on “My Computer” (if you have Windows 7) or “This PC” (if you have Windows 10) and select “Manage”, then go to disk management.
We have our removable device in front of us; there is simply no way to divide the flash drive into sections. But you can still do this using a special driver.
Create 2 partitions on a USB flash drive in Windows 10 using DiskPart
You can also create several partitions on a USB flash drive using the console utility DiskPart . In this example, we will create 2 partitions: the first partition with the Fat32 file system, and the second with NTFS (you cannot create the first partition with FAT32 from the Disk Management console GUI).
Open a command prompt with administrator rights and run the DiskPart command. In the Diskpart context, you need to run the following commands sequentially:
list disk select <here you need to specify the number of the disk assigned to the USB drive in the system> clean create partition primary size=3000 format quick fs=fat32 label=»1Part(Fat32)» assign letter=J active create partition primary format fs=ntfs quick label="Data(NTFS)" assign letter=K list vol exit
Editing files
We are interested in the ID of our flash drive; you can find it in the device manager by calling the context menu and selecting “Properties”. Next, you need to go to the “Details” tab and find the “Equipment ID” line in the drop-down menu. We need the very first line, copy it and save it in any text editor, for example, Notepad. We minimize both the text editor and the device manager.
We need a driver for Hitachi Microdrive external drives. It will help the system recognize the USB drive as a hard drive, then we can delete partitions and create new ones like on a regular hard drive. The archive is freely available on the Internet, available for both 32-bit and 64-bit systems.
So, we downloaded the archive, unpack it, open the folder. We are interested in a file with the extension “.inf”, call up the context menu, select “Open with” and in the window that appears we find any text editor, for example, “Notepad”.
We need to edit one line in the section which is shown in the screenshot.
After the line [cfadisk_device] there are three grouped lines, we need the last one. Open a notepad with the saved ID and copy part of the line after the expression “USBSTOR\”, paste this phrase into our text file after the expression “DISK&VEN_”. It is impossible to give clear instructions here, because everyone has their own USB drive ID, so everyone will insert it differently. To make it clearer, below are screenshots of “How it was” and “How it became.” Don't make a mistake, otherwise nothing will work. Save the edited file.
How to merge partitions on a flash drive and return the MBR
If you need to merge partitions of a flash drive in Windows 10 and return the flash drive to MBR partition information storage type, then you will need to perform low-level formatting of the flash drive. You can perform low-level formatting of a flash drive using the HDD Low Level Format Tool.
Launch of the free version of HDD Low Level Format Tool
Launch the program in free mode by clicking Continue for free in the window that opens.
In the HDD Low Level Format Tool program, select the flash drive for low-level formatting
In the program, select your flash drive, and then click on the button labeled Continue.
In the HDD Low Level Format Tool program we launch low-level formatting of the flash drive
Go to the LOW-LEVEL FORMAT tab. To combine volumes on a flash drive and change its type, click on the button labeled FORMAT THIS DEVICE. Low-level formatting of a flash drive will take a long time.
Disk management, format RAW flash drive to NTFS
Once the low-level formatting is complete, you need to open Disk Management. Find your flash drive there and make sure that you managed to merge the flash drive volumes. Your flash drive will be a RAW file system, so format it to the NTFS or FAT file system. When you manage to connect a broken flash drive, be sure to check that a letter is assigned to it.
Update the device driver
Go to the device manager again. We find our device, right-click on it and select “Update drivers”. Select the following interface elements:
- Perform a search on this computer;
- Select from the list of already installed drivers;
- Install from disk;
Click the “Browse” button and find our driver with the file that we just edited. Confirm your choice and click the “Next” button. We will be warned twice about the danger of what is happening, we ignore the warnings, click “Yes” and “Install this driver anyway.” After a short wait, the driver finishes installation, close the window and restart the computer.
How to split a flash drive into 2 disks? Now our computer sees the USB drive as a local drive. Therefore, we can divide it into several sections. Open the Disk Management snap-in. The disk was removable, but became the main one. Next is the standard procedure for dividing the drive into volumes. Right-click on the desired volume and select “Shrink Volume”, specify the desired size, and free up space. We mark out this space: right-click on the unmarked area and select “Create a new volume”, follow the instructions of the wizard. If you have a desire to return everything back, then we transfer everything that we managed to save on the second partition to another place, for example, to one of the hard drive partitions. We delete the volume and connect the area to the first section of the flash drive.
Now we can use the first partition as a multi-boot partition, and on the second, for example, store music. Both parts are autonomous and do not interfere with each other.
The natural question is how to get everything back? Very simple. Open Device Manager, find our flash drive, right-click and select “Properties”. Next, go to the “Driver” tab and click the “Roll Back” button. After such manipulations, the drive will return to its original state.
How to split a flash drive into several sections
Just a few years ago, the hard drives of the average PC had a smaller capacity than flash drives have today. In this regard, there is a temptation to split the flash drive into several logical drives - partitions, and use them as an additional hard drive. The problem, however, is that the corresponding software, much less tools built into Windows, do not exist.
Another thing is Linux, which allows you to create partitions on any drive, regardless of its physical nature. If we are talking about working under an OS manufactured by Microsoft, the only way out is to use modified drivers or utilities from the manufacturer of the flash drive itself.
Hitachi Microdrive Driver
This driver was created by Hitachi, and its latest version can be downloaded from the company's website. The driver allows you to change the device type of a flash drive at the Windows level from a removable disk to a hard disk. Hitachi Microdrive is only compatible with 32-bit versions of Windows.
Device Instance ID
We connect the flash drive to the computer, go to the device manager, you can get to the manager in the following ways:
“Start” -> “Search programs and files” (WIN + R) -> enter devmgmt.msc or Right-click on the “My Computer” icon -> “Properties” -> “Device Manager” tab
Then in the list of devices we find the flash drive, double-click on the icon and then:
“Information” -> item “Property” -> look for and copy the line “Device instance code”.
In our case, the line looks like this:
USBSTOR\Disk&Ven_UFD_2.0&Prod_Silicon-Power16G&Rev_PMAP\12021152061E6C219001714008F&0
Now we can move on to editing the cfadisk.inf file
Editing the cfadisk.inf file
Open the cfadisk.inf file and edit the 25th line. We replace the line with the copied value, as shown in the figure, after “cfadisk_install,”.
Driver update
Now all that remains is to install the updated cfadisk.inf driver for the flash drive. We will update the driver there in the “Device Manager”, in the properties of the flash drive, select “Update driver” and then “Search and install the driver manually”.
After installing the driver, the flash drive will be recognized as a hard drive and you can create partitions on it.
Converting a flash drive into a hard drive using the utility - BooIT
The BooIT application operates in a similar way, only it does not replace the driver, but modifies the software installed on the flash drive - thanks to this, the system begins to “see” it as a hard drive. Using BooIT is simple.
First you need to select the flash drive in the “Devices” field of the main program window and click “Flip Removable Bit”.
Then you will need to remove the flash drive and insert it again. Now the flash drive should be defined not as a “Removable disk”, but as a “Hard disk”. If everything worked out, you can proceed to creating partitions on the flash drive.
Partitioning using Windows
You can split a flash drive into the required number of partitions using Windows tools.
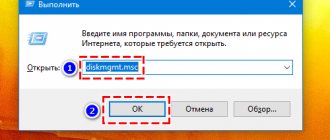
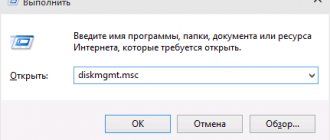
Select “Storage devices” in “Computer Management” or “Start” -> “Search programs and files” and enter the command diskmgmt.msc
Partitioning using the program – Acronis
We launch the program, select the flash drive in the “List of Basic Disks”.
Right-click on the flash drive and select “Split Volume” from the context menu.
Set the sizes of the new sections.
Partitioning using flash drive manufacturer utilities
Some well-known manufacturers of USB flash drives have special utilities that implement partitioning into several logical partitions. For example, Transcend has mFormat. However, this utility only works with some flash drive models and there is no guarantee of full compatibility with all common operating systems.
Thus, a simple and effective solution to the problem of dividing a flash drive into partitions is a matter of the future. Perhaps not so distantly, if the trend towards increasing the volume of flash drives does not stop.
Installing and downloading Windows OS
Creating, deleting and working flash drive partitions
Partitions on a flash drive are created and deleted by disk manager programs. The choice of a specific disk manager depends on its user. All modern disk managers can work with flash drives.
Access to flash drive partitions
Access to flash drive partitions in Windows OS is limited. The operating system does not “see” more than one partition on the flash drive. The working (accessible) partition of a flash drive in the operating system is classified as a logical disk or volume. Its main feature is the letter designation. If several partitions with letter designations are created on the flash drive, then the first of them will be selected as the logical drive. All other sections of the flash drive are empty words for Windows.
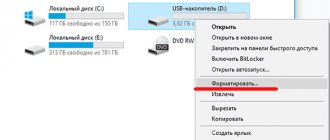
Formatting a partition
Sometimes you need to change the system when areas have already been created. Formatting causes data loss, so the user needs to move important files to a safe place in advance to avoid data loss. You can partition a flash drive in Windows 7, but if the Windows Was notable the Format error appears, it is better to use the MiniTool wizard.
- Select the USB area and “Format partition” in the action bar.
- Expand the file system list and select the one you want before clicking OK.
- When the main interface appears again, click “Apply” on the toolbar.
- Sometimes you need to convert a FAT / FAT32 partition to NTFS to save individual files larger than 4 GB. In this case, Windows reports that "the file is too large for the target file system."
- The MiniTool Partition Wizard will help you complete the conversion without losing data.
- You need to select the FAT/FAT32 partition on the USB drive and “Convert FAT to NTFS” from the action bar, and then click the “Start” button in the pop-up window.
- Also, sometimes you need to use the drive on your PS3/PS4 to play games that don't support NTFS. In this case, you need to convert the NTFS partition to FAT32.
Similarly, MiniTool Partition Wizard offers a way to convert NTFS back to FAT32 without losing data.
Additional Information
To conclude the article, there are some points that may be useful:
- Flash drives with multiple partitions also work on MacOS X and Linux.
- After creating partitions on the drive using the first method, the first partition on it can be formatted in FAT32 using standard system tools.
- When using the first method from the “Other methods” section, I experienced Disk Management bugs that disappeared only after restarting the utility.
- Along the way, I checked whether it was possible to make a bootable USB flash drive from the first partition without affecting the second. Rufus and Media Creation Tool (latest version) were tested. In the first case, you can only delete two partitions at once; in the second, the utility offers a choice of partition, loads the image, but when creating the drive it crashes with an error, and the output is a disk in the RAW file system.
And maybe this will be interesting:
Why not subscribe?
Distribution of new, sometimes interesting and useful, materials from the site remontka.pro. No advertising and free computer help for subscribers from the author. Other subscription methods (VK, Odnoklassniki, Telegram, Facebook, Twitter, Youtube, Yandex.Zen)
03/04/2018 at 19:40
Krch, divided in the 2nd way, Windows XP PE sees everything! Everything is working! Thank you for this really USEFUL! An article.
03/10/2018 at 20:41
Thank you, you helped a lot
12/16/2018 at 04:33
Add to the first method: Only an NTFS partition can be compressed; if the flash drive partition is in a different format (FAT32, exFAT) - the partition must be deleted, and then the necessary ones must be created. If you need it without uninstalling, you will need a third-party utility, for example MiniTool Partition Wizard.
12/16/2018 at 16:11
Good time. I divided the flash drive into 2 partitions (FAT32 and NTFS), and wrote Kaspersky antivirus to the partition with FAT32 using “Kaspersky Rescue Disk Maker”. As a result, I can’t boot from a flash drive, the error “an operating system wasn’t found” comes up, and I can’t write to the “Rufus” program, since “Rufus” wants to erase both partitions. Perhaps I'm doing something wrong? I would be very grateful for your help.
How to create 2-3 partitions with FAT, FAT32 and NTFS on a flash drive (external drive)
Question from a user
Is it possible to create several partitions with different file systems on a flash drive? The fact is that my phone only sees FAT32, but you cannot write files larger than 4 GB to this system. Therefore, I would like to make a universal option.
Good day.
Yes, almost any flash drive or external hard drive can also be divided into several partitions, just like a classic HDD on which you install Windows. True, for this you need to use a special one. utility in Windows - disk management (this operation is not available through “My Computer” or “Explorer”).
In this article I will show everything with examples (I think you can figure it out easily).
Diskpart disk assistant
Diskpart opens somewhat differently for different OSes. For Windows 10, open by pressing the Windows key and R (simultaneously), then enter diskpart in the pop-up window and press Enter. For Windows 7 and XP, open by clicking Windows, then select “Command Prompt” and “Run as Administrator”. For Windows 8 – Windows + X (simultaneously) and select “Command Prompt” (Admin). Before you divide the flash drive into partitions, you need to execute the command line, for which you press the Enter key after each transition.
Further operations with disks:
- Enter “disk list”.
- Then determine which USB key is.
- Enter select disk * (* denotes USB key) -> enter clean -> list part. Next, “create a primary partition” -> list part, and then enter select part 1 -> active -> enter format fs = fat32 label = 'Tabernus'.
- The process may take some time.
All steps in Diskpart are irreversible. It has been discovered that USB keys have different partition table settings, some USB software will not work with. You can use Windows Diskpart to reformat the USB key and partition it again:
- Open a command window (cmd).
- Enter diskpart.
- Enter the selected drive x, where x is the USB key.
- Enter format fs = fat32 label = Tabernus (the label is optional - the USB key is labeled as Tabernus in Explorer, etc.)
- The process may take a while, but USB now works to erase USB Tabernus.