UEFI boot is a new generation program that will speed up booting your computer and is similar in structure to BIOS.
BIOS is a pre-program (code built into the computer's motherboard). It runs before the operating system boots, checking the functionality of the computer and debugging the hardware (drivers). UEFI, unlike the usual BIOS, is a graphical interface that is flexibly programmed and really allows you to launch the OS faster.
The preprogram is located on top of the entire hardware of the computer, and its code, which is significantly larger than the BIOS in size, can physically be located anywhere - in a memory chip on the motherboard, on a hard drive or in network storage. Thanks to this, it resembles an operating system, only in a simplified version. When the computer starts, the UEFI service first loads, checking all the latest components, and then the operating system itself.
Benefits of UEFI
- OS loading acceleration;
- Russian language support;
- there are no problems with the use of large-capacity hard drives (2 TB and above);
- supporting multi-launch operating systems, their proper organization;
- visual monitoring of the condition of PC parts;
- convenient and human-friendly visual interface;
- The program microcode contains greater protection against viruses than the BIOS;
- like full-fledged operating systems, it has its own software and network storage.
As for UEFI Secure Boot, this is a pre-provided method for protecting against the launch of unlicensed code by developers. It does not allow virus programs to replace the bootloader, and when using Microsoft, it saves you from a pirated version of the OS. However, most often this mode is disabled by default, or for some reason users have to disable it themselves.
Currently, UEFI is presented as a separate part of the standard BIOS, but computers with motherboards are already being produced where the opposite is true - the BIOS is considered an additional module to UEFI.
What is Legacy Boot?
Legacy boot refers to the boot process used by the BIOS firmware to initialize hardware devices . Legacy boot mode contains a set of installed devices that are initialized as the computer performs a POST TEST during the boot process. Legacy boot will check for the presence of a master boot record (MBR) on all connected devices, typically in the first sector of the disk.
When it can't find the bootloader in the devices, Legacy switches to the next device in the list and continues to repeat this process until it finds the bootloader, and if not, it will return an error.
Difference between UEFI and BIOS
Ability to support GPT markup;
GPT partitioning was created specifically to make it less problematic to work with disks of 2 TB or larger. In addition, when setting up the operating system for the first time, you can split the disk into any number of partitions, which was previously impossible. The previous partitioning method - MBR is not compatible with uefi and working with it is only possible with the additional CSM (Compatibility Support Module) extension.
Modular architecture;
The shell module (not available on all laptops) “allows” the user to manage applications directly in UEFI mode. As mentioned, UEFI is like an operating system in its own right, even with support for network drivers. The specification of the program “allows” the use of drivers for UEFI using the OS, for example, if the main operating system does not have a network driver or does not work.
Built-in boot manager;
If you plan to multiboot, you do not have to install a specialized boot manager. You can independently add new sections to the menu, where the list of all disks and flash drives is located. Thus, it is possible to run the Linux kernel without using a bootloader or install both Windows and Linux on one device.
Secure Boot does not cancel this option for Windows 8 users. All devices have the ability to disable this mode, except ARM tablets, where Win 8 was installed as the standard OS. Protected mode prevents the use of unsigned code even while the operating system is running, so malicious Trojans will not penetrate either Windows or Linux. However, if an attacker has physical access to the PC, he can almost always replace the license keys with his own.
Other bootloaders
systemd-boot is very simple and provides a spartan looking black and white menu. There are more beautiful options if the soul asks for beauty.
rEFind is a very beautiful downloader. can be found here as a deb package. I use it on my laptop. Can create a boot menu automatically, without a config - simply by scanning files.
Clover. Allows you to set the native screen resolution, has mouse support on the loading screen, and different themes. The default theme is terrible, the xml config is unreadable, I couldn’t configure it.
Using UEFI to boot an operating system from a USB drive
Execution order:
- Go to the BIOS and in the Secure Boot item select Disable.
- In the OS Mode Selection item, select Uefi and Legacy boot (allow boot).
- After this, you can restart the BIOS - booting from USB is activated.
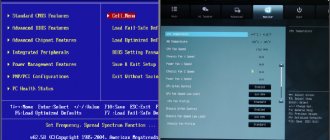
How to boot from a flash drive in Phoenix Award BIOS
This version of BIOS has this interface:
Algorithm for installing boot from a flash drive in Phoenix Award BIOS:
- Open Advanced BIOS Futures.
- In the Hard Disk Boot Priority parameter, set the value to USB-HDD.
- Under First Boot Device, select USB-CDROM.
- In the “Second Boot Device” parameter you need to set “Hard Disk”.
- Open the Integrated Peripherals menu. Opposite the keyboard and mouse (USB Keybord Function and USB Mouse Function) you need to set the values “Enabled”.
- Exit using the Esc key. You will be asked if you want to save your changes. To accept them, press the Y key.
Installing Windows UEFI
Installing windows via BIOS is fundamentally different from installing via UEFI. The first step is to create a bootable USB flash drive. One of the most suitable programs for such purposes is the Rufus 1.4.6 utility. It is free, does not require installation and therefore does not take up much space on your hard drive or removable media. What's important is that it is suitable for GPT hard disk partitioning and can work with the UEFI specification. The appropriate utility update can be downloaded from the official website of the developers.
We launch the utility and indicate the name of the flash drive intended for installation (you must first delete important files by clearing the memory). In the “File system” item, select FAT 32, then GPT (GUID Partition Table) as the partition scheme, system interface – UEFI. Check the box next to “Create a bootable disk using:”, select ISO Image next to it and specify the full path to the ISO image of the Windows operating system.
After entering all the described parameters, you can click on “Start” and the program will independently prepare the flash drive for loading the OS. The time taken for this process depends on the speed of your computer and the USB generation.
If you are not satisfied with the operation of the Rufus utility or have problems loading UEFI, you can use an absolutely similar program called WinSetupFromUSB.
Downloading is also available on the manufacturer’s website, and its name (translated as “Boot Windows from USB”) speaks for itself. A bootable flash drive is created in a completely similar way, since the programs have almost the same interface.
How to create a bootable USB flash drive for Windows
The algorithm is simple:
- Go to the official Microsoft website and download the official image of Windows 10 or Windows 11.
- Launch the Media Creation Tool and accept the terms of the license agreement.
- Check that you want to create installation media.
- Select a specific flash drive and click Next.
- If the device and USB ports are working properly, then after a while you will see the message “USB flash memory device is ready.” After this, the operating system can be installed.
We talked about how to upgrade to Windows 11 or install it from a flash drive in a separate guide.
Booting UEFI and preparing for installation
Setting up UEFI is similar to setting up the BIOS. Restart the PC, and as soon as it starts to boot, press the F2 key (or Delete, it depends on what motherboard is installed, you can only check it empirically). The control menu will open.
Press the F7 button and select the “Advanced” subsection. In the “boot” or “startup” tab, you need to select the “USB support” function and set the “Full initialization” item there.
In the “Secure Boot” tab, you should select (Windows UEFI Mode).
In the “Download” tab, select “Compatibility Support Module” and o (available). It will not be superfluous to click on additional links and find the line “boot device settings”, where you select “only uefi” (only uefi).
This precaution protects against the accidental use of media that does not support your specification. In the entry “booting from media (or storage devices)” you need o (both, but uefi first).
Now go back to the main menu and check the boot device priority. First, the flash drive is selected, then the hard drive. Save the specified settings by pressing the F10 button, then Enter and wait until the computer boots.
After completing all of the above, you can install the operating system in the usual way.
Troubleshooting an error that occurs in Windows 8.1
If, after installing Windows or after updating version to 8.1, a notification appears in the right corner of the monitor about incorrect secure boot adjustment.
On most computers, the problem can be solved by going to the uefi menu and turning on the “Secure boot” mode in the BIOS.
In the event that your BIOS version does not have an option to enable/disable secure boot, you need to download the update for version 8.1 from the official Microsoft web page. It is located there under the number KV 2902864 and is valid for both 32-bit and 64-bit systems.
After downloading and installing the update, your computer will restart and error notifications will no longer appear.
How does the computer boot?
Before we dive into what UEFI and legacy boot modes are, let's discuss how a computer boots. Understanding this will help clarify some points.
When you turn on your computer, it turns on the central processing unit, the key component of the computer that processes commands and what are called instructions.
However, at this stage of the boot process, no instructions are loaded into memory. Thus, the central processor switches to the system firmware, which contains its instructions for the boot process.
The firmware code initializes the power-on self-test (POST) and configures all connected peripherals. After a successful check, the firmware boots the storage devices and checks for the presence of a bootloader. The firmware then switches instructions to the bootloader to handle the boot process.
At this point, a boot loader such as LILO and GRUB takes control, loads the system kernel into memory, and initializes the necessary processes.
As mentioned, firmware helps handle hardware initialization during the boot process. This firmware is commonly known as BIOS or Basic Input Output System.
How to disable UEFI
If you do not have Windows 7-8-10, but XP or Ubuntu, UEFI mode may cause problems when starting the OS from a disk or flash card. The best solution would be to disable this mode.
UEFI disabling algorithm:
- Go to the computer's BIOS. If you plan to disable UEFI in Windows 8 or 8.1, you can click on “Restart” in the “Start” menu and select “UEFI Software Settings” in the additional options. This is the most convenient option - the laptop will start in the required settings.
If the operating system version is not suitable, enter the BIOS using F2 or Delete, as suggested above. There may be other options for keys; most often, the required button is indicated at the bottom of the start screen when you turn on the PC.
- Open the Boot tab, then Secure Boot and find the OS Type sub-item. There you need to specify “Other OS” (other OS) and save the settings by pressing the F10 key. Sometimes you may need to additionally disable the safe startup parameter (the “disabled” position).
The described instructions are intended for ASUS brand laptops, but for other brands the algorithm is the same, the difference is which key needs to be pressed when starting the computer.
Disabling Secure Boot on motherboards
The desktop motherboard market is quite conservative and the clear leaders are 2 companies: Asus and Gigabyte. They supply more than half of all equipment, so it is most rational to consider methods for deactivating Secure Boot in the context of these manufacturers. In any case, the third and fourth places have long been occupied by MSI and ASRock - the first four are entirely made up of Taiwanese companies. Bottom line: there will still be no fundamental differences in the disabling instructions and most users will find below exactly what they are looking for.
Note that you can switch directly to UEFI in some cases directly from Windows (from version 8 and later). To do this, try the following:
- On the desktop on the right, call up the sliding panel.
- Then follow the path: “Settings” => “Changing settings...” => “Update and...” => “Recovery”;
- In the window that appears, find the option to reboot the system and set this line to “UEFI Settings” or “UEFI Firmware Settings”;
- Then click on “Reboot” and UEFI should start automatically.
How to disable Secure Boot on Gigabyte motherboard?
After logging into UEFI (by pressing F12 before starting the OS), proceed as follows:
- go to the “BIOS Features” tab;
- set the “Windows 8 Features” criterion to “Other OS”;
- for the “Boot Mode Selection” criterion - “Legacy only” or “UEFI and Legacy” (there is not much difference between them);
- for the criterion “Other PCI Device ROM Priority” – “Legacy OpROM”.
After all, you need to record the changes, that is, press F10 => “OK”.
Asus motherboards and laptops
Let us immediately note that most often on motherboards of this particular manufacturer an error appears when loading the OS: Invalid signature detected. Check Secure Boot Policy in Setup. In most cases, to fix the problem you should turn off Secure Boot, and to do this you need to:
- go to UEFI - press F2, Delete or the Fn+F2 key combination before loading the OS;
- on the home screen, press F7 (Advanced Mode), and then go to the “Boot” menu => “Secure Boot Menu”;
- specify the value “Enabled” in the “Secure Boot State” line, and “Other OS” in the “OS Type” line;
- go back one level to the “Boot” menu => “Compatibility Support Module (CSM)”;
- set the “Launch CSM” line to “Enabled”, and the “Boot Device Control” line to “UEFI and Legacy …” or “Legacy OpROM …”, and the “Boot From Storage Devices” line to “Both Legacy opROM first” , or “Legacy opROM first”;
- after that, click on F10 and save all changes, and then check the correctness of the settings made.
Specifically for Asus laptops, the algorithm will be as follows:
- go to UEFI;
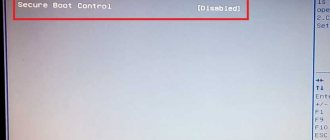
- go to the “Security” tab;
- find the line “Secure Boot Control”, specify the value “Disabled” in it;
- go to the “Boot” tab;
- Find the line “Fast Boot”, set it to “Disabled”, and in the line “Launch CSM” to “Enabled”.
How to tell if Safe Startup is enabled
This option is suitable for the eighth and tenth versions of Windows. Press the Windows + R buttons and in the resulting window, enter the command “msinfo32” (without quotes). Press the Enter button.
In the window that appears, select the “System Information” section on the left, and find the “Secure Boot Status” line on the right. The Value column shows whether the feature in question is enabled or disabled.
Possible errors when converting a partition
If you receive the error "MBR2GPT cannot find the OS partition(s) for disk 0" when you run the conversion command, the Windows Recovery Environment may not be configured on the system. To check the status of its service, run the command:
reagentc/info
If you receive a "WindowsREStatus: Disabled" response message, you need to enable the Recovery Environment service. To do this, run the command:
reagentc /enable
The Windows Recovery Environment will be configured and enabled. Now try converting the style again.
Also, when running the conversion command, you may encounter the errors “MBR2GPT Disk layout validation failed for disk 0” or “cannot find room for the efi system partition”.
They occur when the MBR2GPT utility encounters a partition layout error when checking for convertibility. In general, to launch the utility, the following conditions must be met:
- maximum 3 main sections;
- there must be no logical/extended partitions.
If there are more than 3 main partitions, then you can merge them without losing data. The same can be done with logical/extended partitions.
Additional Information
- The utility, updated to the second version, supports 32-bit platforms, although it was created for 64-bit ones.
- The functionality looks like tables of values about the state of computer components, boot services and the so-called runtime - a set of tools for working with the OS.
- EFI extensions are also installed from non-volatile sources - from a flash drive or removable HDD.
- For “machines” with pre-installed Windows 8, it may be difficult to switch to Linux - their distributions must have signed (certified) crypto keys from the manufacturer.