Now I will show you how to check your hard drive for errors in Windows 10 and other versions of this OS (Windows 7, 8), on any computer: PC and laptop. Anyone new to computers can use this step-by-step instructions.
The method is suitable for any drive: HDD, SSD or flash drive. Over time, bad sectors accumulate on everyone, and if we are talking about the system disk, then this ultimately leads to unpleasant consequences: some folders/files/local drives do not open or even display, programs do not start and the computer as a whole begins to slow down!
Don’t bring the situation to more complex corrections, including calling an expensive specialist, when everything you need can be done according to my instructions, even for a beginner, right now.
Performing hard drive diagnostics in Windows 10
Diagnosing a hard drive is required in order to find out detailed information about its condition or find and correct possible errors. The Windows 10 operating system provides several system tools for performing this procedure. In addition, various third-party software has been developed that allows you to check the quality of the HDD. Next we will examine this topic in detail.
Victoria
This program is one of the most popular utilities for checking the health of your hard drive. Its convenience lies in the fact that, if necessary, Victoria can be launched, even if there is no way to log in to the system - a special boot disk is used for this. We'll see how Victoria works in the Windows environment. Therefore, first let’s get acquainted a little with the program interface:
- “Standard” tab – contains the main characteristics of the hard drive: model, number, size, number of cylinders, etc.
- “SMART” tab – view the current state of the hard drive.
- “Tests” tab – contains a number of tests to check the condition of the media surface.
Now let’s figure out how to work with these tabs in order to get complete information about the performance of the hard drive and, if necessary, fix bad sectors:
- Go to the "SMART" tab and click the "Get SMART" button.
- Look at the identified indicators - if your status is “Good”, then the disk is fine.
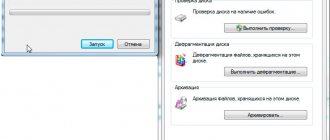
- For a full test, go to the “Tests” section and click the “Start” button.
- Wait until the scan finishes.
Ideally, all sectors should be gray or light gray. If after testing you see a lot of red and orange rectangles, then this is a reason to think about the condition of the hard drive’s surface.
If you find blue sectors labeled “Err x”, then run the check again, oh.
During a repeat test with the “Remap” function activated, the program will try to restore bad sectors and correct all errors. You can learn more about this procedure from our article about
We diagnose the hard drive in Windows 10
Some users wondered about checking the component in question because it began to make characteristic sounds, such as clicks. If such a situation arises, we recommend that you refer to our other article at the link below, where you will learn the main causes and solutions to this problem. We move directly to methods of analysis.
Method 1: Special software
A detailed check and correction of hard drive errors is easiest to do using special third-party software. One of the representatives of such software is CrystalDiskInfo.
The capabilities of CrystalDiskInfo are enormous, so we suggest that you familiarize yourself with all of them in our other material at the following link.
There is also other software on the Internet designed specifically for checking HDDs. Our article at the link below talks about the best representatives of such software.
Method 2: Windows System Tools
As already mentioned at the beginning of the article, Windows has built-in tools that allow you to complete the task. Each of them works according to different algorithms, but performs approximately the same diagnostics. Let's look at each product separately.
Checking for errors
The properties menu for logical hard drive partitions has a function for finding and fixing problems. It starts like this:
After the procedure is completed, the found file system problems will be corrected, and the operation of the logical partition will be optimized.
Check Disk
Scanning media with the FAT32 or NTFS file system is available using the Check Disk utility, and it is launched via the Command Line. It not only diagnoses the selected volume, but also restores bad sectors and information, the main thing is to set the appropriate attributes. An example of an optimal scan looks like this:
Repair-Volume
It is most convenient to manage certain processes and system operations through PowerShell - the Command Line shell. It contains a utility for HDD analysis, and it starts in several steps:
This brings our article to its logical conclusion. Above we talked about the main methods for diagnosing a hard drive. As you can see, there are a sufficient number of them, which will allow you to carry out the most detailed scanning and identify all the errors that have arisen.
Source
Broken sectors: what are they and where do they come from?
To begin with, it is worth touching on the main issues of the article under consideration and determining what a “bad sector” is and what danger it poses to the user.
The specifics and structure of the operation of information storage devices are quite complex, so going into the details of their functioning is not the best choice, but should focus only on the main aspects.
So, a “sector” is a specific unit of information storage on a hard drive or solid-state drive, which ensures the safety of data.
During the process of using the HDD/SSD (or immediately during production), some of the sectors may fail, which will lead to their inaccessibility for both reading and writing information.
Such sectors are defined as “broken” or “bad blocks”, and accordingly, the greater their number, the more serious the damage to the disk and the greater the risk of information loss.
These sectors were divided into two categories:
- This physical
, that is, the damage is hardware in nature, acquired as a result of the following possible reasons:- Damage during assembly of the device in production;
- Damage due to mechanical impact;
- Damage due to exposure to high temperatures.
- These are logical
bad sectors that are the result of software influence on the disk structure. There are a great many reasons for this development of the situation, for example, viral activity, or more likely, incorrect work with the HDD/SDD and the computer as a whole on the part of the user.
That is, what actually disabled the sector without the possibility of its restoration.
How to find out the status of your hard drive using built-in tools in Windows 10
As you can see, Windows 10 evaluates the condition of the hard drive as normal: All drives are working fine. OK.
But in fact, if you now run a special program for diagnosing hard drives, CrystalDiskInfo, you will see that the condition of the hard drive is C (Alarm!) and it is full of unstable sectors that the built-in firmware of the hard drive could not fix.
The Victoria program will say the same thing.
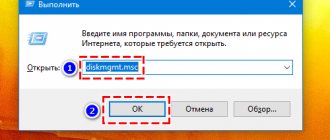
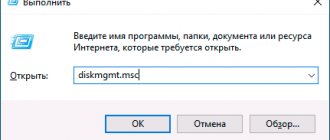
How else can you find out the status of your hard drive using the built-in tools of Windows 10 or how to use the disk check utility (chkdsk). Running disk check from the GUI
Windows 10 has a disk check utility called chkdsk and you can run it directly in the graphical interface or using the command line. After checking, the utility will issue a full report on the state of the file system of your operating system installed.
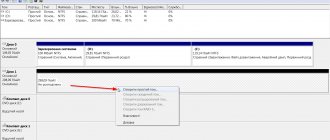
Go to the Computer window and right-click on the drive (C:), select “Properties”
Go to the “Service” tab and click on the “Check” button
The disk is being checked for errors.
The disk has been successfully verified. No errors found.
Click on "Show details"
The Event Viewer window opens. You can view the scan results on the “Details” tab or double-click the left mouse on the “Details” link
In the window that opens, you can view the result of the check. If you want, click on the "Copy" button and paste the result into a text file.
Windows checked the file system and found no problems.
Run chkdsk from the command line
The next time you boot, drive (C:) will be checked for errors.
Source
Increasing the speed of an SSD hard drive by 10 times video
https://youtube.com/watch?v=NnVN80ZkkMA%3Ffeature%3Doembed
The answer to the question of how to test an SSD disk for errors and performance will be the use of a number of special diagnostic programs that I described just above. Most of them have fairly simple functionality, allowing you to monitor the status of your SSD drive in real time and, if necessary, perform additional checks. If you are the proud owner of such disks, then use the functionality of one of the described programs to regularly monitor the condition of your device, this will allow you to timely monitor its condition and protect your files from unwanted losses.
1. Optimization and defragmentation in Windows 10
Traditional SATA hard drives may have largely given way to much faster SSDs.
But they're still very popular and remain an affordable way to store things like images, videos, and other simple file types.
SSDs work a little differently, and while they never need to be defragmented (since fragmentation is related to where the data is physically stored on the drive, which is not a factor for SSDs), they do sometimes need optimization.
If you feel like your hard drive (not SSD) is slowing down, you should check how fragmented it is.
You can do this using Windows 10's built-in defragmentation tool (type "defrag" into the Start menu, then navigate to "Defragment and optimize drives"), then select the drive and click Analyze.
If fragmentation is detected, click Optimize (formerly called Defragmentation) for that drive.
We actually found that the free Defraggler app does a better job of detecting and reducing fragmentation, but not everyone wants to install additional apps when the functionality is built right into the OS.
You can also optimize your SSD using Windows 10's defragmentation and optimization tool, although Windows 10 should take care of this automatically.
Checking for errors using standard tools
This method is equally effective for Windows Xp, Vista, 7, 8 and 10. Required:
- Go to “My Computer”.
- Right-click on the desired drive and select “Properties”.
- In the window that opens, select “Service” and click “Check.”
- After this, you need to check 2 checkboxes: Automatic correction of system errors; Checking and restoring the system sector;
- Click "Launch".
If the notification “Windows cannot scan the drive that is currently in use” appears, click “Schedule scan”.
So now we do a reboot, and when the system boots, it will run a performance test through the BIOS and fix media errors. Its duration can range from 2-3 minutes to an hour, depending on the characteristics of the hard drive and its capacity.
Use HDD manufacturer tools
Most major hard drive manufacturers provide free, reliable tools for monitoring hard drive health and performance.
The first step to determining which one to use is, of course, knowing the brand of your hard drive.
If you know the brand of your hard drive, you can skip this part.
If not, press the Win key, type "Device Manager" and click it when it appears in the search results.
In Device Manager, expand the Disk Devices checkbox and make a note of the model number of your hard drive.
Then enter the model number into Google to get results that will tell you the brand of the hard drive.
After that, go to the manufacturer's support page and look for the hard drive utility.
To help you out, here are links to the relevant download pages of some of the largest hard drive manufacturers:
Each of these tools works a little differently, but most importantly, they each have diagnostic features that let you check the health of your hard drive.
Windows CHKDSK tool
Windows CHKDSK Tool is a built-in Windows tool that will scan your drive to find system errors and bad sectors and show if there is any problem with your hard drive.
It will scan and fix problems that it can fix, and will tell you if there is a more serious problem that it can't fix.
You can use this tool to both check the health of your hard drive and fix bad sectors and errors if possible.
To use CHKDSK, right-click the drive you want to check for errors and select Properties.
Next, click on the “Tools” tab and then click on the “Check Now” button.
A dialog box will open with two options to fix errors and scan bad sectors.
You can select these options if you want to fix errors and bad sectors, otherwise, you can simply click Start to get a basic report of hard drive problems (if any).
This tool is very simple and is focused on finding system errors and bad sectors.
It will simply tell you if there are any serious problems and nothing more, so only use it as a basic hard drive check and fix tool.
Software check
Of course, the above method is not always effective. Therefore, we will look at a number of programs such as Victoria. They will allow you to conduct the most thorough analysis of the condition of the hard drive on your computer or laptop.
Victoria
A utility for diagnosing and testing hard drives. It will help you not only detect problems in its operation, but also eliminate them. The program has a number of advantages and useful functions:
- Reads the hard drive passport and provides detailed information;
- 5 diagnostic modes;
- Eliminates crashes;
- Displays unstable areas;
- Hides defects;
- Evaluates media performance.
Victoria is one of the best today. It can solve problems with bad sectors and quickly bring any type of hard drive into working condition.
Couldn't solve the problem? Contact a specialist for help!
HDD Regenerator
One of the most effective programs for assessing the status and troubleshooting drives. It makes it possible to obtain information about the current SMART status of the selected device and complete control over it. Among the main features are:
- Simple and intuitive interface;
- Complete security;
- NTFS and FAT support;
- Pre-scan mode;
HDD monitoring in real time; That is, with the help of a regenerator you can test the hard drive as efficiently as possible.
TestDisk
Designed to determine the status and test drives. In addition to simple diagnostics, it also detects bad sectors and corrects any errors found. Its main functions include:
- Perform an analysis of the current state of the hard drive;
- Search for bad sectors;
- Recovering deleted partitions;
- MFT fix;
Checking external hard drives; In addition, the utility has a number of functions that are related to the recovery of deleted files.
Hitachi Drive Fitness Test
An excellent program designed to find and fix problems on drives. It is universal, since diagnostics of any drives can be carried out. With its help, you can very quickly find out the current position of the hard drive, as well as obtain additional information about it. Includes:
- Quick but thorough check;
- Support for all components;
- Monitoring;
- Data statistics;
This utility is suitable for all devices and can even be used on a netbook.
Seagate Seatools for Windows
Used to check and test the status of the hard drive. She finds any problems and failures.
- The utility can fix:
- Equipment incompatibility;
- HDD file system violations;
- Errors in installed drivers;
- Viruses and malware that infect the file system;
In addition, it provides complete information about the media and all related indicators. According to the developers, this utility is incredibly effective at independently correcting minor problems, SSD and HDD errors, and is capable of completely restoring their functionality.
So, now you have complete information on how to determine whether your hard drive is working properly, and how to solve the problems associated with it yourself. Choose the option that suits you best or the one you like and act!
Video: checking the hard drive using standard tools
https://youtube.com/watch?v=Gj7WTv-tmC8%3Ffeature%3Doembed
Use WMIC
WMIC is a command line interface that allows you to perform many administrative tasks, including checking the health of your hard drive.
It uses the SMART (Self Monitoring, Analysis and Reporting Technology) feature of the hard drives to see the status and make a simple conclusion like "OK" or "Fail" etc.
This is still a very simple command that offers very little information, but it is a fast and built-in Windows feature.
To test your hard drive using WMIC, press the Win+R buttons to open the Run dialog box. Type "cmd" and click "OK" to open the Windows Command Prompt.
and press "Enter". When the WMI interface is ready, enter:
and press "Enter" again. You will see the status of your hard drive after a short delay.
Main types of hard drive tests: what they show
Self-diagnosis
Self-diagnostic tests are carried out by built-in means of the storage devices themselves. They are supported by the vast majority of modern hard drives and allow you to obtain reliable and detailed information about the current state of the device.
Self-diagnosis does not affect information stored on disks. During testing, you can use the drive as usual, but the computer may slow down.
A quick self-test involves checking the condition of the main components of the device: spindle, heads, electronics, etc. This test takes a few minutes.
During advanced self-diagnosis, the disk surface is additionally scanned.
Surface test
Scanning the surface of disk devices is carried out using different methods:
- reading;
- records;
- recording and subsequent reading;
- reading – writing – reading, etc.
Each technique has its own advantages, disadvantages and features. Some of them are safe for the stored data, and some destroy it.
Read testing verifies that hard drive sectors are accessible and completely safe for the information on it. However, it is not very accurate - it may miss existing defects.
write test not only checks, but also corrects “bad” sectors by reassigning them to the reserve area. Compared to reading, the writing method examines the surface of the HDD more thoroughly and deeply, so hidden defects, if any, are almost always detected. However, after such a procedure, no user information remains on the drive. Don't forget to create a backup copy before starting the scan.
If the write test reveals defective sectors, it is recommended to repeat it.
write-followed-read test enhances the effectiveness of the previous method.
read-write-read technique is intended to control error correction. During testing, the program reads data from the sector, then writes it back and compares both versions. If they are identical, the error is considered corrected correctly.
The last two tests intensively load the disk under test and take several times longer than just reading or writing. It is not recommended to run them for preventative purposes and to assess the condition of working drives.
Interpreting the results of scanning the HDD surface usually does not cause difficulties, since it is clear and obvious.
The screenshot below shows the result of the reading test in HD Tune. The array of red areas at the beginning of the disk and its area relative to the entire surface leave no doubt that this device is unlikely to be restored.
And this screenshot shows an almost healthy drive. Several unreadable blocks in the middle part may well be replaced from the reserve. If the red area does not grow, the disk is suitable for further use and the presence of damage will not affect its performance in any way.
Head drive test
This technique is designed to study the acoustic properties and heating level of HDDs under high load.
The head drive test is usually performed to evaluate the noise volume after changing AAM settings, and also as a stress load when checking the stability of the device. The results are assessed subjectively and based on temperature indicators. If they are unsatisfactory, you will have to sacrifice performance by slightly reducing the speed of the heads. This will improve your acoustic comfort and preserve the health of the disc for a long time.
Use a third-party hard drive health test tool
You can also use a third-party hard drive health test tool, which will offer much more information than just good or bad health.
These tools use the same "SMART" feature of hard drives to extract data as WMIC.
However, they provide you with all the details rather than just showing you a "good" or "bad" status.
CrystalDiskInfo
For this purpose, CrystalDiskInfo is a really simple yet powerful tool.
This is a very easy to use free tool that offers all the information you need.
For example, such as temperature, health status, hard drive type and characteristics, as well as other attributes such as read/write error rate, spin-up time, etc.
The standard tool comes as a 4MB ".exe" file and its installer contains advertisements, so make sure you use the "Custom Installer" option and uncheck the side tool (advertising).
Once installed, all you have to do is launch the program and you will see all the information about your hard drive(s) on the main interface.
The tool will also check the status of your hard drive every 10 minutes (by default) and alert you if something is wrong.
What can cause errors on a hard drive?
Errors on the hard drive can occur for various reasons. For example, while working on a computer, the electricity suddenly went out, and some files or programs were open. Additionally, some users turn off the computer by pressing the power buttons rather than by shutting down. Such actions are equivalent to a sudden power outage. In this case, the computer shuts down incorrectly. In addition, there are a large number of reasons why errors appear on the hard drive.
How to check the health of your Windows 10 hard drive
Due to the high price of solid-state drives, all users are forced to use regular hard drives. And in most cases, after many years of using a hard drive, no one pays attention to its condition. And the state of the hard drive begins to interest users only when problems begin. Therefore, it is worth checking the hard drive for errors at any suspicion.
In this article, we will look at how to check the status of a Windows 10 hard drive using the built-in tools of the operating system and actually selected for you the best programs for checking your hard drive for errors. Before choosing a program, you should evaluate the pros and cons of programs for checking the status of the hard drive.
Data security comes first!
Physical memory contains hundreds of thousands of files and folders that are processed by the OS and users. Nobody wants to lose important information. And if your PC is reliably protected from viruses and spyware attacks, this does not mean that you can relax.
Over time, the disk becomes “filled” with bad sectors, threatening the integrity of the data. They need to be identified and eliminated in a timely manner. Now I will share with you a couple of secrets that will help keep the HDD in optimal condition. You will learn to use the built-in Windows tools - they are quite enough to fix most problems. No additional software installation is required.
If your hard drive is making strange sounds, then the situation is quite unpleasant, and I advise you to take more drastic measures to correct the situation. I will tell you about them in one of the future publications.
Programs for checking the status of the hard drive
All programs from our article can be found in the table below. If you want to get acquainted with programs for checking the status of your Windows 10 hard drive, then read the article further.
| Program | License | Russian language | Smart analysis | Error correction |
| Victoria HDD | Free | No | Yes | Yes |
| HDDScan | Free | No | Yes | No |
| CrystalDiskInfo | Free | Eat | No | No |
| Hetman Partition Recovery | Trial | Eat | Yes | No |
| HD Tube Pro | Trial | No | No | No |
| Western Digital Data LifeGuard Diagnostic | Free | No | Yes | Yes |
Before choosing a program, we recommend paying attention to the program’s capabilities. And also, if necessary, look for the presence of the Russian interface language.
Afterword
Today we took a look at two utilities for monitoring the status of hard drives. I would like to say that each one copes with its task exactly as much as the developers intended. One (HDDlife) has a laconic design coupled with a necessary and sufficient set of functions to determine the health status of the disk, and the other (HDD Control 2) is a comprehensive, but not always my favorite because of this, tool for working not only with external, but also internal filling of the hard drive.
What will you choose? This is a personal matter for everyone. I would recommend having the first one in your arsenal, and seriously thinking about the second one. However, our mission – to provide useful information – has been completed, which means it’s time to say goodbye. As always, we will be glad to hear your additions, questions, feedback and so on. Write in the comments.
Well, yes, of course, don’t forget about the article “Purchasing a hard drive: “Selection criteria” or “What to rely on so as not to make a mistake”
PS. Thanks to team member 25 KADR for the existence of this article
Subscription:
We are in social networks:
The best programs to check your hard drive
As in all cases, it is possible to use both built-in operating system tools and third-party programs to check the status of the hard drive. Here we have collected for you the best programs for checking your hard drive.
Victoria HDD
Victoria HDD is the most popular program for checking your hard drive for errors. It has really great capabilities and even allows you to correct errors. It is possible to download the Russian version of the program on the Internet.
How to work with the Victoria HDD program
HDDScan
HDDScan is a small free utility that allows you to check your hard drive for errors. It only allows you to check drives for errors, but you won’t be able to correct these errors right away, which is the main disadvantage.
Instructions on how to use HDDScan
CrystalDiskInfo
CrystalDiskInfo is a powerful tool for checking the status of hard drives for errors. All data is displayed in a detailed report. The program is able to find sector errors and immediately suggests ways to eliminate them.
Hetman Partition Recovery
The Hetman Partition Recovery program allows you to recover data from damaged logical partitions, and also allows you to recover damaged files. Well, of course, it is possible to check the status of the hard drive.
HD Tube Pro
HD Tube Pro is a powerful tool that allows you to check the status of your computer's hard drive and more. It is possible to check not only HDD drives, but also SSD drives. The program also eliminates software errors that have arisen.
Western Digital Data LifeGuard Diagnostic
The free Western Digital Data LifeGuard Diagnostic can do a standard and time-consuming test. It has a simple interface, but the downside is the lack of Russian interface language.
In this article, we looked at the best programs for checking the status of a hard drive and actually how to check the status of a Windows 10 hard drive. If you don’t know English well, choose programs for checking your hard drive in Russian.
Write to us in the comments whether you have checked your disk for errors.
Source
What to do with bad sectors
This is perhaps the most logical question when problems arise in the operation of information storage devices.
As already indicated above, if there are physical bad sectors, it is simply not possible to restore their functionality.
Yes, of course, there are a huge number of specialized companies that offer everyone in need qualified assistance in restoring the functionality of the disk.
But, for the most part, we are talking about logical sectors, since physically failed blocks will remain so.
Therefore, the only option is to limit the load on the disk and not delay in transferring the necessary information to another disk. But you can and should work with logical sectors.
Assessing the condition of a hard drive: how many years will it last?
Perhaps this is one of the most popular questions asked by all users who are encountering problems with their hard drive for the first time (or who are thinking about the safety of storing their data). Everyone is interested in the time it takes for the disk to work until it stops completely. Let's try to predict.
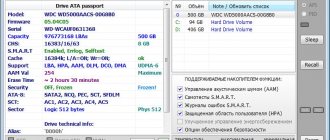
Therefore, in the first part of the article, I decided to show a couple of utilities that can receive all the readings from the disk and analyze them independently, and give you only the finished result (in the second part of the article, I will provide utilities for viewing SMART readings for independent analysis).
Method number 1: using Hard Disk Sentinel
Hard Disk Sentinel
What is SMART storage devices and how to read it
SMART is a technology for self-checking the health of drives, which includes an algorithm for predicting their viability and failure time.
SMART monitors the disk status using several dozen parameters and displays the results in the attribute table. Some attributes are included in the analysis set of any HDD, some are optional.
Among the attributes there are critical ones, changes in which may indicate the imminent failure of the device, some are important, and there are simply informational ones, showing, for example, the number of on-off cycles.
This is what a SMART HDD looks like in Hard Disk Sentinel:
Critical attributes include such attributes as (the list is incomplete):
- Reallocated Sectors Count. It displays the number of unreadable sectors remapped. If the attribute value is greater than zero, the disk requires increased attention, and if the indicator increases, its rapid failure is very likely.
- Raw Read Error Rate. Records the number of errors when reading from the drive. A non-zero value indicates surface defects or problems with the read/write heads.
- Spin-Up Time. Shows the time it takes for the disk spindle to spin up until it reaches operating speed. An increase indicates wear or mechanical problems.
- See Error Rate. Displays the number of read/write head positioning errors. A non-zero reading may indicate mechanical problems, surface defects, or that the disk has been subjected to overheating, shock or vibration.
- UDMA CRC / SATA R-Errors Error Count. Shows the number of errors during data transfer between the drive and the host. A value other than zero indicates defects in the interface cable or connection connectors.
A complete list of SMART attributes is given on Wikipedia, so it is not necessary to know them by heart. In addition, reading utilities can analyze the indicators themselves. If the value is normal, the attribute line shows “ OK ”, “ Pass ”, a green or other neutral color icon. Indicators with a moderate deviation from the norm are most often marked with the word “ Warning ” or yellow , and bad indicators with “ Failed ”, red or icons with an exclamation mark .
This is what SMART looks like in the Victoria program. The “Health” column contains health indicators - colored dots, and the “Raw” column contains the numeric values of the attributes:
A high probability of an imminent disk failure is indicated by the “Failed” indicators next to critical attributes. If the latter are marked as “Warning”, the device requires constant monitoring using monitoring programs and urgent data backup.
Below are three free, portable utilities with SMART analysis. They can be launched from a USB flash drive under Windows:
- Victoria
- HDDScan
- CrystalDiskInfo
How to view SMART readings
If previous utilities independently assessed the condition of the disk based on SMART data, then the utilities below will give you more freedom and data for independent analysis.
Method No. 1: using CrystalDiskInfo
СrystalDiskInfo
An excellent free utility for viewing the status and SMART readings of a hard drive (SSD drives are also supported). What’s so attractive about the utility is that it provides you with complete information about the temperature, technical condition of the disk, its characteristics, etc., and some of the data comes with notes (i.e., the utility is relevant for experienced users who themselves know “what-is- what” and for beginners who need a hint).
For example, if there is something wrong with the temperature, you will see a red indicator on it, i.e. СrystalDiskInfo will inform you about this.
CrystalDiskInfo main window
The main window of the program can be roughly divided into 4 zones (see screenshot above):
As an example to the above, I will give a screenshot that shows two disks: on the left - with which everything is fine, on the right - which has problems with reassigned sectors (technical condition - alarm!).
As a reference (about reassigned sectors):
when the hard drive detects, for example, a write error, it transfers the data to a specially designated spare area (and this sector will be considered “reassigned”). Therefore, on modern hard drives you cannot see bad blocks - they are hidden in reassigned sectors. This process is called remapping, and the remapped sector is called remap.
The higher the value of reassigned sectors, the worse the condition of the disk surface. The "raw value" field contains the total number of reassigned sectors.
By the way, for many disk manufacturers, even one reassigned sector is already a warranty case!
Then you will see the temperature program icon next to the clock in the tray. In general, you can now be more confident about the condition of the disk.