- 123shared
- 2Facebook
- 116Twitter
- 5VKontakte
- 0Odnoklassniki
A front panel with audio and USB ports is an integral part of any modern computer. This is a very convenient thing that allows you to connect removable media, headphones or a microphone without unnecessary movements. However, it is often with the front panel that problems arise, as a result of which the sound stops working and you can no longer use the computer as usual. In this article we will try to understand the possible causes of such malfunctions.
Before you start troubleshooting problems with the front headphone and microphone jacks, you need to make sure that all drivers are installed correctly and the sound is working properly on the back panel of the computer. If there is no sound when you connect headphones to the back of the system unit, then the problem is more global and, therefore, requires a different approach to the solution and a separate conversation. We will devote this article entirely to the front panel.
Why doesn't the sound on the front panel work?
We begin diagnostics by remembering at what point the inputs stopped functioning. For example, if the computer was only recently assembled and you have never used headphones with a microphone, then perhaps during assembly the connectors were incorrectly connected (or not connected at all) to the motherboard, i.e. The front panel is simply not connected properly. If the panel worked properly before, then try to determine the action after which the problems probably began. Perhaps some settings were made in the Control Panel or BIOS. If nothing comes to mind, follow the recommendations below.
How to check if the microphone is turned on on a laptop and PC
Not every person knows how to check the operation of the device. The easiest way is to call a friend via messenger and ask him to evaluate whether you can hear you normally. But this method is not suitable for everyone.
If you can't contact anyone, do the following:
- Go to your control panel.
- Find the "Sound" category.
- Click on “Record”.
- Find your headset in the list.
- Say something.
- Check to see if the opposite indicator fluctuates.
Front Panel Configuration in BIOS
Sometimes it happens that the front panel works according to the old AC'97 standard, but the motherboard provides the new High Definition Audio specification. By the way, both connectors are similar, and the user may not notice this discrepancy. At the same time, no problems should arise when connecting a panel with AC'97 to a motherboard with High Definition Audio. True, in some cases you will have to change the operating mode through the BIOS.
We go into the BIOS by pressing the F2 or DEL key when booting the computer. Next, go to the “Advanced” section and look for the “Onboard Devices Configuration” item. Just below is the “Front Panel Type” parameter (it can also be called High Definition Front Panel Audio or Legacy Front Panel Audio). Switch it from the HD Audio position to the AC97 position. If your front panel uses the HD Audio standard and the BIOS is set to AC97, then switch back.
Some motherboards do not provide the ability to change the operating mode of the front panel, but only allow you to disable or enable the sound controller. The Onboard Audio Function parameter (may have a different name) is responsible for this function, providing only the “Enabled” and “Disabled” values. In such a situation, you do not need to reconfigure anything in the BIOS, and the sound should work without additional manipulations.
How to activate the microphone in Skype, Odnoklassniki, VK, Discord, Viber, games
To operate the device in applications such as Skype, Discord or Viber, you just need to call someone. The microphone will be detected on its own, you won’t have to do anything additional. If you need to check its operation, find the corresponding item in the settings and select the desired headset from the list.
In VK and Odnoklassniki, the first time you use it, you should click on “Allow” when the resource asks for access to the headset.
To activate the recording device in games, you need to go to the settings and find which key is responsible for this action.
Why don't my headphones transmit sound through the front panel?
There may be several reasons why there is no sound in the headphones.
- The device was detected incorrectly. To resolve the situation, you need to select the required device in the “Sound” section;
- The sound is reproduced in HD standard when the AC-97 connectors are used. You can fix the problem by switching the sound output method in the BIOS or deactivating the recognition of connectors on the front audio device in the settings;
- no connection of front connectors;
- missing or installed incorrect drivers.
How to connect and use a microphone for karaoke on a PC and laptop
To do this, you need to purchase a switch from jack to mini-jack on the radio market. You need to connect a karaoke headset to one end, and connect the other to the connector of your computer or laptop.
After this, adjust the volume and turn off the gain completely using the settings described above.
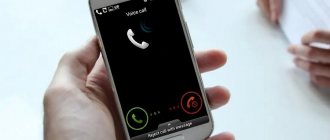
Using a microphone, people communicate with people located thousands of kilometers away. Anyone can hear the voice of an old school friend who moved to another country. The main thing is to connect and configure the headset correctly, but we can help you with this.
- There is an opportunity to talk to a person.
- You can hear a friend's voice on the Internet and answer him.
- Telling is faster and more convenient than writing.
- The headset with it costs more.
- There are almost no separate microphones.
Setting up sound in Windows XP, 7 or 8
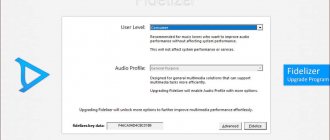
Everything is quite simple; further configuration is carried out through the audio manager. In our case, we need to go to “Realtek HD Manager”.
In our case, we click on the folder-shaped button, as shown in the picture below. In your case, everything may look different: the icon may look different or be in a different place; It may not exist at all, in which case we are looking for the audio connector settings.
Now you need to switch the connector option from “Front HD Audio” to “Front AC97”. Picture below:
After doing this, the problem should be resolved.
For Windows XP and Windows 8, this procedure is basically the same. Below are screenshots of the Windows 8 interface - the Realtek HD icon and the dialog box that pops up when you click on the icon.
Read: “How to clean your computer from dust. He can make money faster."
Watch the video review of the Be Quiet case! This is fire!!!
How to activate an external microphone on a laptop and PC under Windows, lunux, mac os
You can connect the device to any system. The algorithm does not depend on whether you are running Windows or Linux. Simply purchase a headset, take the plug, which will likely be colored pink, and plug it into the corresponding port of the same color on the front or back panel. There is no need to select anything - the external microphone will become active by default.
The form factor of laptops is usually built on the same principle. Therefore, the instructions presented below will be relevant for brands such as acer, hp, lenovo, msi, asus, lenovo, samsung and many others.
- Locate the row of ports on one side of the laptop.
- Look for several round nests.
- Insert the plug into the one next to which the recording device is drawn.
Windows 10
A common way to enable the front headphone panel on Windows 10 is through Realtek.
For the headphones to function, click on the “Speakers” tab and go to additional settings. The window that appears indicates that the output sockets are separated and that automatic socket detection is disabled.
After the above described manipulations, the headphones will work. Another reason why the computer does not see the headphones is the lack of a driver. You need to start Device Manager. Make sure you have an audio driver.
How to turn on and off the microphone input on a computer and laptop
To manipulate the jacks you will need the Realtek HD Audio driver. You can download it from the official website.
After installation, do the following:
- Open the downloaded software.
- Click on the small folder icon in the upper right corner, above the image of the panels.
- Click on the “Disable Front Panel” checkbox.
The sockets cannot be manipulated from behind. No program can provide you with such functionality. You also can’t turn off anything on your laptop.
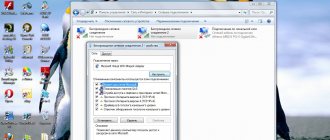
Selecting a device in the “Control Panel”
To turn on devices connected to the PC case, you need to:
- Press Win + R.
- Enter control and click on the OK button.
- Go to “Hardware and Sound” (view type “Category”).
- Go to the “Playback” tab.
- Open the context menu by clicking on an empty space.
- Activate display of disabled and disconnected devices.
- Find broken headphones. The properties indicate a 3.5 mm jack.
- Through the context menu, make the “Set as default” item active.
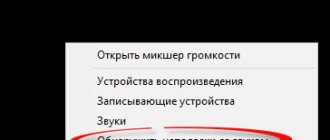
Enable display of disabled and disconnected devices in Sound settings
Note! You need to check the volume level of the system and individual windows through the mixer on the taskbar.
How to choose a built-in microphone on a laptop or PC
You can activate the internal headset only on a laptop. There is no such function on the computer. PC owners will have to purchase an additional device - either headphones, or a separate plug-in microphone.
To enable the built-in microphone, do the following:
- Go to “Control Panel - Sound - Recording”.
- Among the list, find the built-in headset (usually it is labeled according to the laptop model).
- Click on it with the right mouse button.
- Select "Enable".
Lack of compatibility
Problems arise when using a telephone headset that combines speakers with a microphone. It is necessary to familiarize yourself with the official characteristics of the equipment and check the compatibility of the device with the computer. If the front headphone panel on Windows 10 does not work for this reason, replacing the headset will help.
Sources
- https://F.ua/articles/kak-nastroit-zvuk-na-perednej-paneli-kompyutera.html
- https://viarum.ru/ne-rabotaet-perednyaya-panel/
- https://myearphones.ru/instruktsii/kak-vklyuchit-perednyuyu-panel-dlya-naushnikov-na-windows-7-i-10
- https://os-helper.ru/pc/kompyuter-ne-vidit-naushniki-votknutye-v-razem-na-peredney-paneli.html
- https://NaladkaOS.ru/windows-10/vklyuchenie-peredney-paneli-dlya-naushnikov.html
Causes of the problem
There are three key factors that can cause the PC to not respond to connecting headphones to the connectors on the front of the system unit:
- The wrong playback device is selected in the audio settings.
- The connectors on the panel operate according to the outdated AC'97 standard, and the motherboard provides a more modern High Definition Audio.
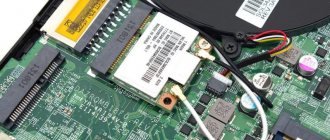
- Connection to motherboard failed.
We will offer several options for correcting the error - by trying each of them sequentially, you can find the cause of the malfunction and return the front panel to working condition.
Let's start activating this connector.
Now you can start putting this connector into operation. For this:
1. Connect the audio output device to this audio output (these can be headphones or speakers, the main thing is that they are in good working order).
2. Right-click on the sound icon on the taskbar and go to “Playback Devices”.
3. We see several sound devices here.
Please note that by default we have speakers.
The output designation here is as follows:
We need to use the second “Headphone” device. Yours may be called “Headphones” and be in a different location.
To do this, right-click on this device and click “Set as default”.
It should look like this:
Then all the sound will go to the device connected to the front panel of the computer. Please note that the device connected to the rear panel will turn off. Rearranged in reverse order.
That's all for today! Subscribe to my channel, like and share posts with friends. Bye everyone!
Source
What is the difference between headphones and a microphone?
For most people, the question of what is the difference between a microphone and speakers will seem strange and counterintuitive. After all, the answer lies on the surface:
- headphones are a device for reproducing sound;
- microphone - for recording.
However, everything becomes not so obvious if you know how gadgets are designed and work. The devices have the same structure. They consist of a coil with electric current, a magnet to create a constant magnetic field and a membrane. This means that the inside of the devices are the same.
The difference lies in the direction of the current. In the case of headphones, the vibrations of the coil are “pushed” onto the membrane, which is why the sound is heard. In the case of a microphone, the direction of the current goes in the other direction, so the vibrations of the cone go in the other direction along the wires.
The essence of the devices is the same. But with the development of technology, it became possible to improve the devices. For example, today the membrane of headphones is made of harder materials, and therefore is not as sensitive. This reduces the cost of the speakers, but does not affect the quality of the speakers. But the sound receiver’s diffuser is extremely sensitive, so it picks up even quiet sounds.
Although the design of the gadgets remains the same, their quality has changed, so it is difficult to use a microphone from headphones on a computer. The sound will be dull and muffled. You'll have to strain your vocal cords to make the recording of passable quality.
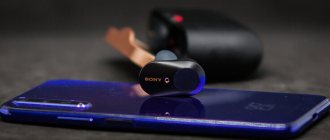
Features and functions of i7 TWS headphones
- They do not have a cord, which means the user can do whatever he can and not worry about anything happening to his headset. It is worth noting that they feel incredibly comfortable in the auricle, because they completely replicate the anatomical structure of the ear.
- The kit includes a special container that is charged by the user. That is, you can charge the container and walk around with a charged headset all the time. This is very convenient, because it is rarely possible to charge the headphones.
The design of the device itself resembles the well-known container from Apple. It is worth noting that the price tag for this headset is much lower than it really could be. A pair of headphones is placed in a container where they are charged. The container itself is not only a case, but also, as mentioned earlier, an excellent charger. The user can simply move the headphones into the tray to recharge them a little, providing additional hours of listening. It is also worth noting that the case itself and the headphones are made of high-quality plastic, which is pleasant to the touch and not made of toxic material. Such plastic cannot cause allergies.
- If we talk about the capsule itself, it needs to be charged, as mentioned earlier. In order to recharge them, the kit includes a special USB cable that takes up little space. As a power source, you can use not only a power outlet, but even a computer or telephone if you have an adapter.
- The case itself, like the headphones themselves, are painted white - not the only color presented by the company. White is the most laconic and quite true color, because it will suit not only any image, but also, in principle, any phone.
You can connect headphones not only to a phone or computer, but even to a special smart watch. It’s worth talking about the connectivity options in more detail below.
The price for this device is quite affordable, even though many companies often inflate the price of their headsets. Price starts from 10 dollars. Since the headphones are made in China, but are an American clone, all prices are presented in dollars.
A more detailed overview of them can be seen in this video
see also
Copyright (c) 2022 HTFI. Copying information is permitted, provided that active links to sources are indicated.
Source
How to choose a mode?
Settings according to the described principles is sufficient if a PC or laptop running Windows 10 has a simple sound card with standard drivers. If the device is advanced, then you should use a proprietary utility. So, on some sound cards you need to additionally select a playback mode. In the proprietary software, you should switch to headphones, otherwise there will be no sound in them.
It is necessary to make such a switch. This directly affects the performance of the equipment. If we look at it in more detail, this need arises due to the fact that headphones have a certain resistance, usually in the range of 16-300 Ohms or more. The sound card must send a signal to the accessory with different current strengths depending on this parameter.