Gradually, classic optical discs are used less and less for installing an operating system; it is much more convenient to burn the OS image to a flash drive. Modern modifications of netbooks and laptops no longer have an optical drive, since it is simply not needed.
Users have stopped creating images on disks to install the OS on their personal computer and use only USB drives. This is because:
- Flash drives are already much cheaper.
- they can be rewritten many times.
- the operating speed is much higher.
Almost every beginner is interested in the answer to the question: “How to create a bootable Ubuntu USB flash drive?” This is the image most often used in Linux distributions. It is worth noting that the required utilities will not be difficult to install from the official repository.
Content
- 1 Burning an installation image to DVD 1.1 Burning a disk image in Windows 1.1.1 Burning a disk image using SCDWriter
- 1.1.2 Burning a disc image using Nero BurningROM
- 1.2.1 Burning a disk image using K3b
- 2.1 In the Windows operating system 2.1.1 ALT Media Writer (altmediawriter)
- 2.2.1 ALT Media Writer (altmediawriter)
Best Linux distribution
The term best is relative. Each Linux distribution is created for a specific purpose to satisfy the needs of its target users.
Desktop distributions are available for free on their respective websites. You can try them one by one to understand which distribution is more suitable for a particular task. Each one has unique design, applications, and security.
For beginners, Ubuntu, Mint, Lite, OpenSUSE, Debian are suitable.
Burning a disk image in Windows[edit]
An ISO disc image file is a special format file prepared for burning to a disc. To burn an iso image under the MS Windows operating system, use special programs: SCDWriter, Nero BurningROM and others. We recommend using new discs from well-known manufacturers for recording: Verbatim, Mirex, Memorex. An image written to a bad disk can cause unresolvable problems during installation.
Burning a disk image using SCDWriter[edit]
- Download the program archive from here.
- Unzip the archive to any folder.
- Insert a blank disc into the drive.
- Enter the folder where the downloaded archive was unpacked and run the SCDWriter.exe program.
- Open the menu item Disk
⇒
Burn ISO image to disk
and in the window that appears, specify the path to the disk image. - Click the Burn
.
Burning a disc image using Nero BurningROM[edit]
- If you do not have this program installed, download it from the manufacturer’s website https://www.nero.com and install it.
- Launch the program and select the drive you need to burn the CD/DVD from the list of devices.
- Click the Open project
in the main window.
In the window that appears, select the required ISO image to burn and click the Open
. - In the Burn Project (Burn Image)
, configure the necessary parameters. - Proceed to burn the iso image to disk by clicking the Burn
.
We create in the Windows environment
There are situations when your computer is running Windows and you need to install the Linux operating system on a virtual machine. In this case, third-party programs will help, for example, one of the most popular rufus.
First of all, download the installation image from the official website in iso format; for example, consider Ubuntu.
Next, download the rufus program. To do this, go to the website https://rufus.ie, click on “rufus portable version”.
Launch rufus and insert the USB flash drive.
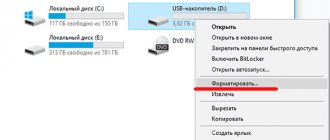
We check that our flash drive is in the “Device” column. Click on the “select” button and select the iso image.
Check the box for quick formatting and click on the Start button.
Burning a disk image in Linux[edit]
To burn ISO images, you can use many utilities and programs with a graphical or text interface. It is most convenient to use the K3b or Brasero programs, which are supplied with any distribution of the Linux operating system.
Burning a disk image using K3b[edit]
- If the k3b program is missing, install it on the system using the standard program installation tools for your distribution.
- Launch the program. If the settings are correct, the program will report that there are no problems with the system and offer to proceed to burning to disk.
- In the menu of the main window Service (Service),
select
Burn DVD image
. - In the Burn DVD image
, click the
Select file to burn
.
A dialog will open in which you need to select the iso image to burn and, after selecting, press the OK
. - If you did everything correctly, the program will show information about the iso file and begin calculating the checksum. This operation may take several minutes. You can compare the resulting checksum with the MD5SUM sum on the distribution page.
- If the numbers don’t add up, it means you chose the wrong file to record or the iso image you downloaded was corrupted during data transfer over the network.
- If the numbers match, insert the recording disc into the drive. Wait for the Start
, then click on it.
Attention! Rufus
,
UNetbootin
and
UltraISO
, instead of simply writing a hybrid ALT Linux image to a flash drive, try to convert it a second time into a bootable one for the flash drive and thereby break the ability to boot from it.
Therefore,
it is not recommended
to use
these programs to record images. Attention! Writing a distribution image to a flash drive will change the partition table on the media. Thus, if a flash drive has performed the function of a boot/installation device and you want to return it to the function of a portable data storage device, then you need to delete all existing partitions on the flash drive and create the required number of them again.[2] To restore compatibility of the flash drive with Windows operating systems, you may also need to re-create the partition table (for example, using parted/gparted or any other programs that can work with partitions). You need to delete the GPT table and create a table of msdos type. In addition, there should only be one partition with FAT or NTFS. You can also simply fill the beginning (and probably the end) of the media with zeros - for example, using wipefs -a /dev/desired: in this case, Windows will detect the media as empty and will be able to work with it.
Note: Alt OS images for Elbrus (e2k* architecture) are not hybrid; To burn them to non-DVD, please see the recommendations received[3].
Creating a bootable Linux flash drive: instructions
Linux is a family of free and open source operating systems. It is distinguished by a variety of assemblies tailored for specific purposes: home use, development, education, entertainment.
A bootable Linux flash drive is used for:
- UNIX-based operating system installations;
- Hardware diagnostics and maintenance: memory testing, HDD checking.
- Working with drive partitions: splitting, merging, converting.
- Backup and restore information, entire volumes.
- Downloads a portable OS that can run from a portable drive on any laptop, computer, netbook.
Linux distributions supported by Rufus
- Mint (Mint);
- HiveOS;
- Arch Linux;
- Archbang;
- BartPE;
- CentOS;
- Damn Small Linux;
- Debian;
- Fedora;
- FreeDOS;
- FreeNAS;
- Gentoo;
- GParted;
- gNewSense;
- Knoppix;
- KolibriOS;
- Kubuntu;
- Manjaro (Manjaro);
- Parted Magic;
- Raspbian;
- ReactOS;
- Red Hat;
- REFInd;
- Slackware;
- Super Grub2 Disk;
- Tails;
- Trinity Rescue Kit;
- Ubuntu.
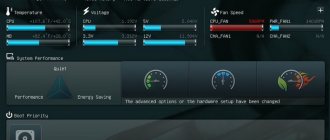
PC Configuration Determination
To record correctly, you need to know the PC configuration (using Windows 10 as an example):
- Open the properties of the This PC directory.
- Check the processor capacity.
CPU bit size in the “System type” line. - Right-click on Start and bring up Disk Management.
Disk management. - Open the properties of the drive (on the left), not the logical partition.
Go to Disk properties and go to Volumes. - Remember or write down the “Section Style”. Information will be needed later.
How to download a Linux image for a bootable flash drive
You already know where to download the required Linux distribution, but we will list below why they choose Linux:
- Free distribution.
- Customizable – everything changes.
- Ease of installation.
- Undemanding on hardware resources - will run on a computer with 256-512 MB of RAM.
- Security – you have to try hard to become infected with a virus.
- Fast installation of applications from the store.
- A variety of shells or graphical environments.
- Advanced file system.
- A well-thought-out method for storing settings.
- Confidentiality - does not collect or share information with the developer.
- Free apps.
In the Windows operating system[edit]
ALT Media Writer (altmediawriter)[edit]
ALT Media Writer is a tool that helps users write ALT images to their portable storage devices such as flash drives.
It can automatically download images from the Internet and burn them, extracting compressed images (img.xz) if necessary.
HDD Raw Copy Tool[edit]
The HDD Raw Copy Tool utility is also suitable for writing an image to a flash drive. The first step is to select a disk image file:
In the second step, you need to select a flash drive on which we will write the image:
Attention! Don't miss the choice of a flash drive - writing an image to your hard drive by mistake will lead to an almost guaranteed loss of data on it!
And finally, after checking that the selected parameters are correct and clicking Continue
You can start recording by pressing the
START
. Upon successful completion of recording, the window indicating the recording process will close, after which you can close the window of the program itself.
Rufus[edit]
You can burn an image in Windows 7 and higher using the Rufus program. To run the program you will need administrator rights. In the first step, you need to select a disk image file and a flash drive to write to:
In Windows XP and Vista, you can use the archived version of the program. In the first step, you need to select a disk image file and a flash drive to write to:
In the second step, after pressing the START
, you need to select the hybrid image recording mode “DD-image” and click
OK
to start the recording process:
Win32 Disk Imager[edit]
- download the archive with the Win32 Disk Imager program;
- unpack program files from the archive to any directory;
- insert the flash drive into the USB connector (the size of the flash drive must be no less than the size of the downloaded disk image);
- run the .exe file;
- in the window that appears, select the iso image of the distribution, specifying all files in the “File type” field - item *.*;
- select a device (flash drive);
- Click the Write
to write the image to a flash drive
Installation and selection of parameters
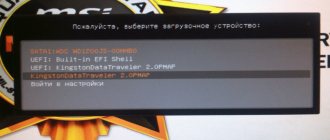
After launching, you will see a black and green Linux design and the inscription Welcome (this means “Welcome”). To use the distribution:
- In the list, go to the line “Start Linux Mint” and press Enter. If there is access to the network, the OS will begin loading. Wait until all data is transferred. Don't break the connection.
- The desktop will appear. Look at the interface and some of the functions before installing Linux Mint from a flash drive. On the right there will be a column describing the OS and its capabilities.
- If you do something in the “portable” version, the changes will not be saved. Full installation required.
- Double-click the Install icon.
- Choose language.
- A. These are various multimedia codecs and drivers. If you don’t install it now, you’ll have to download them manually later. There are no suspicious utilities or malware.
- If there is a distribution installed on your computer, the wizard will offer to remove it or install Linux Mint next to it. A bootable USB flash drive will destroy all user data (documents, music, images) if o. With a parallel installation, you can choose which operating system to use. And your files will be saved.
- The “Other option” item is intended for experienced users. You can create and edit partitions. Problems may arise due to incorrect settings. If you don't understand this, you need a standard installation.
- In the next menu, select the logical drive on which you want to download Linux. Use the slider to redistribute disk space. Specify how much memory you “give” to the new OS. Mint itself needs 20–40 gigabytes. But if you plan to store a lot of files and work with multimedia content, allocate more resources to the OS.
- The “Where are you?” menu appears. Click on the map or write the name of the city. The system will determine your time zone.
- Fill in the “Username”, “Computer name” and “Password” fields. Leaving them empty will not work, since you cannot install Linux Mint from a flash drive without an administrator account.
- Check one of the options: “Login automatically” or “Require password”. If you do not want to enter the code every time you start, select the first option. But it's better to leave protection. This way, only those to whom you tell the password will have administrator rights.
- The installation will begin. If there are multiple systems on the PC, a list will appear. Click on one of them to enter it after the download is complete. If you do not select an OS, Linux Mint will open.
- Don't forget to change the startup priority in the BIOS.
It’s very easy to figure out how to install Linux Mint from a flash drive. The installer has a clear interface. An explanation is given for each parameter. The main difficulties are recording the image and setting up the BIOS. But you can deal with them too.
On the Linux operating system[edit]
To write an image to a flash drive, you can use any of three programs with a graphical interface:
ALT Media Writer (altmediawriter)[edit]
Official website: https://github.com/altlinux/ALTMediaWriter
ALT Media Writer is a tool that helps users write ALT images to their portable storage devices such as flash drives.
It can automatically download images from the Internet and burn them, extracting compressed images (img.xz) if necessary.
The package is also available for Arch Linux (in AUR).
SUSE Studio Imagewriter (imagewriter)[edit]
ROSA Image Writer (rosa-imagewriter)[edit]
Write directly via dd[edit]
Searching for a flash drive device file[edit]
Attention! Don't miss it - writing an image to your hard drive by mistake will lead to an almost guaranteed loss of data on it!
Attention! The hard drive/SSD is not always /dev/sda!
1. First, look in /dev/disk/by-id:
$ ls -1 /dev/disk/by-id/usb* /dev/disk/by-id/usb-JetFlash_Transcend_16GB_01CUL45SENFPCJP3-0:0 /dev/disk/by-id/usb-JetFlash_Transcend_16GB_01CUL45SENFPCJP3-0:0-part1 / dev/disk/by-id/usb-Kingston_DataTraveler_3.0_1831BFBD3065E320B963003B-0:0 /dev/disk/by-id/usb-Kingston_DataTraveler_3.0_1831BFBD3065E320B963003B-0:0-part1 /dev/disk/by-id/usb- Kingston_DataTraveler_3. 0_1831BFBD3065E320B963003B-0:0-part2
If it is clear where the flash drive is, for example, /dev/disk/by-id/usb-JetFlash_Transcend_16GB_01CUL45SENFPCJP3-0:0, we proceed to the recording itself.
2. If it was not possible to find the flash drive device file in /dev/disk/by-id (the flash drive is not recognized as USB, the name does not mean anything, etc.), then look in /proc/partitions and try guess by size where the flash drive is:
$ grep 'sd[az]$' /proc/partitions 8 0 976762584 sda 8 32 15138816 sdc
The flash drive corresponds to /dev/sdc (or you have a terabyte flash drive). If the size makes it clear where the flash drive is, for example, /dev/sdc, we move on to recording.
3. It happens that there are several suitable candidates:
$ grep 'sd[az]$' /proc/partitions 8 0 976762584 sda 8 32 15138816 sdc 8 48 15098880 sdd
Then we disconnect the flash drive, connect it again, and immediately look at the kernel log:
$dmesg | tail [2560188.692099] usb 2-3.1.2: new SuperSpeed Gen 1 USB device number 55 using xhci_hcd [2560188.713428] usb 2-3.1.2: New USB device found, idVendor=8564, idProduct=1000, bcdDevice=11.00 [2560188. 713433] usb 2-3.1.2: New USB device strings: Mfr=1, Product=2, SerialNumber=3 [2560188.713436] usb 2-3.1.2: Product: Mass Storage Device [2560188.713439] usb 2-3.1.2: Manufacturer: JetFlash [2560188.713441] usb 2-3.1.2: SerialNumber: 01CUL45SENFPCJP3 [2560188.837988] usb-storage 2-3.1.2:1.0: USB Mass Storage device detected [2560188.838229] scsi host4: usb-storage 2-3.1.2: 1.0 [ 2560189.995370] scsi 4:0:0:0: Direct-Access JetFlash Transcend 16GB 1100 PQ: 0 ANSI: 6 [2560189.996018] sd 4:0:0:0: Attached scsi generic sg2 type 0 [2560189.997050] sd 4:0: 0:0: [sdd] 30197760 512-byte logical blocks: (15.5 GB/14.4 GiB) [2560189.997731] sd 4:0:0:0: [sdd] Write Protect is off [2560189.997739] sd 4:0:0: 0: [sdd] Mode Sense: 43 00 00 00 [2560189.998457] sd 4:0:0:0: [sdd] Write cache: enabled, read cache: enabled, doesn't support DPO or FUA [2560190.036918] sdd: sdd1 [2560190.039495] sd 4:0:0:0: [sdd] Attached SCSI removable disk
The flash drive corresponds to the file /dev/sdd
Record[edit]
Note: Before recording, you should make sure that the flash drive is not in use and is unmounted.
First you need to remove the partition table(s) from the flash drive. To do this, you can use the wipefs
.
wipefs -a /dev/sdX
Attention! If you do not remove the partition table, you may experience a boot error. The kernel may decide to use a GPT backup that is stored at the end of the disk. As a result, the installer will not be able to find the image.
Recording can be done in the console under root user rights. For example, like this:
dd oflag=direct if=alt.iso of=/dev/sdX bs=1M status=progress; sync
If you do not support the status=progress parameter, do not write it in the command; For the same purpose (monitoring progress), you can use the pv utility from the package of the same name:
pv alt.iso | dd oflag=direct of=/dev/sdX bs=1M; sync
where alt.iso is the ISO disk image, and /dev/sdX is the flash drive device file.
Attention! Don't miss the letter - writing an image by mistake to your hard drive will lead to an almost guaranteed loss of data on it!
Attention! Do not add the partition number, the image is written to the flash drive from the very beginning!
Attention! Do not remove the flash drive until the image is completely written!
Note: You can determine the end of the process when the flash drive indicator stops blinking or using the “Safely remove removable devices” widget. In the console you can issue the command eject /dev/sdX
and wait for its successful completion. However, the examples are given with an additional sync command, which causes the cache to be reset to the media, including for the flash drive that was just written, so that after sync is completed, the flash drive can be removed without eject.
Example[edit]
Determine the name of the flash drive device:
$lsblk | grep disk sda 8:0 0 931.5G 0 disk sdb 8:16 0 931.5G 0 disk sdc 8:32 1 7.4G 0 disk
The flash drive has the device name sdc
.
And then we write it like this:
# dd oflag=direct if=/space/office/cas/iso/school/school-7.0.5-20140611-school-master-i586-ru-install-dvd5.iso of=/dev/sdc bs=1M status= progress;sync
or, for example, like this:
# pv /space/office/cas/iso/school/school-7.0.5-20140611-school-master-i586-ru-install-dvd5.iso | dd oflag=direct of=/dev/sdc bs=1M;sync dd: warning: partial read (524288 bytes); suggest iflag=fullblock 3GiB 0:10:28 [4.61MiB/s] [================================ ===> ] 72% ETA 0:04:07
How to fix a flash drive
What to do if your USB drive was used as a Linux USB Live, took part in experiments with recording images and turned out to be faulty? It happens that a flash drive cannot be correctly detected by the system or its actual capacity is not displayed when formatting.
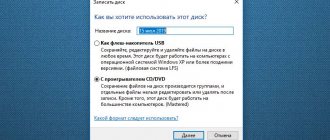
We'll fix it. Insert the drive into the USB slot, press the Win+R and enter cmd :
In the console that opens, enter (the administrator password may be required):
diskpart
Now run the command and look carefully at the list of disks available in the system:
list disk
USB wipe example
Disk 0 is a 111 Gb Disk 1 is a 14 Gb
I will clean up USB (Disk 1) .
Choose the disc you want to continue with VERY carefully Don't make the mistake of accidentally destroying another disk; disk numbering depends on your individual system configuration.
Select a disk:
select disk 'your_disk_number'
Enter the command to clear the disk file structure:
clean
Diskpart may display the message “DiskPart has encountered an error: Access is denied. See the system event log for more information." This can be resolved by running the clean .
Let's create a partition on the cleaned disk:
create part primary
Enter exit and exit the Diskpart program. Next, just format the flash drive and use it.
Unetbootin
Unetbootin is an open source graphical utility for burning an image to a USB flash drive. It works completely differently. Unlike dd, here the flash drive must be mounted to the system and formatted into the correct file system. The utility will unpack the contents of the image onto the USB flash drive, and then add the necessary partition flags and install the bootloader so that everything works as it should.
You can select an image from the file system or download the system automatically via the Internet. In addition, you can burn images of floppy disks as well as hard drives. You can also leave free space on the flash drive so you can write files there in the future. It is an excellent alternative to Rufus Linux and is used as often as Rufus on Windows.
You can install the program from the official repositories. On Ubuntu, to install, type:
sudo apt install unetbootin