It's time to update our old instructions on how to create a bootable USB flash drive with Windows 10 from a disk image. I have already covered the issue of burning an ISO disk image from Windows 7 to a USB flash drive. But today a more modern version of the Windows 10 operating system (86x and 64x) is already relevant. New programs have also appeared for creating a boot disk for BIOS or UEFI - UltraISO, Rufus and the proprietary Microsoft Media Creation Tool. Let's look at each of them in more detail.
Preparing to create a bootable USB flash drive
Before creating a bootable USB flash drive, the user needs to prepare the drive for proper operation. To do this, you need to insert your flash drive into the USB port of your PC or laptop, find its “This Computer” menu, right-click on the drive icon and select “Format”.
In the window that opens, you need to select file system parameters. For correct operation of a bootable flash drive, the FAT32 file system is required. We install it and start formatting.
Important: all data located on the disk will be deleted .
To recover formatted files from a flash drive or hard drive, you can use the RS Partition Recovery program, which can quickly recover lost data.
After formatting is complete, the flash drive will be ready to burn a Windows 10 ISO image onto it.
Features of a bootable UEFI flash drive with Windows 7
If you are creating a Windows 7 installation USB flash drive for a UEFI computer, you need to follow additional steps:
- On the USB flash drive, go to the directory f:\efi\microsoft\boot;
- Copy its entire contents one level up (to the F:\efi\boot directory)
- Copy the file bootmgfw.efi to the directory f:\efi\boot and rename it to bootx64.efi;
Note. It is the bootx64.efi file that the UEFI environment must transfer control to. The bootmgfw.efi file can be copied from an already installed system with Windows 7 x64 (it is located in the %windir%\Boot\EFI directory), it can also be extracted from the install.wim file in the distribution using the 7ZIP archiver, you can find it in the sources path \install.wim\1\Windows\Boot\EFI\bootmgfw.efi).Note : For some motherboards, you must additionally copy the bootx64.efi file to the root of the USB drive, either with an identical file name or with the name shellx64.efi.
Creating a bootable flash drive using the Universal Media Creation Tool
Universal Media Creation Tool is another way to create a bootable Windows flash drive. Using the Universal Media Creation Tool, you can create a bootable flash drive with any version of Windows 10, as well as Windows 11.
As has long been known, to install Windows 11, your computer must meet the minimum requirements in the form of the TPM 2.0
Universal Media Creation Tool - allows you to create a bootable flash drive with Windows 11, and during installation of the operating system, the computer’s compliance with the minimum requirements will not be checked.
Is it possible to delete?
Despite the fact that this hidden system partition does not contain the operating system loader, and if you remove it, Windows will still start normally, we strongly do not recommend doing this. This is due to the fact that in the future, when you need to do something with your local disks, for example, expand or, on the contrary, shrink one of them, due to the missing MSR (reserved), this may not be possible.
And what’s the point of deleting it if in the “Computer” window it is not displayed among the local drives (that is, it does not interfere in any way), and its size is no more than 500 megabytes, by freeing which you will gain practically nothing.
Creating a bootable Windows 10 USB flash drive using the official Media Creation Tool software
Important: to start creating a bootable USB flash drive using any of the methods described below, the user will first need the Media Creation Tool utility. With its help, you can create ISO images of the current Windows 10 installed on your PC.
- Follow the link to the official MicroSoft website and click on the second item in the list https://www.microsoft.com/ru-ru/software-download/windows10
- We study all the information in detail, and then click on the “Download tool now” button
- On the next window you need to select the required OS installation parameters: language, edition and architecture.
Note that all modern processors have a 64-bit architecture, while single-core processors of the previous generation must be installed with a 32-bit architecture. Select the required parameters and click next. - Next, select the first item “USB flash memory device”.
- We insert our flash drive into the USB port, and then find it in the window that appears and click next.
After downloading and installing the OS image onto the USB flash drive, it will be ready to install Windows 10, as well as restore the system.
Creating an EFI partition before Windows
The boot partition usually exists at the beginning of the disk, before the system partition. It doesn't have to be this way, but it's done to speed up Windows startup. To make UEFI find the bootloader faster. On an SSD, such optimization is unlikely to be noticeable, but in the case of an HDD, you can compete even for a fraction of performance.
On board the Sagittarius LiveDisk we launch AOMEI Partition Assistant . Click on the system partition, and on the side operations panel click “Resize” .
Pull the slider on the map slightly to the right so that several MB appear in the column below “Unallocated space in front” . Next, instead of the drawn number, we enter 105. To get 105 MB. Click "Ok" .
As a result, the program will free up the correct amount of disk space, in our case 102.01 MB. And it will leave a small tail at the back of the section. Click "Apply" .
We confirm.
Next we can attach the tail to the section.
Now let's launch the command line. And we create an EFI partition in the same way as described in paragraph 1 of the article.
The EFI partition has been created.
All that remains is to recreate the bootloader, as described at the end of paragraph 3 of the article.
Create a bootable USB flash drive without using third-party software.
Modern motherboards are already equipped from the factory with special software that allows you to create bootable flash drives without using additional software. To do this, just follow these simple steps:
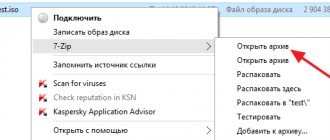
- Find the downloaded ISO file with the Windows 10 image (a Windows 10 image can be created using the Media Creation Tool) and right-click on the icon, then select “Run”.
- In the window that opens, you can find the system installation files. To create a bootable flash drive, simply copy them to a formatted flash drive.
Ready. The bootable USB flash drive has been created.
GPT partition structure in Windows 8
In the process of moving towards studying the structure of GPT partitions in Windows 8 , at some point there was a need to consider in detail the principles of forming the structure of partitions on physical media. I would like to understand how the structure of GPT partitions is formed in Windows 8, what partitions the operating system creates at the installation stage, how it places them on the physical media (disk), what data the OS stores in certain partitions, how it uses partitions in process of work? These, as well as some other questions, are intended to be addressed (I hope so to some extent) by this article. Where should we start? From the choice of platform. Since I did not have any additional hardware at hand at the time of writing, I decided to opt for a virtual environment. To complete the experiment, it would be correct to choose a new model of a laptop, for the sole reason that manufacturers of such devices often additionally place on the media sections containing images for restoring the OS. The obvious advantage of this approach is that we have an additional section with specific software from the manufacturer, which is necessary to restore the OS to its “original” state. But, since I didn’t have this opportunity, I simply decided to perform a new, “clean” installation of Windows 8 on an existing virtual machine. Perhaps in the future it will be possible to add the missing information to this article. Initially, I wanted to find a disk with a capacity of more than 2TB in order to test some of my assumptions, but, unfortunately, I was not able to find such a medium, and I did not have the slightest desire to do software emulation of such a large volume in VMWare.
The experiment will be carried out on the following configuration:
- VMWare ESXi v5.5.0 build 1331820.
- VMWare virtual machine: with a 32GB disk. (Thick Provision Eager Zeroed), that is, the disk is “zeroed” when created (zeros are written throughout the entire space).
- Boot options are set in EFI. Thus, we exclude the option of using MBR markup.
- Windows 8.1 update 1 - x64 Professional. Russian. version 6.3.9600.
It was no coincidence that my choice fell on the 64-bit version of Windows 8. For myself, I explained it quite simply - the 64-bit version of Windows is now a “displacing” configuration in the software market, that is, there is a tendency for more and more users to switch to this bit level . I don’t argue that the 32-bit version of Windows 8 can work perfectly with GPT for both loading and storing data, but it will adhere to the “mainstream”.
In order to obtain exactly the typical structure of GPT partitions in Windows 8, during the installation process (at the disk partitioning stage) we leave everything “as is” and choose a partitioning scheme that is quite often used by users - we use all the available space without manual partitioning:
After this, we continue installing the OS, give the necessary answers to questions about the parameters and complete the OS installation. After the final reboot, we get a new, pristine Windows 8.1 OS on our virtual machine. Now, at startup, you can log in to the system using your account. Now, we will choose the traditional and most accessible method for studying the partition structure of Windows 8 - the “Disk Management” snap-in. To do this, right-click on the “This PC” icon and select “Manage”, then launch the “Disk Management” snap-in. In the screenshot below you can see a typical disk partition layout:
In this snap-in we see three partitions that were created during the installation of Windows. However, having some experience with MS products, we will not make hasty conclusions about the number or content of sections. To confirm the GPT partition structure in Windows 8, we will need additional verification. Let's try to double-check and confirm the information received using the diskpart utility:
Creating a bootable USB flash drive using the UltraISO utility
The UltraISO program is extremely popular among users who often work with disk images. This program also has the function of creating bootable flash drives.
- Download UltraISO from the website ezbsystems.com, choosing the free Trial version.
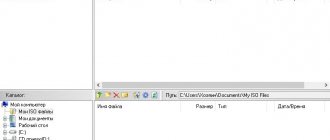
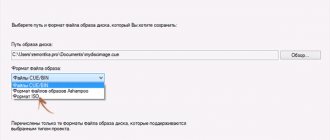
Install the program, accepting the license agreement and all the marked points. Launch the program by selecting “Trial period”. - Open the disk image in the program, and also go to the “Boot” and “Burn hard disk image” items.
- In the window that opens, select the required flash drive, format it if necessary, and also press the “Burn” button.
Once the installation is complete, the bootable USB flash drive will be ready.
Creating an EFI partition on an empty hard drive in the command line
So, we have a medium initialized as GPT without markup and data.
Launch the command line.
Be sure to do this on behalf of the administrator.
We enter one by one:
diskpart lis disk sel disk 1 (instead of 1, indicate the number under which the hard drive you need is listed above) creat par efi size=100 format fs=FAT32
In the disk management utility we see that a 100 MB EFI partition has appeared on the second hard drive. Now we can create a regular partition to indicate it to programs like WinNTSetup or WinToHDD as a system partition C.
Method 3: Rufus
If your computer does not support UEFI or the previous methods did not suit you for some other reason, you can use third-party software, for example, Rufus. Another important scenario in which the program can help you out is images larger than 4 GB, which FAT32 simply cannot work with due to internal limitations. This utility is free and does not require installation. To download Rufus and burn the image, you will need to follow these steps:
- download Rufus from the official website, no installation required;
- in the first field - “device” - select the desired drive;
- the second field - “loading method” - we specify the path to our image;
- the third field - “partition scheme” - select MBR, if it was the BIOS that became the stumbling block in the previous method, or GTP for UEFI systems. The “target system” field is filled in automatically. The remaining points are optional, but will help with fine-tuning.
- Click “start” and wait for the image to be recorded.
Method 4: For Mac OS X
So far we've looked at methods for working in a Windows environment, but what if you have a Mac at hand? This method is suitable specifically for such equipment with OS X on board. It’s also worth noting that the resulting flash drive will only work on PCs and laptops with UEFI, but as we wrote above, this is most likely not a problem. As for the ISO image, it must be mounted in OS X. As in the previous methods, the drive must be formatted in FAT 32. To do this, follow these steps:
- we follow the path of “program” - “utility” - “disk utility”;
- select the drive we are interested in, in the “format” field select MS-DOS (FAT);
- click “Erase”.
Next, all that remains is to copy the existing image to the flash drive. To avoid possible errors, we recommend using a terminal. Enter the command “cp -R path_to_mounted_image/path_to_flash drive”. Of course, I don’t want to write all this manually, so after “cp -R” (with a space), we simply drag the image and flash drive shortcuts into the terminal, separating them with a slash and a space.
If the progress bar is not displayed, a prompt to enter commands will indicate the end of recording; you just need to wait for it.
Multiboot flash drives
Read more about tools that allow you to create a multiboot flash drive or other USB drive. As the name suggests, a multiboot flash drive allows you to boot in different modes and for different purposes, for example, on one flash drive you can have:
- Installing Windows 10, 8.1 and Windows 10
- Antivirus boot images
- Live CD images with utilities
- Installation of various Linux distributions - Ubuntu, Mint, Android x86 variants
This is just an example; in reality, the set can be completely different, depending on the goals and preferences of the owner of such a flash drive. Below are several programs that make it relatively easy to create such USB drives.
WinSetupFromUSB
In my personal opinion, one of the most convenient utilities for creating a bootable USB flash drive. The functions of the program are wide - in the program you can prepare a USB drive for subsequent conversion into a bootable one, format it in a variety of ways and create the necessary boot record, check the bootable flash drive in QEMU.
The main function, which is also implemented quite simply and clearly, is to record a bootable USB flash drive from Linux installation images, disks with utilities, as well as installations of Windows 10, 8.1, Windows 7 and XP (Server versions are also supported). The use is not as simple as some of the other programs in this review, but, nevertheless, if you more or less understand how this kind of media is made, it will not be difficult for you to figure it out.
Learn detailed step-by-step instructions for creating a bootable flash drive (and multiboot) for beginners and more, and you can also download the latest version of the program here: WinSetupFromUSB.
AIO Boot
AIO Boot Creator is a powerful utility in Russian for easily burning bootable and multiboot flash drives and external hard drives with operating systems, LiveCD and utilities, suitable for booting into UEFI and BIOS (Legacy), and also includes a set of useful additional tools.
Learn more about the program and its capabilities in the instructions How to use AIO Boot to create a bootable and multiboot flash drive.
Ventoy
Ventoy is perhaps one of the easiest programs to create a multiboot flash drive with different ISO images. The principle of operation is the same as in the previous case: after special preparation of the USB drive, you just need to copy the necessary files from it.
Unlike the previous program, you will have to configure the appearance of the menu, captions and other elements manually. In detail: Creating a multiboot flash drive in Ventoy.
WinUSB
WinUSB is a relatively simple free program that allows you to easily make a bootable USB flash drive with Windows 10, 8.1 or Windows 7, Linux, LiveCD and utilities. Features include support for UEFI and Legacy boot for NTFS and FAT32 file systems, as well as the ability to write a multiboot flash drive without first formatting it.
More details about the program and instructions for use in the article Multiboot flash drive without formatting in WinUSB.
Free program SARDU MultiBoot Creator for creating a multiboot flash drive
SARDU is one of the most functional and simple programs with support for the Russian language, which allows you to easily burn a multiboot flash drive with:
- Images of Windows 10, 8.1, Windows 7 and XP
- Win PE images
- Linux distributions
- Anti-virus boot disks and bootable drives with utilities for resuscitating the system, setting up partitions on disks, etc.
Moreover, for many images the program has a built-in downloader from the Internet. If all the methods of creating a multi-boot flash drive that have been tried so far have not yet worked for you, I strongly recommend trying: Multi-boot flash drive in SARDU.
Easy2Boot
The program for creating a bootable and multiboot flash drive Easy2Boot works according to approximately the following principle:
- You prepare the USB drive in a special way.
- Copy bootable ISO images into the created folder structure on the flash drive - any number of almost any images.
As a result, you get a bootable drive with images of Windows distributions (10, 8.1, 8, 7 or XP), Ubuntu and other Linux distributions, utilities for computer recovery or virus treatment. Essentially, the number of ISOs you can use is limited only by the size of the drive, which is very convenient, especially for professionals who really need it.
The disadvantages of both programs for novice users include the need to understand what you are doing and be able to manually make changes to the disk if necessary (everything does not always work as desired by default). Detailed instructions and video: Multiboot flash drive using Easy2Boot.
XBoot
XBoot is a free utility for creating a multiboot flash drive or ISO disk image with several versions of Linux, utilities, antivirus kits (for example, Kaspersky Rescue), Live CD (Hiren's Boot CD). Windows is not supported. However, if we need a very functional multiboot flash drive, we can first create an ISO in XBoot, and then use the resulting image in the WinSetupFromUSB utility. Thus, by combining these two programs, we can get a multiboot flash drive for Windows 10, 8.1 (or 7), Windows XP, and everything that we recorded in XBoot. You can download XBoot on the official website https://sites.google.com/site/shamurxboot/
Creating bootable media in this program is done by simply dragging and dropping the desired ISO files into the main window. Then all you have to do is click “Create ISO” or “Create USB”. Another opportunity provided in the program is to download the necessary disk images by selecting them from a fairly extensive list.
WinSetupFromUSB is one of the best in the business
Let's move on to another program, the purpose of which is only to cut system images (not only Windows 10) onto USB drives, the utility is called - WinSetupFromUSB
A bootable Windows 10 flash drive is created very simply here - we select the media on which we want to burn the ISO image and check the box that we want to put on it. Click on the button with “three dots” next to the marked item and select our distribution - click the GO button and go drink tea, nothing more is required from you.