Author of the article
Vladimir Novoselov aka Rescator
Technical support specialist, PHP programmer, WordPress developer
Ask a Question
The flagship networking equipment company, Tp-Link, usually doesn’t worry about the names of its new developments. It has already released six reincarnations of the popular Tp-Link TL-WR940N 450m model, which users have many questions about setting up. Adding fuel to the fire is the WR940ND line, which also recently celebrated its sixth rebirth. So, what is the WR940N in the sixth version and what is it eaten with?
Indicators and connectors
Traditionally, on the top cover there is a row of indicators, as well as large letters of the brand name. And although the number and location of indicators remained unchanged, when creating a new version, the developers redid the way they work. The blinking mode is no longer supported, the indicators light blue (if devices connected to the ports are working and the modes are not disabled in the web interface), and the WAN indicator has two options:
- in normal operation mode, like “neighbors”, it lights up blue;
- if the cable is connected, but there is no connection with the provider, the color turns orange.
Naturally, if there is a problem with the cable or it is not connected, it does not light up at all.
The TL-WR940N router has 8 indicators:
- Nutrition;
- Wi-Fi;
- 4 indicators for the number of ports for a wired connection;
- Internet connection;
- WPS.
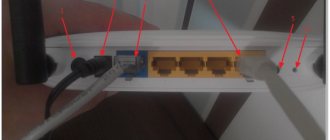
The rear panel of the model is also standard:
After the first antenna:
- Connector for power supply;
- Power button;
- Reset to factory settings;
- WPS;
- Blue port for connecting to the provider.
After the central antenna there are 4 ports for connecting wired devices.
Description, main characteristics of TP-Link TL-WR940N
In terms of functionality, this model belongs to the entry-level, although cheaper routers with approximately the same capabilities can be found on the market.
The technical characteristics of the router correspond to its class: single-band wireless network with a maximum speed of up to 450 MB/sec and 5 wired ports at 100 MB/sec, three non-removable antennas. In addition to the router itself, the delivery package includes a power supply, a patch cord, small connection instructions, as well as a CD with software that basically duplicates the capabilities found in the firmware.
As for the appearance of the router, it has evolved in accordance with the trends of technical fashion, and the current generation has a completely modern and attractive design.
In addition to purely external changes, among the features of the model that distinguish it from its predecessors, we can note the presence of a repeater mode - previously, to amplify the signal, you had to buy a separate device. An increase in Wi-Fi network speed from 300 to 450 MB/sec may seem significant, but if you take into account the speed of the network connection (100 MB/sec), then such an increase will only be useful when actively using intranet traffic, which is very rare.
Let us also mention such a nuance as the difference in web interfaces - in early versions of the firmware these are the usual green colors with a well-established menu, in the latest versions of the firmware blue color prevails and a slightly different configuration of settings.
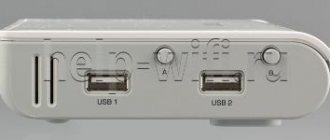
The front of the router is devoid of control elements - only light indicators. All buttons and connectors are located on the back: a power button, 4 LAN and one WAN port, three rotating but non-removable antennas, a socket for connecting a power supply, a Wi-Fi shutdown button and a combined WPS/reset button.
Here are the main characteristics of the TP-Link TL-WR940N router:
- wireless network broadcast frequency – 2.4 GHz;
- max wireless data transfer speed – 450 MB/sec;
- 4xLAN and 1xWAN ports 100 MB/sec;
- firewall;
- support for Dynamic DNS and static routing;
- demilitarized zone;
- ability to work in access point and repeater modes;
- radio transmitter power – 20 dBM;
- antenna sensitivity – 5 dBi.
Connection
Connecting the router does not cause any particular problems.
As a rule, the process is standard:
- Using the supplied cable, connect one of the yellow sockets (LAN) to the computer socket;
- Connect the provider cable to the blue socket (WAN);
- Connect the TV set-top box (if you have one);
- Turn on the router's power.
If everything is correct, then after booting the router will show a blue indicator that it is working, that the computer is connected and that the provider’s cable is turned on. But the router cannot connect to the network yet.
Preparing for work
The first stage is the simplest, but you can’t do without it - you need to prepare the router for work. To do this, first connect the power supply to it, and then turn it on. If the antennas are disconnected, screw them back on.
The router is connected to the computer using the standard cable included in the kit. Connect one of its connectors to any of the four yellow sockets on the back of the case. The second connector of the cable goes to the network card of your computer or laptop.
If you want to use a wireless connection, look in your environment for an open connection that matches the name of your router. You can make sure that this is your router by playing with the power button. If the selected network disappears when disconnected, then this is our device.
The blue jack labeled WAN is for connecting a cable from your Internet Service Provider.
Login to router settings
In order to configure the router, you will need any web browser available on the user's computer.
Tp-Link also promotes its configuration application, but, according to user reviews, in the sixth revision it allows you to manage an already configured router. It will not be possible to do the initial setup using it.
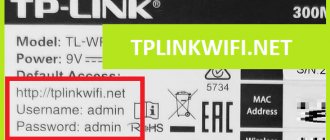
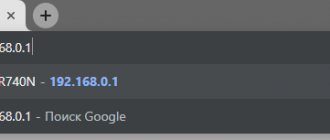
Next, the well-known address 192.168.0.1 is entered in the address bar and confirmed by pressing “Enter”. In previous revisions, the address was 192.168.1.1. You can also use the special address that Tp-Link offers to all owners of its routers - tplinkwifi.net.
The router prompts you to enter a password to enter the settings (the factory default is admin in both fields).
Having specified the necessary data, confirm the action by pressing enter.
Setting up L2TP, where IP is static
To do this, you will have to perform the following steps:
- Go to the “Network” section.
- Then to “WAN”.
- In the router connection type, select L2T for the Russian region.
- Below you will find information about login and password.
- Since a static IP is used to establish communication, it is recommended to leave the corresponding confirmation with the static IP.
- Then you need to enter the server address.
- Specify the subnet mask.
- Enter the gateway.
- Fill in DNS.
- Save changes.
The above information is provided by the Internet service provider or company.
Automatic setup
The first login to the system activates a wizard that offers to configure the Tp-Link TL-WR940N router, connect to the Internet and even set up a wireless network.
It also indicates that you can either agree with the proposal by clicking “Next”, or refuse and proceed to manual configuration by clicking “Exit”.
Since you can return to the quick setup at any time by clicking the button in the left menu, click “Exit”. The router displays a summary page of default settings.
On the right you can read what is displayed on the page and what each setting is responsible for. Return to the quick settings menu is the second button from the top in the left block.
Digital interactive television
The massive transition to high-speed Internet has provoked an increase in the popularity of streaming video, including such services as digital television. A speed of 100 MB/sec is enough to watch video in HD and even Full HD quality, and many providers did not fail to offer this service to their subscribers.
If it is included in your package, you can configure the router to transmit data to the playback device (TV, set-top box) in the required format. To do this, in the main menu, select the “Network” item and the “IPTV” sub-item.
The first option, "IGMP Proxy", must be enabled. For the “Mode” parameter, select the “Bridge” value. All that remains is to assign the port through which the video stream will be broadcast. Depending on the firmware, you will either have a list of four ports from which you need to select the one you need by setting it to IPTV, or a list in which you select the desired port value.
IMPORTANT. The LAN port assigned for broadcasting interactive digital television cannot be used to access the Internet, since it broadcasts this in a different format.
Manual setting
If the user decides to do everything manually, to do this, go to the “Network” block of the left menu. Here the WAN setup immediately opens - connection with the provider.
Select PPPoE/PPPoE Russia from the list at the top of the page that opens. If the provider uses a different scheme, you need to select the appropriate one. This can be clarified in the contract or in the supplier’s technical specifications. Just below enter the connection name and password. The latter must be entered twice - for control. You can leave further settings alone, setting them as shown in the picture above.
Check the correctness by clicking the “Connect” button. If everything is configured correctly, the router will try to connect to the provider. This completes the Internet setup on the Tp-Link TL-WR940N router.
Setting up PPTP where the IP address is static
Setting up a connection with a static PPTP IP address follows the classic scheme. Typically, IP is given to legal entities or individuals as an additional service. To connect you need:
- Go to the menu, section “Network”.
- Click on the “WAN” subsection.
- In the WAN connection type, select PPTP with the Russian region.
- Below you will be prompted to specify your username and password.
- Since the connection occurs with a static IP address, you need to check the appropriate box.
- Next, specify the IP address for the server name.
- Be sure to register the subnet mask with the main gateway and DNS. The specified data is specified in the provider’s contractual instructions.
- After entering the required data, check the automatic connection box.
- And click on the save button.
Wi-Fi connection and settings
Setting up a wireless Wi-Fi network on the Tp-Link TL-WR940N is quite simple. When you select the “Wireless mode” block in the settings, a page opens on which you need to specify the network name (under this name the router will be shown to all devices).
The rest of the settings on the page can be left alone or set as in the picture. Please note that the “Enable wireless broadcasting” checkbox must be enabled. Disabling it blocks access to all wireless devices.
There is no network protection in the out-of-the-box version. Therefore, you need to go to the “Wireless Security” page and make a few settings here.
In most cases, everything is already configured correctly - you just need to enable protection. In this case, pay attention to the “Wireless network password”. The characters entered here will need to be repeated the first time you connect a new wireless device.
Brief overview of the router
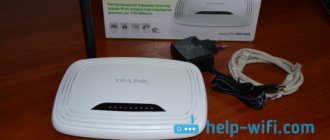
Structurally, the TL-WR940N model differs from its predecessors. The device is quite large in size. The developers have equipped it with three antennas that perfectly transmit Wi-Fi signals. The functionality of the device is quite wide. You can install it at home or in a small office.
The scope of delivery includes:
- the device itself;
- power adapter;
- patch cord;
- brief operating instructions;
- installation disk with software;
- guarantee.
Externally, the device looks attractive. The electronics are housed in a black plastic case made in an unusual shape. The router cover is concave. The antennas in this model are not removable. The lid is matte, so it does not leave fingerprints. An indicator block is located on the front of the case. LEDs indicate equipment operating modes. The manufacturer placed a corporate logo in the center of the router panel. Ventilation compartments are located at the ends and bottom of the device.
On the rear panel there are:
- power adapter socket;
- router switch;
- universal WPS and reset button;
- WAN connector;
- 4 LAN ports without LEDs.
Repeater mode
By default, the router starts in the “Standard Wi-Fi router” mode. You can check and configure this in the “Operating mode” block.
After rebooting the router, the appearance of the web interface will change slightly, but you will need to configure the same block as above - “Wireless network”.
Instead of your home network, you will need to specify the network that needs to be expanded.
You will need to find it using the “Search” button.
After selecting a network from the list of found ones, click the “Connect” button on the right side of the window. The router will try to connect to the selected network, but will not be able to. After that, opening the search window again, you need to copy the main network protection settings and repeat them in your settings.
Naturally, the password must be set identical to the password of the main network. After saving the settings, you need to go to the “Network” block. There you need to set the “Type” switch to the “Smart IP” position, this will allow the main router to assign addresses to all devices in the extended mesh.
Conclusion
The WR940N modem from TP-Link is an inexpensive device with the necessary functionality for connecting to the network. Link is easy to use and easy to customize.
pros
The advantages of the router are as follows:
- Low cost.
- Easy to install.
- High quality case material.
- Stylish design.
- Russified certificate.
- Wide functionality.
- Wide range of action.
- Availability of IPTV, broadcast rules, firewall.
Minuses
Disadvantages of Link include indicators:
- More powerful devices with improved characteristics are sold in this price category.
- Impossibility of mounting on the wall.
- Big sizes.
- Long non-removable antennas.
- Periodic loss of Wi-Fi signal.
Setting up IPTV
IPTV on the router can be configured in a few clicks, but the position of a pair of switches will depend on the user’s decision on how to watch the programs. The general setting is located in the “Network” block on the “IPTV” page.
If you plan to use a PC for viewing, the settings should be left at default.
This position of the switches will allow you to watch TV on any device connected to the router.
If you have a set-top box and plan to watch TV only on it, you need to indicate the port to which the set-top box is connected.
After specifying the port, all TV traffic sent by the provider will be forwarded to the selected port. A computer connected to a different port will be able to surf the Internet without experiencing any inconvenience, since after setting up the router, traffic of various types will be strictly directed to the consumer. The router allows you to use 1, 2 or 3 set-top boxes simultaneously. You need to choose how many ports to mark for TV traffic, and after rebooting the router, you can configure the set-top box.
Setting up a Wi-Fi password
To set a password for Wi-Fi using the router system, you need to open the tab with the wireless mode in the main menu and go to the settings. Next, enter in the network name field any name that will be displayed in the Internet access section on your laptop or personal computer. After entering the name, be sure to select the region and save the settings.
The next step is to enter the subsection with online mode protection. Here you should set up a password for online by clicking on the desired type of data encryption. Then, in the PSK password tab below, come up with and enter a new password. Press the save button.
After confirming that the entered data is correct, there will be a message above the button indicating the saved settings and the need to reboot the router. This must be done by clicking on the link. After rebooting the data, the wireless network will be in the computer's network settings.
Change Password
As is customary with Tp-Link, the WR940N model allows you to change not only the password for logging into the web interface, but also the username. You can change them in the “System Tools” block on the “Password” page. You need to specify old data, new data and click the “Save” button.
After clicking, the router will reboot, prompting you to log in with the updated data. Unlike devices from other manufacturers, the wireless network password and the web interface login password are not related to each other.
Mobile client
As noted above, not only stationary but also mobile devices can be used for configuration. There is a proprietary application for them that can be downloaded from the Play Market or AppStore.
It allows you not only to configure the network using the “Management” subsection, but also to view statistics.
For example, you can find out:
- router status;
- firmware version;
- amount of traffic;
- number and names of connected clients.
Here you can block access to unwanted devices.
As for the “Management” section, it allows you to change parameters such as:
- connection settings;
- wireless connections;
- parental control;
- system and regional settings.
You may be interested in:
MTU in a router - what is it? Increasing Internet speed
Which Internet connection is best for your home? Overview of all possible options
Top Tips: How to Strengthen Your Router's WiFi Signal
How to connect a router to a router via WiFi - 2 easy ways
Firmware update
When new firmware appears on the manufacturer’s website, sometimes it makes sense to download it and update the device. This is done in the “System Tools” block, but this time on the “Firmware Update” page.
Using the “Browse” button, find the firmware file on your computer, select it, and click the “Update” button. Tp-Link will reboot, trying to use the new software for work.
It is unnecessary to remind you that the router cannot be unplugged from the outlet during the operation.
Possible problems and ways to resolve them
If you're having trouble connecting, you'll need to run some diagnostics. In terms of hardware, TP-Link routers are quite reliable. Users rarely send their devices in for repair. Occasionally, problems with the LAN connectors may occur. Software malfunctions occur more often after a firmware update. If the port on the router fails, you will have to take it to a service center for repairs. If there is a problem with the firmware, you can fix the problem yourself. What to do if there is no Internet on the router:
- Reboot your router and PC.
- Check with your service provider to see if emergency or maintenance work is being carried out on the line.
- Check your balance. Sometimes subscribers forget to top up their account, so they are left without access to the Internet.
- Perform a cable integrity check. If there are kinks or other deformations, the wire will have to be replaced.
- Carefully inspect the router case.
- Check the basic device settings.
Updating the firmware
Experts recommend updating the firmware immediately after purchasing the router. The procedure is performed through the control panel. This option is not provided in the mobile application. Through the application you can only check the current firmware version. Go to the device control panel. Select the “System Tools” category. There is a special subsection here. Using its functionality, you can change the firmware yourself.
To begin with, the software file is downloaded from the manufacturer’s official website. It is highly undesirable to download software files from third-party web resources. Save the downloaded file to your PC. Then we go to the web interface and find the section with system tools. Here we will be interested in the “Firmware update” item. Click on review and select the previously downloaded file. Click on “Update”. As we have already noted, it is impossible to flash the firmware through the application. But with the help of the utility you can control the device status, traffic volume and other parameters.
How to reset settings
Resetting settings to factory settings can be done in two ways - software and hardware. In the second case, you will use a special button on the device body. Press and hold the RESET button. Ten seconds are usually enough for the device to reset the settings.
If you chose the program method, the sequence of actions will be as follows:
- In the web interface we find a section with system tools.
- We find a subsection with factory settings.
- Here we select the “Restore” option.
- We confirm the actions and wait for the process to complete.
After resetting, all settings will have to be re-registered.
Reset
The firmware also provides the ability to programmatically reset all settings, restoring factory settings.
To do this, in the “System Tools” block you need to find the “Factory Parameters” page and click the only button on it. The router will pop up a dialog box and ask if the user really wants this. After receiving confirmation, it will begin rebooting. The new download will use all default settings. All user settings will be forgotten.
Network card settings
To begin with, I always recommend checking the operating system settings for connecting to the router. I’ll tell you using the example of “tens”:
- We go to “Windows Settings” through “Start”, head to “Network and Internet”.
- In the list on the left, select “Ethernet”, then in the main field we look for “Configure adapter parameters”.
- The “Network Connections” page will open, where you need to right-click on the network and select “Properties”.
- In the window that opens, look for protocol version 4 in the list and click “Properties”.
- In the “General” tab, you need to check the boxes to automatically obtain IP addresses and DNS servers.
- Confirm that the settings are correct with the “OK” button.
Now you can configure the router.
Guest network
This feature will be useful if network access is often used by strangers. And not only outsiders. For example, you can offer additional Wi-Fi to friends. Then you will be sure that you will not “catch” the virus and no one will gain access to personal data stored on your home network.
How to enable additional access point on TL-WR940N:
- We are looking for the “Guest Network” section in the panel on the right.
- Go to “Wireless Settings”.
- Check the box next to “Guest network”.
- Set the network name and password.
- You can also enable bandwidth control and set up a schedule.
Some routers can configure up to 4 guest networks. Our model has one additional access point, but this is quite enough for a home router.