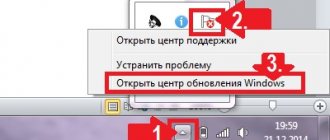
In Windows 10, unfortunately, the Update Service Center is significantly different from previous modifications of Microsoft operating systems. It has additional features, but does not have the usual functions that the service had in Windows 7 and 8.1.
Often, users in the new “Ten”, even after a painstaking search, cannot find the location of the updated upgrade center in Windows 10. In particular, Windows Update is now almost devoid of the ability to customize its settings and cannot be launched from its usual place in the Control Panel. Basically, only owners of the Professional modification of the OS can make adjustments.
Users of other versions are forced to wait for unexpected Windows 10 updates, risking losing the results of their unsaved work during unplanned computer reboots. It is strange that Microsoft specialists do not realize that people often use computers with their system to perform important and urgent work, and not just for entertainment purposes.
Windows Update location
If you need to enable this service, you need to perform the following sequential steps:
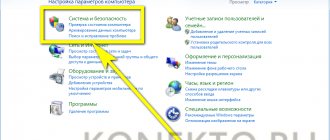
- Click "Start" and then go to the "Settings" section;
- Find and open the “Update and Recovery” tab;
- Next, in the menu that appears, go to the “Update Center” tab. Windows";
- In this window, the user can independently change the time when it is convenient for him to start the computer restart process.
- The service menu also displays a list of available updates and next to them there is detailed information about them;
Using the Run dialog box
Most Control Panel items can be opened using the Run dialog box (or even the Command Prompt), as long as you know the command you need. There is such a command for the Network Control Center.
- Press the Win+R keys on your keyboard to open the Run window. Type the following command into it and press Enter. control.exe /name Microsoft.NetworkandSharingCenter
- The Network and Sharing Center will open.
There is another command option with the same effect: explorer.exe shell:::{8E908FC9-BECC-40f6-915B-F4CA0E70D03D}
Setup procedure
From the previous section of the article it has already become known how the user can configure the system restart time on his PC. But this is clearly not enough for comfortable use of the computer. It is immediately necessary to upset users of the new OS and announce the fact that there is almost a complete lack of freedom in changing the parameters of the upgrade service in Windows 10, since the included center here works completely automatically. By default, the running service installs all application and driver upgrades, and making adjustments to its functions is practically impossible for the system.
However, there are small options for settings in the “Advanced Settings” tab, where you can set some rules for installing update packages. You can tell the system to notify the user in advance of the need to restart the computer.
If you set this parameter, the PC owner will always have time to save the files he is working with before rebooting the system.
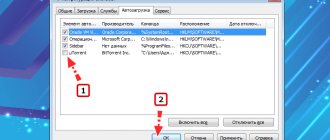
If the user needs to update only Windows 10 itself, and not touch other Microsoft applications installed on the PC, then you need to uncheck the box shown in the figure below:
If you need to temporarily postpone the procedure for installing upgrades, then in the professional version of the OS you just need to uncheck the corresponding line in the menu.
Enable in Local Group Policy
You can restore the operation of this service in the “top ten” as follows:
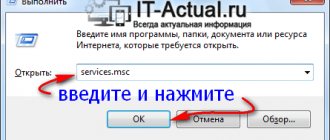
- Open the Run program using the + key combination. Enter the command “services.msc” and start execution with the OK button.
- The “Services” window will appear in front of you. In the right list, find the line “Windows Update” and using RMB in the menu, select “Properties”.
- In the “General” tab, find the “Startup type” line and set the “Automatic” option in the menu, then apply the changes with the “OK” button.
- Restart your PC.
In this way, you can start the CO in the Windows 10 operating system. This method can help you get rid of error code 0x80070422.
Emerging problems and errors in the service
Sometimes packages don't download at all. For such cases, there is a choice of a method for downloading upgrades, for example, through a peer-to-peer network. This is very convenient for local networks, because after downloading updates to only one computer, they will quickly spread to all other PCs. In the parameters window, you need to set the corresponding parameter toggle switch to the “Enabled” position, and check the box “PC on the local network and PC on the Internet”.
If errors occur in the operation of the PC, you need to uninstall updates that caused functional failures through the “Additional” section. parameters”, where in the log click on the corresponding link, as shown in the figure below:
After this action, we must pay tribute to the Tens developers, the OS immediately begins to update itself.
In Control Panel
Despite the fact that some items in the Windows 10 Control Panel began to redirect to the Settings interface, the item located there for opening the Network and Sharing Center remained accessible in its original form.
- Open the Control Panel, today the easiest way to do this is to use the search in the taskbar: just start typing “Control Panel” in it to open the desired item.
- If your control panel is displayed in the form of “Categories”, select “View network status and tasks” in the “Network and Internet” section; if in the form of icons, then among them you will find “Network and Sharing Center”.
Both items will open the desired element for viewing the network status and other actions on network connections.
Reset settings
Another method of dealing with service errors is to reset its settings and restart. For this purpose, it is necessary to perform several successive steps:
- First open the notepad file and type the following:
- After that, save it with the name and extension, as shown in the figure below:
- Then call up the context menu on it and click on the line “Run with administrator rights”;
- Next will be instructions from the system that must be followed sequentially;
- As a result, all settings will be reset and the center will restart;
- After completing all the procedures, you must restart the PC.
"Local Group Policy Editor"
To run the program, follow these steps:
- Go to “Run” using + . Write the command “gpedit.msc”.
- Open the “Windows Update” branch, which is located along the path “Computer Configuration” - “Administrative Templates” - “Windows Components”.
- On the right side of the window, find the line “Setting automatic updates” and right-click on it. In the menu, go to “Edit”.
- Set the setting to Enabled (1). In the "Options" section, select the settings according to which automatic updates will work (schedule, installation, notifications about available downloads, etc.). Apply the changes with the “OK” button.
How to restore the classic version?
If you are used to using the classic application to update your computer, restore the classic Update Center.
Important! This method only works in early builds of Windows 10.
- Search window → enter “Notepad” → RMB → Run as administrator.
- Paste the text into the notepad field: Windows Registry Editor Version 5.00 [HKEY_LOCAL_MACHINESOFTWAREMicrosoftWindowsUpdateUX] “IsConvergedUpdateStackEnabled”=dword:00000000 [HKEY_LOCAL_MACHINESOFTWAREMicrosoftWindowsUpdateUXSettings] “UxOption”=dword:00000000
- Menu File → Save As → specify the document name and set the extension to “.reg"(in the "File type" line, select all files).
- Run the created file → confirm your actions in the warning window → Ok.
More detailed instructions are provided in the video.
Recovery
The Recovery section offers three options to help you fix your computer if something goes wrong. Resetting this PC allows you to reinstall Windows without losing any files (though we strongly recommend that you back up your files before performing this fix).
Go back to the previous build by uninstalling the latest version of Windows 10 on your PC. This option has a time limit: you can revert to an earlier build within 10 days of the update. If you recently upgraded from an older version of Windows to Windows 10, you have 30 days to revert to your previous operating system.
Advanced Startup reboots your computer so you can restore Windows from a system image, USB drive, or disk.
Discussion
In the comments, show the results of the three commands from the article on your main home PC. Let's see how long it's been since you did a clean install
(Get-CimInstance Win32_OperatingSystem).InstallDate Get-Hotfix -id KB4562830, KB4517245 | ft HotFixID, Description, InstalledOn Get-ChildItem -Path HKLM:\System\Setup\Source* | ForEach-Object {Get-ItemProperty -Path Registry::$_} | Select-Object ProductName, ReleaseID, CurrentBuild, @{n="Install Date"; e={([DateTime]'1/1/1970′).AddSeconds($_.InstallDate)}} | Sort-Object {[int]($_.CurrentBuild)}
To publish text reports, use pastebin, and upload pictures to third-party hosting sites. Then just paste the link in the comments.
clean install in the last two or three years
because of the purchase of a new disk or computer, tell us what prompted you to do this.
Why is the ReportingEvents log stored on disk?
In the above directory there is a RepotingEvents file without an extension, which can be opened with a text editor. The following information about the installation is stored here:
- loading;
- unpacking;
- installation;
- examination;
- installation status;
- time of process start and completion.
This document also displays errors that occur during installation. Each such bug is assigned a special identifier, with which you can re-download problematic programs and install them.
Deferring or disabling parameters
With it, as you already understand, you can endlessly postpone upcoming new products until you are ready to update your device. Now you know how to disable updates and where the settings for disabling them can be located. Now you not only know where Windows 10 Update is, but you also know how to configure it.
- How to disable updates in Windows 10
Self-configuration of auto-updates is a drop in the ocean compared to many other processes that you will encounter when using this system. This is where our website will help you; here you can find a huge number of other articles relating to all versions of operating systems.
We never tire of repeating that you need to constantly update your PC, so we often receive questions about how to do this. And one of the most common questions related to this is where Windows 10 Update is located and how to launch it. In order to close this issue once and for all and help everyone who cannot run the so-called Update, we decided to prepare this material in which we will answer this question.
View received updates
If you need to view or delete already downloaded or installed updates, you can use one of two methods: editing through the control panel or searching using Explorer.
Search through Explorer
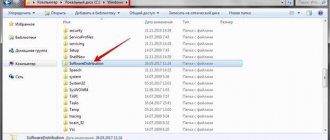
This method allows you to view downloaded but not installed updates, since update files are deleted from the computer some time after installation so as not to take up a large amount of memory. Go to the path Primary_disk_partition:\Windows\SoftwareDistribution\Download. In the final folder you will find subfolders with long names - these are update files that have not yet been installed or have been installed recently.
View downloaded updates in the Main_partition_disk folder:\Windows\SoftwareDistribution\Download
Via control panel
This option will allow you to view a list of previously installed updates, as well as select and remove some of them:
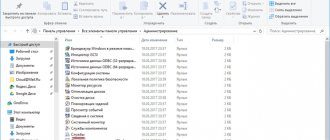
- Expand the control panel. You can find it through the system search bar.
Opening the control panel - Select the Programs and Features tab.
Open the “Control Panel” section - Click on the line “View installed updates”.
Open the “View installed updates” section - A list of updates will open. You can view their name, select the one you need and click on the “Delete” button to erase it and roll back the computer to the moment when it was not installed. After uninstallation, you will have to reboot the system so that it can correctly install the previous version and get rid of the update you deleted. Please note that a removed update will be immediately downloaded and installed again, unless you have previously deactivated the automatic update.
We look through installed updates and remove unnecessary ones
Where is network management in Windows 10?
Let's start with the simplest method, which is a little similar to the usual path used earlier.
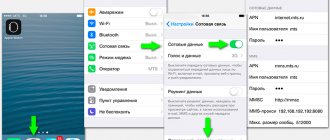
- You need to right-click on the network connection icon (it may look like a screen or a signal level - in the case of a Wifi connection);
- Go to the item “Open parameters...”:
- 3-4 seconds will pass and a window will appear. There is no need to switch to other tabs on the left, we just scroll through the list of options on the right to the very bottom and see there a link to the functionality we need:
It seems to me that such a solution is not much more complicated than the one that users of previous versions of the OS are accustomed to. Just a couple of steps and you're done. But next I’ll talk about a few more options.