The created image of the Windows operating system is the optimal and most effective means of quickly restoring it to a working state with all the previously made settings. Most experienced users resort to such a solution, because it saves enormous time, and the restored system has all the necessary settings and contains a complete list of necessary software, if, of course, it was installed before the image was created. In this topic, we will look in detail at how to create an image of Windows 7, 8, 10 and the outdated, but still used Windows XP, in the most effective way.
Why should you choose a Windows 10 image backup?
We all know that backing up our data is important, especially when upgrading to a new version of Windows. But instead of fiddling with partitions for specific data or syncing to the cloud, why not just back up your entire Windows installation?
You can add personal folders to the image backup, but skip apps and games. In addition, you can create an image of the entire system disk. Naturally, you will need a suitable amount of storage for such a backup.
Thanks to the ISO image format, you can create backup copies of your entire PC. Essentially, it creates an exact copy of your entire drive or selected directories. You will be able to restore the backup image in the event of a disaster.
ISO files can also be used to backup existing CDs and DVDs
What are ISO files and how can you create, use and burn them for free in Windows 7
What are ISO files and how can you create, use and burn them for free in Windows 7 ISO files can be created from any CD or DVD you have. They are called "disk images" because they are an exact image of the disk. The ISO file contains an exact representation of… Read more
,
CDBurnerXP
CDBurnerXP is another convenient free utility in Russian that allows you to burn discs and at the same time create their images, including in Windows XP (the program works in both Windows 7 and Windows 8.1). With good reason, this option is considered one of the best for creating ISO images.
Creating an image takes place in a few simple steps:
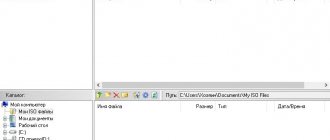
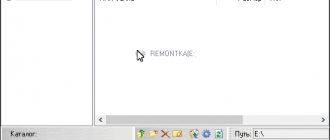
- In the main program window, select “Data disk. Create ISO images, burn data discs" (If you need to create an ISO from a disc, select "Copy disc").
- In the next window, select the files and folders that you want to place in the ISO image, drag and drop them into the empty area at the bottom right.
- From the menu, select “File” - “Save project as ISO image”.
As a result, a disk image containing the data you selected will be prepared and saved.
You can download CDBurnerXP from the official website https://cdburnerxp.se/ru/download, but be careful: to download the clean version without Adware, click “More download options”, and then select either the portable version of the program that works without installation, or the second installer option without OpenCandy.
Creating a Windows 10 ISO System Image Using DataNumen
One popular way to use disk images is to create a clone of the hard drive (HDD or SSD) that may end up in the last place.
DataNumen Disk Image (aka "DDKI") is one such solution, works on all versions of Windows and is available as free software.
After downloading and installing the utility, use the clone tab to select the drive from which you want to make an image; To clone multiple drives, use the Batch Clone tab.
Select the destination and assign the file name in Output Image File as the field where you have to select the destination drive. This is the device you use to save your backup. This could be an existing external drive or a hard drive you recently purchased.
Click Start Cloning . This copies your disk to the target device, ready for use. Our view on HDD cloning
How to clone your hard drive
How to Clone Your Hard Drive Copy the entirety of one hard drive to another. This is called cloning, and it is an important process if you want to replace or upgrade the primary hard drive on your computer. Cloning is not the same... Read more
covers this topic in more detail.
Possible problems
If you follow everything according to the instructions, there should be no problems. However, let's look at the possible options:
- the download does not start : if the process hangs from the very beginning, then you need to check the Internet connection and the antivirus blocking; perhaps it is blocking the service. Also check the storage capacity (there may not be enough space);
- the process freezes at a certain point : in this case, there is a high probability that you have a problem with the hard drive. In this situation, you can make several attempts to correct this situation.
- Check your system for virus programs.
Virus in the system - Press the combination “Win + X” -> “Command Prompt”. Enter the command: “chkdsk C: //”. We accept the verification and reboot the computer.
- the disk or flash drive does not work: replace the image and rewrite the installation disk;
- Lost connection with the drive: let's try to clean the disk and start the installation again. There are situations when the only solution is to replace the disk.
In fact, burning a system image to disk is not such a difficult task, so problems are encountered very rarely.
Creating an ISO Disk Image in Windows 8.1
The same disk image tool is available in later versions of Windows. Ideally, you will need to upgrade Windows 8 to Windows 8.1 before proceeding.
To find the system image tool, click Start and type " file history ". Automatic search will show Recover your files from File History entry first, so click that button to open File History tool, then System Image Backup in the bottom left corner.
You can then continue as described in the Windows 7 section above. After creating a backup ISO, follow the Windows 8.1 steps below to restore the image to Windows 10. In case of a disaster recovery, you will need to boot into Windows 10's equivalent of Safe Mode.
How to Boot into Safe Mode in Windows 10
How to Boot into Safe Mode in Windows 10 Safe Mode is a built-in troubleshooting feature that allows you to fix problems at the root without the intervention of non-essential applications. You can access Safe Mode in a variety of ways even if Windows 10 no longer boots. Read more
restore the image.
Recovering a Windows 8.1 disk image
If upgrading to Windows 10 doesn't work for you (you might end up with a reboot loop), having an ISO image to fall back on is a huge advantage. You can restore a Windows 8.1 disk image in the Windows Advanced Settings screen, which you will find by pressing F8 several times when your computer boots (or holding SHIFT while clicking Start again ).
In Advanced startup options , select Repair your computer > System image recovery and follow the instructions, ensuring that Windows can find the ISO file.
Note that even if you have Windows 8.1 installation media, you can still restore the disk image. On the Install Now screen, use the Fix your PC link and then Repair .
Creating an image using the Archive Wizard
Step-by-step instruction:
- Open “Start” on your computer desktop.
Open the Start menu
- Go to the “Control Panel” section.
Go to the “Control Panel” section
- Select "System and Security".
Select "System and Security" - “File history” - click on this section.
Click on “File History”
- On the left click “Backup”.
In the left column, click “Backup”
- In the menu list on the left, launch “Image creation”.
Run “Create a system image” - While the system is searching for devices, your task is to select the storage location for the archive and then specify it.
There are some options for the location of the Windows image:
- hard disks . There are 3 options for storing your image: 1) SSD drive (external); 2) internal additional hard drive; 3) one of the disk partitions that you are archiving. The most reliable is the first option. If the archive is stored internally on a disk, then if the hard drive fails, the archive will be lost;
- DVD disc . This option is not reliable, but still many prefer to choose it;
- network folder . If you consider yourself an experienced PC user, then you can safely choose this option. To do this, you need a network connection and you must know the parameters for accessing the resource.
- Select an option and click “Next”.
Select an option and click “Next”
- At this stage, it is possible to select archiving disks.
After this procedure, click on the “Archive” button. You can look at the volume it takes to create your copy. Click on the “Archive” button - We wait for the archiving process to complete (this often takes about 20-40 minutes). Once completed, you can immediately begin creating the disk if you do not have one.
Select create a recovery disk and click “Yes”
Backup your Windows PC using an ISO image
As you can see, creating an ISO image backup of your entire Windows system is ideal for backup before a major system update. Additionally, the speed with which an ISO can be created and subsequently restored should make it a much more attractive option than simply backing up your data and hoping for the best.
Once your ISO is made, you may need to boot your computer from it after a system crash. Try one of these tools to create a bootable USB from your ISO file
10 Tools to Create Bootable USB from ISO File
10 Tools to Create Bootable USB from ISO File Installing an operating system from a USB drive is fast and portable. We test several ISO-USB tools to find the best one for you. Read more
,
Learn more about: data backup, data recovery, disk image, ISO.
How to Run Really Old Software on a 64-bit PC: 6 Methods
View Queue
Queue
- delete everything
- Disable
Free ISODisk program - full-fledged work with ISO images and virtual disks
The next program is ISODisk, which can be downloaded for free from https://www.isodisk.com/. This software allows you to perform the following tasks:
- Easily make ISOs from CDs or DVDs, including a bootable image of Windows or another operating system, computer recovery discs
- Mount the ISO on the system as a virtual disk.
Regarding ISODisk, it is worth noting that the program copes with the creation of images with a bang, but it is better not to use it for mounting virtual drives - the developers themselves admit that this function works fully adequately only in Windows XP.
Video text
In this tutorial I will tell you how to make a backup (image) of installed Windows in Acronis. Then how to restore (deploy) any Windows from an image (backup). Or how to install a fully configured and ready-to-use Windows XP, Windows 7, 8 and 10 in 5 minutes. Like and subscribe to the channel, there are many more interesting videos.
Cheap license for Windows and Office - https://vk.com/market-43241369
With the help of our videos you can easily upgrade your computer. Remove all viruses and nasty things from Windows. Conduct self-diagnosis of your computer. In general, everything for the good functioning of your computer!
A disk image is a file that contains the most complete information about the file structure and data of any media (hard drives, optical disks, USB drives, etc.). It can be used for completely different purposes (installation or system recovery, data backup). The following will show you how to create an ISO image. Let's take Windows 7 as the platform used. But consideration of this issue is inextricably linked with what kind of result should be obtained.
Creating a disk image in Ashampoo Burning Studio Free
A free program for burning discs, as well as for working with their images, Ashampoo Burning Studio Free - in my opinion, is the best (most suitable) option for most users who need to make an ISO image from a disc or from files and folders. The tool works on Windows 7, 8 and Windows 10.
The advantages of this program over other similar utilities:
- It is free of additional unnecessary software and Adware. Unfortunately, with almost all the other programs listed in this review, this is not entirely true. For example, ImgBurn is very good software, but you won’t be able to find a clean installer on the official website.
- Burning Studio has a simple and intuitive interface in Russian: to perform almost any task you will not need any additional instructions.
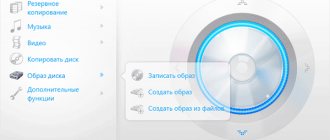
In the main window of Ashampoo Burning Studio Free, you will see a list of available tasks on the right. If you select “Disk Image”, then you will see the following options (the same actions are available in the File - Disk Image menu):
- Burn image (writing an existing disk image to a disc).
- Create an image (taking an image from an existing CD, DVD or Blu-Ray disc).
- Create an image from files.
After selecting "Create an image from files" (I'll cover this option), you'll be asked to choose an image type - CUE/BIN, Ashampoo's native format, or a standard ISO image.
And finally, the main stage of creating an image is adding your folders and files. At the same time, you will clearly see on which disk and what size the resulting ISO can be written to.
As you can see, everything is elementary. And this is not all the functions of the program - you can also burn and copy discs, record music and DVD movies, and make data backups. You can download Ashampoo Burning Studio Free from the official website https://www.ashampoo.com/ru/rub/pin/7110/burning-software/Ashampoo-Burning-Studio-FREE
How to create an ISO disk image in Windows 7: options
Despite the fact that today you can find quite a lot of image formats, we will focus on considering all the procedures based on the most popular ISO format, which is supported by all programs and systems.
So how do you create an ISO image? Windows 7 is a platform that is perfect for such purposes. Based on further use, images can be divided into several categories:
- installation distribution image;
- to boot and restore the system;
- a backup image of Windows, programs and user information.
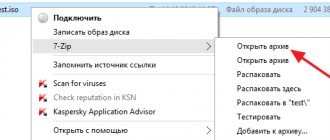
Opening a disk image in Windows 10
You can open the disk image using the WinRAR archiver.
- Open the folder in which the disk image is located.
Open the folder in which the disk image is located
- Right-click on the image and select “Open with” -> “Select another application”.
In the additional window, click “Select another application” - In the window that opens, select “WinRAR” or “Zip” and click “OK”.
Select “WinRAR” or “Zip”, click “OK” - Ready.
In the window that opens, you can see the contents of the image. You can view the files, extract them, or copy them to another folder. The contents of the image can be copied to another folder
Recovering or installing a system using a disk image is not that difficult. By following the instructions, you can understand which method is closer to you and cope with this task.
Most popular programs
Today, you can find quite a lot of applications on the software market that can work with images. The most popular are the following:
- UltraISO.
- Daemon Tools.
- Nero.
- Alcohol 120%.
- ISO Workshop.
- Acronis True Image, etc.
With a wide variety of all kinds of software, you should also take into account that Windows systems themselves have good tools for working with images. This particularly applies to backup and recovery. Like most of the above-mentioned programs, such tools allow you to create images in a matter of minutes. True, if the contents of a hard drive or virtual partition are copied, it may even take several hours. It all depends on the amount of information.
We use third-party snails
Remember that this recording on optical DVDs is gradually losing its relevance. After all, netbooks, ultrabooks and tablets do not have a disk drive. We recommend sticking to recording on an SSD drive or flash card.
We first install the necessary program and then proceed to record the operating system image.
Daemon Tools
DAEMON-Tools program
This product is the most popular on the software market. We create a system image on disk by performing the following steps:
- Let's launch the program.
Launch the Daemon Tools program
- Open the “Disc Burning” section.
Open the “Disc Burning” section
- Select “Burn image to disk”.
Select “Burn image to disk” - Click on the rectangle with three dots and select a location. There should already be a prepared disc in the drive.
Click on the rectangle with three dots and select a location
- We launch the program by clicking on the “Start” button. After recording is complete, you should check the functionality of your drive.
We launch the program by clicking on the “Start” button
Making a USB drive as a system image.
- Let's launch the program.
Launch the Daemon Tools program
- Open the USB section.
Open the USB partition - Find and select “Create bootable USB”.
Select “Create bootable USB”
- Select the path by clicking on the rectangle with three dots.
Click on the rectangle with three dots
- You need to check the box “Windows boot image (not Linux)”. We launch “Start”.
Click on the “Start” button
We check the functionality of the bootable flash drive.
Alcohol 120%
This program has been in effect for many years, there is a huge disadvantage here - it only works with disks (optical media), so you won’t be able to make a flash drive with bootable media.
We begin the process by performing the following steps:
- Open the program and select the second section “Write images to discs” in the left menu.
Select the second section “Write images to disks” - Select the desired file, which is the image (click the “Browse” button). Click on “Next”.
After selecting the file, click “Next”
- We start the program with the “Start” button.
We launch the program with the “Start” button
Upon completion, we check the functionality of the disk.
Note! Also, the Alcohol 52% program has the right to exist, but its functions are even more limited; it can only write an image to a virtual disk. Starting the system properly with these actions does nothing.
Modern analogues will provide you with a more necessary service.
NERO
With this program, you will again be able to record only to external DVDs, but not to a flash drive.
- You can download a trial version of this program and use it for these purposes.
- After installing the program, launch it. We proceed sequentially: “New” -> look for “DVD-ROM”, in the “Multi-session” section, select the item “WITHOUT multi-session” -> then “New” again (button in the lower right corner).
After the sequence of actions, click the “New” button
- In the top menu, select “Recorder” and proceed to “Record an image”.
On the “Recorder” tab, select “Record image..”
- Find the required IOS image and open it by clicking on the “Open” button.
- Click “DVD Image”, change the speed if necessary and start “Burning”.
Click “DVD Image” and start “Burning”
The average process time is 30-40 minutes, it can reach an hour (depending on the selected speed). Upon completion, we check the functionality.
Nero Express
- Launch the program file, select “Image, project, copy” on the left, then click on the folder icon named “Disk image or save project.”
Click on the folder icon named “Disk image or save project” - Select the desired file, which is an image, and “Open” it.
Select the image and click “Open”
- Launch "Record".
Launch “Record”
We wait for the end of the installation process and check the functionality of the disk.
Note! Unfortunately, Nero does not have a version that can work with flash drives, so this program is not as effective.
ULTRAISO
This old tool is the most powerful for the job. With its help, you can store a disk image on flash drives and on various disks.
Making bootable media from a flash drive
- We launch the program, then at the bottom we find the desired file, which is the image, and left-click twice (double-click).
Launch the program and find the required file
- You can find the “Bootboot” item in the top menu list, click “Burn hard disk image”.
In the “Boot” section, click “Burn hard disk image” - Select the desired flash drive and start “Recording”. The program may require formatting of your drive, which you must approve.
Select the desired flash drive and click “Record”
We are waiting for completion, checking for functionality.
The boot disk is created in the same way.
- Select the desired file.
- In the top menu item “Tools”, select “Burn image to DVDCD”.
- Let's start "Recording". We are waiting for the program to finish.
Other applications that may be useful
- Universal_USB_Installer;
- Win_Setup_FromUSB;
- BOOTLER;
- RUFUS;
- XBOOT;
- SARDU;
- Win2_USB Free, etc.
Creating a disk image using Microsoft resources
Few people know that recently developers from Microsoft Corporation have provided users of licensed Windows 7 operating systems with the opportunity to create a system image for recovery in case of unexpected failures directly on the official web resource. How to create an ISO image of Windows 7 in such a situation? As it turns out, it’s as simple as shelling pears. To do this, you need to go to the Microsoft website in the Software section, scroll down the page and see if the product license key is actually listed there (nothing will work without it).
Installing Windows 10 from an image
You can install the OS without certain skills and abilities.
- Insert the flash drive or disk into the PC and restart the computer. Press any button and the BIOS window appears.
- Select the basic settings and click “Next” -> “Install”.
- Enter the product key, if available. Or click the “No key” button.
Enter the key or click “Skip”
- Next, we accept the agreement and select the installation type (custom installation should only be selected by experienced users).
- Select the partition in which the system will be installed. We are waiting for the process to complete.
Select the partition in which the system will be installed and click “Next”
After installation, we configure the system (creating an account, setting standard parameters).
How to Create a Bootable Windows 7 ISO Image
If you don't have a key, you can use another tool. The question of how to create an ISO image of Windows 7 using system tools is resolved through the archiving and recovery section. Here, in the menu on the left, you need to use the image creation item, and after scanning, the system will prompt you to select the option for saving data (hard drive, optical media, network location). If we are only talking about creating a disk from which you can then boot and fix some malfunctions or glitches, you can choose DVD-ROM. However, if you are backing up an entire disk partition, it is better to save the copy on a hard drive (you may need too many optical disks).
Additionally, you can use the creation of a recovery disk from which the boot will be made if a backup copy is saved on the hard drive. In principle, you can use third-party utilities, but when creating an image you should pay attention to one point. The image you create must have boot entries. For example, UltraISO offers to create an ISO image of Windows 7 through the boot menu (Make Disk Image). In this case, we mean a copy of the hard drive with a working system. From it in the future it will be possible to restore not only the OS itself, but also all installed programs in a few minutes.
PowerISO - advanced bootable ISO creation and more
The PowerISO program, designed to work with boot images of Windows and other operating systems, as well as any other disk images, can be downloaded from the developer’s website https://www.poweriso.com/download.php. The program can do anything, although it is paid, and the free version has some limitations. However, let's consider the capabilities of PowerISO:
- Creating and burning ISO images. Creating bootable ISOs when there is no boot disk
- Creating bootable Windows flash drives
- Burn ISO images to disk, mount them in Windows
- Creating images from files and folders, from CDs, DVDs, Blu-Ray discs
- Converting images from ISO to BIN and from BIN to ISO
- Extracting files and folders from images
- Support for Apple OS X DMG images
- Full support for Windows 8
The process of creating an image in PowerISO
These are not all the features of the program and many of them can be used in the free version. So, if creating boot images, flash drives from ISOs and constantly working with them is your thing, take a closer look at this program, it can do a lot.
Creating an installation image
Finally, one more aspect. Let's say you want to create an ISO image of Windows 7 as an installation distribution that you can save to your hard drive or burn to optical media. To do this, you will need a real DVD with the distribution and one of the above programs. For convenience, again, let's take UltraISO.
We insert the original DVD into the drive, and in the running program we use the tools menu, where the image creation line is selected (to quickly call the procedure, you can press the F8 key). Next, select the drive with the distribution, indicate the storage location and the name of the image file being saved, and set the output format (in our case, ISO). After that, click the “Make” button and wait for the process to complete. The file will be saved in the selected directory. Then it can be written to an optical disc.
We are working on creating a Windows 10 image
Necessary tools to create a Windows 10 image
We prepare the necessary tools for this process. You may need things like:
- SSD disk (external);
- USB drives;
- DVDs.
Next, select the appropriate option (all options are described below) and begin work.
Instead of an afterword
Finally, it remains to add that when creating images, you should initially pay attention to what kind of data such a file should contain. Depending on the purpose and sequence of actions will be different. In terms of the programs used, the user himself decides what to give preference to. In general, all means are good. However, it is believed that backups can be created both using system tools and using third-party programs, but making copies of optical media using Windows tools is a troublesome task. All you have to do is copy files to the hard drive, displaying hidden objects, then write them to disk, etc. Moreover, such a copy will not be an image. To simplify all these procedures, we can speak with 100% confidence about the advantage of third-party utilities.
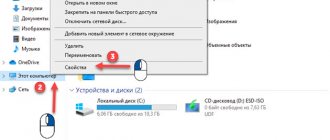
Windows image storage location
You can see the location of your archive files, as well as find out the space it occupies.
A visual view of storing an image of your system:
Type of storage of your system image
An example of the location of the image can be seen in the screenshot.
Example of image location
To find out the size of the archive, right-click on the folder and go to “Properties”.
Go to “Properties”
Format
The .ISO format is in no way related to Windows 7. This format is used to distribute any programs, including the distribution of operating systems. Moreover, when you buy a CD/DVD with a game/program, there is a very high probability that the media was created from this type. So there is no connection between Windows 7 and the ISO format; the OS is only one of many utilities that is distributed in this format. This format has gained popularity for a number of objective reasons:
- Allows you to reduce the size of installation files;
- Allows you to create installation media;
- Optimal for working with external media;
In Russia they are not very accustomed to the term ISO, most often calling it simply an image. This is the same thing, and if you want to call it an ISO image, then you can do so. The main thing is not to get confused about why this format exists. From it you can create installation media.
On the Internet you can download the OS in another form, for example, in its pure form or a ready-made installation file. These formats also have a right to exist, but they often hide viruses. The ISO format is also good because it is literally transparent to antiviruses and can be checked even by regular ones.
Option 2: ImgBurn
Due to its ease of use and clear interface, this free program can be called one of the most convenient. However, even on the official website you will not find a pure executable file. The standard installer package also contains unwanted software.
If this fact doesn’t bother you or you need a powerful antivirus, feel free to take this application and use it. By the way, no suspicious activity was detected in Windows 10, but you should still be careful. Developer website: www.imgburn.com. ImgBurn is a functional program with a simple interface. With its help, you can create a boot disk for installing the Windows 7 operating shell.
When downloading by default, the program is downloaded in English, but, if desired, you can always download the crack file from the official source, and then insert the file with the Russian language into the Language folder.
The application can create virtual images from disks and files. Creating an image from a file is very simple: just click on the appropriate icon and add files and directories to create the image.
How to reinstall Windows with all programs in 15 minutes
Today, in continuation of the topic of setting up and optimizing Windows 10, I’ll tell you how I solve the issue of backing up the system disk.
So, we installed Windows, configured it, cleaned it of unwanted functionality, and installed all the programs. Everything flies, everything is fine. Now it is important to somehow record this state of the system so that in the future you can easily return to it, and not do the same work every time.
This can be done by creating an image of the system disk and a special bootable flash drive.
Such an image will be a kind of safety net in case some virus penetrates the system or the computer simply refuses to boot at the most inopportune moment. And in general, if you are ever no longer satisfied with the speed of the system, you can quickly return to the original state of the newly installed and configured operating system with all the programs on board in 10-15 minutes.
How to make this image?
First, we need a special program that can create images of hard drive partitions. There are many such programs. Some of them are paid, but there are also good free options.
The most famous paid program is Acronis True Image . I purchased a license for this program and am using it successfully.
Among the free ones, I can recommend Macrium Reflect Free and AOMEI Backupper. In this guide, we will walk you through the process of creating an image using the AOMEI Backupper program as an example.
Step 1. Install AOMEI Backupper
You can download AOMEI Backupper from the official website of the developer: AOMEI Backupper. After the download is complete, run the installer. In the window that appears, click Install Now .
Next, wait until everything is installed and click on the Enjoy Now .
Step 2. Create an image of the system partition
Open the Backup . Next, select System Backup .
Next, select the system drive, indicate the location to save the image and click the Start Backup .
We are waiting for the image of the system partition to be created. While we wait, you can check the checkbox Check backup integrity on completion - check the image for integrity after its creation.
When the process is complete, look at which directory the image was placed in. In my case, this is C:\System Backup(1) and click Finish .
Now find this folder
Let's open it. Inside we have an image of the system disk that was created by the program in the previous step.
It is better to immediately save it to an external hard drive or network drive, if you have one.
Step 3. How to restore the system from this image when the need arises?
If the system has been infected by a virus or it simply no longer suits you, then you will most likely want to restore the system. How to do it?
There are two options here.
Option 1. If your computer starts normally and Windows continues to work, then to restore the image you simply run this program and go to the Restore .
There we check the box next to System Restore, connect the external hard drive on which you have the image and use the Path to point it to the program. Next, click the Next .
In the window that appears, the program will detect that you are about to restore the system partition. We agree.
Next, make sure that we have selected the correct image file from the external hard drive and click Next .
On the next page, we check that the source partition and the one recorded in the image match in file system and size, and click Start Restore .
A window like this will appear in which we are warned that the recovery will occur in reboot mode. Click Yes .
The program will require some time to prepare the system. After a few minutes, the system will automatically reboot and the recovery process will begin during the reboot process.
For me it looked like this:
Option 2. In case your computer won’t boot at all (due to a virus or something else), you will have the opportunity to boot from a special flash drive and restore the system partition from there.
To create a bootable USB flash drive you need to go to the Utilities and select the Create Bootable Media .
Windows PE bootable media type and click Next .
Next again
We indicate USB Boot Device and select a clean flash drive there. A flash drive with a size of 1 GB or more is suitable.
Further we are warned that all information that was previously on the flash drive will be destroyed. We agree.
Now the program will analyze which drivers need to be added to the image so that booting from the flash drive goes smoothly. Click Ok .
We wait until the bootable media is created. It took me about 5 minutes. When everything is ready, click Finish .
Now let's check the flash drive. It should have the following files.
Now, if you need to boot from it, then when you restart the computer you will need to go into the BIOS and set this flash drive as the first source.
Next, you will boot into an environment from which you can restore the system partition using the steps described in step No. 3.
That's how it works. I hope this information was useful to you, and now you will definitely make a backup system image for yourself in case of emergency. And in general, it’s much more comfortable to work at the computer when you know that you always have a backup copy of your perfectly configured system, which you can return to in 15 minutes.
I am also pleased to announce that for those who are interested in the topic of the Windows 10 operating system in a more complete format, I have prepared a new course “Customizing and optimizing Windows 10 using the method of Evgeny Popov.” It was recorded during the actual installation and configuration of Windows 10 on my computer.
In it, in the format of step-by-step video tutorials, you will see everything that I do with my system from A to Z.
The entire course is divided into several blocks:
1. Optimizing performance 2. Cleaning spyware functionality 3. Installing and configuring programs 4. Setting up protection via Shadow Defender
There is also a separate module for creating images of the system partition using Acronis True Image and Macrium Reflect .
The course itself will be launched next Wednesday, May 31, 2017 . According to tradition, the best conditions will apply in the first three days. Firstly, these days the price will be 35% lower , and secondly, several more valuable points await you, which I will tell you about next week.
While we are perfecting the course, I invite you to read a short presentation from which you can learn more about the course.
Click here to go to the presentation
ISO recorder
A good utility that is the simplest solution for Windows 7. Unfortunately, it can only create images from disks, but not from folders and files. This is a minor drawback that requires a writing optical drive.
- Many useful options: selection of speed mode, automatic ejection of the drive immediately after the end of the recording process;
- Minimal impact of the program on system performance. You will be able to go about your business without even noticing the image creation procedure;
- If you need to burn a disc as quickly as possible, you should select the accelerated mode, which will reduce the time but create a greater load on resources;
- The software is integrated into the context menu for accelerated access to program functions.
Download
Download
The instructions are very simple:
- Insert the desired media into the drive;
- When it loads, go to “Computer” and right-click on the disk;
- From the context menu, select “Create image from CD / DVD”.
I think there is no need to remind you that the program must first be installed in order for this item to appear in the menu.
How to use
Using this file, you will not be able to install the OS until you create an installation disk/flash drive. You can even open .ISO with a regular archiver, but it won’t do any good. The installation must take place from external media and start from the BIOS. Otherwise, you may harm the operation of the system on which you downloaded Windows 7. More details about downloading:
If you open the archive, you will find regular program files inside, as if you had opened them on disk. In this regard, the format is as similar as possible to archives. Moreover, using this format, the final size of installation files is significantly reduced. But this is not an archive, it is a convenient shell for creating installation media. You can use it not only to create a disk, but also a flash drive.
To give you the maximum experience, we have released Windows 7 Ultimate. This is the most complete version of the OS, but it is also the heaviest.
OS installer media is useful. You never know at what point the system will refuse to work or a friend will urgently need to reinstall Windows, let alone a recovery disk that can bring a dying operating system back to life. Let's look at how to create and burn bootable (installation) media for different cases.