https://ultraiso-ezb.ru/#download You decided to install Windows: you recorded a digital copy on a flash drive, configured the BIOS, rebooted your computer or laptop, but for some reason the installation did not start. What the heck? Why doesn't the BIOS detect the bootable flash drive? It seems like everything was done correctly...
There are 2 most likely reasons here. The first is that the BIOS does not display the flash drive because it is not bootable. Second, you haven’t configured the BIOS quite correctly.
Although there is one more nuance - your BIOS is too old. It does not support USB drives, and therefore does not see them. In this case, you can install Windows from a disk.
As for the first two reasons, we will look at them in more detail.
BIOS does not see bootable USB flash drive in Boot Menu - how to fix it
Guides for installing Windows from a flash drive or simply booting a computer from it include simple steps: set boot from a flash drive in the BIOS (UEFI) or select a bootable flash drive in the Boot Menu, but in some cases the USB drive is not displayed there.
This instruction details the reasons why the BIOS does not see the bootable USB flash drive or does not show it in the boot menu and how to fix it. See also: How to use Boot Menu on a computer or laptop.
Setting up BIOS to boot from a USB drive
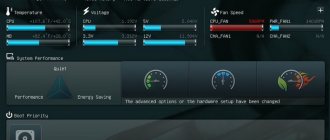
Let's look at an example of loading UEFI BIOS from a USB drive. For example, we will use the MSI motherboard - A58M-E33, which has the latest version of UEFI BIOS. To enter the UEFI BIOS settings of the A58M-E33 motherboard, you must press the key when starting your laptop or desktop computer. A boot menu will open in front of you, in which you need to select a flash drive, in this case it is “KingstonDataTraveler 2.0PMAP”.
You can also set it in the options so that the flash drive boots immediately from the BIOS. To do this, press the key during boot. You will be taken to the UEFI BIOS main menu.
Then go to Settings Boot menu and put the flash drive in the first place as shown in the picture below.
Now your system will boot from the selected flash device. But if your PC or laptop has UEFI and the system does not see the bootable USB flash drive, it means the image was written incorrectly, or the “Safe boot” mode is enabled (how to fix it, see the section below “How to set up UEFI so that ...").
Boot Legacy and EFI, Secure Boot
The most common reason that a bootable flash drive is not visible in the Boot Menu is that the boot mode supported by this flash drive does not match the boot mode set in the BIOS (UEFI).
Most modern computers and laptops support two boot modes: EFI and Legacy, and often only the first is enabled by default (although it happens the other way around).
If you burn a USB drive for Legacy mode (Windows 7, many Live CDs), and only EFI boot is enabled in the BIOS, then such a flash drive will not be visible as a bootable one and you will not be able to select it in the Boot Menu.
Solutions in this situation may be as follows:
- Enable support for the desired boot mode in the BIOS.
- Burn the flash drive differently to support the desired boot mode, if possible (for some images, especially not the newest ones, only Legacy boot is possible).
Regarding the first point, most often you need to enable support for Legacy boot mode. This is usually done on the Boot tab in the BIOS (see How to enter the BIOS), and the item that needs to be enabled (set to Enabled mode) may be called:
- Legacy Support, Legacy Boot
- Compatibility Support Mode (CSM)
- Sometimes this item looks like selecting an OS in the BIOS. Those. The name of the item is OS, and the option values for the item include Windows 10 or 8 (for EFI boot) and Windows 7 or Other OS (for Legacy boot).
Additionally, when using a bootable USB flash drive that only supports Legacy boot, you should disable Secure Boot, see How to disable Secure Boot.
On the second point: if the image being written to the flash drive supports booting for both EFI and Legacy modes, you can simply write it differently without changing the BIOS settings (however, for images other than the original Windows 10, 8.1 and 8, you may still need to disable Secure Boot).
The easiest way to do this is using the free Rufus program - it allows you to easily select what type of boot you want to burn the drive for, the main two options are MBR for computers with BIOS or UEFI-CSM (Legacy), GPT for computers with UEFI (EFI boot) .
More details on the program and where to download - Creating a bootable USB flash drive in Rufus.
Note: if we are talking about the original image of Windows 10 or 8.1, you can burn it in the official way; such a flash drive will support two types of boot at once, see Bootable Windows 10 flash drive.
System file INFCACHE.1 – the root of all evil
If you have tried all the above methods, but the problem has not disappeared, then you can try another, but more drastic method. Simply remove the INFCACHE.1 system file from your computer. You can find it in the WINDOWS root directory, on your hard drive C, or wherever your operating system is installed. The full path to this file looks like this: WINDOWS:system32DriveStore. You can also find it through search or using the command line. If after deleting this file the problem disappeared, then all the problems were related to cache memory corruption. The next time you turn on your computer, the INFCACHE.1 file will be restored by itself.
Additional reasons why the flash drive does not appear in the Boot Menu and BIOS
In conclusion, there are some more nuances that, in my experience, are not fully understood by novice users, which causes problems and the inability to boot from a flash drive in the BIOS or select it in the Boot Menu.
- In most modern BIOS versions, in order to enable booting from a flash drive in the settings, it must first be connected (so that it is detected by the computer). If it is disabled, it is not displayed (connect, restart the computer, enter the BIOS). Also keep in mind that the “USB-HDD” on some older motherboards is not a flash drive. Read more: How to put boot from a flash drive in BIOS.
- In order for the USB drive to be visible in the Boot Menu, it must be bootable. Sometimes users simply copy the ISO (the image file itself) to a flash drive (this does not make it bootable), sometimes they also manually copy the contents of the image to the drive (this only works for EFI boot and only for FAT32 drives). You might find it useful: The best programs for creating a bootable USB flash drive.
It seems that's it. If I remember any other features related to the topic, I will definitely add to the material.
Booting from a USB drive on older computers
On older BIOS versions, you can also boot from a USB drive. For example, to boot from an old Acer laptop, you need to press the key at startup. Once in the BIOS of your Acer laptop, go to the “ BOOT ” menu.
Next, go to “ Boot Device Priority ” and put your boot device in first place.
Now after saving, your Acer laptop will boot from the flash device. This configuration of the old BIOS is installed on most Acer laptops. Therefore, with other older Acer laptop models, the setup will be similar.
What to do if the BIOS does not see the bootable USB flash drive
Modern laptops are getting rid of CD/DVD drives one after another, becoming thinner and lighter. At the same time, users have a new need - the ability to install an OS from a flash drive. However, even with a bootable USB flash drive, not everything can go as smoothly as we would like. Microsoft specialists have always loved to present their users with interesting problems. One of them is that the BIOS may simply not see the media. The problem can be solved by several sequential actions, which we will now describe.
Summing up
So, the author of this article is confident that after you have read the material in the presented article, you will certainly succeed. And yet, I would like to note one important fact: most users make mistakes only because they misunderstand the problem and resort to sometimes meaningless advice from “kind Internet GURU”. At the same time, exposing your car to the critical danger of “complete failure.” Be wise when choosing one or another solution to your computer problems and your experience will always be productive!
BIOS does not see the bootable USB flash drive: how to fix it
In general, there is nothing better for installing an OS on your computer than a self-made bootable USB flash drive. You will be 100% confident in it. In some cases, it turns out that the media itself is not made correctly. Therefore, we will look at several ways to make it for the most popular versions of Windows.
In addition, you need to set the correct parameters in the BIOS itself. Sometimes this may be the reason why a drive is not in the list of drives. Therefore, after we figure out how to create a flash drive, we will look at three more ways to configure the most common BIOS versions.
Method 1. Flash drive with Windows 7 installer
In this case, we will use Windows USB/DVD Download Tool.
- First of all, go to the Microsoft website and download the utility from there to create a bootable flash drive.
- Install it and start making a flash drive.
- Using the “Browse” button, which will open Explorer, indicate the location where the OS ISO image is located. Click on “Next” and proceed to the next step.
In the window for selecting the type of installation media, select “USB device”.
Next, the actual process of creating a drive will begin.
- Close the window as usual and begin installing the system from the newly created media.
- Try using a boot drive.
This method is suitable for Windows 7 and older. To record images of other systems, use our instructions for creating bootable flash drives.
In the following instructions you can see ways to create the same drive, but not with Windows, but with other operating systems.
Method 2: Setting up Award BIOS
To enter Award BIOS, press F8 while the operating system is loading. This is the most common option. There are also the following entry combinations:
Now let's talk about how to properly configure the BIOS. In most cases, this is precisely the problem. If you have an Award BIOS, do this:
- Go to BIOS.
- From the main menu, use the arrow keys on your keyboard to navigate to the “Integrated Peripherals” section.
Check that the USB controller switches are in the “Enabled” position; if necessary, switch them yourself.
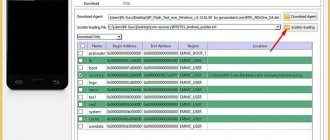
Go to the “Advanced” section from the main page and find the “Hard Disk Boot Priority” item. It looks like the photo below. By pressing “+” on the keyboard, move “USB-HDD” to the very top.
As a result, everything should look as shown in the photo below.
Switch back to the main window of the “Advanced” section and set the “First Boot Device” switch to “USB-HDD”.
Return to the main settings window of your BIOS and press “F10”. Confirm your selection with the "Y" key on your keyboard.
Method 3: Setting up AMI BIOS
The key combinations for entering the AMI BIOS are the same as for the Award BIOS.
If you have an AMI BIOS, follow these simple steps:
- Go to BIOS and find the “Advanced” sector.
Go to the “Boot” tab and select the “Hard Disk Drives” section.
Move the “Patriot Memory” item to its place (“1st Drive”).
The result of your actions in this section should look like this.
In the “Boot” section, go to “Boot Device Priority” and check - “1st Boot Device” should exactly match the result obtained in the previous step.
If everything is done correctly, go to the “Exit” tab. Press “F10” and in the window that appears, enter the enter key.
Method 4: UEFI Setup
Logging into UEFI is carried out in the same way as in BIOS.
This advanced version of the BIOS has a graphical interface and can be operated using the mouse. To set boot from removable media there, follow a number of simple steps, namely:
- On the main window, immediately select the “Settings” section.
In the selected partition, use the mouse to set the “Boot Option #1” parameter so that it shows the flash drive.
Now, armed with a properly made bootable USB flash drive and knowledge of BIOS settings, you can avoid unnecessary worries when installing a new operating system.
Thank the author and share the article on social networks.
Alternative options
So, you have tried all the methods outlined above, but the BIOS still completely refuses to work with the flash drive. In this case, you can use two alternative options.
The first one is installing the OS from a disk. If your computer has a CD-ROM, feel free to create a bootable CD and install the operating system from it. In addition, you can temporarily borrow a CD drive from friends and connect it to your PC.
The second option is to use the Plop Boot Manager utility. It is installed on the hard drive and allows you to select the boot priority without having to go into the BIOS.
What to do if the BIOS does not see the flash drive: step-by-step instructions on News4Auto.ru.
Our life consists of everyday little things that in one way or another affect our well-being, mood and productivity. I didn’t get enough sleep - my head hurts; I drank coffee to improve the situation and cheer myself up - I became irritable. I really want to foresee everything, but I just can’t. Moreover, everyone around, as usual, gives advice: gluten in bread - don’t go near it, it will kill you; A chocolate bar in your pocket is a direct path to tooth loss. We collect the most popular questions about health, nutrition, diseases and give answers to them that will allow you to better understand what is good for your health.
BIOS Settings
Check if USB device support is enabled. How to do this depends on the motherboard model. After turning on the computer, the message “Press [key] to enter Setup” will appear at the bottom of the screen. Click it to enter the BIOS. And look for a menu that has “USB” in its name.
New BIOS versions
You can work with new BIOS versions using a keyboard and mouse. There is also support for the Russian language. You will quickly understand the parameters. But even if it is not there, you will be able to configure the boot order and launch via a USB flash drive.
- Open the “Advanced” tab.
- “USB Configuration” menu.
- Allow initialization from external devices.
- This option may be in another place. For example, in the “Boot” section. It depends on the BIOS type. Focus on the “USB” parameter in the name.
- There, set the launch priority you need.
- Save your changes.
Award-BIOS
After starting the BIOS, do you see two lists on a blue background? Then you have the Award version. You won't be able to navigate through the menu by clicking the mouse. It can only be configured using the keyboard. Below or on the side there will be instructions on which buttons to press for this.
- Go to the "Integrated Peripherals" section.
- Find the "USB Controller" item.
- If the option next to it is “Disabled”, change it to “Enabled”.
- There may be several such points.
- Return to the main menu. To do this, press Esc.
- Open the "Advanced BIOS Features" section.
- Next is the “Hard Disk Boot Priority” subsection.
- You need the "HDD-USB" or "Patriot Memory" parameter. Select it and move it to the top using the “+” (“Plus”) key.
Now let's take a look at boot priority.
- Go to the previous menu.
- Open the "First Boot Device" menu.
- Put “HDD-USB” or “FDD-USB” there.
- It is better to make the second device (“Second Device”) a hard drive (“Hard Drive”). If the flash drive does not start, the bootloader will read data from the hard drive.
- Look in the instructions to see which key is used to save settings. The inscription looks something like this: “F10 Save & Exit”. The system will ask you to confirm the action. Press "Y" (the first letter of the English word "Yes").
When you are finished working with the drive, return to the previous BIOS settings.
AMI-BIOS
The BIOS AMI interface has a gray screen, blue font and a row of tabs at the top. The information block is on the right. Mouse control is also not available.
- "Advanced" section.
- "USB Configuration" menu.
- Next to all settings whose names include “USB Controller” and “USB Function”, set the value to “Enabled”.
Now you can change the bootloader parameters:
- "Boot" tab.
- "Boot Device Priority" parameter.
- Put the flash drive in first place: “Patriot Memory” or “USB”.
- Press Esc to go back to "Boot".
- Open "Hard Disk Drives".
- In “1st Device” select flash media.
- To save changes, go to the Exit tab. There will be an “Exit & Save” option.
Phoenix-Award BIOS
In BIOS Phoenix-Award there is also a gray screen. Information about which keys to press is located below and highlighted in green. If the computer does not boot through the drive:
- Open the "Peripherals" tab.
- There are two “USB Controller” parameters. Set them to “Enabled”.
- You can configure the launch priority in the “Advanced” section.
- Save your changes - go to the "Exit" tab and select "Exit & Save".
You enabled USB support, but for some reason the flash drive is not in the BIOS? The problem could arise due to UEFI, a mode that “protects” the bootloader from malware and foreign code. This module will start the operating system even if you have configured the BIOS correctly. What to do? Disable UEFI.
Settings depend on the motherboard manufacturer. First way:
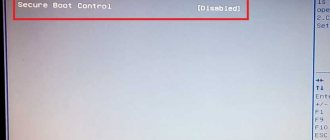
- Open the "Security" tab.
- Set the “Secure Boot” parameter to “Disabled”.
- "Advanced" section.
- “System Configuration” item.
- In "Boot Mode", select "CSM" or "Legacy and UEFI" instead of "UEFI".
- This item may be called “OS Mode Selection”.
- Save.
- Check if the PC boots via flash media.
- "Boot" tab.
- “Boot Device Control” item.
- Select "Legacy and UEFI".
- Save.
After working with the media, re-enable “boot protection”.
You need the “right” flash drive
Perhaps it's the flash drive itself. More precisely, in the way it is written. If you copy information onto it directly, nothing will work. But why is it necessary to create a “bootable” drive? To run it, you need some kind of “software script”. Without it, the system will not understand what to do with the media.
To create a bootable USB flash drive from the LiveUSB utility:
- Insert the drive into the slot.
- Run the installer.
- Select your Flash media from the list.
- Confirm installation.
- Now through this drive you can “reanimate” the system.
To install a third-party OS, you need a ready-made ISO image and a burning program. For example, UltraISO or Rufus. Let's look at the second one:
- Insert the drive into the USB port.
- Launch the program.
- Check the “Create a boot disk” checkbox.
- Click on the disk button.
- Specify the path to the image.
- Click on “Start”.
You can create a bootable USB drive using Windows.
Reason one. Incorrect information on the flash drive
It is possible that the BIOS cannot detect the bootable media because there was a failure during writing or the data does not comply with the BIOS/UEFI standard. Why does this happen? There are several answers:
- You removed the drive without completing the recording process to its logical conclusion.
- You did not use a special recording program, but simply copied the data from the directory - maybe even without unzipping it.
- You are using a “author’s” assembly with critical errors.
In this case, the BIOS does not see the flash drive in the Boot Menu as a bootable media - but it is displayed as a regular flash memory.
To avoid errors in determining the drive, use special applications for recording - for example, Rufus or WinSetupFromUSB - and be sure to complete the recording process without removing the media until a notification appears about the successful copying of data.
BIOS does not see the bootable USB flash drive, how to solve the problem
So, you have decided to install a new system, or use some kind of utility to work with the same system, but it must be written to a flash drive. You insert a flash drive into a USB port, and then the question arises, why doesn’t the BIOS see the bootable flash drive ?
You created a bootable USB flash drive, but the BIOS does not see it. Many factors play a role here, for example, you made the bootable USB flash drive incorrectly, the BIOS needs to be reset or even updated, the program you used to create the bootable USB flash drive turned out to be damaged, and much more. Let's try to solve this problem.
What to do if BIOS does not see the bootable USB flash drive
How to make a bootable USB flash drive and how to do it correctly
First, you should make sure that the flash drive really does not work with your computer. You can check this by using the drive on another PC or laptop; if the same thing happens there, then you probably created the bootable USB flash drive incorrectly.
I would like to note that if you just threw files onto a flash drive and think that it will work, then I hasten to disappoint you. To record a distribution of a system or program, special utilities are required. I will list them now:
And this is not all the programs, but I have listed the most basic tools. I have a review for each. For example, if you want to make a bootable USB flash drive with Windows, then use Rufus or WinSetupFromUSB. If the first one does not work and the flash drive is not visible in the BIOS, then use another one.
I will list the articles that I talk about creating a bootable USB flash drive. You probably know many of the methods.
If you have used all the specified utilities and the flash drive still does not work, make sure it is working properly, try formatting it to NTFS or FAT32, and try booting from another computer. And if this does not help, then use another flash drive.
USB drive for UEFI computer
If you buy a new computer or laptop now, it will definitely support UEFI BIOS. There are many benefits to using the new UEFI BIOS, so the bootable flash drive must support UEFI systems.
If you create a bootable USB drive for Windows 7, 8.1 using MediaCreationTool , then the UEFI system will support it. But this option will not work with the Windows USB/DVD Download Tool for Windows 7.
Let's consider the option of creating an installation flash drive with support for UEFI systems for Windows 7. To do this, download the Rufus . Before starting the program, insert the USB drive. After launching the Rufus utility, select the Windows 7 image. This can be done by clicking on the DVD disk icon. The program window will look like this.
If all the points match, as shown in the figure, then feel free to press the button, after which file recording will begin.
After recording the files, you can use the flash drive to install Windows on the UEFI system. Rufus can also be used for systems with a regular BIOS. A notable feature of the Rufus program is the fast speed of writing the image to the drive.
After reading this material, you will be able to create bootable flash drives for Windows and Linux-like operating systems. And you won’t have questions like: why is my flash drive not in the BIOS or why Windows doesn’t support the UEFI system.