Lenovo is on the list of the largest companies in the world that produce computers. And since the demand for the products of this company is growing, questions about the proper operation and operation of Lenovo equipment are becoming more and more pressing for users. And for those who decide to reinstall Windows, at the very beginning of the process the question arises: how to enter the BIOS in Lenovo?
First, it’s worth understanding what a BIOS is and what it comes with. So, BIOS on Lenovo is a special microscopic program that ensures correct and stable interaction between all components of the PC and the OS and allows you to customize it. And the BIOS setting is a standard PC setting that helps the system calculate the functions that should be activated and how they should be loaded. BIOS is available on any computer, be it Lenovo B560, Lenovo S21 or M5400.
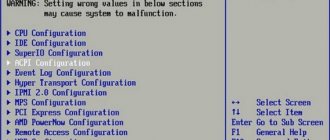
Today, several different versions of Bios have been created, which differ slightly in appearance, but as far as functions are concerned, everything is identical. Each version is used to initially set up the computer and test it. BIOS functionality includes:
- Setting date and time;
- Selecting the boot sector – the device from which the operating system will be installed or loaded;
- Checking system components, including checking the health of RAM and hard drives;
- Connecting password protection on your laptop to protect personal data.
How to enter BIOS
On different Lenovo models, the methods for entering Bios on a laptop may differ. First, try the standard login method - when you start your personal computer, you need to press the F2 button on the keyboard, sometimes holding down the Fn key first. Next, the PC settings menu will be called up.
But this method does not always work. For some Lenovo models, the BIOS does not load when you press F2 or Fn+F2 - for example, Lenovo Legion Y520, Lenovo G70, G50-30 or G500. If you tried to enter bios using the method described above and it did not work, the following instructions are for you:
- There should be a special small key with a curved arrow on the side of the laptop (where the charging socket is usually located) or right next to the power button. It's called Novo Button, One Key Recovery or One Key Rescue System. You need to turn off the laptop and click on it.
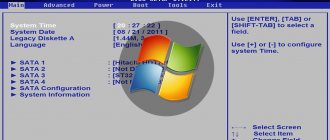
- If you pressed the correct button, the laptop will start, and on the screen you will see that we go to a special start menu:
- Normal Startup (normal download);
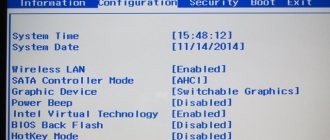
- Bios Setup (parameters);
- System Recovery (system recovery);
- Boot Menu (boot menu).
- As you most likely guessed, to enter the BIOS on Lenovo, you need to go to the BiosSetup item. After you select it, you will see that the laptop has entered the BIOS and you can configure it as you wish.
How can I change the boot order?
Sometimes you need to change the boot order of your device. That is, make sure that the laptop boots not from the hard drive, but from the installation media (CD or flash drive). Consider the Lenovo G50 laptop:
- We already know how to enter the BIOS, so we’ll skip this step.
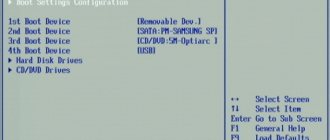
- After clicking the notorious “New” button, a menu will appear where, among other things, there will be a Boot Priority item. That's what we need.
- We go to this item and see a list of devices that are currently available for download. If you are installing the operating system using a USB drive, then you need to select the USB-HDD item.
- And if an optical disk is used as the installation media, then select the “ODD-device-name” item.
After this, the computer will begin to boot not from the hard drive with the pre-installed operating system, but from the bootable media. And you will be able to start installing the system.
Open BIOS on a Lenovo laptop using a key on the keyboard
There is nothing complicated about it. The most commonly used key is F2. It must be actively pressed immediately after turning on the laptop (after pressing the power button).
The BIOS menu should open immediately. On my laptop it looks something like this:
Rarely, but it happens that you need to press the Fn + F2 key combination. It depends on the laptop model.
As a result, the menu we need with the settings should also appear. By the way, you can change the boot order on the “Boot” tab.
I'm not familiar with all Lenovo laptops, they have a lot of models. But it seems to me that everyone has this arrow button. As far as I understand, it is called Recovery. Most often it is located near the power button, or on the side.
On some new models (for example, Lenovo IdeaPad 320-15IAP), this button is recessed into the body, and you can only press it with something sharp and thin. There's just a hole there.
This button is very easy to use. Turn off the laptop and click on the “Recovery” button (with the arrow). The laptop will turn on and the Novo Button Menu will appear. We need to select "BIOS Setup". You can also start system recovery from this menu and go to the boot menu, which I wrote about at the beginning of the article.
Select “BIOS Setup” and get to the menu we need.
Branded NOVO button
One of Lenovo's signature offerings to consumers of its products is Lenovo OneKey Recovery software, which is a system designed to provide data backup and recovery on Lenovo-branded computers. In terms of launching BIOS settings, a noteworthy hardware component of the system in question is the Novo key located on the laptop body.
Keyboard shortcuts
Fortunately, Lenovo has established a single key combination for almost all of its laptop models: Fn + F2 , where Fn is a special “function” button, usually located in the lower left corner.
Much less often, in order to enter the BIOS, you have to use another Fn + F1 or simply press the Delete (Del) key.
In general, the user's actions come down to two steps:
- Open the Start menu and, by clicking on the virtual power button, select one of the options - shutdown or restart.
- Turning on your Lenovo laptop again or waiting for it to start after a reboot and using one of the key combinations listed above to enter the BIOS is no more difficult than understanding the benefits of UEFI Boot.
If everything is done correctly, the user will see the BIOS menu in front of him. Now he can configure the BIOS, set the operating system boot order and perform other required manipulations - if necessary, after entering the password.
Tip: if your Lenovo laptop starts up too quickly or you can’t enter the BIOS after rebooting, it makes sense to turn it off using a physical button by pressing and holding it for a few seconds.
Now, after giving the Lenovo laptop a little rest, you should start it again - and do not forget to use one of the combinations listed above in time to enter the BIOS.
Owners of Lenovo laptops from the ThinkPad line, as well as some other models, can enter the BIOS without using key combinations - just use the special NOVO button, located next to the power button or on the end of the device.
After turning off your Lenovo laptop, press and hold NOVO for a few seconds; By selecting the BIOS Setup item in the window that appears, the user can finally enter the BIOS and continue working in the basic input/output system.
Tip: sometimes, instead of the NOVO button, there is a special hole on the device body, near which the same icon is located. In this case, you can open the BIOS menu by inserting a special paper clip for an iPhone or smartphone or a regular paper clip into the connector and lightly pressing the contact for two to three seconds.
Why do you need to enter the BIOS?
BIOS is the basic input/output system. It is this that allows you to communicate with a PC or laptop at the hardware level. BIOS settings greatly affect the performance of the computer as a whole. You also need to go into it before installing the operating system in order to select booting from installation media and not from the hard drive. In general, knowing such information is very useful, as it may be useful in the future. And at the most inopportune moment. Therefore, it is highly recommended to know how to enter the BIOS of a Lenovo G50 or some other equally capricious laptop model.
In addition, BIOS can be incredibly useful for restoring the functionality of your computer. It is he who can reset the hardware settings to factory settings. Among other things, it is the settings of the basic I/O system that regulate the operation of the laptop hardware. Therefore, let’s take a closer look at the question of how to enter the BIOS of the Lenovo G50.
Ways to enter BIOS on a Lenovo laptop
Owners of Lenovo laptops from the ThinkPad line, as well as some other models, can enter the BIOS without using key combinations - just use the special NOVO button, located next to the power button or on the end of the device. After turning off your Lenovo laptop, press and hold NOVO for a few seconds; By selecting the BIOS Setup item in the window that appears, the user can finally enter the BIOS and continue working in the basic input/output system.
Tip: sometimes, instead of the NOVO button, there is a special hole on the device body, near which the same icon is located. In this case, you can open the BIOS menu by inserting a special paper clip for an iPhone or smartphone or a regular paper clip into the connector and lightly pressing the contact for two to three seconds.
Some Lenovo models have a dedicated Novo to replace the BIOS setup key. It is usually located next to the power connector with a logo. If you have a Novo button on your laptop, you can enter the BIOS much easier. All you have to do is click the New button when your laptop is turned off . The laptop will then turn on automatically and show you the menu. You can select "BIOS Setup" from the menu to enter BIOS.
Here are the keys to enter the BIOS for different models of Lenovo laptops.
Lenovo model BIOS Setup Key Ideapad N series F2 Ideapad P series F2 on Lenovo logo Ideapad S series New button, some models: F2 Ideapad U series New button, some models: F2 Ideapad V series F2 Ideapad Y series F2 Ideapad Z series New button, some models: F2 Serie B New button, some models: F2 Series E New button, some models: F2 Edge Series New button Flex Series New button Series G F2 Series K F1 Series M F1 Series N F2 Series S New button Series V F1 Series Y New button Z series New button Yoga series New button, some models: F2 / (Fn + F2) ThinkPad Yoga 12 F1
This method is suitable for versions of Windows 8/8.1/10.
Before proceeding to the first step of this method, try holding down the Shift and reboot your device through the Start . If this is how you get to the Select actions , then immediately proceed to step 4 of this method.
Press the Windows + i to go to system settings;
In this window, select the Update and Security
Next, go to the System Restore tab and in the Special boot options , click the Restart now , after which you will be taken to the Select Actions
Select Troubleshooting .
Next, select Advanced options
UEFI Firmware Settings
And in the last menu, select the reboot button. After this, your device will automatically enter the BIOS settings.
ATTENTION! If none of these methods work, then, after unplugging the laptop and disconnecting the battery, open its case (bottom cover) and remove the flat battery from the motherboard for 10-15 minutes. This will reset the BIOS settings. Next, return everything back and, when you turn it on, try the first 2 methods again.
Why do we need a BIOS?
The laptop is available in various modifications. Why might you need to know how to enter the BIOS of the Lenovo G50 and other laptops in the series? Of course, Lenovo specialists strive to provide consumers of their products with perfect solutions that will require, during operation, from the owner a minimum level of knowledge in matters of setting up and maintaining the hardware configuration. At the same time, you need to understand that no computer can be completely immune from such unpleasant phenomena as critical errors and malfunctions. It is precisely such moments that dictate the need to have information on how to enter the BIOS of the Lenovo G50 of various modifications.
Methods to enter BIOS [Lenovo]
1) Standard hotkeys for login
F2 or F1 button should work (you need to press it immediately after turning on the laptop. Model range: ThinkPad, IdeaPad, 3000 Series, ThinkCentre, ThinkStation).
In some models, it may require pressing the Fn+F2 (for example, in the G50) .
Addition . The F12 key (Fn+F12 - enters the Boot Menu) is very rare - to enter the BIOS (Lenovo b590 model). I recommend trying the same.
Fn+F2 - Lenovo laptop keyboard
2) Special recovery button “with arrow”
Some Lenovo laptop models are equipped with special buttons on the device body for entering the BIOS. We are talking, for example, about these: g505, v580c, b50, b560, g50, g500, g505s, g570, g570e, g580, g700, z500, z580, Z50, B70 and others.
When turned on, they may not react at all to your pressing the F2 buttons. To enter the BIOS, in this case, you need to use the special Recovery button (with an arrow). You need to press it instead of the power button (i.e. when the laptop is turned off).
The Recovery button is located on the device body, next to the power button (on some models this button is located on the side).
Lenovo G700 - button to enter device settings (including BIOS)
Lenovo B70 - button to enter BIOS next to the power input. It is most convenient to press with a pencil or pen
After you click on this “arrow” button, the laptop will turn on and you will see a small service menu (usually consisting of several items): Normal startup (normal boot), Bios Setup (BIOS settings), Boot Menu (boot menu, for example, to boot from a flash drive without changing the boot queue), etc.
After you select Bios Setup, you will be taken to the most common BIOS settings (as in other laptops) and can set the necessary parameters.
3) ThinkVantage button
If you have a blue ThinkVantage button on the device case, then you need to press it immediately after turning on the laptop - while the welcome message is still on and the device manufacturer's brand is shown (see photo below).
Next you will see a menu with several items, including entering the BIOS - the F1 button (see arrow-1 in the screenshot below).
Lenovo SL510 - ThinkVoltage input
4) Hole instead of recovery and ThinkVantage button...
A number of Lenovo laptop models do not have any buttons at all, but have a small hole on the side of the device (usually where the power is connected).
For example, the Lenovo 100 laptop does not have a recovery button (which has an arrow) at all. There is a small hole (next to the hole is the same arrow). The button itself is located in this hole; to press it, you need to use, for example, a paper clip or a knitting needle.
Lenovo 100 - BIOS entry hole
Manufacturers are apparently trying to eliminate accidental button presses - after all, the vast majority of users very rarely have to enter the BIOS.
About some glitches...
1) Some laptop models do not allow you to enter the BIOS if it is running on battery power. I can’t say that this is 100% a glitch - but the setting is very controversial. To check for sure, connect the device to the network and try to enter the BIOS using the methods described above.
2) The Lenovo v580c model sometimes has a very unpleasant glitch: if you cleaned the disk and installed a new Windows, the BIOS login buttons will stop working.
To enter the BIOS again (instructions for advanced users!) - turn off the laptop, then unplug it, remove the battery. Next, remove the cover and take out the small battery from the mat. fees. After 5-10 minutes, assemble the device.
When turned on, the BIOS will be loaded automatically to set basic parameters. You need to open the “Startup” tab: in the “UEFI / Legacy boot” setting there are three parameters (Both, UEFI Only, Legacy Only) - you need to select “Both”. In the “UEFI / Legacy Boot Priority” item, you need to set “Legacy”. Next, save the settings and reboot the laptop. Everything should work as expected.
Possible problems
If you have problems entering the BIOS, it is recommended to connect your Lenovo laptop to the network. Some models have a feature that prevents the base system from starting on battery power.
Users of Windows 8 and 8.1 often have problems entering the BIOS using standard methods: using keyboard keys or special buttons. The fact is that the operating system implements fast startup, which is based on hibernation, i.e. When you turn on the laptop, the last saved state is restored, rather than a full initialization, during which you can enter the BIOS. In this case, Restart Options
OS or disabling the fast startup feature.
Two secrets for launching Bios
But if you still haven’t been able to start the BIOS using one of the methods described above, and the Windows 8.1 or higher operating system is installed on your laptop, we’ll tell you two startup secrets.
First:
- You need to turn on your PC. With the computer running on the desktop, drag the mouse pointer to the lower right corner of the desktop (call up the side menu).
- A menu opens for us where we select “Options” - “Update and Recovery” - “Recovery”.
- Here, in the “Special boot options” section, click on the “Restart now” button.
- Next, a blue screen with tiles will open. Open the “Diagnostics” tile, clicking on which will take you to additional options.
- You need to open the “UEFI Firmware Settings” item and click the “Reboot” button. Ready! You are in BIOS!
Second secret. Many Win 8.1 users make a mistake when trying to enter Bios. Everyone knows how to get into the BIOS - you need to press a certain button on the keyboard. To do this, the user clicks on “Shutdown”, waits until the laptop turns off, and then presses the button to enter the Bios, but the computer starts as before - the OS is loading.
The whole problem is that the Windows 8.1 operating system initially works with a quick startup function, which is based on sleep mode - enter the BIOS without turning off the PC, but rebooting it.
Some useful tips:
- After entering Bios, go to various settings for system parameters and boot in the BIOS itself. Be very careful and careful, and it’s better not to touch something you don’t know, as there is a risk of doing something wrong and completely losing your computer. And after making all the changes, go to the “Exit” section and select “Save & exit”. After this, the laptop will reboot, and when it starts again, all the settings that you previously had to set will be taken into account.
- If the above methods for entering the BIOS on a Lenovo laptop do not work, try pressing and holding the F12 key when starting the device until the BIOS starts - this method works on some Lenovo models.
- Very rarely, but it still happens - in some models the F1 key works (you need to press it several times until the laptop turns on).
- Manufacturers recommend configuring PC settings in Bios only with a fully charged laptop battery, since if during the setup process your laptop turns off due to being discharged, this will most likely cause some system problems in the future.
- Before exiting the BIOS, be sure to save all changes so as not to go astray.
Remember that setting up Bios is a very serious action that requires maximum understanding of the process and great attention to detail. You should be aware that if configured incorrectly, some system components may not work correctly, which brings additional operational difficulties. And if you doubt that you know how to do it correctly, it is better to call qualified specialists, this will save money, time, and nerves. We hope that this article helped you understand how to enter Bios.
Sources
- https://LenovoGid.ru/blog/bios/kak-zajti.html
- https://prostocomp.net/oborudovanie/kak-zajti-v-bios-noutbuka-lenovo.html
- https://konekto.ru/kak-zajti-v-bios-na-noutbuke-lenovo.html
- https://ocomp.info/kak-zayti-v-bios-na-noutbuke-lenovo.html
[collapse]
Settings for installing Windows 7
Lately, Lenovo laptops have come with the Windows 8 operating system pre-installed. But not everyone is happy with it, and when you try to install Windows 7 on a laptop, the laptop starts to throw errors. The situation can be saved by properly configuring the device’s BIOS.
Let's consider the situation using the Lenovo G50-30 laptop as an example. We already know how to enter the BIOS, so let's go straight to the settings. Go to the Exit tab and look for the OS Optimized Defaults item there. There is a Windows 8 system there. We need to change it to “seven”. That's all!
However, after this you need to load the optimal BIOS settings. This must be done before each installation of the operating system:
- to do this, on the same Exit tab you need to select Load Default Settings;
- then you need to click OK;
- press F10;
- reboot the laptop.
After all these manipulations, installation of the seventh version of Windows will be possible. There will be no more problems.
Removing the battery
If the owner of a Lenovo laptop is also an extreme sports enthusiast, he can enter the BIOS by partially disassembling the device case and taking the round battery out of the motherboard for a few seconds - and then installing it in place.
As a result, a minor system failure will occur, and with a high degree of probability, the next time you start the laptop, it will automatically boot into BIOS mode, without even asking for the owner’s permission.