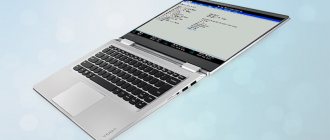
Today we will tell you how to enter the BIOS on a laptop running the Windows operating system from XP, Vista to “ten”. It stands for Basic Input Output System and contains a set of microprograms built into the motherboard. Each of the software components is responsible for processing and executing important processes related to the performance of the device.
- How to get into BIOS settings using hotkeys?
- Launching the BIOS shell in Windows 8
- Method to boot onto Windows 8.1
- Special boot option in BIOS in Windows 10
What is BIOS - the main functions of the bootloader
The need to run BIOS on desktop computers and laptops arises in completely different cases, for example:
- Selecting a media (disk, USB flash drive, SSD) for subsequent installation or reinstallation of the OS;
- Enable or disable various integrated functions from the motherboard chips;
- API access to PC or laptop hardware components, as well as connected peripherals and other equipment;
- Quick change of video card (if there are two);
- Adjusting system time and date;
- Allows you to set or change the operating system password;
- Helps eliminate the consequences of improper hardware overclocking;
- Ability to configure sleep mode and hibernation;
- Checks the status of your desktop or laptop (POST option);
- CPU and video adapter temperature monitoring;
- Elimination of various types of problems and malfunctions;
- Resetting the settings used by the interface to the basic ones;
- Power monitoring will be needed in case of voltage surges;
- Restoring correct configurations in case of a problem or failure and much more.
To start the shell, you need to restart or turn on the laptop and immediately (before loading the Windows OS) press a special button or key combination at the start of the computer. What exactly to press depends on the specific laptop manufacturer, model of computer equipment and publisher of the BIOS menu (Phoenix Technologies Limited, AMI American Megatrends Incorporated, etc.) There is also Award Bios, but this boot is much less common.
Method 2: Command Line
- To launch the auxiliary tool, you need to find two keys and the English letter R. Press them at the same time. By the way, I almost forgot - the operating system must be running.
- Enter the command “cmd”.
- We write:
shutdown.exe /r /o
There must be a space between “shutdown.exe”, “/r” and “/o”. To run the command, press “Enter”. The computer will begin to reboot, and at the very end you can go into the BIOS settings.
How to enter BIOS Setup using a special key?
It is worth noting that before loading the OS itself, a hint about hot keys is displayed on the screen for several seconds; they can be seen in the line below. Just click the right one in time and you can download Basic Input/Output System.
Let's look at the instructions:
- First you need to reboot or turn on the device;
- Start pressing the key several times to enter the BIOS (you can press and hold), immediately until the screen with the Windows logo appears (if you miss this short moment, you will have to restart the computer again).
Let's look at the list of buttons we need on various laptop models:
- Most often these are keys F2 or Del, you can use them when loading a laptop Samsung, Acer, Asus, Lenovo, Dell, Sony, Toshiba, Panasonic, Fujitsu-Siemens, eMachine, Tiget;
- On netbooks and laptops from HP, Acer and Compaq, pressing F10 ;
- On some Lenovo Thinkpad, IBM and Hewlett Packard ultrabooks, press F1 ;
- There are modifications of Samsung that require entering F8 , F11 or F12 , as well as Sony Vaio and RoverBook - F3 ;
- For certain Toshiba, Cybermax, Travelmate and Dell products there is an ESC ;
- In more rare cases, you should try other methods by holding down the key combinations Fn + F1 , Ctrl+Alt+Esc , Ctrl+Alt+Ins , Ctrl + Alt + Delete , Shift + F10 , Ctrl+Alt+S , Ctrl + Ins , Ctrl +Alt+Enter .
It is recommended to remember which keys are used to call up the BIOS, this will make the user’s work easier in the future.
BIOS has a password
If you can’t start the subsystem on your computer because a password is immediately required upon login, then you can use some methods to bypass authentication.
- Password selection – these keys are usually installed in stores. Therefore, the easiest way is to simply try to enter the name of the store or website where you bought this laptop or computer.
- Using a battery , turn off the power on the computer, open the side cover of the system unit and remove the battery. Take it out for a couple of minutes. If the reset does not occur, you can try to close the contacts of the battery compartment, while the computer must be turned off. With the contacts closed, press the power button several times. The computer will not show any signs, but the BIOS will be reset.
- CLR_CMOS - usually there are two contacts next to the battery for clearing the memory. You can find it by the labels or look in the documentation for your motherboard, but usually it has the letters CMOS in the label. The computer must be connected to the network. To reset the BIOS settings, just close these two contacts using a jumper or a regular screwdriver. If there are three contacts, then you need to turn off the computer, set the jumper to a different position (moving it to the right), press the power button several times. And then set the jumper to its original position.
After turning it on, you need to go to the BIOS settings again and set the necessary parameters. If necessary, set your own password.
How to enter the BIOS on a computer running G8?
After Windows 7, many manufacturers decided to disable the ability to enter the BIOS when starting the computer. Now the system is booted differently:
- Move your mouse cursor to the right side of the monitor and click “Options”;
- At the bottom, select “Change PC settings”;
- In the next window, look for the “General” subsection;
- On the right side of the menu that opens, look for “Special boot options”, click “Restart now”, agree to the pop-up message confirming the action being taken;
- After the reboot, you will see a special interface in which you can launch the shell you are interested in.
Method 4: On Lenovo laptops
On Lenovo laptops they most often use not Del, but F2. Sometimes manufacturers block the direct use of a row of F keys, so you will additionally need to press the auxiliary Fn button, which is most often located in the very bottom row between Alt and Ctrl (on the right side).
If F2 doesn't work, then try F8. Some new models have a special button to launch the subsystem - on top of the button you can see a “bent arrow” icon. It may be located next to the power key or on the side of the case. In more rare cases, at the bottom of the laptop. You should only press it when the laptop is turned off.
How to enter BIOS on Windows 8.1
The procedure in this version is slightly different from the previous one, the user must adhere to the following steps:
- Go to “Settings” and open “Change computer settings”;
- Go to the “Update and Recovery” tab;
- Next, you need to press the “Diagnostics” button, then select Advanced Settings;
- In “Boot Configurations” click “UEFI Firmware Settings” and reboot the device.
Actions when the BIOS requests a password
How to insert the battery
Typically, the BIOS will ask for a password if it has been set in advance. Then, when entering the BIOS, the user must enter this exact password.
Resetting a password on a laptop is much more difficult than on a regular computer. When working with a laptop, make your decision based on the model you are using.
To reset the password on a regular PC, find the switch on the motherboard near the battery.
So, this article provided instructions on how to enter the BIOS on a computer and laptop.
To do this, it is enough to have at hand a list of hotkey combinations that will help you easily get into the BIOS.
VIDEO: How to enter BIOS on a laptop
Entering BIOS settings on Windows 10
- From “Start” go to “Settings”;
- Find the item “Update and Security”;
- On the left side, click “Recovery”;
- On the right side of the panel, select “Restart now”;
- The OS will begin to reboot, all you have to do is wait for the boot process to complete;
- A menu will appear in front of you, click on the inscriptions on the display one by one: “Troubleshooting” (“Diagnostics”, depending on the “tens” edition), “Advanced parameters”, “UEFI firmware parameters” and call BIOS Setup by clicking on restart options.
Sony VAIO laptops
On older Sony VAIO laptops, if there is no Assist key, enter the BIOS by pressing F2, Esc + F2. If this option doesn't work, try the F1, F3, and Del keys as well. If your SONY has an Assist key, use it.
How to enter BIOS on Sony Vaio with ASSIST button? It’s very simple: with the laptop turned off, press the Assist button and wait for VAIO Care to appear (rescue mode). Next, select “BIOS Settings” or “Start BIOS Setup”. Usually the Assist button is located next to the laptop power button.
VAIO Care screen
Above, I looked at entering the BIOS on the most popular laptop brands and talked about the main universal ways to enter the BIOS. If none of the methods worked for you, I strongly recommend using BIOS login through Windows 10. If for some reason you still couldn’t do this, write in the comments and we’ll definitely figure it out together.
Sincerely, editors of FixErro.com
BIOS - Basic Input Output System
Before describing practical steps, I want to offer a little information about what a BIOS is and why it is needed. Literally a few lines of theory to understand what we are dealing with.
BIOS generally represents a set of rules that determine how computer components are configured when it is turned on, how its devices interact with each other, and how simple data input/output is carried out.
It is the BIOS that determines the progress of the computer boot process, testing and configuration of connected devices. Only after this, control is transferred first to the operating system boot loader, and then to the system itself, if one is found on the PC. Then, during the operation of the computer, it is the BIOS that provides the functions for interaction between devices.
How the computer will work largely depends on the BIOS settings.
How to disable Windows Fast Boot mode
To increase the time it takes for information about how to enter the BIOS to appear on the screen, you must disable the Windows Fast Boot feature on your computer.
To do this, follow these steps:
- Go to Control Panel, select "Power Options".
- In the "Power Options" window, click on the "Power button actions" option.
- In the System Settings window, click the Change settings that are currently unavailable link.
- After unlocking the options, uncheck the box next to “Enable fast startup (recommended)”, and then click on the “Save changes” button.
The Fast Boot feature may be enabled in the UEFI BIOS, so this feature must be disabled there as well.
How to fix Huawei boot loop?
Perform a factory reset
- Then rotate the phone while holding down the following key combination: Power button Volume up button.
- Hold the buttons until the Huawei logo disappears from the display and the screen turns black.
- You can now release the buttons.
- After a moment, this will display the boot menu.
Interesting materials:
How long does it take to breed Thumpies My Singing Monsters? How long does it take to edit a trailer? How long does it take for ads to appear on YouTube? How long does it take to reset a Netgear router? How long does it take to make a train? How long does it take to make a whiteboard video? How long does it take to break a headset? How long does it take to break a remote control brushed motor? How long does it take to make a two-hour film? How long does it take to assemble a computer for the first time?
Basic advanced menu settings
Let's look at the basic settings that can be found on the advanced tab.
Let's take for example the old AMI BIOS - version 3. Other BIOS versions should have similar functions and may have different names.
Quick Boot
– Fast boot, which means to enable or disable (Enabled – enabled, Disabled – disabled) fast loading of the operating system, without spending time checking devices and testing memory with the basic I/O system.
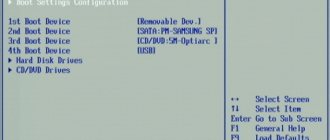
Boot Device Select
– A favorite menu and a familiar menu for those who have at least once encountered reinstalling Windows; in this menu you need to change, if not the default, the device boot priority. In other words, here you should select the first device that will be checked for boot information (Windows boot loader or Live CD), usually the default is a hard drive (HDD), you can change, for example, to CD\DVD USB and other devices from the list. Generally speaking, you need to install First Boot Device - CD\DVD, if the installation program is on the disk, then you can install the hard drive, and leave the third priority device empty. (two or more is enough for convenience). By analogy, you can install Fist Boot Device – Flash\USB... if the boot files are on a USB flash.
Full Screen Logo Show
– this is a rare menu, it is not found on all motherboards and is also rarely used.
SMART for Hard Distance
- this is a BIOS function that checks the hard drive for functionality; to put it another way, this function will tell you in advance when it is recommended to replace your hard drive. The information will be checked every time you turn on the computer. And when the life of the hard drive reaches the end, you will be advised to copy the data to a new hard drive right on the start screen.
BootUp Numlock
- This is a BIOS feature that automatically turns on the right numeric keypad right when you turn on the computer.
Floppy
... are functions associated with outdated floppy drives and devices for reading them.
Password Check
– here you can set a password to enter the BIOS. If you forget, you will have to remove the battery and reset the settings to factory settings. Necessary for protection from “prying eyes”.
Hyper Threading
- this is a technology that is difficult to explain, the essence of which is that the operating system will count one computer core as two and because of this technology the processor is used more rationally. This setting affects performance.
MPS
– this option is needed if you have a multiprocessor motherboard.
APIC ACPI SCI IRQ
– use advanced mode if you have a multi-core processor; if advanced mode is disabled, the computer will only see one core.
CPU L1 & L2 Cache
– enable or disable fast processor memory. It’s better not to touch these settings, especially if you don’t know why.
System BIOS Cacheable
– old operating systems used some of the ready-made BIOS functionality, so this option could speed up work, but now operating system developers do not use it, and, therefore, it is better to keep it disabled.
ATTENTION
: If you are updating the BIOS, this option should be disabled (DISABLED). Otherwise, flashing the BIOS may not be completed completely, which will lead to the BIOS not working.
C00 32k Shadow
– this option could speed up the operation of the video card by copying the BIOS of the video card into RAM; it is not used on modern platforms.
Let's take a quick look at another type of advanced BIOS menu
JumperFree Configuration
– this is a set of settings necessary to overclock a computer.
ATTENTION
: IN THESE SETTINGS YOU NEED TO BE VERY CAREFUL AND KNOW WHAT YOU ARE CHANGING WHY. SINCE ACCELERATION IS ASSOCIATED WITH AN INCREASE IN ELECTRICITY AND HEAT. FAILURE TO CHANGE THESE SETTINGS MAY RESULT IN CORRECT OPERATION OF THE COMPUTER EQUIPMENT.
CPU Configuration
– this is information about the processor and its current settings.
CHIPSET
- This is usually a set of settings for overclocking RAM. The recommendations are the same as for all overclocking parameters.
Onboard Device Configuration
– this is a set of settings for enabling a network card.
PCIPNP
– this is a set of settings related to the maintenance and interrupt processing of components on PCI.
USB Configuration
– this is a set of USB-related settings.