The Windows 10 operating system has a built-in virtualization component, the Hyper-V hypervisor, with which you can run virtual machines on your computer. Inside the current operating system, other operating systems are installed on the virtual machine: Windows, Linux or FreeBSD for testing or experimenting with the software.
In addition to the built-in Windows tool, there may be other third-party virtual machines running on your computer, and conflicts may occur between them. Therefore, some users are interested in the question of how to disable Hyper-V on a PC.
The Hyper-V virtualization environment is used on computers running Windows 10, Windows 8.1, Windows 8, as well as Microsoft server operating systems. Virtualization technology is not used on all computers, but only on those that meet certain system requirements for hardware and software.
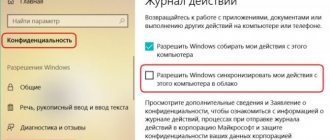
First, you need to figure out whether the Hyper-V technology is used on this PC, whether it is possible to disable the hypervisor. It may well happen that Hyper-V virtualization support is disabled on your computer, and you do not need to work to disable this system component.
Hyper-V virtualization places the following requirements on computer hardware:
- The computer uses a 64-bit processor.
- The processor declares support for hardware virtualization.
- The PC has at least 4 GB of random access memory (RAM).
- The device has virtualization technology enabled in the BIOS or UEFI.
The hypervisor only works on Windows 10 OS versions:
- On 64-bit Windows 10 Enterprise, Windows 10 Professional, and Windows 10 Education operating systems.
Hyper-V is used to run Windows Sandbox, an isolated, secure environment that runs on a running Windows 10 operating system.
Users of home versions of Windows are unable to use virtualization tools on their computers. Microsoft believes that ordinary users, who make up the majority of Windows 10 Home users, do not need such a feature.
Read more: How to enable virtualization on a PC in Windows
To prevent conflicts and problems from occurring, for example, with VMware Workstations or VirtualBox virtual machines, we need to disable Hyper-V in Windows.
In this guide, we will look at how to disable Hyper-V virtualization in Windows 10 using different methods. These options involve solving the problem in two ways:
- Disable and remove Hyper-V components from your PC.
- Disable virtualization without removing components.
In the instructions, we'll show you how to completely disable Hyper-V on a laptop or desktop PC, as well as how to disable the hypervisor from starting without affecting the entire virtualization platform.
Hyper-V System Requirements
Hyper-V is available in Windows 10 and Windows 11, but to enable it, the operating system and computer must meet the minimum system requirements:
- Only 64-bit versions of Windows are supported. Hyper-V does not work on 32-bit versions.
- Hyper-V does not work in the Home edition.
- For Intel this is Intel-VT (or VMX)
- For Intel, this is the Extended Page Table or EPT.
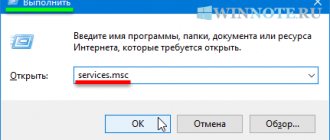
To check your system's compatibility with Hyper-V, you need to launch a command prompt with administrator rights and run the "systeminfo" command.
As a result, information about your computer will be displayed on the command line, at the end of which there will be a block with Hyper-V system requirements. For normal operation, all listed requirements must be set to “Yes”.
Activation in the Windows Components window
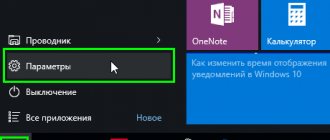
To enable Hyper-V in Windows Features, press the keyboard shortcut
+ R and in the Run window that opens, type (copy and paste) OptionalFeatures and press the
Enter key ↵
.
In the Windows Components window that opens, select Hyper-V and click OK.
Once the installation is complete, you will be prompted to restart your computer.
To disable Hyper-V, in the Windows Components window, disable Hyper-V and click OK.
Once the installation is complete, you will be prompted to restart your computer.
Using the steps above, you can enable or disable the Hyper-V feature.
Many third-party virtualization applications do not work with Hyper-V. Affected applications include VMware and VirtualBox workstations. These applications may not start the virtual machines or may revert to a slower, emulated mode.
These symptoms are introduced with the Hyper-V hypervisor. Some security solutions are also hypervisor dependent, for example:
- Device Guard
- Credential Guard
Original product version: Windows 10 - all editions Original KB number: 3204980
How to enable Hyper-V through Windows Features
The easiest way to enable Hyper-V is the built-in Windows Features utility, which is designed to enable and disable various Windows components. This utility is available in both Windows 10 and Windows 11. To call it, you need to press the Win-R key combination and execute the “OptionalFeatures” command.
This will open the Windows Components window. Here you need to scroll through the list of available components and check the box next to Hyper-V. After saving the settings, you need to restart your computer.
Disabling Hyper-V is done in the same way: open the “Windows Components” window, uncheck it and restart the computer.
How to shutdown and remove a Hyper-V virtual machine
We recommend using Hyper-V Virtual Machine Manager to manage virtual machines. Hyper-V Manager allows you to create and configure virtual machines. Therefore, before disabling Hyper-V in Windows 10, you must first stop the previously created virtual machines.
First of all, go to the Hyper-V Manager and in the virtual machines section, right-click on the running new virtual machine and select Shutdown from the context menu ...
Only after this can you delete all disabled virtual machines by selecting the appropriate item in the context menu. In principle, you can leave the configured virtual machines, but they will take up some space on your hard drive. See also other ways to clear drive C of unnecessary files in Windows 10.
Enabling Hyper-V via PowerShell
You can also enable or disable the Hyper-V virtualization system through the PowerShell console. To enable Hyper-V, you need to run PowerShell with administrator rights and run the following command:
Enable-WindowsOptionalFeature -Online -FeatureName Microsoft-Hyper-V -All
You can also disable Hyper-V using the same method. In this case, the command will look like this:
Disable-WindowsOptionalFeature -Online -FeatureName Microsoft-Hyper-V-All
After running the above commands, you need to restart your computer.
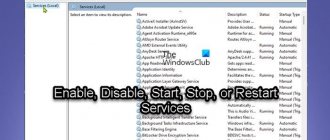
Hyper-V Virtual Machine Management Service
Next, we will stop the virtual machine management service and the services that depend on it. By stopping this service, you will not be able to manage the virtualization environment, including your virtual machines.
- In Hyper-V Manager, right-click on your server (computer) and select Stop Service...
- In the window that opens to stop the management service, confirm the decision by clicking the button Stop the service.
Enable Hyper-V using DISM
Another option for enabling or disabling Hyper-V is the DISM command, which is designed to manage the installation of Windows 11 and Windows 10. This command can be run either from PowerShell or through the regular command line (CMD). The main thing is that the console is launched as an administrator.
To enable Hyper-V using DISM, you need to run PowerShell or CMD with administrator rights and run the following command:
dism.exe /Online /Enable-Feature:Microsoft-Hyper-V-All
To disable Hyper-V use the command:
dism.exe /Online /Disable-Feature:Microsoft-Hyper-V-All
In both cases, after executing the commands, the computer must be restarted.
What is virtualization and what requirements does it place on a PC?
Virtualization refers to a technology that represents information about computing power combined by software logic separately from the hardware. It provides separation of processes occurring in the host and virtual spaces.
Windows 10 Hyper-V system component
The main goal of virtualization is to isolate computing processes from each other or from sets of specific activities occurring on the same device. This allows you to maximize software capabilities and reduce hardware.
For your information! This technology is used to create virtual machines.
Virtualization is divided into the following types:
- software;
- data storage;
- network;
- hardware;
- memory.
Virtualization in the operating system
Different tools use different types of virtualization. Using the example of the Hyper-V hypervisor, you can see that it needs hardware virtualization, because this will make it possible to create and run virtual machines. The device itself and the operating system must meet the following requirements:
- CPU support Intel VT-x or AMD-V virtualization technology;
- The OS must be 64-bit only and no less than the Pro edition;
- CPU support for Second Level Address Translation (SLAT) function;
- at least 4 GB of RAM;
Finding out whether your home computer can support Hyper-V virtualization is quite simple. To do this, you need to open the PowerShell console with administrator rights or open the command line and enter the “systeminfo” command. You need to click on the required link in the search results. It is recommended to pay special attention to the application requirements. If everyone has the word “yes” next to them, then you can without hesitation activate the hypervisor and create a virtual machine.
Note! When at least one of the items is marked as “no,” you will need to clarify whether the device supports virtualization and open information about the computer specification.
Virtualization and BIOS
Often, errors and problems occur due to the BIOS option not functioning. To avoid them, it is recommended to activate virtualization in the BIOS. To do this, you need to enter its menu and go through the following algorithm:
- Open "Advanced".
- Go to "CPU Configuration".
- Enable the "Intel Virtualization Technology" option.
- Select the “Enabled” option.
Note! Depending on the BIOS version, the names of the section and the required option may be different.
How to enable virtualization if it is not in the BIOS?
Once in the BIOS, find the Intel Virtualization Technology line. Change the parameter value to Enable, save the changes made (to do this, press Y and F10) and restart the computer.
Interesting materials:
How to properly dilute emulsion with color? How to properly dilute paint with white spirit? How to properly dilute phosphoric acid? How to cut linoleum correctly? How to properly cut leeks? What is the correct name for fish oil or fish oil? How to plant yellow raspberries correctly? How to calculate payroll correctly? How to sow lawn grass correctly in spring? How to sow cabbage seeds correctly?
Video
To help users who want to better understand Windows 10 virtualization settings, below are links to videos.
When reading materials on websites and forums dedicated to computer topics, you have probably come across the concept of virtualization more than once. Perhaps many of our readers have been using this wonderful technology for a long time. For those who do not yet know what it is, it will be very useful to read this article.
We will talk about Hyper-V - although not a particularly popular, but very useful component of the Windows operating system, designed for creating virtual machines. Below we will look in detail at how to enable hardware virtualization in Windows 10 and how to use its functionality. However, first let’s say a few words about what virtualization actually is.