We use third-party programs
9 Easy Ways to Open Command Prompt in Windows 7-10
There are now many utilities that allow you to efficiently burn a Windows 10 image to a USB drive or DVD. As a rule, these programs are easy to use and have a Russian language in the interface. Let's look at the most popular ones.
Rufus
A small utility from independent developers. It is completely free and does not require installation. You can download it on the official website. And it's very easy to use. The program easily copes with recording Windows and Linux distributions.
1
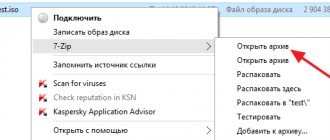
We go to the directory with the downloaded program and run the executable file with EXE permission.
2
The main program window will open immediately. If a USB drive is already inserted into the port, the utility will detect it. Next, you need to select the desired image to record by clicking on the “Select” button. 3
Now select the previously downloaded Windows 10 image and click “Open”. 4
The next step is to select recording options. It is necessary to set the UEFI or BIOS options, and also select the partition table type (MBR or GPT).5
All is ready. All that remains is to press the “Start” and wait for the operation to complete.
The image is now written to the USB drive. You can restart your PC or laptop and begin installing the operating system on your hard drive. It's worth noting that the latest version of Rufus is required to write "ten" .
Windows 7 USB/DVD Download Tool
Another very popular program for burning an image to a USB drive. Initially, it was created for recording to a Windows 7 flash drive. But the utility copes well with the “ten” . And you can download it on the official Microsoft website.
1
Download and install the application. Then we launch it using the appropriate shortcut and get to the main window. First you need to select an image using the “Browse” button. 2
Select the desired ISO image and click “Open”. 3
Now click the “Next” button. 4
Now the wizard will ask you to choose where to write the image. If you planned to record to a flash drive, then click “USB device”. If you need to write to disk, then select “DVD”. 5
Select the desired flash drive and click the “Begin copying” button.
The recording process will begin immediately. Once it is completed successfully, the program will display a corresponding message. This method is good because it is somewhat reminiscent of the first. In addition, it is also officially approved by Microsoft.
Ultra ISO
This is a more serious program designed to work with images of any type. Its functionality is rich, but now the most important thing is that it is also capable of recording a Windows 10 image to a flash drive or disk. However, the utility is not free.
1
Download the program from the developer’s official website, install it and launch it using the appropriate shortcut. In the main window, select the desired image (in the lower left window).2
Now select “Boot” and click on “Burn disk image.” 3
In the next window, select the desired drive and click “Burn”.
Upon completion of the recording process, the program will check the integrity of the files on the flash drive, and if everything is in order, it will display a corresponding message. Now you can restart your computer and begin installing the operating system.
WinSetupFromUSB
A small free utility from free developers that can write any Windows distribution to a USB drive. The program can even cope with Windows XP, not to mention the modern “top ten”. There is no need to install the utility. Just download and unpack.
1
So, go to the directory with the unpacked program, select the executable file with the required bit depth and double-click on it.2
In the main window, mark the desired USB drive and the recording option (the desired distribution).3
Now press the image selection button and click on the desired ISO.4
All that remains is to click on the “GO” and wait for the recording process to complete.
This completes the creation of bootable media. You should restart your PC or laptop and set the boot priority in the BIOS settings. You can start installing the operating system from scratch.
What is a Windows 10 image and what is it used for?
A disk image is a file that copies the contents of the original disk with a specific software product. In this particular case, the software product is the Windows 10 operating system.
The created image is written to external media, usually a flash drive, which can later be used as an installation disk. When opening a recorded file, the system behavior will be the same as if the user had placed a regular disk with an operating system in the computer.
creating a bootable image of Windows 10 and having an installation flash drive with you for several reasons. Firstly, any, even the most stable operating system, begins to work slower over time. At some point, the user may need to do a clean reinstall of the OS to get the previous level of performance back.
A similar procedure may be required if the system is infected with viruses that cannot be identified and neutralized using special programs. Installing a new Windows 10 or restoring Windows 10 will help solve this problem or at least temporarily restore normal operation of the device.
Secondly, if you create an image of installed Windows 10 , you can be sure that in the event of failures or breakdowns, you can install the operating system on your PC without any unnecessary difficulties. This is especially true for computers and laptops with a damaged hard drive. Incorrect operation of the drive can lead to loss of system data and subsequent failure of Windows.
Thirdly, a bootable USB flash drive that you recorded yourself can be used to transfer the operating system to another computer. This is convenient if you need to update an old version of Windows to 10. Previously, this procedure could be carried out directly through the update center. But now it is no longer possible to upgrade to the tenth version for free, which explains the need for an installation disk.
Creating an image using the Archive Wizard
Step-by-step instruction:
- Open “Start” on your computer desktop.
Open the Start menu - Go to the “Control Panel” section.
Go to the “Control Panel” section - Select "System and Security".
Select "System and Security" - “File history” - click on this section.
Click on “File History” - On the left click “Backup”.
In the left column, click “Backup” - In the menu list on the left, launch “Image creation”.
Run “Create a system image” - While the system is searching for devices, your task is to select the storage location for the archive and then specify it.
There are some options for the location of the Windows image:
- hard disks . There are 3 options for storing your image: 1) SSD drive (external); 2) internal additional hard drive; 3) one of the disk partitions that you are archiving. The most reliable is the first option. If the archive is stored internally on a disk, then if the hard drive fails, the archive will be lost;
- DVD disc . This option is not reliable, but still many prefer to choose it;
- network folder . If you consider yourself an experienced PC user, then you can safely choose this option. To do this, you need a network connection and you must know the parameters for accessing the resource.
- Select an option and click “Next”.
Select an option and click “Next” - At this stage, it is possible to select archiving disks. After this procedure, click on the “Archive” button. You can look at the volume it takes to create your copy.
Click on the “Archive” button - We wait for the archiving process to complete (this often takes about 20-40 minutes). Once completed, you can immediately begin creating the disk if you do not have one.
Select create a recovery disk and click “Yes”
Using the installation program
To download the image, you can go to the official website or any other Internet resources.
- Select the computer bit depth and install the MediaCreationTool program.
- We launch it, “Create installation media”, go “Next”.
Select “Create installation media”, click “Next” - Set the necessary parameters and move “Next”.
Set the required parameters and click “Next” - Let's start choosing the media. The process of downloading and burning the image will begin immediately if you chose to select a flash drive. If you choose to download to your computer, you will need to specify a folder.
Selecting media for the ISO image - After the process is completed, the product can be used for the required purposes.
Downloading Windows 10 to media
Possible problems
If you follow everything according to the instructions, there should be no problems. However, let's look at the possible options:
- the download does not start : if the process hangs from the very beginning, then you need to check the Internet connection and the antivirus blocking; perhaps it is blocking the service. Also check the storage capacity (there may not be enough space);
- the process freezes at a certain point : in this case, there is a high probability that you have a problem with the hard drive. In this situation, you can make several attempts to correct this situation.
- Check your system for virus programs. Virus in the system
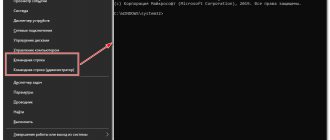
- Press the combination “Win + X” -> “Command Prompt”. Enter the command: “chkdsk C: //”. We accept the verification and reboot the computer.
- the disk or flash drive does not work: replace the image and rewrite the installation disk;
- Lost connection with the drive: let's try to clean the disk and start the installation again. There are situations when the only solution is to replace the disk.
In fact, burning a system image to disk is not such a difficult task, so problems are encountered very rarely.
Situations when an image is needed
Using an OS image, you can reinstall everything from scratch. It is also possible to correct errors when starting the operating system or clean your PC of unnecessary and unnecessary programs. Main reasons to use:
- OS reinstallation;
- restoring the OS in case of problems.
You can create an image if you use programs such as:
- archiving wizard;
- installer;
- third-party: Nero Express, UltraISO, etc.
We use third-party snails
Remember that this recording on optical DVDs is gradually losing its relevance. After all, netbooks, ultrabooks and tablets do not have a disk drive. We recommend sticking to recording on an SSD drive or flash card.
We first install the necessary program and then proceed to record the operating system image.
Daemon Tools
DAEMON-Tools program
This product is the most popular on the program market. We create a system image on disk by performing the following steps:
- Let's launch the program.
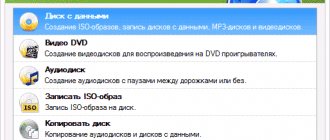
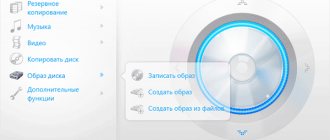
Launch the Daemon Tools program - Open the “Disc Burning” section.
Open the “Disc Burning” section - Select “Burn image to disk”.
Select “Burn image to disk” - Click on the rectangle with three dots and select a location. There should already be a prepared disc in the drive.
Click on the rectangle with three dots and select a location - We launch the program by clicking on the “Start” button. After recording is complete, you should check the functionality of your drive.
We launch the program by clicking on the “Start” button
Making a USB drive as a system image.
- Let's launch the program. Launch the Daemon Tools program
- Open the USB section.
Open the USB partition - Find and select “Create bootable USB”.
Select “Create bootable USB” - Select the path by clicking on the rectangle with three dots.
Click on the rectangle with three dots - You need to check the box “Windows boot image (not Linux)”. We launch “Start”.
Click on the “Start” button
We check the functionality of the bootable flash drive.
Alcohol 120%
This program has been in effect for many years, there is a huge disadvantage here - it only works with disks (optical media), so you won’t be able to make a flash drive with bootable media.
We begin the process by performing the following steps:
- Open the program and select the second section “Write images to discs” in the left menu.
Select the second section “Write images to disks” - Select the desired file, which is the image (click the “Browse” button). Click on “Next”. After selecting the file, click “Next”
- We start the program with the “Start” button. We launch the program with the “Start” button
Upon completion, we check the functionality of the disk.
Note! Also, the Alcohol 52% program has the right to exist, but its functions are even more limited; it can only write an image to a virtual disk. Starting the system properly with these actions does nothing.
Modern analogues will provide you with a more necessary service.
NERO
With this program, you will again be able to record only to external DVDs, but not to a flash drive.
- You can download a trial version of this program and use it for these purposes.
- After installing the program, launch it. We proceed sequentially: “New” -> look for “DVD-ROM”, in the “Multi-session” section, select the item “WITHOUT multi-session” -> then “New” again (button in the lower right corner). After the sequence of actions, click the “New” button
- In the top menu, select “Recorder” and proceed to “Record an image”. On the “Recorder” tab, select “Record image..”
- Find the required IOS image and open it by clicking on the “Open” button.
- Click “DVD Image”, change the speed if necessary and start “Burning”. Click “DVD Image” and start “Burning”
The average process time is 30-40 minutes, it can reach an hour (depending on the selected speed). Upon completion, we check the functionality.
Nero Express
- Launch the program file, select “Image, project, copy” on the left, then click on the folder icon named “Disk image or save project.” Click on the folder icon named “Disk image or save project”
- Select the desired file, which is an image, and “Open” it. Select the image and click “Open”
- Launch "Record". Launch “Record”
We wait for the end of the installation process and check the functionality of the disk.
Note! Unfortunately, Nero does not have a version that can work with flash drives, so this program is not as effective.
ULTRAISO
This old tool is the most powerful for the job. With its help, you can store a disk image on flash drives and on various disks.
Making bootable media from a flash drive
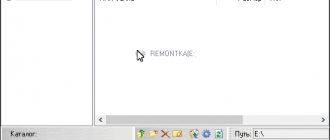
- We launch the program, then at the bottom we find the desired file, which is the image, and left-click twice (double-click). Launch the program and find the required file
- You can find the “Bootboot” item in the top menu list, click “Burn hard disk image”. In the “Boot” section, click “Burn hard disk image”
- Select the desired flash drive and start “Recording”. The program may require formatting of your drive, which you must approve. Select the desired flash drive and click “Record”
We are waiting for completion, checking for functionality.
The boot disk is created in the same way.
- Select the desired file.
- In the top menu item “Tools”, select “Burn image to DVDCD”.
- Let's start "Recording". We are waiting for the program to finish.
Other applications that may be useful
- Universal_USB_Installer;
- Win_Setup_FromUSB;
- BOOTLER;
- RUFUS;
- XBOOT;
- SARDU;
- Win2_USB Free, etc.
Creating an OS image using the Archiving Wizard
How to speed up Windows 10? TOP 6 Main ways to overclock an operating system
Strictly speaking, this method allows you to create an image of an already configured system with installed drivers. If the operating system crashes, you can quickly deploy this image on your hard drive and not spend a lot of time on a complete OS installation.
This image is created using the standard Windows Backup Wizard. It first appeared in the Vista version, but only in the “ten” did it begin to work adequately. This component allows you to create an image of a fully working OS and write it to a USB drive.
It is important to know that the OS needs to be prepared for archiving. How to do it? Very simple. You just need to remove all third-party software: browsers, players, graphic editors and other programs. Otherwise, the OS deployed from the image may become unstable.
1
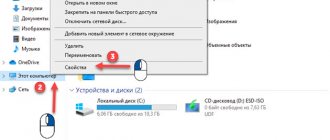
So, let's assume that all third-party software has been successfully removed and the registry has been cleaned. Now you need to find the Archive Wizard itself. Launch “Control Panel” and click on “Backup and Restore”. 2
Select the item “Create a system image”. 3
The Archive Wizard will launch. You should select the drive to save the image and click “Next”. Under no circumstances should you select a system disk, since if the OS fails, the image may also be damaged. It's better to choose another section.4
Next, the wizard will warn you about which partitions will be archived (by default, this is the system volume and the hidden “System Reserved” ). The wizard will also inform you that the image may take up more than 28 gigabytes. Just click on the “Archive” button. 5
The image creation process will begin immediately. Progress will be displayed in the corresponding line. As soon as the operation is completed, the program will display a corresponding message.
Now all that remains is to burn the resulting ISO image to a USB drive using one of the methods described above. Then you can reboot the machine and begin installing the operating system.
Where is the system image stored?
If you are interested, you can see the location of the archive files and the volume they occupy. The system image is saved on the previously specified media in the following format:
Drive letter : WindowsImageBackup Computer name Backup year-month-date hoursminutesseconds
For example, for the archive created for writing this article, the image location is as follows:
E:WindowsImageBackupCompConfig-ruBackup 2016-02-03 065439
You can also see how much space the image takes up.