Windows operating systems
07/18/20194416 1 comment
PC users most often need 2 languages (Russian and English) to fully work in the browser and other multilingual applications. Some use 3 or more layouts. But sometimes switching between languages on the keyboard stops working due to various reasons - software and hardware malfunctions. The computer owner can solve this problem on their own using the tips below.
Why doesn't the language bar switch to English?
There can be many reasons for this phenomenon: ranging from short-term failures to the breakdown of the keyboard itself. Let's figure it out together.
When the keyboard does not switch to English, the main facts influencing the occurrence of such a failure are considered to be the following:
- short-term system failure;
- lack of language required for switching;
- incorrect switching settings;
- lack of an installed keyboard layout;
- disabled service responsible for layout and switching;
- device failure.
Actually, in the simplest case, sometimes it is enough to simply restart the computer terminal or laptop. Perhaps this problem will disappear when restarting again. But in a situation where the Russian language does not switch to English, as a rule, other reasons are to blame. We will talk about them now.
Keyboard won't switch to English: adding a language
The most common occurrence is considered to be a situation where, for some reason, the second language in the system was removed or initially absent altogether (although English is enabled by default in the standard Windows settings). To solve the question of why the language bar and, as a result, the keyboard does not switch to English, you just need to check whether a second language is installed in the system.
So, go to the standard “Control Panel” and turn to the languages and regional standards section. After this, in the settings window you need to go to the languages and keyboards tab. We use the change keyboard button to display all languages installed on the system.
Pay attention to the general parameters tab (in the window in the middle). Languages are displayed there. If only one Russian is specified, a second language must be added. To do this, use the corresponding button located slightly to the right.
Next, you just need to select English from the list, expand the keyboard menu, and set the layout to “USA”. Be sure to save the changes. In theory, after completing the actions in the previous list, the second language will appear immediately.
Keyboard shortcut settings
But it also happens that a language is present in the system or, as in the previous list, it is configured correctly, but this does not give any effect. So why does the keyboard switch to English by default, but not to Russian?
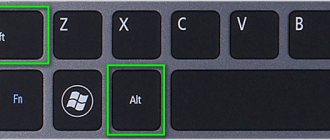
Perhaps the problem is that the so-called “hot” keys, which are responsible for quick switching, are not configured. The standard system settings initially use the Alt + Shift combination. If the user thinks that he can immediately switch using Ctrl + Shift, he is deeply mistaken. First, try the standard option. If this does not help, on the switching tab you need to look in the drop-down menu at the top to see if such a combination is set at all.
Next, use the button for changing the keyboard shortcut, which is located at the bottom right, after which one of the proposed options is installed to change the language or layout.
Language bar display settings
Fast switching is impossible for another reason. Why doesn't the keyboard switch to English? Sometimes this is only due to the fact that the language bar itself is not docked in the tray. It is unknown why, but this can also happen.
In the above section, go to the language bar tab and make sure that the checkbox next to its pin in the “Taskbar” is selected. If for some reason the buttons do not work, you can switch languages directly from the corresponding panel (the icon next to the clock in the system tray) using the mouse.
How to change language in Windows 7
In this case, too, the procedure is no different from other systems, except for the absence of the Charms panel and a different interface. When changing the language in Windows 7 in the taskbar, the selection will be slightly different. Clicking the left mouse button will change the language.
And by right-clicking you can go to the panel settings.
Checking the functionality of the buttons
Finally, the most unpleasant situation is related to the breakdown of the keyboard itself. You can check its functionality in any text editor (but only for keys with letters, numbers and special characters). But what should you do to check other buttons like Ctrl, Alt, Shift, etc.?
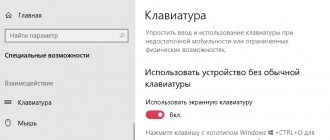
To do this, you will need to call the on-screen keyboard (accessibility section) from the main menu, and then check it using it. This is done by sequentially pressing the desired buttons. Changing their color on the virtual keyboard will signal their functionality. If there is no color change, you can be sure that the key is not working. As is already clear, in this case you will either have to take the keyboard for repairs, or (for cases with laptops) buy a new one. But in the simplest case, you can try to perform some actions yourself, for example, remove the buttons and clean the contacts from accumulated dirt (this, unfortunately, happens very often).
Adding a language
If you see a language bar on the taskbar in the system tray, then feel free to skip following the instructions in this section. Otherwise, follow these steps:
1. Launch the Windows 7, 8 Control Panel. Switch to large or small icons in the viewing area. Among the components, find and select "Region and Language".
2. Go to the “languages and keyboards” tab. Then click the “change keyboard” button.
3. Pay attention to the number of languages. If one is “Russian”, then click the “add” button.
4. In the huge list, find the “English (USA)” language and click the plus sign in front of it. There are 2 items available here.
Click on the plus sign of 1 item. O to assign the classic English layout. If you use manual touch input, expand section 2 and check the handwriting recognition option - Ink Correction. Next, click OK.
5. Now English should appear next to Russian. From the list above, select the default language that will be in effect after Windows starts. Click the “apply” button and check the changes. If even now the keyboard does not switch from Russian to English, then take the steps below.
Assigning language switching keys
First of all, go to the “Control Panel” and select “Regional and Language Options”.
A window will open. Select the "Languages and Keyboards" tab and then click on the "Change Keyboard" button.
A window called “Languages and text input services” will open in front of you. Select the Switch Keyboard tab. At the bottom of the window there is a button “Change keyboard shortcut” that you need to click on.
Now you can assign keys to change the input language. There are three options to choose from:
- CTRL+SHIFT
- ALT left +SHIFT
- Yo or accent mark (`)
Make a selection and click OK.
Just in case, open the “Language Bar” tab and make sure that it is pinned to the taskbar (there should be a checkmark next to this item).
Now check the keyboard. When you click on the selected buttons, the language should change.
Setting hotkeys
Go to the “languages and text input services” window, which you will reach by following steps 1 and 2 above. Go to the “keyboard switching” tab. Look at what actions you have and whether keyboard shortcuts are assigned to them. I have “no” everywhere, because of this the keyboard does not switch and the input language does not change.
To assign buttons, click on “switch language”, then “change keyboard shortcut”. In the window, set the input language to change from the 3 available options:
- Ctrl + Shift
- Alt (left) + Shift
- E, accent mark (above Tab)
I chose option 2, it is more convenient for me. Select your combination, click OK in this and the previous window.
You can also set hotkeys for a specific language. Select, for example, English and click “change keyboard shortcut”. The image has the Ctrl + 1 buttons assigned, assign your values and click OK.
If the input language does not change after the steps taken, check the functionality of the buttons. Launch the on-screen keyboard and click the destination buttons in sequence. A change in the color of a key indicates its serviceability.
In the language settings in the language bar tab, make sure the option to pin to taskbar is checked. This will help you switch the language from Russian to English using your mouse. Click OK.
Now you know why the keyboard does not switch to English, and what to do in this situation. Recommendations work 90% of the time, with the exception of faulty keys and damage to the text service.
PC users most often need 2 languages (Russian and English) to fully work in the browser and other multilingual applications. Some use 3 or more layouts. But sometimes switching between languages on the keyboard stops working due to various reasons - software and hardware malfunctions. The computer owner can solve this problem on their own using the tips below.
How to set up a layout and “make” it switch ✔
STEP 1: Keyboard Test
It’s logical to start this article by checking the functionality of the keyboard (why it could fail: flooding, physical wear, dust and crumbs under the keys, etc.).
We are primarily interested in the ALT, SHIFT, CTRL keys. For these purposes, it is best to use special. utility - Keyboard Test Utility (see screenshot below). Ideally, you need to click through all the keys and make sure that each of them lights up blue (that is, it works).
How to conduct a keyboard performance test - see step-by-step instructions
If it turns out that some key(s) does not work, see the instructions
Keyboard testing
*
STEP 2: Configure language settings in the OS
Next we need to open the date, time and language settings (in Windows they are located in the same section).
A universal way to open these parameters is to press the Win+R combination (the “Run” window should appear) and use the intl.cpl command.
intl.cpl – setting language, date, time (time zone)
Further, depending on the version of Windows, there may be slightly different windows:
- in Windows 7 you need to open the “Language and keyboards / Change keyboard” tab;
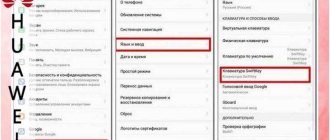
- in Windows 10, click on the “Language options” link (I’ll dwell on this OS in more detail...).
Language options
In the “Language” tab, you need to open the link “Select an input method that is always used by default.”
Note! Also make sure that your preferred languages include Russian and English layouts (see screenshot below). If you only have one language available, then, of course, you won’t be able to switch...
Select input method...
Afterwards, open the language bar settings.
Language bar options
And in the “Keyboard switching” tab, set the key combination that is most convenient for your work (by default it is: ALT (left) + SHIFT).
Change keyboard shortcut (Windows 10)
Actually, having changed (recognized) the key combination, all that remains is to press them, and the layout will change to English (Russian). ✔
*
STEP 3: Alternative Switching Utility
I recommend paying attention to the special. programs that allow you to automatically switch layouts in Windows (they help speed up typing on the keyboard and solve problems with changing the language).
For example, one of the leaders today is Punto Switcher. The utility allows you to assign any keys to switch layouts (see screenshot below).
Help with switching from Punto Switcher
I can’t help but add that Punto Switcher also corrects text you typed incorrectly and will help you avoid various bugs...
*
STEP 4: system rollback/reinstallation
If your layout stops changing after installing some programs, drivers, changing settings, etc., it makes sense to try to roll back the system to a checkpoint (i.e. restore it. By the way, checkpoints are created automatically, if, of course, this option included...).
To check if there are rollback points: press WIN+R and use the rstrui .
rstrui – start recovery
Next, a window will appear containing a list of several points to which you can roll back the system (orient by date). Such a rollback will not affect documents (but you may have to reinstall programs and drivers).
To perform a system rollback, just select the points and agree to restore
By the way, in some cases (for example, when installing various non-official assemblies of Windows), only reinstalling the OS will help correct the situation. Below is a link to how this can be done without losing data...