There are probably no PC users who do not need to go into the BIOS at least once during the entire time they work with the computer. Those who use Samsung products did not stand aside either.
This manufacturer has a huge list of laptops, and not all of them can enter the BIOS in the same way, but setting it up is easy - the functions are the same everywhere. Today we will try to figure out how to enter the BIOS on a Samsung laptop.
Why might there be a need to enter the BIOS on Samsung? Even though laptop manufacturers in each new released model try to minimize the user’s PC knowledge requirements and give the simplest possible answer to the question of how to configure it or determine the cause of problems, sometimes there is a need for finer adjustment of parameters. What can you use this input for:
- Turning on and off some laptop hardware, diagnosing problems;
- Configuring boot parameters for the OS and the entire device;
- Configuring the disk subsystem, in particular, its operating modes;
- Customization of many other functions, parts or the system in general.
How to enter the BIOS of a Samsung laptop: method 1
Equipment manufacturer Samsung has created its own software called Samsung One Key Recovery - this is a system that includes the ability to backup data on a Samsung PC and restore it. In order to turn it on, there is an additional button on the laptop - Novo. It is found on almost all the latest laptop models from Samsung and is located either on the side panel of the case or near the power button.
Sometimes, in the most modern models, there is a small hole with a microswitch inside. In this case, you need to use a thin, non-sharp object - for example, a paper clip.
And despite the fact that the direct purpose of this button is not to call up the BIOS, you can still get into the BIOS using it:
- Turn off the device by holding down the power key for 10-15 seconds;
- Hold the Novo key for 2-3 seconds and release;
- Your laptop turns on and opens a small menu with a choice - click on the line labeled “BIOS Setup”.
Possible problems
At first glance, booting a laptop from a flash drive is not difficult. However, some problems can always arise. Therefore, we decided to describe the most frequent of them. In addition, we will tell you how to eliminate them.
Can't boot from a USB 3.0 flash drive on a Windows 7 laptop? Indeed, this version of the OS does not support this standard without special drivers. Therefore, the easiest way is to switch the USB card to another connector. After all, many laptops have both a slot for 3.0 and 2.0 flash drives. It's quite easy to distinguish them. The USB 3.0 connector is blue (2.0 is black) and has two letters SS next to the port
Do you press a variety of keys on the keyboard when loading the OS, but still cannot get into the BIOS or Boot Menu? Then when you start the laptop, pay attention to the inscriptions at the bottom of the screen. These are user tips
For example, the following may be written there - “Press F11 for Boot Menu”, “Press Del to enter Setup” or something similar. You did everything correctly, but the bootable USB flash drive is still not recognized? There may be several reasons for this problem. However, most often the whole point is whether the installation distribution was written incorrectly or the USB drive itself is faulty. It's worth checking the flash drive on another device. It is better to record the software itself onto media using DAEMON Tools or Alcohol 120%. If you cannot boot your laptop from a USB drive using the boot menu, then you need to go into the BIOS. Here you need to make sure that the boot device priority is set correctly. To do this, go to the Boot tab. The flash drive should come first. If this is not the case, then highlight it and press F6. Thus, it will move to the first position. Quite often, on laptops with Windows 8 and 10, it is not possible to boot into the BIOS from a flash drive. Disabling the Quick Start feature helps. To do this, go to the Control Panel. Select the “Power Options” section, then on the left click on the “Power button actions” item. Next, uncheck the box that refers to “Enable fast startup.” All that remains is to save all the changes.
Please note that very old laptops may not be able to boot from USB flash drives at all. Then you need to either upgrade the device by installing a new motherboard and software, or think about purchasing a new computer.
Entering BIOS on a Samsung laptop: method 2
Entering the BIOS on a Samsung laptop is carried out in several ways - unfortunately, there is no one solution for everyone on how to get into the BIOS, but the methods for launching it are quite simple. So, let's move on to the first method.
The most popular solution is to use the keyboard - simultaneously pressing several laptop buttons immediately after starting it. Turn off your laptop (this method will not work if it is turned on), then press the power button and immediately one of the options:
- F2 button or Del button;
- Combination Fn+F2;
- F1 key
If the BIOS was launched incorrectly, the computer will boot the OS in normal mode. In this case, you will have to turn it off again and call the BIOS again, but using a new boot method. To avoid playing guessing games and launch the BIOS faster, you can also look at the instructions for your Samsung laptop.
It also happens that the laptop starts up too quickly, and the user does not have time to press the required combination. To avoid this, turn off the laptop by holding down the power key for 10-15 seconds. Then hold down the desired combination to enter the BIOS, and then press the power button and release, while continuing to hold down the keys to enter the BIOS until the desired screen with parameters appears in front of you.
Each BIOS has its own approach
But this option may not work. The fact is that although Samsung has not conquered the entire laptop market, it has presented a large number of different models (NP, R, RC and others), which, in addition to the electronic filling, also differ in the way they enter the BIOS.
As you can see, there can be a variety of ways. And this is largely due to the hardware of your laptop.
Therefore, in addition to F2, you should always have in stock such “BIOS” keys as F8, F12, Delete, or the popular key combinations “Fn+F2”, “Ctrl+F2” or “Fn+F8”. But it’s better to still pay attention to the inscriptions that appear on the monitor during the loading process. Especially these ones: “Press (key) to run setup.”
This is what you and I are looking for.
Actually, this is all you need to know to load BIOS smoothly on a Samsung laptop. I think you can easily master these simple skills. And you will be able to handle your PC at a professional level.
With that, I wish everyone good luck and say: “See you soon on my blog!”
Source
How to enter the BIOS of a Samsung laptop: method 3
Around the same time that the new BIOS version called UEFI was released, the new Windows 8.1 operating system was released. And along with it, a new way to load the BIOS appeared - through the OS:
- First you need to go to the desktop. Then call the side menu of the Windows desktop - to do this, move the mouse cursor to the lower right corner of the desktop. Select “Settings” – “Change computer settings”;
- Next, go to the “Update and Recovery” menu item, and then under the “Special boot options” line, click on the reboot key;
- After the reboot has been completed, we are taken to a screen with the ability to select an action. Click on the Diagnostics tile and then on UEFI Firmware Settings;
- Confirm your choice by clicking on the “Reboot” button. Done, the laptop has entered the BIOS!
How to go to BIOS on a Samsung laptop: method 4
If you have Windows 10, then there is another way to load the BIOS, similar to the previous one. Here it is done a little differently:
- In the “Start” menu, click on “Settings”, select “Update and Security”;
- Open the “Recovery” tab and under the inscription “Special boot options” click on reboot;
- The device reboots, and we see a window for selecting an action. After you enter the desired menu, do everything as in the previous paragraph when starting the BIOS on Windows1.
If, when using this or the previous method, you do not see the “UEFI Firmware Settings” button on the screen, this means either that this laptop has an outdated version of the BIOS without UEFI, or that the OS was installed on the laptop in Legacy mode. Then working with UEFI is not available from the operating system - you will have to use the first two methods.
Installing Windows Vista or Windows 7 can be divided into the following basic operations:
Preparing a flash drive or memory card with Windows Vista or Windows 7; Setting the laptop BIOS to boot from a flash drive or memory card; Installing Windows Vista or Windows 7.
Preparing a flash drive or memory card with a Windows distribution
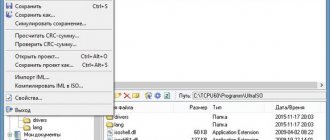
First, copy the Windows Vista or Windows 7 image in iso format to the hard drive. Then we install and run the UltraISO utility, which is present in the archive via the links above. Since we are using a demo version of this utility, we click on Trial period. Now you need to open the iso image with the operating system. To do this, click on the menu File -> Open.
.
We indicate where the image with the operating system is located. Go to the Boot menu and select the item Burn hard disk image. Now insert the flash drive or memory card into the laptop. Click on the Format
.
Select the file system type and click Start
.
Formatting is complete. Now click on the Burn
. Now you have a memory card or flash drive with the system.
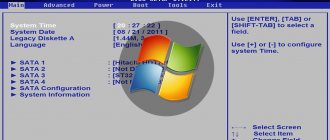
Enabling booting from a flash drive or memory card in the BIOS
Turn off your laptop, netbook or computer, put a flash drive or memory card in it and turn it on
This is very important because some laptops and other equipment do not recognize flash drives in the BIOS that were inserted after being turned on. It should also be noted that not all laptops and netbooks are capable of booting from a memory card that is inserted into the built-in card reader
In this case, you need to look for either an external USB card reader or a USB flash drive.
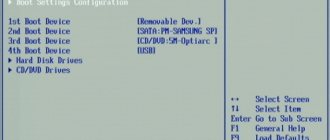
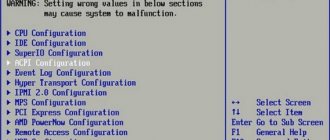
We go into the laptop BIOS. To do this, when the laptop starts booting, you need to press a certain key. As a rule, when loading, the bottom of the screen indicates which button to press to enter the BIOS. Most often these are F2, Del, Esc and others. How to enter the BIOS should be described in the instructions for the laptop and at the bottom of the screen when loading the BIOS. After entering the BIOS, you need to find where the boot order is configured. Typically these settings are located on the BOOT tab. To change the boot order, the F5 and F6 buttons are usually used, sometimes something like a menu is used. Click on the item and select the device. As a rule, the settings page indicates which buttons can be used to change the download list. How to change the boot order should also be indicated in the instructions for the laptop.
Install your flash drive or memory card first in the boot list. Flash drives usually act as USB-HDDs. Now you should save the settings and exit the BIOS. To do this, you need to find an item in the BIOS with the approximate name Save and Exit Setup. After saving the settings, the laptop should reboot. Now you can proceed to installing the system.
Installing Windows 7 and Windows Vista
Installing Windows 7 and Windows Vista from a flash drive or memory card is completely similar to installing from a disk. The procedure itself is described in detail in the manuals: Installing Windows Vista and Installing Windows 7
Pay special attention to operations with selecting a partition for installation and disk operations
How to enter BIOS: method 5
The last method is the most radical, and can only be recommended to those users who already have good experience in disassembling such a device. Otherwise, you run a high risk of permanently damaging your Samsung laptop.
The essence of the method is as follows: to reset all BIOS settings, you need to temporarily disconnect the special CMOS battery that is connected to the device’s motherboard. After performing this action, the device will “think” that the settings may be incorrect and will offer you to open the BIOS to correct them, or it will even enter it on its own.
BIOS batteries look different and are in their own place in almost every model, so you’ll have to dig around before you get to it and turn it off. But in general the procedure is as follows:
- Turn off the laptop, remove the battery;
- Access the CMOS battery and carefully disconnect it from the motherboard;
- Wait 15-20 minutes (this is necessary so that the CMOS chip is de-energized and the capacitors on the motherboard are discharged);
- Reconnect the battery, reassemble the laptop, connect the power and turn on the device;
- If you did everything correctly, you will see the BIOS settings screen.
We hope that one of the methods described above helped you find the answer to the question of how to enter the BIOS on a Samsung laptop