The BIOS needs to be reset on laptops and PCs when the user encounters a number of problems that can only be corrected by resetting the BIOS. Some problems can only be fixed by doing a hard reset, but the user needs to be aware of what this entails and how to do it. Most often, the problem is not in the hardware, so this will help bring the device back to life.
Resetting the settings to factory settings is not difficult at all. But a user who encounters this for the first time will need to specify the “path” and answer questions.
Why is it necessary to reset the BIOS on a laptop:
- You need to reset your password-protected BIOS because you have lost access to it. But this is only necessary if you will access the BIOS settings often
- Incorrect “overclocking” of the processor, while the highest, critical values for the bus frequency or memory timing are set. In general, overclocking the processor on laptops is not recommended.
- The system cannot boot, but the BIOS is available
- Various changes were made to the BIOS by an inexperienced user, which led to system malfunction
For PCs and laptops, there are several main options for resetting the BIOS to factory settings:
- Using the BIOS interface itself, if available
- Using additional software, most often applicable for 32-bit OS
- Mechanically
Other methods for resetting a PC to factory settings can be found in its documentation, if it is preserved. You can also find instructions for certain device models on the Internet or on the manufacturer’s website.
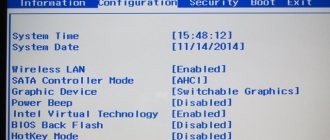
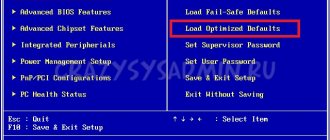
Resetting BIOS settings can be done through the working BIOS itself, using a special utility already built into it. To do this, you need to go to the interface. The transition to the BIOS interface can be done using the following buttons: Delete, F2, F10, F1, Esc. Most often, this button is indicated when the system starts. The picture shows an example.
Once you are in the BIOS menu, you need to find the special “Exit” menu and select the “Load setup Defaults” item. Confirm the reset using the “Y” button, so the factory settings will be applied. After confirming the action with the F10 key, all changes will be saved.
Some laptop models have a different name for the reset option. For example, Sony has “optimized defaults”, that is, using this item you can reset the BIOS settings.
In Toshiba, Samsung and HP, this item is located under the F9 key and is called “Setup Defaults”. For older models, these items are most likely: Use Default Settings or Set BIOS Default.
Most often, resetting the settings will cause your PC or laptop to boot normally.
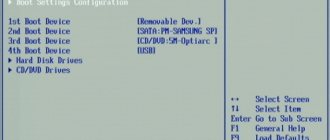
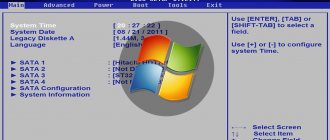
But if an error occurs during the BIOS reset process, for example, at the system media selection point, you will need to go to the BIOS again and go to special settings:
- Go to BIOS
- Find the Boot section
- In the Boot Mode tab, change the UEFI item to Legacy
- Save settings and reboot system
This method has a chance of not working, for example, if a password is set on the BIOS, or it is inaccessible for some other reason.
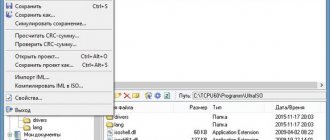
You can change BIOS settings or reset it using a special add-on for Windows OS. Most often, it is built into x32 systems and must be launched “as an administrator”.
- Open the Run program Win + R
- Enter “debug.exe”
- Now enter “o702E”, “o71FF” and “q” one after the other
- Confirm your entry with the “Enter” button
After this action, all BIOS settings will be reset. And after the system reboots, the user will receive a notification that it is necessary to check the BIOS settings. Next, you will need to configure the BIOS yourself, or leave it as it is.
The disadvantage of this software is the inability to run on x64 Windows OS. This means that most modern computers will need to be “zeroed” using other methods.
Such a “hard” reset of the laptop BIOS settings is needed when the BIOS password is forgotten, unknown, or in any other case when the BIOS is inaccessible.
In this case, the only way out is a hardware reset of the BIOS.
Why you may need to reset the BIOS to factory settings
BIOS (an abbreviation for the English basic input/output system, that is, “basic input/output system”) is a set of firmware and protocols for managing computer components and synchronizing their operation. This interface refers to the system software. Moreover, the BIOS can be considered system-forming, since without it the computer simply will not work - the components will not be able to interface at the hardware level.
This term applies to the PC platform, that is, IBM-compatible computers and laptops in AT and ATX formats. In devices using a different architecture, this tool is called differently. The BIOS is written into the CMOS chip on the motherboard.
You may need to reset the BIOS on a laptop in the following cases:
- The owner set the settings incorrectly or overclocked the equipment, so the system crashes or crashes into the “blue screen of death.”
- The user has forgotten the login password, so he cannot log into Windows and use the computer.
- The components have been upgraded and the device is already lagging with the old BIOS settings.
- The computer cannot load the operating system because the boot priority from storage devices is set incorrectly.
- The system does not see the hard drive due to incorrect activation of the AHCI/RAID mode.
- Unsuccessful BIOS firmware update to a newer version.
In any of these cases, resetting the BIOS settings on your laptop is sometimes the only way to fix the problem. However, this is not a panacea: there are breakdowns associated with the operation of this system, but which cannot be eliminated by resetting the settings.
UEFI is a graphical shell for BIOS, adapted for modern motherboards. If in a “bare” BIOS you can only control settings using the arrow keys and service buttons, then UEFI already supports entering commands using the mouse. For the current generation of users, this is more convenient and familiar.
There is no fundamental difference: it is the same BIOS, only in a beautiful “wrapper”, which, on top of everything else, is also Russified. By resetting the UEFI settings, you can also eliminate all the problems described above.
Resetting BIOS via interface
If the device turns on and does not lag too much, then you can reset the BIOS on the laptop using its interface. To do this, you need to restart the computer and go into the BIOS interface by pressing the F2, F2, Delete or Escape button before Windows loads. Which button to press depends on the motherboard model and BIOS version.
This is usually indicated in the motherboard's splash screen, which appears first when you turn on the computer - Press [button name] to enter setup.
If the BIOS boots normally, then the reset can be performed through its interface. The required function is usually located in the Exit tab and may be called Load Setup Defaults or Load Optimized Defaults. To confirm the selection, you will need to press the Y button, to cancel - N. After this, the laptop will reset the BIOS settings and reboot. If the BIOS interface does not load for some reason, then try the methods described below.
How to start booting from a disk on a computer?
Fast loading from disk
- When you turn on the computer, look at the bottom of the screen, there will be buttons for editing bios (SETUP) and for quickly booting from disk (BOOT MENU).
- By pressing the written key you will be taken to the download source selection menu. After selecting the source you need, press enter.
Mar 20
2016 Interesting materials:
How often is the audit carried out? How often do rabbits breed? How often does an eclipse occur? How often do you exercise to lose weight? How to cut girlish grapes? How to view electronic sick leave through government services? How to give Baytril to chickens? How to give chloramphenicol to Broiler chickens? How to share apps on iPhone? What is the cheapest way to fly to Spain?
How to reset BIOS to factory settings using software
Debug is a utility from the basic set of 32-bit operating systems of the Windows family. Its use is suitable for resetting the BIOS to factory settings on a laptop if the OS is still loading. The procedure is a little simpler than changing the settings described in the previous paragraph. To find out the bitness of your version of Windows, click the “Start” button and right-click on the “Computer” icon, selecting “Properties”. The parameter is indicated in the “System type” line.
To launch this tool, you need to press the Win + R key combination and enter the word debug in the search bar. An interface that resembles a command line will open.
Important! First you need to check the BIOS version that is installed on your computer. To do this, press Win + R again and enter the query MSINFO32. Highlight the System Information category in the menu on the left. The BIOS version is indicated in the window on the right in the list of elements. In the Debug utility, you will need to enter the following values, pressing Enter after each line.
Award BIOS AMI BIOS:
- 70 17;
- 71 17;
- Q.
AMI BIOS:
- 70 10;
- 71 0;
- 70 11;
- 71 0;
- Q.
Phoenix BIOS
- 70 FF;
- 71 17;
- Q.
After this, the computer will ask to restart. After completing the procedure, it will reset the BIOS or UEFI settings to default. What happens in this case is that the operating system sends the specified values to ports 70 and 871, resetting the checksums in the BIOS and thereby resetting its settings. Important! On 64-bit versions of Windows, the Debug utility is deactivated, so this method will not work.
Resetting the BIOS password for HP laptops (one of the best methods)
Every time an HP notification arrived, there was a problem with resetting the password. So I'll just leave this here :)
There are two main methods for implementing this action. The first occurs with the assistance of software directly from HP. The program is called HP System Software Manager and the catch is that newer versions (available for download) do not have the functionality that we need. The last available version was 2.15 Rev. A , well, or sp52095.exe and it with instructions can be downloaded here HP System Software Manager sp52095.
The second method is more universal, effective, but also dangerous. I will warn you in advance that before using it you should save all information about the laptop (serial number, UUID, etc.) which can be viewed by pressing F1 when loading the laptop. After resetting the password, you will need to re-enter this data into the laptop. On the Internet, the method is called HP Probook/Elitebook BIOS Password Reset Utility (you can “google” it by the name of the same name), and it was with this method that I was able to reset the passwords. Taking into account that the links to the program were deleted several times and are difficult to find (although I took them in one of the posts on the profile topic), I decided to keep it all separately for myself. You can download everything you need (instructions and software) from the following link: HP Probook Elitebook BIOS Password Reset Utility.
In the second archive you will find instructions directly for resetting the password, as well as an image of a flash drive and a program for creating it. There is also a video on how to make a bootable USB flash drive.
Update from 05/20/2018:
I came across another method online, apparently based on new laptops. Previously, the post was open, but now it is hidden for unauthorized users. The link is another method, maybe this method will help someone with newer devices, I haven’t gotten around to reading/checking it myself yet
Upd from 11/01/2018/MrJeRR: I understand that after the reset, important sections of the BIOS are unlocked and until the countdown “manufacturing... something like 3 of 10” ends, you can make changes (serial number, product number, model name, etc. etc.) via HP System Software Manager sp52095 (I had to download the new version from the developer’s website), i.e. via biosconfigutility64.exe/get:cfg.txt – upload the configuration, in it we can make changes (serial number, product number, model name, etc., etc.), and through biosconfigutility64.exe/set:cfg.txt we add it back to the BIOS the changes made and after a reboot everything is applied. To avoid the inscription “manufacturing...something 3 of 10” when starting, you need to find the line “manufacture programming mode” at the end in the uploaded cfg.txt file and set the asterisk (*) to “lock” and the inscription will no longer appear! BUT you won’t be able to change the data (serial number, product number, model name, etc., etc.) after that! I recommend that you first enter all the missing serial numbers, and then lock the change in the BIOS system parameters!
Did our article help you? If you want to help us, find out how to do it (follow the link)
How to reset the BIOS to factory settings mechanically
Removing the Power Supply
As mentioned above: the BIOS is written in a special chip on the motherboard called CMOS. The data is not reset even if you remove the battery from the laptop and turn off the power. This is because continuous power is provided by a CR 2032 battery - a round, flat coin cell, the likes of which are often used in electronic scales.
To reset the BIOS or UEFI settings, you need to turn off the power to the CMOS chip, and to do this, remove the battery.
You will have to almost completely disassemble the laptop to get to the motherboard. Disassembly features may vary depending on the laptop model, but the principle is the same for devices from different brands:
- Turn off the computer, disconnect the power supply and remove the battery.
- Remove the keyboard. To do this, you need to remove the plastic cover separating the keys and press flat-head screwdrivers onto the grooves in the part closest to the screen. Lift the input device slightly and disconnect the cable from the motherboard.
- Inside, unscrew all the screws that hold the bottom cover in place. Also unscrew the screws securing the optical drive, if there is one.
- Remove all screws on the bottom cover, including those hidden in the battery compartment.
- Remove the bottom cover.
- Remove the optical drive.
- A protective plate may be hidden under the bottom cover, which is secured with screws. It also needs to be removed.
As a rule, this is enough to gain access to the battery that powers the CMOS chip. Disassembly features for a specific laptop model may vary slightly. It is best to watch video instructions, which can be found on YouTube or a similar video hosting site.
To reset the BIOS settings, just remove the CR2032 battery for a few seconds. By inserting it back, you can put the computer back together and turn it on. But since you have disassembled your laptop, take the opportunity to blow off any dust. At the same time, you can change the thermal paste on the processor and video card - anyway, sooner or later you will have to do this.
Important! When disassembling the laptop, handle the cables carefully so as not to damage them. They are quite fragile and can tear or break if too much force is applied.
Switching jumper to clear settings
Some laptop motherboards are equipped with a three-pin terminal, which can be used to quickly reset the BIOS settings. This is rarely seen in laptops: this design feature is more typical for motherboards designed for installation in a stationary system unit.
Such an element is usually located next to the CMOS chip and a CR2032 battery. To get there, you will also have to disassemble the laptop, as described above.
The three-pin terminal is equipped with a jumper - a special jumper that closes the first and second contacts. To reset the BIOS settings, you need to move the jumper to the second and third contacts, closing them, and then put them back. If the jumper is lost, you can use a pin or paper clip - its conductivity is sufficient even for a small current flowing between the terminals.
There are modifications of motherboards that have only two contacts on the terminal for resetting the settings. Nearby you can see the CLR_CMOS marking. To reset the settings, just close these contacts.
There is also a 6-pin terminal. In this case, the jumper needs to be moved from the second and fourth pins to the fourth and sixth.
Special button
New models of motherboards, including for laptops, can be equipped with shutdown, reset and clear BIOS buttons. Typically, such a button is labeled CLR CMOS, and the markings are printed directly on it. Typically, the buttons are also placed somewhere near the chip and the battery that powers it. The computer, again, will have to be disassembled.
It is possible that the buttons are located in another area on the system board. Typically, the location of all elements is indicated in the accompanying documentation for the motherboard.