Word automatically wraps the typed text, even if you don’t press Enter. But this is not always convenient. For example, you wrote your full name. The initials may appear at the end of one line, and the last name at the beginning of another. This way the information is perceived worse. Yes, and it looks ugly. To avoid choosing a place for each word, figure out how to create a non-breaking space in Word. With it, the phrase will not be separated when transferred.
Special characters help you format text on a page correctly.
Non-breaking space: hotkeys and their purpose
As mentioned above, to save yourself from the problem of entering long spaces when typing text in Word, you need to use a special space. We will now talk about how to create a non-breaking space in Word.
In order not to beat around the bush, it’s worth saying right away that there is a special key combination to enter such a space - CTRL+SHIFT+SPACEBAR. You can try pressing it yourself. Of course, if you haven’t had a problem with long spaces, then you won’t notice the difference (between regular and non-breaking spaces). However, you can use this method everywhere to protect yourself from incorrect document formatting.
Now you know how to make a non-breaking space in Word, but not everyone will be able to remember such a combination or it will simply be inconvenient to enter it every time. To make your life easier, you can use reassignment of these hotkeys. Let's talk about this now.
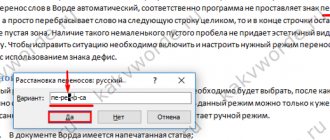
You need to go to the “Special Characters” menu. To do this, go to the "Insert" tab, select "Symbols" and click "Other". Now in the window, go to the tab we need - “Special characters”. Now in the list, find the line “Non-breaking space”. Double-click on the “Keyboard Shortcut” field and enter the combination that is convenient for you.
Now you know not only how to create a non-breaking space in Word, but also how to independently assign a key to it. But that's not all we'd like to talk about.
Installing AutoCorrect
If you still experience discomfort when pressing a given key combination, then there is another way to create a non-breaking space in Word. It involves assigning autocorrect. This is a very useful option not only for printing non-breaking space.
First, you will need to place (in simple words, copy) the desired element on the clipboard, in our case a non-breaking space. After this, you need to go to the already familiar “Special Signs” menu. In this window, click on the “AutoCorrect” button, which is located below.
Now you see the AutoCorrect window. You need to enter in the “Replace” field those characters that will be replaced with a non-breaking space, and insert that same space into the “To” field. Be sure to remember to put o. After that, click the “Add” button.
So you’ve learned how to make a non-breaking space in Word; it’s up to you to decide which method to use. Now let's talk about the special space.
Large spaces
In Word documents, large spaces are quite common. There may be several reasons for this. The most common way spaces fluctuate is when text is justified. This happens because the application strives to space words evenly on a line, but since the words themselves consist of a different number of letters, that is, they have different lengths, in some lines there will be more spaces between words, and in others less.
The spaces in the first line are noticeably smaller than in the second (paragraph alignment
Inserting hyphens will help correct this design; it is more convenient to use automatic insertion. In this case, words and spaces between them will be spaced evenly, and words that do not fit completely into the line will be separated according to the hyphenation rules.
Automatic hyphenation made spaces equal
How to remove spaces at the beginning and end of a line
Easy way
Quite often, inexperienced users replace the red line with several spaces at once. But it's better to do the following:
- Menu Format|Paragraph;
- “Indents and Spacing” tab;
- Field "Indent|First Line";
- In the indent field, set the value to 1.27 cm.
In order to eliminate all unnecessary spaces and indents at the end and beginning of a line, you need to select all the text and align it to the center. This will help remove any extra padding. After which you can immediately set a different alignment, for example, width.
Correct way
You should be especially careful not to upset the different alignments for individual parts of the text; for example, quite often all text is aligned along the edge, and headings and subheadings are centered. In this case, the best solution would be to replace spaces with paragraphs with just paragraphs. To do this, select “Edit – Replace” from the menu (you can press Ctrl+H) and enter a space in the search bar. Then click on “More” - this will open an extensive dialog box. Click on “Special” to expand the menu and select the paragraph mark. Next, you need to insert the characters ^p (paragraph mark) into the replacement line, but without a space at the beginning. Then make an automatic replacement using the “Replace All” button. It is recommended to do this operation 2-3 times, since there is a possibility that the spaces were not double, but triple.
Non-breaking space
In order for the text to have equal distances between words, it is often recommended to use non-breaking spaces. They are set by simultaneously pressing the Ctrl+Shift+space buttons on the keyboard. However, you can notice that in this case words are transferred from one line to the next without a hyphen and without observing the rules for word hyphenation. In addition, the right edge of the end of lines is now not as smooth as with regular spaces.
Due to the use of a non-breaking space, words are carried to the next line incorrectly and without a hyphen
In texts using a non-breaking space, you can observe the following: in some sentences the space will be of normal size (where the non-breaking space is set), but in the rest of the sentences the spaces can be very large. This is usually found in texts copied from electronic databases of abstracts and coursework on the Internet. Here, everyone decides for themselves whether to remove non-breaking spaces or not.
In the part of the line with a non-breaking space (indicated by arrows), the space is of normal size, where the space is normal, it is increased. And this happens (the “non-printing characters” button is pressed)
Why do you need an unusual space?
Many, even if they have heard about this concept, their knowledge is limited to the fact that MS Word, when typing numbers with thousands separators, automatically changes the regular space to a non-breaking one. In normal mode this is not noticeable; you can see the difference only in a special mode of operation of the program, which can be turned on by clicking the ¶ button on the toolbar.
The non-breaking space is needed to ensure that the wrapping from one line to another is correct. It's no secret that text editors and browsers automatically move text to a new line when the current line is full. At the same time, they are not at all guided by the rules of the Russian language. The non-breaking space is needed to prevent line breaks in this place.
When you need a non-breaking space
1. Separation of groups of discharges
As shown above, when separating digits with a space, you need to use its non-breaking version.
2. Initials and surnames
If the initials are on one line and the last name is on the other, this is at least ugly. To reduce the chance of incorrect hyphenation, some editors advise not to put a space between initials. However, it is more correct to separate them with non-breaking spaces.
3. Abbreviations
These include phrases and phrases
4. Abbreviation and proper name
5. Unit of measurement, counting word, special sign and associated number
Other cases when you need a non-breaking space:
1. When inserting a dash into the text.
It’s good to make the space before the sign continuous, and after it normal.
2. Binary mathematical operations
Here, a non-breaking space is also used before the mathematical sign, and a regular space after it.
3. An unbreakable space should be used to separate one- and two-letter conjunctions, prepositions and words from previous words: and, a, but, would, whether, in, with, you, I, etc.
How do you know if there is a non-separated space character?
Go to the “Home” tab in the “Paragraph” subsection and turn on the “Hidden Characters” button. Refer to the picture below.
This icon will appear throughout the text, in places where there is a space. Knowing this trick, you can remove or put a non-breaking space in the right place. The text where there is an unbroken gap is very neat. The main thing is that the non-breaking space performs the main task.
With a simple space, there will be dots between words; in the case of a non-breaking space, circles in the form of a degree sign will be indicated. If suddenly the phrase does not fit into one line, then use the “Hidden Symbols” button to check, which will show whether non-separated spaces are included everywhere.
Special space
The principle of how to create a non-breaking space in Word is very similar to creating a special character. At least the essence is practically the same. Use a special character if you want to set a specific distance between letters or words. This symbol, by the way, is called Narrow non-break space.
So, to install a given symbol, you need to open the table of all symbols. Now select “Plain Text” from the “Font” drop-down list and “Punctuation” from the “Type” list. Now, among all the many different symbols, find the one you need - Narrow non-break space. If anything, its name is displayed above the “AutoCorrect” button.
Having found the symbol, click the “Insert” button, after which the symbol will be inserted into the location you specified. If you're wondering what this feature might be useful for, it's great for entering dates. Thus, the numbers “2017” will be written next to the word “Year”, and there is no way to move them away.
Another universal way
Another way to enter a non-breaking space is to use a non-breaking space. In this case, the procedure is as follows:
- We find this symbol anywhere and select it using the mouse. For example, on the Internet on any website.
- We use the key combination Ctrl + C to add the non-breaking space character to the clipboard.
- Next, go to the application in which you need to insert this character, and place the cursor at the input location.
- Then press the combination Ctrl + V. After this, the copied symbol should be inserted into our document.
Keyboard shortcut
A non-breaking space is a special character that prevents text editors from breaking a line at a specified location. Word uses a special key combination: Shift+Ctrl+Space.
If you don’t know which buttons you need to use to insert a non-breaking space, go to the Insert-Symbol-Other Symbols menu and then use the Special Characters tab.
Also in this dialog box you can add your own keyboard shortcut or configure autocorrect settings using the corresponding buttons.
In the Keyboard shortcut menu in the specified line on the keyboard, press several buttons at the same time; if such a combination is possible, it will be displayed in the line. Be sure to click the assign button and close the dialog box.
Autocorrect is needed so that when you enter certain characters or words, the program automatically changes them to a special interval. The autocorrect window contains a replace field, where you enter what should be changed to what when entering the invented code. Be sure to confirm the changes made.
We use ASCII codes
Any character can be entered using a special ASCII code into the input field of a Microsoft word processor. The Gap is no exception in this regard. The input algorithm in this case is as follows:
- We set the input pointer in the required place using the manipulator or cursor keys.
- We switch to English text input language using the same manipulator on the language bar.
- Hold down the Alt function key on the left side of the keyboard.
- We sequentially type the key combination 2-4-8 (this is the ASCII code of this character).
After the manipulations have been done, this particular symbol should appear.
"Other symbols" function
Let's return to the first tab of the Other Symbols menu, namely Symbols.
You can also insert a non-breaking gap with this tool. To do this, look for NO-BREAK SPACE among the many signs and click Insert
Also marked in the picture is the Character Code, which can be used to insert a space. To use this code, after entering the value, press Alt+X.
The situation in the Microsoft Office 2013 package
The most difficult situation with how to put a non-breaking space in Word is in the latest versions of this software - Office 2013. The usual key combination specified earlier does not function in it by default. Therefore, when you launch this software for the first time, it is recommended to change its basic settings. To do this, go to the “Insert” menu or tab and find the “Symbol” item on it. In the “Character code” field, enter the combination 202F (this is the hexadecimal code of this character). After this, the system will automatically find a non-breaking space. Then click on the “Keyboard Shortcuts” button and then in the window that opens, set the key combination we are familiar with for this character. We save the changes made using the “Assign” button. In the future, when entering text, if you need to type this character, you just need to simultaneously press the usual combination of two function keys and a spacebar - and that’s it.
Where to find hidden symbols
In Microsoft Office Word, formatting symbols are hidden from the user's view. To make the characters visible, just click the special button in the Paragraph block.
After this operation, you can easily remove the non-breaking space by placing the cursor before or after the character and pressing Del or Backspace, respectively.
As you can see, there are several ways to insert formatting characters in Word. The text editor will also allow you to independently assign hotkeys for adding one or another tab character.
Difference between Word 2003 and Word 2007
The information presented in the article is relevant for the Word 2007 version. The table shows the differences between versions of the text editor when formatting text.
| Action | Word 2003 | Word 2007 |
| Changing letter spacing | Format > Font > | Home > Font > Spacing. Select "Condensed", enter a value, click "OK" |
| Find and Replace | Edit > Replace | Home > Editing > Replace |
| Insert special characters | Insert > Symbol > Special Characters | Insert > Symbols > Symbol > Other Symbols > Special Characters |
Once you find out the reason for large spaces between words in Word, you can easily eliminate it. To do this, you need to use the built-in functions of a text editor and tidy up the appearance of the document.
You can also watch a thematic video on the topic of the article.
Video - How to remove spaces between words in Word
Hello, dear readers of the blog site! Those who have at least superficially familiarized themselves with it have probably already taken note, albeit in general terms. This means they have an idea of what HTML symbols are generally used in the document code.
In today's article we will try to figure out what a space is in HTML and in what cases you can use whitespace characters when formatting the code itself for easy reading. We will find out when it is necessary to use a non-breaking space, and also get acquainted with other special characters (or, as they are also called, mnemonics).
In fact, I would advise you not to ignore the topic of using various special characters, since this is an important component that allows you to complete your study of hypertext markup language. In general, the information provided in this publication will definitely not be superfluous. Well, now to the point.
Extra spaces between words
Extra spaces between words are also sometimes encountered. Probably in order to increase the length of the text, the authors deliberately insert several spaces. You can detect this using the non-printable characters button.
You can see extra spaces by “turning on” non-printable characters
In this case, extra spaces must be removed. AutoCorrect will help significantly speed up the process of removing extra spaces. To do this, in the Find window, press the spacebar key twice, and in the Replace window, press the spacebar key twice, that is, replace double spaces with single ones.
Replace double spaces with single spaces
You can fill out autocorrect lines like this:
Thus, the amount of space in Word (MS Word Office) is affected by text alignment, prohibition of hyphenation in words, and in some cases, extra spaces between words.
Changing the spacing between words
So, the only correct decision that can be made if it is necessary to increase or decrease the distance between words is to replace regular spaces with long or short spaces, as well as ¼ space. We will tell you how to do this below.
Add a long or short space
1. Click on an empty space (preferably an empty line) in the document to place the cursor there.
2. Open the “Insert” tab and select “Other Symbols” from the “Symbol” button menu.
3. Go to the “Special Characters” tab and find “Long Space”, “Short Space” or “¼ Space” there, depending on what you need to add to the document.
4. Click on this special character and click the “Insert” button.
5. A long (short or quarter) space will be inserted into an empty space in the document. Close the Symbol window.
Replace regular spaces with double spaces
As you probably understand, manually replacing all regular spaces with long or short spaces in the text or a separate fragment of it does not make the slightest sense. Fortunately, instead of the lengthy “copy-paste” process, this can be done using the “Replace” tool, which we previously wrote about.
Lesson: Finding and replacing words in Word
1. Select the added long (short) space with the mouse and copy it (CTRL+C). Make sure you copied one character and that there were no spaces or indents previously on that line.
2. Select all the text in the document (CTRL+A) or use the mouse to select a piece of text in which the standard spaces need to be replaced with long or short ones.
3. Click on the “Replace” button, which is located in the “Editing” group in the “Home” tab.
4. In the “Find and Replace” dialog box that opens, in the “Find” line, put a regular space, and in the “Replace with” line, paste the previously copied space (CTRL + V), which was added from the “Character” window.
5. Click on the “Replace All” button, then wait for a message about the number of replacements completed.
6. Close the notification, close the Find and Replace dialog box. All normal spaces in the text or selection you made will be replaced with large or small spaces, depending on what you needed to do. If necessary, repeat the above steps for another piece of text.
We could have finished here already, if not for one “but”: in addition to increasing or decreasing the spacing between words in Word, you can also change the distance between letters, making it smaller or larger compared to the default values. How to do it? Just follow these steps:
1. Select a piece of text in which you need to increase or decrease the space between letters in words.
2. Open the Font group dialog box by clicking on the arrow in the lower right corner of the group. You can also use the “CTRL+D” keys.
3. Go to the “Advanced” tab.
4. In the “Intercharacter spacing” section in the “Spacing” menu, select “Sparse” or “Dense” (increased or decreased, respectively), and in the line on the right (“On”), set the required value for the indents between letters.
5. Once you have set the required values, click “OK” to close the “Font” window.
6. The spacing between letters will change, which, paired with long spaces between words, will look quite appropriate.
But in the case of reducing the indents between words (the second paragraph of text in the screenshot), everything didn’t look the best, the text turned out to be unreadable and merged, so I had to increase the font from 12 to 16.
That's all, from this article you learned how to change the distance between words in a MS Word document. Good luck to you in exploring other features of this multifunctional program, with detailed instructions for working with which we will delight you in the future.
We are glad that we were able to help you solve the problem.
Did this article help you?
Not really
In Word documents, large spaces often appear when text is justified. There are several reasons for their appearance and in each case they are removed differently. The proposed solutions on the Internet do not give the correct answer to the question or provide complex methods. And the problem is easily solved.
To remove a large space, just delete it and put a regular one by simultaneously pressing three keys.
Removing a non-breaking space
We turn on the hidden character mode by pressing the key combination Ctrl+Shift+8 or on the Home tab in the Paragraph section, click a button similar to the PI sign.
In the figure, unbroken spaces are underlined with a red line; they are indicated by empty circles. You can delete such a character by highlighting it and pressing the normal space bar on the keyboard. In a short document, this operation is easy to do, but if the text is voluminous, then automation is necessary.
A non-breaking space is a special character that prevents the character or word immediately following from being hyphenated without a preceding word. Set with the key combination Ctrl+Shift+Space
Let's replace non-breaking spaces throughout the text. Using the hot keys Ctrl+H or the Home in the editing section, click the Replace .
Now in the window that opens, you just need to indicate what to replace and with what. But the problem is that a non-breaking space is a non-printing character and you won’t be able to specify it for searching as a simple character. What to do?
Click the More and get additional functionality. Now click in the Find so that the text cursor blinks there. At the bottom of the window, click the Special and select Non-breaking space .
Now a combination of characters corresponding to a non-breaking space will be inserted Find Go to the Replace and press the Space . All initial data is specified, we proceed to replacement by clicking the Replace all .
If all of the above was done correctly, you will see a message like this.
As you can see, friends, this technique can also be used when replacing other non-printable characters. I hope you find this information useful.
Table of non-printing characters for the Find field
How to reduce the space between lines in Word
You can change the distance between lines at any time when writing text. If the spacing changes for a fragment that has already been written, it must be highlighted, since the text editor itself, by default, changes the settings only for the current paragraph, as well as for subsequent text.
Accordingly, you can set the interval settings in advance, and then get to work. Changing the distance between lines in this case will remain unchanged even after closing the document and when opening a new file for work.
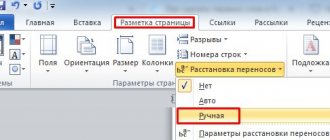
To change the distance between lines for versions of Word 2007 and earlier, you need to select the “Spacing” icon on the main tab, which is located in the “Paragraph” subsection and looks like two arrows pointing up and down.
You can make the interval less than 1 only in the “Other interval options” section. When you select this field, the following window appears where you need to change the multiplier values.
In the Sample window, you can immediately see how the text will look after the change. Any multiplier values can be specified. They can either be entered manually or selected using the up and down arrows next to the “Value” cell.
But in the second case there is no way to select values less than 1
Please note that you must select “Multiplier”. This category means that the initial width of the space between lines (for example, 11 pt) will be multiplied by the specified value
When multiplied by a value less than 1, the overall parameter decreases, reducing the distance. The minimum value that can be entered in the column is 0.01. It is worth noting that even with an interval of 0.2-0.3 the text cannot be read.
In addition to the “Multiplier” line, you can use “Minimum”. The trick of this column is that instead of the standard point measured in pt (points), you can set the value for the interval in centimeters and millimeters.
In this case, the distance between the lines will be the same even when changing the font. In order to change an item to centimeters or millimeters, you need to remove “pt” in the value line and write the abbreviation cm or mm through a space after the number.
The lines “Single”, “Double” and “One and a half” will set the spacing to 1, 2 and 1.5, respectively. The “Exactly” line will indicate the font size, which will be equal to the value 1 for line spacing.
In this line you can also change this value, but only in points. You can manually calculate this distance. 1 point is approximately equal to 0.35-0.37mm depending on the country. The US does not use a unified metric system, so points are equivalent to 1/72 of an inch.
A similar menu can be opened not only from the command line, located in the header of the open text editor. There is also a faster way when using the context menu.
To do this, just click the right mouse button once and select the “Paragraph” section from the drop-down window, confirming your choice by clicking the left mouse button, as in all other cases with selecting a specific item from the drop-down list.
How to change spacing in older versions of Word
In the Word 2003 version, the program interface is slightly different, which may make it difficult to find the required section. However, the corresponding values are still located in the “Paragraph” subsection. You can find this subsection:
- Through the context menu, which remains approximately the same for all versions, so just right-click and select “Paragraph”.
- Through the header of an open text editor, when selecting the “Format” tab. A list will automatically drop out of it, among the names of which will also be “Paragraph”, which is necessary to change the distance between lines.
Application of the sign
It is recommended to use non-breaking spaces in situations where the right and left parts of the text being separated by a space must be on the same line or page:
- in initials like F.I. or full name – abbreviations of first and middle names are always located next to each other. An example is the phrase “I.I. Ivanov”, parts of which without a non-breaking space may end up on different lines;
Rice. 2. Using and not using the non-breaking space
- in abbreviations before surnames (“Dr. Ivanov”) and geographical names (“St. Petersburg”, “McKinley”);
- when denoting abbreviations such as “etc.,” “etc.,” “n. e." and a number of others, which, when transferred to different lines, become unreadable;
- between a number and a unit of measurement (“10 l”, “15.6 m”) or a number and a counting word (“1630” and “Chapter VIII”);
- when numbering some objects or paragraphs («№ 25», «§ 8»);
- before the symbols and numbers in the software name (“Windows 7”, “Recuva 1.53.1087”).
It is recommended (though not required) to put non-breaking spaces after conjunctions and prepositions, especially those consisting of one letter.
It is advisable to use this sign after the word with which the sentence begins, and in headings that can be broken into several parts.
It is worth using such a space before the particles “zhe”, “would” and “whether”.
You should know: It is correct to put marks in the middle of sentences, using them to highlight long dashes. And in large numbers consisting of 4 or more characters, groups of three digits (“RUB 1,200,000”) are separated using non-breaking spaces.
How to insert into text
You may decide that it is the responsibility of the person who will publish the text to use spaces correctly. However, an author who respects himself and his customers immediately inserts the correct spaces into the text.
Inserting a non-breaking space in a text editor
Alt+255 or will help with this :
You can also find this function in the Word panel:
To control the use of space, you should get into the habit of typing and proofreading texts in a mode where all non-printable characters are shown. Otherwise, you won’t be able to distinguish an ordinary space from a non-breaking one by eye.
Insert page breaks and remove white space
I have to start each new section of my document at the top of the page. Then I need to remove all the section breaks that create large gaps in empty space. If I remove the breaks, it changes the formatting of the category title. How to reapply heading style 2?
— (Posted by anonymous)
ANSWER: There are two ways to insert page breaks in Microsoft Word: manually insert a page break, or change the style to start on a new page. I'll show you how to insert a page break manually, and then I'll show you how to remove the white space without disturbing the layout.
Inserting Page Breaks
To insert page breaks, follow these steps:
- Open your document, then insert your cursor at the end of the line before the section you want to start on a new page.
- On the ribbon, on the Insert tab, find the Page group.
- Click Page Break .
- Repeat this process for each section.
Once you're done, you may need to clean up your document further.
Removing white space
As you can see in this sample document, there is a large chunk of white space that needs to be removed after creating a new page. This is most likely caused by incorrectly using carriage returns, tabs, and spaces to format the document.
You need to remove breaks that are causing markup problems. The only way to remove breaks without accidentally changing the formatting is to see what you're doing.
Press Ctrl + * (Ctrl + Shift + 8). This will activate the Show All switch.
Now we see why the second section is too far down the page! There are three additional line breaks, a section break, two tab lines, and many spaces that were inserted using the spacebar.
This is a very common occurrence, so it is useful to know how to solve this problem.
First look at the two headings. Do you see the blue paragraph symbol after each one? This is where the style information for the title is stored. If you cut and paste text, be sure to save the style information or you will lose formatting. In other words, before cutting or copying, select the entire line, including the hidden character.
Now you can carefully remove all unnecessary characters. Select them all, then press Delete on your keyboard.
Press Ctrl + * to hide everything.
Your document should look like this:
If you need to reapply header 2, follow these steps:
- Select the title text or insert the cursor into the text.
- On the Home , in the Styles , click Heading 2 .
- Press Ctrl + S to save.
You now have a nice clean document.
Comments
(These comments were from the previous comment system. If you have anything to add to the discussion, please use the comment box at the bottom of the page. Thanks!)
Word 2007 by: Aretha
Thank you so much, you are a life saver. Now I understand the text better.
Welcome! by Sue
I'm glad this helped you. Good luck with your document!
White Space by: Linda
I did as you suggested - there are no formatting marks. Still can't get rid of the large white space below the title.
Can't remove white space - hidden table or style? by Sue
Linda: It sounds like you may have a hidden table or paragraph style that is causing problems.
If you hover your mouse over the title text, will a small box with a plus sign appear in the top left corner? If yes, click on it. This will highlight the hidden table.
The easiest way to work with a hidden table is to show the borders. Here's how:
- With the table selected, right-click.
- Select Borders & Shading from the menu. The Borders and Shading dialog box opens.
- On the Borders tab, select All .
- Click OK .
Once you see the table borders, you can drag the cell border to shrink the row that is causing the empty space below the header. When you're done, follow the same instructions as above, but on the Borders tab, select None.
If the table is not at fault, then the space can be set in the paragraph settings.
Here's how to fix it:
- Place the cursor in the title.
- On the Home tab, in the Paragraph group, click the small arrow in the lower right corner to open the Paragraph dialog box.
- On the Indents and Spacing tab, in the Spacing section, change the After setting.
If the After spacing is already set to zero or a small number and changing it does not eliminate the spaces, place the cursor in the next sentence, then repeat the instructions. Only this time change the Do interval.
Hope this helps! If not, I can troubleshoot the document itself. Use my contact form to contact me.
Extra space under title - corrections continued Posted by Sue
Continuing from Linda's problem, there is an issue that can cause extra spaces to appear between the page title and the first line of text in your document. This has to do with the way you set the page margins and title margins.
For example, if your top margin is set to 1.25″ and your title margin is set to 0.25″, you will have almost an inch of free space below the title.
First, check what the page's top margin is set to. Then check the header fields. To do this, double-click inside the header to activate it, then follow these steps:
- On the Header and Footer Tools Design tab, find Line Item Group.
- Change the title from top level .
- Click Close Header and Footer .
Hope one of these fixes works for you!
large white space under the title by: Anonymous
I had this problem. Double-clicking an empty space will open the title for editing. But this is only on some pages. If you drag the title marker on the left ruler to reduce the size of the title, the bottom of the title bounces down to the footer, overlapping the main text. This is weird. I think this is a software bug.
Blank space under title Author: Charlotte
I have the exact same problem - random spaces under the title, different on different pages, in the same section - it's driving me crazy! No marks, nothing, just pushes the text down and looks stupid.
I don't know what to do :o (
Random solution from: Charlotte
I did manage to get rid of mine, somewhat randomly, by removing the page breaks and carriage returns that appear at the end of a paragraph/section where the weird white space above appears. It just went back to where it should be - two incidents. Hope this works for someone else too maybe? Charlotte
Style that starts on a new page Author: Anonymous
One solution was to change the style to start on a new page, but there were no instructions on how to do this in the article.
Change styles to launch on new page Posted by Sue
Thanks for your attention, Anon. Here is a link to this page: Change styles to launch on a new page
My docs show all line returns and spaces between words Author: Anonymous
How to remove these characters when viewing a document. I have no confidence that it will be sent online without seeing these characters.
Disable formatting marks Author: Sue
Hi Anon: To turn off formatting marks, press Ctrl + * (in other words, press Ctrl + Shift + 8 at the same time).
Fixed huge header space Posted by Daniel
Okay, so I had the same problem where after inserting a page break in the header for no apparent reason there was a huge amount of space without labels or anything. So after going a little crazy I found a solution. If you go to Page Layout > Page Settings. On the layout tab where it says Page. Make sure it is not in anything other than the top one. I had it in the center, so every time I inserted a page break, the text would appear centered. So change this option and the problem will be solved.
Sanity Saved “Fixed huge header space. NEW: Daniel” Author: Eliz
Daniel is a genius. This was driving me crazy. Page layout, vertical page alignment fixed my problem. Yeah!
Thank you, Daniel! by Sue
Daniel...thanks for your input. Clearly, you're not the only one who has encountered vertical alignment issues! I always appreciate it when my readers add their tips and corrections. Thank you!
My page breaks are gone! author: Karen
For some reason, when I'm working on my dissertation, working with Microsoft Office 2003 at home and 2007 at uni, I've lost all the page breaks and my work looks like one continuous piece of paper. What can I do?
Hide or show white space between pages Posted by Sue
Hi Karen! Make sure you are in print layout mode and not draft mode. (These options are on the View tab.) In print layout mode, there should be a thin gray line between pages. Hover your mouse over it until you see an icon with two arrows facing each other. Once you see this icon, double click. The empty space between the pages should appear again. This is a toggle, you can repeat the process to hide the empty space again.
.
Use in Word
In the MS Word text editor, regardless of the product version, non-breaking spaces can be added in two ways:
- by simultaneously pressing three keys: “Ctrl”, “Shift” and space bar;
- using the character combination Alt + 0160.
You should know:
You should use alt codes by first holding down the “ Alt ” and then typing the indicated numbers.
After releasing the function key, the corresponding symbol will appear on the screen. If you are using a laptop with a shortened keyboard, press “Fn” along with the “Alt” button). To remove non-breaking spaces, you first need to determine where they are located. This can be done by turning on non-printing character mode.
The enable button is located on the main editor panel of Word 2007 and later versions or on the standard panel of Word 2003, 2000, 97 and below.
It looks like an inverted letter "R".
Rice. 3. Button to enable non-printing (invisible) characters in Word 2003.
Using the menu
You can also add a non-breaking space in Word using the menu. To do this, place the input cursor at the typing location. In the menu, go to the “Insert” tab for “Office 2007” and later versions of this software product or select the “Insert” menu item for “Office 2003” and later versions of this software. Then we find the “Symbol” item and click on it with the left mouse button. In Office 2007 and later versions of this software, the Symbol option is usually located on the right edge of the display. In the menu that opens, find the non-breaking space, select it and press the “Insert” button. All these manipulations are performed using the mouse or the cursor and tab navigation keys, which allow you to switch between different elements of the user interface.
Sign in HTML code
By typing HTML code in an appropriate editor, you can insert non-breaking spaces in the same way as for the Word editor. That is, key combinations on the keyboard.
If the code is typed in the browser, the indivisible interval is denoted as nbsp - more precisely, .
Rice. 4. Non-breaking spaces in HTML code.
Non-breaking spaces can be placed in a row. When displaying, the browser takes into account each such character.
Two non-breaking elements are shown as a double-length space, three - as a triple element. This is convenient to use, for example, when compiling price lists posted on the website.
When transferring, the amount of 11,200 rubles can be divided into 11 and 200 rubles, which makes it unreadable. If you put it between two parts, then it will always be transferred entirely.
This allows you to write prices in long enough lines without breaking them into parts.
Video
:
Non-breaking space in html
If you come across the responsible author, then the non-breaking spaces in the text have already been inserted, and all you have to do is replace them with the appropriate code - >;>
This will have to be done manually - when copying text into a visual editor, the latter will replace non-breaking spaces with regular ones.
Non-breaking space and SEO
Sometimes promotion specialists are categorically opposed to the use of non-breaking space and line break () HTML tags in the text, motivating this approach by the fact that it interferes with promotion. This is not entirely true. Search engines process these tags quite normally if they are inserted correctly. Improper use makes it difficult to promote, for example or nbsp; (without &).
Sources
- https://FB.ru/article/293896/instruktsiya-kak-v-vorde-sdelat-nerazryivnyiy-probel
- https://compone.ru/probel-v-vorde
- https://profreelance.ru/nerazryvnyj-probel/
- https://mir-tehnologiy.ru/nerazryvnyj-probel-v-vorde/
- https://tvojkomp.ru/kak-ubrat-nerazryvnyj-probel-v-vorde/
- https://geek-nose.com/nerazryvnyj-probel/
Tag pre
It is not always possible to format text as needed using standard markup tags. At the same time, by typing it from the keyboard, you can achieve the desired result. But in the end, when viewing the page in a browser, all manual formatting will disappear and you will get plain text. The same result will occur if you manually add several non-breaking spaces in a row, simply by clicking the key of the same name.
What to do in such a situation?
Here is an example of text with a long space. We achieved this by enclosing the text in a PRE tag
As you can see, several consecutive line breaks are also saved. This is exactly what this tag is used for. It leaves manual formatting to the text that is enclosed within it.
Video for the article: