- How to make footnotes
- How to make inline footnotes
- How to insert endnotes
- How to format a footnote
- How to remove a footnote
Any scientific work, from an abstract to a dissertation, is based on research already completed and opinions expressed. According to copyright law, it is necessary to indicate the source of borrowing so as not to suffer from bypassing anti-plagiarism, and the best way is footnotes on the page .
Their number and design are an important factor that helps the teacher determine how thoroughly you have studied the supporting material. There is an opinion that the more footnotes in your work, the more extensive the research you have done, however, even here you need to be careful and not build a fence out of footnotes. Since the first chapter of a course or dissertation is theoretical, it brings together various sources, each of which must be indicated at the bottom of the page. Many students add footnotes after completing all the work, when all sections of the coursework have already been completed. This is a dangerous path, because due to inattention it is easy to miss this or that quote, and it will remain without an indicated source. To avoid this, it is recommended to provide footnotes directly while typing.
Some educational institutions provide students with teaching aids, which, among other things, indicate the rules for the design of footnotes, down to their font and total number. In the absence of such help, you can safely rely on generally accepted norms.
Below are several options for how to format a footnote. There are three types in total: sublinear, inline and trailing (behind-text).
Footnotes
This type involves placing the link at the end of the quote, and indicating the source at the bottom of the page. Below we describe step by step how to make a footnote in Word.
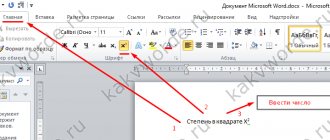
- Place your cursor and left-click before the end quote (if it is a direct quote, there should be closing quotes to the left of the cursor).
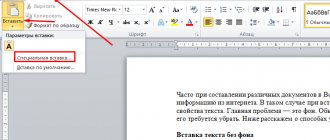
- Click on the "LINKS" button, which you use to create automatic content.
- In the tab that appears, click on “INSERT FOOTNOTE”.
- The link number will appear at the indicated location, and the cursor itself will be at the bottom of the page after the link number. In this space, you can manually enter information about the source of the citation or paste information previously copied from the bibliography.
The footnote font according to GOST should be Times New Roman, 10 or 12 pt, justified, line spacing single. If you wish, you can change the size and font of the footnote. To do this, you need to select its text and perform the usual actions.
In order to make page links , you need to change the footnote format on the “LINKS” tab, changing the numbering from “Continue” to “On each page”. Then the numbering of footnotes will begin again on each page.
What are footnotes in Word?
In my opinion, this is a wonderful tool when writing text containing little-known terms. For example, a person who does not have a specialized education, reading the instructions for servicing a car, will be delighted when he encounters an unfamiliar word, which at the bottom of the page in the form of a footnote will determine its meaning. Or another example where they meet: our beloved marketers, trying to “sell” us another product through advertising stands, write a super profitable promotion, and below, under the “asterisk” footnote, I describe in small print the conditions of that very promotion.
Inline footnotes
If you have a question about how to make square footnotes , the answer is below. These are inline footnotes, which, separated by commas, indicate the source number in the bibliography and the page from which you took the quote. Sample: [4, p. 260].
Square brackets can be inserted in two ways:
- Manually. They appear only on the English layout and are located in the upper right corner of the keyboard. The opening bracket is on the Russian letter “X”, and the closing bracket is on the Russian letter “Ъ”. Do not hold down the Shift key, otherwise you will get curly brackets instead of square brackets.
- Automatically. If you are tired of constantly switching the layout from Russian to English and back, find the square brackets in the “INSERT” tab. Click on the "Symbols" button on the right side of the menu bar, then on "Other Symbols" and look for brackets.
If you have not yet created a bibliographic list, create inline links in the draft version, indicating the author's surname instead of the source number. Upon completion of the work, when all the books, articles and websites used are in order, you will have to once again go through the text of your scientific work and replace the author’s names with their serial numbers in your list.
Removing a footnote from a MS Word 2007/2010 document
To remove a footnote, you do not need to call special commands in Word. To delete a footnote, simply place the cursor after the footnote number, press the “ Backspace ” key on the keyboard, which will highlight the number, then press the “ Delete ” key, i.e. just remove this character. As a result, the footnote associated with this figure will be automatically deleted.
This short article is intended to help novice users of Microsoft Office Word 2007 (2010) in working with footnotes in documents. If you have any questions or requests, please leave a comment below. We will receive notification and will try to respond as quickly as possible.
There are also social media buttons at the top of the article. If you found the article interesting, please click the “Like” button and check the “Tell your friends” checkbox. This will greatly support the project! Thank you!
Endnotes
In this case, all your sources that you referred to throughout your work will be listed in a continuous list on the last page. The result will be something like a bibliographic list, only without division into categories and not alphabetically, but according to the order of appearance in the text.
To add a footnote this way, follow these steps:
- Hover your cursor and left-click in the place where you want to see the link number.
- Click on the "LINKS" tab.
- Select the Insert Endnote option.
- The cursor will be at the bottom of the page to the right of the link number. Fill this space with the source.
If you wish, you can change the footnote numbering style. By default, lowercase Roman numerals are used: i, ii, iii. Click on the small box to the right of the Footnotes menu bar (it's a little hard to see, it looks like a tiny square with an arrow sticking out of it). A settings window will appear where you can select the numbering format and the location of footnotes (single or multi-column).
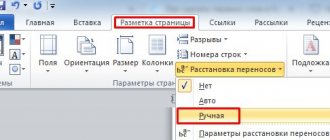
For each section with 1
If your text is divided into sections or chapters, and you need the numbering to start over in each chapter, then in the functions window select the numbering “In each section”.
Please note that at the end of each chapter there should be a “Section Break (from next page)”. To do this, on the “Page Layout” tab, open the “Breaks” drop-down list and select “Next Page” from it.
If you want to change the number format to A, B, C... in one section, instead of 1, 2, 3... - then in the functions window, select the number format and click apply “To the current section”, then click the “Apply” button at the bottom.
In the same way, you can add them immediately after the text for one section, and put them at the bottom of the sheet in another.
How to format a footnote
The text of the footnote, where the source is indicated, is formatted in the same way as the bibliographic list. Due to the abundance of all kinds of dashes, colons and slashes, it would not hurt to first ask the teacher about his personal opinion on the proper appearance of a bibliographic footnote.
Also, do not be lazy to ask him whether to write down the total number of pages of the book or indicate only the page on which the quotation is located.
Below are examples of source descriptions of different categories in accordance with the relevant GOST.
Book with one author:
Kurpatov, A.V. Happy at my own request / A.V. Kurpatov – M.: Bustard, 2015. – 224 p.
Book with two authors:
Genkin, A.R. Blockchain. How it works and what awaits us tomorrow / A.R. Genkin, A.O. Mikheev – Moscow: EKSMO, 2016. – 454 p.
Book with three or more authors:
Bredemeier K. Black rhetoric / K. Bredemeier [et al.] - Yaroslavl: Tree of Knowledge, 2016. - 324 p.
Article in a magazine or newspaper:
Neleyvoda, K.Z. Crisis of funny names / K.Z. Neleyvoda // Expert. – 2022. – No. 3 – pp. 26-28.
If an article was written by several people, the rules for naming them coincide with the description of a book with two, three or more authors.
Electronic resource:
Tarasenko Yu.V. An hour and a half to return to your place [Electronic resource]. – Access mode: URL: https://www.psychologies.ru/wellbeing/poltora-chasa-chtobyi-vernutsya-k-sebe/ (06.06.2018)
If you are revisiting a source, you can shorten its description to the author, title, and page number where the citation is located. However, some instructors do not accept abbreviated footnotes, so be sure to check with your advisor about this.
Removal
To delete comments, you need to highlight the number next to the text and press the “Backspace” button. Removing a footnote is required in the text. If you perform these manipulations in the note itself under the line, then only its contents will be deleted, but the footnote itself will remain.
You can quickly create a note even on a Mac and other platforms that support the text editor in question, with step-by-step instructions with pictures and videos. In the created note, you can enter absolutely any text required by the author.
Share with your friends and bookmark!
Detailed callout settings
If you need to configure more detailed parameters, we can refer to the settings window. Let's see how to do this.
We again need to place the cursor or select the text, and then go to the “Links” tab, but this time we will need to click on the small arrow in the “Footnotes” module. I show it in detail in the screenshot.
After clicking on this arrow, a settings window will open in front of us.
Looking at this window we can set the parameters in more detail, namely:
- In the Position module, you can select the position of the leaders
- In the "Format" module, you can define the type of numbering you need or select a marking symbol. You can also choose whether you want to continue numbering them in all sections or whether you need to restart them on each page or in each section.
- In the “Apply Changes” module, you select where in the document you need to apply these parameters - in the entire document or only in the current section.
After selecting the parameters you need using the context menus, click on the “Insert” button and admire the settings you applied.
Let's now look at how to remove unnecessary explanation links.
Editing Leaders
What should I do if I need to remove unnecessary callouts? It's simple. To do this, simply select the one that needs to be deleted and press “Backspace” (a key for erasing entered characters) or “Delete” on the keyboard.
After deletion, the numbers of others will be updated taking into account the deleted one. Pay attention to the first screenshot and the callout with the number “2”. After that, take a look at the screenshot below to understand how this system works.
This is where we finished looking at setting up and adding callouts on modern versions of Office. Now let's look at how to do this on an older one.