As you create a text document, you may need to use footnotes to explain the meaning of individual words or terms.
Footnotes are especially often necessary when writing abstracts, reports, scientific articles or dissertations.
Sometimes Word text editor users create footnotes manually, but this approach is time-consuming and not very correct. Because Word has special tools for this. In this article we will talk about how to correctly make a footnote in Word 2003, 2007, 2010, 2013 or 2016.
How to make a footnote in Word at the bottom of the page in 2 minutes: detailed instructions
Hello dear readers!
Today I'll show you how to make a footnote at the bottom of a page in Word. So that you can submit an essay and coursework, write a book, submit a publication to a journal. The notes line contains an explanation of terms, a list of sources for writing the article, famous personalities, etc. It will take at most 2 minutes to add these lines. Agree, it’s not a pity to spend so much time on such an important detail. Enter the program. Let's start now.
Word 2007 – 2010
I'm using the 2007 editor for the step-by-step instructions, but the 2010 version is the same. Only the interface looks a little different.
If you are writing an article for a website, then explaining unclear things can be made more profitable for you. Make a hyperlink to a page about an unknown word. You are guaranteed additional content, traffic and a boost to promotion in search.
Go to the “Links” tab. If you click on “AB Insert Footnote”, a line of notes will automatically appear at the end of the page.
To place it in any place, place the cursor (mouse arrow) where you need it and click “Insert endnote”.
Save time. Use the key combination Alt+Ctrl+F. Don't forget to leave your cursor in the right place.
To get sublinear notes, you need to highlight the quotation or words for it. Click “Insert Footnote” on the same panel.
The cursor will move down. There you will see a line and a line for entering information.
How to create a list of sources or literature
Students, all here. We will draw up a list of references in the course work using a real example.
Let's say the text is ready. The final touch remains - list the sources at the end. To do this, switch to the “Links” tab and click on “Bibliography”. Select the appropriate template and click “Insert”.
In the same panel, you can choose the list style. “GOST – sorting by name” is suitable for student work. The font must be Times New Roman size 10.
It is possible to write the title of each book manually. But why? It’s easy to make mistakes and deviate from the standards. As well as content, which is much more convenient to do automatically.
In general, we will fill out a ready-made form. To do this, click on “Insert link”. In the drop-down menu, select “Add a new source...”.
Here we already indicate what type of source we are dealing with, the title, year and author. Nothing complicated. When finished, click “OK”.
Hint for the student. If you often quote from the same source, indicate the page numbers from which the statement was taken.
Information about the book will automatically be displayed in the desired style. Like this.
Word 2003
I highlighted the 2003 editor because it does everything differently. Select the text or word you want to place. Click on the “Insert” menu. In the list that appears, hover over “Link”. Click Footnote.
Settings
You don't quite like the placement of the footnotes. They are numbered incorrectly. We need to swap them. You can solve all these problems in the settings.
Switch to the “Links” tab. Click on the small button in the right corner.
You can set endnotes to appear at the end of a section or document.
Below you can change the numbering. To count from another number, letter or symbol, write or select the desired value in the “Start with:” field.
To start counting anew in each section, select “In each section” in the “Numbering” item.
To use other symbols to represent the words being explained, click on the “Symbol...” button and select the one you like.
The settings will work for certain sections if you select this in the “Apply” item. By default, they will be assigned to the entire document.
Click “Insert” to add a new footnote, or simply “Apply” to save the settings.
You can create footnotes per page. To do this, leave the starting number in “Start with:”. And in “Numbering:” select “On each page”.
Removal
Place the cursor next to the text of the footnote that you want to remove in the editor.
Erase words in a note line using the Backspace button.
Highlight a word's superscript. Click Delete.
Clearing the text of a footnote will do nothing to remove it.
Conclusion
Now you know Word even a little better. Completing coursework and essays is no longer a problem. And the aspiring writer will finally be able to insert an explanation into his book. The document began to look neater, and everyone was happy.
How often do you use footnotes and why? Write comments.
Subscribe. We will have many more tutorials on this text editor and Google Docs.
Marvel movie release schedule.
- MS Office Word
- Footnotes
- Endnotes
[td]
In this article you will learn how to make or remove footnotes in Word. And also about what endnotes are.
Footnotes
- These are small notes to the text, usually placed at the bottom of the page and separated from the main text by a horizontal line. The font of footnotes in documents is made smaller than the font size of the main text.
Each footnote in a document is identified in the text with a special footnote symbol—usually a small uppercase number.
Adding a footnote to a MS Word 2007/2010 document
In order to make a footnote in MS Office Word 2007 (2010), let's look at a simple example.
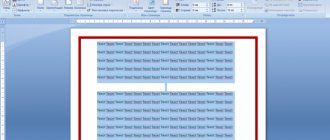
Let's say we have a fragment of arbitrary text in a Word document (Fig. 1):
In order to add a footnote to the text, place the cursor at the place in the text where the footnote will be - a link to the explanatory text.
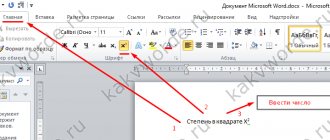
Then in the tool ribbon, select the “ References ” tab, and in the “ Footnotes ” tool block, click the “ Insert footnote ” button (Fig. 2):
After adding a footnote, the cursor will move to the bottom of the document sheet, where the footnote number and a horizontal line will be displayed. Here you need to indicate the explanatory text for the new footnote. For example, as shown in Fig. 3:
Microsoft Word offers the ability to view footnote explanations directly in the text. This means that there is no need to scroll the document to the bottom of the page to read the explanation of the footnote - you just need to move the mouse cursor to the number of the footnote or to the word after which this number appears, and hold for a couple of seconds. A tooltip will appear containing the text we added as an explanatory text at the bottom of the page (Fig. 4):
Endnotes in MS Word 2007/2010
Endnotes are regular footnotes in a Word document. The only difference is that the horizontal line and explanatory text are located at the end of the document. This means that if your document takes up less than one page, then the explanatory text will be immediately below the main text of the document (Fig. 5):
At the same time, if a document takes up, for example, 10 pages, and the index number is on the first page, then the explanatory text will be located at the end of the document, i.e. on page ten.
To add an endnote to a Word document, select the “ References Footnotes toolbox, click the “ Add Endnote ” button (Figure 6):
To remove an endnote, you need to follow the same steps as when removing a regular footnote in a Word document (see below).
Removing a footnote from a MS Word 2007/2010 document
To remove a footnote, you do not need to call special commands in Word. To delete a footnote, simply place the cursor after the footnote number, press the “ Backspace ” key on the keyboard, which will highlight the number, then press the “ Delete ” key, i.e. just remove this character. As a result, the footnote associated with this figure will be automatically deleted.
This short article is intended to help novice users of Microsoft Office Word 2007 (2010) in working with footnotes in documents. If you have any questions or requests, please leave a comment below. We will receive notification and will try to respond as quickly as possible.
There are also social media buttons at the top of the article. If you found the article interesting, please click the “Like” button and check the “Tell your friends” checkbox. This will greatly support the project! Thank you!
How to make a footnote in Word 2007, 2010 and others
How to make a footnote in Word is of interest to everyone who uses the program to write articles, books, essays and other educational works. A footnote is a mark in a sentence that marks a place or term that requires further explanation. There are endnotes and footnotes. The first ones are used at the beginning of the text, the second ones, as the name suggests, are used at the end. Making footnotes manually is very inconvenient, so it is much easier to use the tools that are available in all versions of this text editor.
How to make footnotes in Word
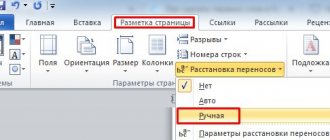
The question of how to make a footnote in Word at the bottom of the page is solved very simply, and the sequence of actions depends on the version of the program. For Word 2007, 2010, 2013 and 2016 they are the same.
Open a new Word document, place the cursor in the place where the footnote should appear. After that, in the top panel, go to the “Links” tab, in which the “Insert footnote” button will open, which you must click on.
As a result, a number with the footnote number will appear near the specified location, and the footnote itself will appear at the end of the page. When you need to make the next mark, the operation is repeated, and the footnote is automatically assigned the next number; you don’t have to keep track of the numbering.
If you need an endnote, in the “Links” tab you need to click the corresponding “Insert endnote” button, then it will not be placed at the end of the page, but where the entire text ends.
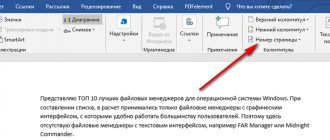
Footnotes in Word can be customized in appearance. To do this, open a dialog box in the “Links” tab
In this window, you can change the placement of footnotes (at the end of the test or document, and each section separately) and their designation in the text (selected from the proposed symbols and numbers). After changing the settings, you must click the “Apply” button.
If you use Word 2003, you will have to do footnotes a little differently. The “footnote” item is located in the “Insert-Link” menu.
After opening the window, just as in later versions of the editor, you can change the format and location of footnotes.
After the parameters have been selected, click on the “Insert” button.
If you are wondering how to remove a footnote, there are two ways to do this. In the first case, a footnote in the text is highlighted and deleted with the “Cut” button or the “Delete” key. In this case, both their designations in the document itself and those in which the explanations are written disappear.
The second method allows you to remove footnotes from the entire text at once. To do this, on the main page of Word with the document being edited, select the “Replace” function, in which the “More” button is pressed. After this, the “Special” button will open. After you click on this button, you should select the lines “Footnote sign” and “Endnote sign”, all footnotes in the text will be shown, which can be replaced with a regular space.
As a conclusion
As you can see, using the editor's tools is much easier than typing them manually. And you now know how to insert a footnote , how to change its formatting or remove it from the text.
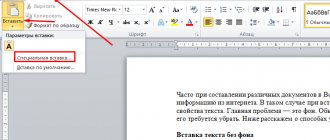
Removing hyperlinks from Word text
There are a number of ways to remove a link from text. Three of them will be presented below. The first method is manual removal:
- Select an unnecessary element;
- Click on it using RMB and select the “Delete” item from the context menu.
The manual method helps to quickly remove unnecessary elements in Word text.
There is a way to delete using a keyboard shortcut:
- You need to select the document using the hotkey combination “Ctrl+A”.
- Then simultaneously hold down the “Ctrl + Shift + F9” keys and delete unnecessary elements.
This method will allow you to quickly remove unnecessary content from the finished article, avoiding lengthy editing.
We recommend you learn: how to work in Office Word online without registration
How to make a footnote in Word for Windows, macOS, or web
These instructions will help you add notes to documents in just a few minutes.
A footnote consists of a number that is inserted into the text and a corresponding comment, usually located at the end of the entire document or the current page. This format allows you to supplement the material with various information without interrupting the main idea.
Footnotes can be used to add, for example, definitions of terms or references to sources.
How to Make a Footnote in Word for Windows
Place the cursor after the word to which you want to add a footnote.
If you want the comment to appear at the end of the current page, select “Links” → “Insert Footnote” from the top menu and enter the text of the note.
If you want to insert a comment at the end of the document, click “References” → “Insert Endnote” and enter the text of the note.
If necessary, change the numbering format (Roman, Arabic, or other) and the placement of footnotes. To do this, click on the small arrow next to “Footnotes” on the toolbar. In the menu that opens, select the type of footnotes and configure their settings.
To delete a footnote, place the cursor immediately after its number in the page text and press Backspace twice.
Currently reading
- 10 things that are still not taught in schools, but in vain
How to Make a Footnote in Word Online
Place the cursor after the word to which you want to add a footnote.
If you want the comment to appear at the end of the current page, select “Links” → “Insert Footnote” from the top menu and enter the text of the note.
If you want to insert a comment at the end of the document, click “References” → “Insert Endnote” and enter the text of the note.
If necessary, click Format Footnotes and adjust the font and indentation.
Click View → Reading View to see how the footnote appears in your document.
To delete a footnote, simply place the cursor immediately after its number in the page text and use the delete key.
Inline Links
An option for those who need callouts in square brackets immediately after the sentence. Here's what inline footnotes might look like (written manually):
- [12; p.22];
- [12; 22];
- [12; With. 22-23];
- [12; 22-23].
First of all, indicate the number of the source from which the quotes were taken (according to the literature list), add a semicolon and write down the pages, it can be one page or several. There is also a possibility that it is necessary to write “s.” - thereby indicating the word “page”. These subtleties in design should be clarified with educational institutions.