Aspiring entrepreneur Dima orders advertising brochures from a fashion studio: “I pay for the best. Well, the design is there, the paper. Yes, bigger, more expensive." And, calculating in his mind the fabulous future profits, he lays out the last of his credit money. But there were still no clients.
Experienced businessman Seryozha knows that super-duper design and expensive paper do not guarantee mountains of gold for him, and chooses a budget but effective alternative - make a booklet in Word and print it on a regular printer. His business is thriving, because Seryozha does not throw money away. So let's follow his example and learn how to create booklets with our own hands using templates and from scratch.
Types and purposes of booklets that can be created in Word
There are different booklets - blue, white, red, as well as image, advertising and informational (for example, instruction leaflets). But this division is conditional.
Booklets are usually printed on A4 sheets, which are then folded in several places depending on the layout method. Elements on them are often placed in 3 stripes and the latter are separated by two folds. This layout is called a Eurobook. If you are creating a booklet for the first time, choose this type as it is much easier to create than the others.
Microsoft Word does not have very rich functionality for creating booklets. This program is suitable for those who do not need a fancy design. After all, Word does not have the tools that professional graphic editors, for example, Adobe Illustrator, have.
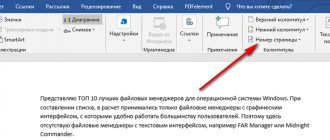
However, there are handy templates here with a simple yet elegant style. In addition, they are equipped with tips on where and what to write. In them you can customize the background of pages, add images (company logo and more), change the appearance of pictures, select fonts for text, etc.
Word also allows you to create a booklet from scratch. But this is a more complicated option. It is suitable for those who have already mastered working with templates.
Print brochure in PDF format
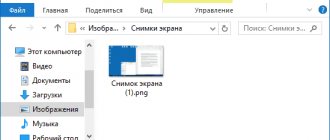
You can print a layout book directly from the Word program. But often printing houses prefer other formats. In the latest versions of the program, it is possible to make a PDF file from a brochure (File - Save As).
The output will be a document with sequential numbering, without shuffling. This is convenient if reading will be done from a computer screen. The same file can be printed as a book: in the print settings, select the “Layout” tab, and in it enable two-sided printing and check the “Booklet” checkbox.
If the output file for printing is presented in PDF format, then few will guess that regular Word was used to create it. The capabilities of Microsoft Word for making brochures, of course, are not as rich as those of professional publishing systems, but they are quite sufficient to obtain a satisfactory result.
Creating a booklet based on a ready-made template
Before creating a booklet, be sure to think about what exactly you will place on it: headings, text, images, etc. To write a persuasive copy, you need to study your target audience: find out the dreams, needs and fears of customers. And then answer questions that interest them.
Then you can start designing your booklet layout:
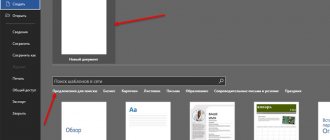
- Launch the Word program. A blank document will open.
- Go to the "File" tab in the top left corner of the screen. Open the "Create" section. In the “Templates” block, double-click on the “Booklets” item.
- Select the layout you want. Please note that in this section, in addition to booklets, there are also templates for brochures and simple leaflets. Brochure and booklet are different printed products. They differ in shape, size and number of pages. A brochure is a multi-page book, a booklet is one sheet of paper folded several times (from 1 to 7 folds). If you have a lot of information to post, choose a brochure; if not, get a booklet. Or a leaflet.
- Wait for the selected template to load into your document. It will already define all the main parameters: landscape orientation of pages, their size and number. The brochure has two pages, which are printed on different sides of the sheet.
- Save the document immediately. To do this, open the "File" tab and click "Save As". Or click on the floppy disk icon in the upper left corner.
- Specify the file name and type as “Word Document (.docx).” Click "Save".
- Edit the first page of the layout - this will be the outside of the booklet. It should contain brief information about your company. The template has all the tips on where and what to place: company name, motto, logo (in this layout it is in the middle column), a short selling overview of products or services, etc.
- If necessary, change the font settings (type, size, color, bold or italics, etc.).
- Edit the second side of the sheet - it will be the inside of the booklet. More detailed information about your company's products or services is usually posted here. Come up with a main heading and a couple of additional ones. In this layout, the main text is placed in the first two columns. The third column contains a picture of the business topic, company name, office address and email.
- If you need to replace the image, select the image that is on the layout and click “Delete”. Insert your picture. To do this, open the “Insert” tab in the panel at the top. Click "Drawing". Select an image on your hard drive and click Open. If necessary, reduce the size of the picture so that it does not occupy the entire area of the column and looks presentable.
We say “Thank you!”
If I helped you, please share this post with others using the social buttons. It's not difficult for you - I'm pleased.
Tell us in the comments if you were able to make your own brochure using my method.
And to always be aware of new releases, subscribe to the newsletter and add to groups: Odnoklassniki, VKontakte - links to groups in the menu. Learn with me the secrets of working in Word.
Article rating:
(
votes, average:
out of 5)
How to make a brochure: step-by-step instructions in Word Link to main publication
A booklet is a convenient format for posting useful information. This:
- ;
- a brief introduction to the work material;
- basic recommendations for resolving health issues, organizing repairs, etc.
The booklet is made on good paper with attractive colors. It takes up little space. A prospectus (brochure) is made by analogy with a booklet and contains basic information with the provision of contacts for complete familiarization and clarification of details.
Creating a booklet from scratch without a template
A booklet without a template is created in several stages. The first stage is changing the sheet format from portrait to landscape and setting the margins (top, bottom, right and left). The second stage is layout planning: determining the location for the stripes and fold lines. The third is creation and layout: placement of materials on the layout.
Now, first things first:
- Launch the Word program. Click on the "Margins" button in the "Page Layout" tab. The tab may be called differently - “Layout” or “Format”, depending on the version of Word.
- Click on “Custom Fields”.
- In the first “Margins” tab, specify a margin of 1 cm from the top, bottom, left and right edges. Select landscape orientation.
- Go to the "Paper Size" tab and select the booklet size if necessary. Usually this is A4 sheet. Click "OK" to save the settings for the future booklet.
- In the same “Page Layout” tab, click on the “Columns” button. Select the number of columns on one page (depending on the number of folds and spreads of the booklet). Click "Other Columns" ("Other Columns").
- If necessary, check the box next to “Separator.” The columns will be separated by vertical lines - they are convenient to use to indicate the fold location. In the same dialog box you can increase the number of columns (if you need more than 2-3). Click "OK" to save the settings.
- Go to the "File" tab. Click "Save As". Or click on the floppy disk in the upper right corner of the window. Select the document format and save location, enter its name and click “Save.”
- Start editing your booklet. On the first page (after you fold the booklet along the dividing lines, it will be the outer one) enter, for example, a title and a short text about your company and product (in the first column).
- Place a thematic picture or logo in the middle column. To insert an image, go to the Insert tab in the top bar of Word. Select the Drawing button. Find the picture on your PC hard drive. Select it with the left mouse button and click “Open”. If necessary, adjust the size of the image in the column.
- To open the settings, double-click on the picture - a new “Format” tab will appear at the top. Using the tools found here, you can crop the image, change its position relative to the column boundaries, select an express style (frame, three-dimensional image, blur, rounded corners, etc.), add brightness and artistic effects.
- In the third column of the first sheet, indicate the name of the company, its slogan and, for example, a unique selling proposition.
- To make the second page of the booklet appear in the window (with the same settings: landscape orientation, number of columns), simply press the “Enter” button while on the last line of the first page. The second page will be internal.
- Start typing the text on the second page. Let there be more detailed information about the products and the company. You can make one main heading and several additional ones, depending on the amount of information you want to place on the page.
- In the third column you can place a thematic picture and write the company’s contacts: office address, phone, fax, email.
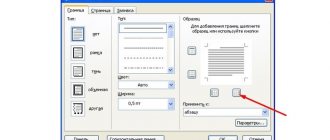
- Change the background color of the booklet if necessary. To do this, click on the “Page Color” button in the “Page Layout” tab. Select a shade from the palette and the background will change on both pages.
- At the end of editing, do not forget to save all changes in the document.
The design of the booklet depends on your imagination. You can change the arrangement of elements (headings, company contacts, etc.) to your taste. I only gave a sample. However, remember that the outside of the booklet serves as its cover - it is intended to provide brief information to attract attention. Most of the text about the company and product should be located on the inside.
Stage 3: Printing Implementation
The last thing left to do is to get the finished product, that is, a booklet that can be folded appropriately and comfortably study the information depicted on it. To achieve your goal, use the most standard printer, even that will be enough. As for paper, you need A4 format, in this case the work was carried out with it:
- Open the tab called "File" which is located in the top left corner.
- Select the “Print” item on the page that appears in front of you.
- Select the printer that is connected and ready to use. Make sure everything is done correctly. Click on “Print” and then wait for the result.
Additional Information. The last tip in the article on how to make a booklet in Word concerns setting the number of copies. After selecting the printer next to the “Print” item, enter the number manually or use the arrows. Please indicate exactly how many copies you need in total. If you are doing a test print, there is no need to change anything; one copy will be enough.
Presentable booklet: how to choose colors and fonts
To make your booklet look more attractive, pay attention to color combinations and fonts. The outer side of the product should please the eye of a potential client and attract his attention. If a person likes the booklet in appearance, most likely he will want to open and study it.
To select harmonious color combinations, use the Itten circle.
Below are several schemes recommended by professionals for working with a circle:
- Complementary combination. Complementary colors are those that are located on opposite edges of the circle. These are the most saturated and contrasting color models.
- A combination of three colors is a triad. A good combination is created by tones located at the same distance from each other. A contrasting, but at the same time harmonious composition will make the booklet effective, even if you choose dim shades.
- A similar combination involves the use of two or three tones located nearby. This color model conveys confidence, calm, and stability.
- Square. It uses 4 colors located at equal distances from each other. This combination gives the booklet brightness and is associated with celebration, movement, and development.
Colors and their combinations create not only mood. They evoke associations with a particular activity, phenomenon or event.
- Green is the color of calm and nature. To give it warmth, you can add a little yellow.
- Red is an aggressive, warlike color. It is important not to overdo it. Too much red, especially in combination with black, evokes a feeling of danger.
- Blue is also the color of nature, water and sky. It helps you concentrate and calm down. Shades of blue combine well with lemon yellow, scarlet, white and rich green.
- White is a base color that can be combined with most shades. Symbolizes purity, impartiality and justice.
- Purple is the color of creativity, mystery, and magic. Associated with competence and well-being, it encourages trust. Purple does not go with all colors. He creates the most successful compositions with beige, pink, gray, yellow, and orange.
- Black is the color of authority, power, labor and law. When there is too much of it, it can give the composition a dark effect. Choose it as the main one only if it is close to the theme of the booklet.
Some tips for choosing fonts and text formatting:
- Use complementary fonts. For example, you can use a decorative font for a company name or slogan, and a clear, geometric sans-serif for the body text.
- Make sure that the lines are aligned - they should not move to the right or left. This immediately “cheaps” the layout. Align text according to one scheme, for example, only left.
- If the audience is female, use fonts with smooth lines and smooth corners. If it’s for men, feel free to use angular letters with clear boundaries.
- Choose fonts of such a size that the reader does not have to strain their eyes. Headings are usually written in larger letters. It is acceptable to use Caps Lock, but without fanaticism and carefully - only to highlight one or two phrases, otherwise the text will “scream” at the reader (and he obviously will not like it).
- If you use small font, increase the spacing between letters and lines. This technique makes it easier to understand what is written.
When a booklet is a sheet of solid text, it feels “heavy.” Therefore, leave enough “air” on the page - empty space with or without graphic elements. The exception is an information booklet, which by definition has a lot of text. But even if you strive to give the reader as much useful information as possible, do it in a concentrated form.