Step-by-step instruction
Despite the simplicity of Microsoft Word, the capabilities of this program are extensive. Your text can become a beautifully designed finished work if you create a document with table of contents, hyperlinks, and numbering. It is enough to familiarize yourself with the basic settings and master the functionality. Numbering a multi-page document is not difficult if you know the algorithm of actions. This knowledge will not only make your work easier, but will also allow you to create more structured texts.
The process of creating content in Word consists of 3 stages:
- Highlighting subheadings.
- Setting up sheet numbering.
- Creating a table of contents.
Next, let's look at each of these steps in more detail.
How to add subheadings in Word?
Before setting up links in the content, you need to create the subheadings themselves, which will serve as a guide to the main text. This issue is not difficult to resolve. Just look carefully at the main Word panel located at the top of the screen. Styles are highlighted in the upper right corner. The first one is called "heading 1". It will be the main one in the test. You can use it to customize the title of an article or document.
Subheadings are the following sections that reveal the essence of the main heading. In addition, “heading 2” is the main one, and with numbering 3,4 and so on, they reveal the essence of the second number itself.
To highlight subheadings:
- Select text.
- Select “Heading 2” in the top control panel.
With that said, it's easy to separate headings and subheadings. To indicate the main section, you need to select the text and click on the “heading 1” icon, and if the essence, which is a subsection of the main section, then heading 2,3,4 and so on. After the main and additional sections are designed, we will link them to the content. Click the left mouse button and select the “update field” function. After this, you should number the sheets.
How to remove the title from the auto table of contents or the auto content itself?
We figured out how to make an auto table of contents in Word of different versions. And now there remains an equally important question: “How to remove the auto table of contents or its individual headings in Word?”
How to change auto table of contents in Word
Is it possible to disable individual sections and subsections from the auto table of contents? Or is this going to happen once and for all? Of course, there is nothing in Microsoft Word that is impossible. Therefore, you can create an auto table of contents to your liking.
So if you don't want the section to be included in the table of contents, do the following:
- select the name of the desired section;
- click the “Add text” ;
- select “Do not include in table of contents” ;
- update auto content.
After the update, this section will not appear in the table of contents.
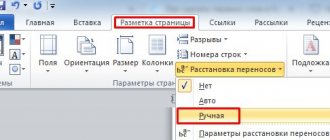
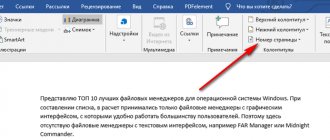
How to set up numbering?
Even if pages are numbered throughout the text, they will not appear in the table of contents automatically unless you enable this feature.
1. Open the “Insert” function on the top panel.
2. Select the “Page Number” section. 3. Select a numbering option.
How to create an auto-assembled table of contents step by step?
It is worth considering the basic rule - the content must be complete, because changes in it can cause confusion in the numbering. The automatic mode will do everything for the user, just a few clicks. To create correct content, it is necessary that key paragraphs be highlighted with a Word “subheading”. Let's consider a step-by-step algorithm of actions:
1. Place italics before the first subheading.
2. Type ctrl+enter. With this manipulation a new sheet will be added. In the future it will contain content.
3. Return italics to the first subheading and go to the menu.
4. Go to the “links” tab. There you need to press the “table of contents” button.
5. A subgroup opens in which you need to select “Auto-assembled table of contents 1 or 2”.
The program itself will transfer all subheadings to the first sheet.
This will be the numbered content. If you choose another method or create a table of contents manually, Word may react incorrectly and independently fill in the empty lines with information from the text that follows.
Watch video instructions:
Creating a Table of Contents
To create automatic content, we follow the following algorithm:
- Headings are created using styles.
- The cursor is placed at the place where the list of headings should be generated.
- The “Links” menu opens - the main menu bar at the top of the program window.
- Click on "Table of Contents". Click on “auto-assembled table of contents”. Here you can select the type of content.
As a result, it turns out to make content from the headings that word found in the text.
Word 2010
The process of generating content is slightly different, depending on the version of Word that is installed on the user’s computer. This latest development has a separate function for such an operation. Let's look at a step-by-step algorithm for adding a table of contents in Word 2010:
1. You need to place the cursor at the very beginning of the text.
2. Then press Ctrl + Home.
3. Then go to the tab called “links”.
It will have a separate “table of contents” icon.
4. The system will ask you to select one of the proposed auto-assembled options. Or you can select the “Table of Contents” item, where you can select the number of levels, the dotted line design option, and display or hide pagination.
5. The program will automatically make changes to the text, highlight subheadings and even number the pages.
If, for ease of navigation through the document, it is necessary to display links instead of numbering, then to do this, check the box next to the “Hyperlinks instead of page numbers” item.
On a note! To navigate through the document, you need to hover the cursor over the subheading in the table of contents, start on the Ctrl button and hold it down and click with the left mouse button. After this, the reader will be transferred to the desired section of the document.
conclusions
By using one of the automatic creation methods, the user will be able to save several seconds each time they change headings.
And, since most documents contain several chapters, sections, paragraphs and subsections, this feature of Word 2010 can be called quite useful for most professions related to office work.
Although, if the text is located on 1–5 pages, the automatic table of contents can be replaced with a regular table of contents, created manually.
Master class: creating an automatic table of contents in Word
How to create a table of contents in Word 2010 automatically? Best ways to solve a trivial problem
Instructions for Word 2003
In MS Word 2003, the functionality is slightly different. The system can add content itself if headings and subheadings are highlighted. Once the text is divided and structured, follow the simple instructions:
- Select the Insert tab.
- Then go to the “link” section.
- Then you need to click on the “table of contents and indexes” icon.
The final stage is to press the “ok” key, which will appear on the screen after selection. Numbering is done automatically because the table of contents was added without a title page in the finished document. If you need to add numbering from the 2nd sheet, then this operation is also carried out in the “insert” tab.
How to remove content
If you no longer need it or your experiments ended in failure, just take the following steps.
- Open the "Links" tab.
- Click on the “Table of Contents” menu.
- Select "Delete Table of Contents".
- Thanks to this, it will immediately disappear.
There is also a second way. To do this, you first need to select everything.
Then click on the Delete or Backspace button. But if the table of contents is large, then it is much more convenient to use the first method.
Word 2007
Experienced users advise immediately highlighting subheadings. This will facilitate further changes. You don’t even have to write the text, but immediately select the headings and create a table of contents, and only then write the body of the text. In this case, it will be much easier to travel through the entire text and make changes to it. Once the document is ready, follow the following procedure to add dotted numbering:
- Select the necessary fragments that require numbering with dots.
- Then you need to enter the “links” section.
- After that, find the “table of contents” button. An additional tab will appear in which you need to select a list of templates to suit your taste.
Word 2016: Customizing Content with Hyperlinks
Whatever the version of Word, you can add an auto-assembled table of contents. Let's consider a step-by-step transition algorithm, starting with setting up the table of contents:
- "links";
- "table of contents";
- “custom content”;
In the window that opens, you need to check the boxes. To make the content fully functional, you need to mark the following points:
- Show page numbers.
- Numbering to the right or left. You can highlight hyperlinks instead of numbers.
- Highlight common formats. It is better to mark them to be taken from templates.
- Select the number of levels.
- Choose a font and style for headings.
- Next, use the links to select “auto-assembled table of contents” and its type.
- Check the “hyperlinks instead of page numbers” box.
To navigate through the document, you need to hover the cursor over the subheading in the table of contents, start on the Ctrl button and hold it down and click with the left mouse button. After this, the reader will be transferred to the desired section of the document.
IMPORTANT! The content can be multi-level, but it is only suitable for voluminous texts, for example, in a thesis.
If the content was created manually, then to add navigation you need to:
- highlight the subtitle in the content;
- go to the “Insert” function located on the top control panel;
- select “Hyperlinks” - “Place in document”
- Specify the subheading to which the link should lead.
- Click on the “Ok” button.
Headings – elements of the Word table of contents
We need to start with the fact that headings in the text are done according to the rules. Word must understand that the piece of text where the author has highlighted it in bold is a heading, and not just a set of letters. For this purpose, the editor has created the “Styles” tool .
Using this tool, the user shows plain text in Word and indicates where the title is. They are divided by levels:
- Main - level 1, usually only one in the text.
- Level 2, often the only one.
- Level 3 is rarely used, and level 4 is even less common.
For example, the book “Shipwreck” consists of two parts: “Everything is bad” and “Everything is good.” The title of the book is title #1. “Everything is bad” and “Everything is good” headlines No. 2. If parts of the book have chapters, they will be considered title #3.
| Heading 1 | Heading 2 | Heading 3 |
| Shipwreck | ||
| Part 1. Everything is bad | ||
| Chapter 1. No food | ||
| Chapter 2. No water | ||
| Part 2. Everything is fine | ||
| Chapter 1. Found food | ||
| Chapter 2. Found water |
Using a hypothetical book as an example , the contents were compiled manually. For Word, it is enough to indicate in the text where the headings are and what level they are, so that the program can automatically create a hierarchical table of contents and set page numbers if necessary. For working with text only in Word, without a printed copy, pages are not so important: if you hold down the Ctrl key and click on a content element, Word will go to the selected item.
How to set up table of contents manually?
It doesn't matter if the user is Word 2007, 2010, 2013 or 2016, you can still create the table of contents manually. To set it up correctly and smoothly, follow the instructions:
- You need to move the cursor to the place where the user wants to create content. This may not be the first page, but the second. This option is relevant if a person has pictures in the text and the title page is occupied by the image.
- After that, go to the “links” tab, then “table of contents”.
- A table will open in which the “manual table of contents” item is selected.
Final step! After this, the content will be created, but the user will have the opportunity to change and edit it at his own discretion. Remember that in this case the numbering will have to be done manually.
What is content in Word
The content is the outline of the document, that is, a thesis statement of the main ideas. Looking at the table of contents, we immediately understand what the document will be about, we can estimate how long it will take to read it, and we can also weed out what interests us little and move on to the most important.
Agree, you won’t leaf through the entire textbook if you are only interested in one question and the corresponding paragraph? The table of contents just helps you understand which page you need to go to in order to immediately get what you want.
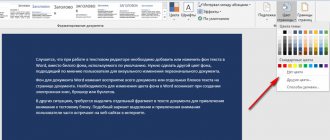
The table of contents can be simple (only H2 level subheadings) and complex or multi-level (H2, h3, h4 subheadings, etc.). The “Table of Contents” function in Word is located in the “Links” tab:
If you click on the “Table of Contents” tab, you can select the content type (manual or automatic) and configure the table of contents format:
As you can see, in the settings you can change the style (classic, sophisticated, simple, modern, intricate, formal). The default is “From template”. In addition, you can change the sign for filling the space between headings and page numbers (dots, bars, dashes).
You can also set up hyperlinks. The latter allows you to quickly switch from one section of the document to another.
Useful links: What is branding, Checking text for spelling, Examples of metaphor, What is text rewriting