Hello again dear readers! Fyodor Lykov is with you. In today's article we will look at ways to make a frame in Word.
This problem can be quite relevant for students at schools, universities, or even when preparing some work documents.
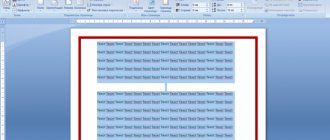
Frames in Word are used to design both the text itself and pages in general. For example, its presence may often be required on the title page for an essay or course work.
Let's look at how to get into the settings block with frames and page borders in different editions of Microsoft Office: 2016 and 2003.
How to make a page frame in Word
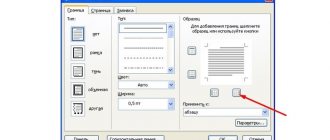
- To create a page frame, you need to go to the “Design” tab and select the “Page Borders” option.
- In the “Borders and Fill” window that opens, in the top line, select the “Page” tab, and in the left column of the proposed types, use the “frame” pattern.
- In the window of this editor you can select the type of border, color, width, etc.
If a decorative or festive decoration of the frame is required, then there is a “Drawing” option, which presents templates of figures from which the frame can be composed. In this case, in the “Sample” section of this window, you can continue editing the frame for the page. The OK button completes the setup process and a frame appears on the page.
Can you tell a cringe from a crash? Take this fun test and find out!
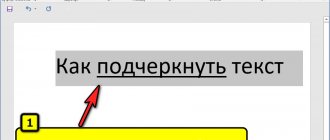
How to make a frame around text
The second option for making a frame in Word is to insert a template for highlighting part of the text.
To do this you need:
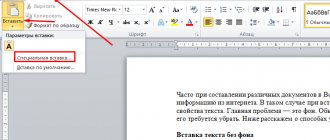
- Activate the “Insert” tab and select “Text Field”. From the proposed templates, the image “Simple inscription” is highlighted in the additional insert.
- After this, a window will appear on the document that can be edited.
- In the corresponding options you can select and configure markup parameters.
- It is also suggested that you customize and edit it yourself.
Here we offer style templates, the fill color inside the frame window and the color of the outline itself.
Super test on the topic “Money” and how can you be friends with it?
A quick way to draw a frame around text
You can quickly select part of the text and fill the window area with a certain color or not.
- To do this, in the “Insert” tab, in the “Shapes” option, select the “Rectangle” shape.
- In this case, by holding down the left mouse button, a rectangle is drawn on the text, highlighting the desired fragment.
- In the “Shape Styles” settings, you can select the proposed template or use the adjacent windows for editing.
The algorithm for inserting a frame in Word 2007 has remained virtually unchanged in older versions. However, subsequent programs have more options and templates for editing frames, text, etc.
Take the test on the topic “Legends of the 90s”, remember which of these you had?
Design of entire sections
The simplest technique that helps to create a frame around text in Word involves installing it for all sheets or sections. To implement it you will have to perform the following steps:
- Go to the "Design" section (or "Page Layout" for MS Word 2007 and 2010 editions).
- Find the “Page Background” tab located approximately in the middle.
- Select the "Page Borders" command.
- On the first tab that opens, select the “Frame” item, which allows you to set this type of frame on the sheet.
When designing only the title page in this way, in the settings you should select “this section (1st page only).” You can set other appearance options for the rest of the document.
If only part of the text is highlighted, you should use another method.
How to frame individual text in Word
While writing a page or editing the desired part of the text, you can insert it into the frame. For this:
- Select the symbols and in the “Home” tab, use 2 options located in the “Paragraph” section. These are the fill and border options.
- In this case, you can not use the fill or choose the desired color. And edit the frame itself in the “Borders” option, then “Fill and Borders”.
- In the window of this editor you can configure the desired frame parameters. You can use templates, choose colors, etc. After confirmation with the “OK” button, a frame with text appears on the page.
Volga or Pobeda? Are you familiar with the Soviet automobile industry? Test yourself in a fun test!
Quickly create a border
In Microsoft Word functions there is a button for quickly executing the function in question. It is located in the “Home” tab. With its help, you can create ready-made borders not only for a page or paragraph, but also for a small passage of text.
In order for a text frame to appear around the required piece of information, it must be selected. If you need highlighting around one paragraph, just place the cursor at its beginning. You can select a bold frame or another type of design in the pop-up menu.
How to make a frame for a diploma
When preparing technical documentation for diplomas, as well as other research works, they are guided by the standards in accordance with GOST 7.32-2001. And in the unified design documentation system, GOST 2.301-68 is used, which defines the frame format.
In Word, you can create a framework of a certain standard in several ways:
- The simplest one is to copy the finished document and use its standard template, removing all the characters from it. The template can also be downloaded from an online location on the relevant websites.
- You can also draw a frame by going to the “Insert” tab, where you select the “Table” column, moving the cursor to the arrow at the bottom. From the options that appear, you must select the line “Draw table”. This will enable the mode for drawing faces and tables. The size can be approximate; subsequently, all the necessary dimensions can be edited by moving the sides, deleting and creating cells.
Ready-made templates, just like tables created by drawing, are not edited, but text, drawings, etc. are inserted there. Naturally, for dissertations, laboratory papers, term papers and abstracts, each time a document is created, there is no point in drawing the frames of the title page and other pages in a new way. For this purpose, existing templates are used.
Ready frames
In addition to the built-in frame editor, you can use ready-made solutions that can be easily found on the Internet.
For example, if you need frames according to GOST, you can download them from here. When the archive is downloaded, unpack it. There you will see the Forms_A4.dot . This will be the frame template. But don’t rush to open it just like that. Copy it to the folder where you have Office installed in the STARTUP folder. Now you have everything installed.
Go to Word. We noticed that when you created a new document, the item “Security Warning” appeared. It always does this when connecting external data. This is fine. Just click on "Enable Content".
Now go to the Add-ons menu. There you will see our downloaded data that we just copied to the office folder. By clicking on any of the templates provided, you will see how it will immediately fit into the document according to all the rules.
Just in case, I put a special font inside the folder for forms of this format. Install this font.
How to make a frame with a stamp
- You can also download ready-made frames with a stamp or create your own. To do this, first make a frame, for which you go to the “Design” tab, as described earlier.
- Here you need to set the appropriate dimensions and configure the frame according to the required parameters. Next, you need to select “Footer” in the “Insert” tab.
- After this, the line “Change footer” will be activated.
The desired stamp frame can now be created in the already discussed “Draw Table” editor. But, of course, you first need to make the main inscription. To create larger cells, you can use the "merge cells" function or by using delete. The presented table editor can create any of them. The inscriptions are inserted later.
How to make a frame with a pattern
In the Word text editor, you can make a frame from the presented shape templates, as already discussed above for holiday and other document designs, letters or congratulations. But the set of drawings available in the program’s arsenal may not be enough. If a more original design is required, you can use a special drawing, photo, illustration, etc.
You can use them as a frame. For example, from sets of written colorful pages.
You can draw the picture yourself or download it, take a screenshot, and edit it in some image editor.
- After that, in the “Insert” tab, select “Drawings” and use the presented interface to indicate the path to the drawing that needs to be applied.
- After setting the desired picture as the background, you need to place text in it. To do this, hover the mouse cursor over the center of the picture, right-click, activate the option in which select the inscription: “Size and position.”
- In the “Layout” window that opens, use the “Text Wrap” tab and the suggested “Behind Text” option.
Now, after activating the “OK” button, you can place text on the background of the picture, edit it, etc.
Method number 2. Using tables
This method also works in absolutely all versions of Microsoft Word and does not cause any particular difficulties.
It consists in first creating a table with one cell and one column, writing some text in it, and then simply “adjusting” the size of the table to the size of the text.
In more detail, in Microsoft Word 2007, 2010 and 2013 all this is done as follows:
- Go to the “Insert” tab on the top panel of the program;
- Click the “Table” button;
- We aim at the grid so that only one square is selected. Click on it.
Process of inserting a table with one column and one row
- The 1×1 table we need will appear on the screen.
- Hover the mouse cursor over it, left-click and enter the desired text.
- We move the mouse cursor over the boundaries of this table, we see that it takes the form of a line with arrows on both sides. We move them in such a way as to reduce the size of the table.
In Microsoft Word 2003 the same thing happens like this:
- On the top panel, select the “Table” menu;
- In the drop-down list, move the cursor to the “Insert” item, then again to “Table”
- A window will open where you need to specify “1” next to the words “Number of columns” and “Number of rows”;
- Further actions are exactly the same - click on the table, insert the desired text there and change its size using the mouse cursor.
Process for creating a 1x1 table in Word 2003
In principle, you can create tables in this way in later versions of Microsoft Word, but there is already a more convenient method, which was described above.
How to customize page margins
- The Layout tab contains templates and a page margin editor.
- Standard options are offered, as well as custom settings. To do this, you need to activate the template and the “Page Settings” window will open.
- You need to set the appropriate settings in it. It should be noted that at the bottom there is an option “Apply to:” and then select the desired column. If the settings are needed for all pages of the document or for a given page, then use the required setting position and confirm “OK”.