While working in the Microsoft Word word processor, many users are looking for an answer to the question of how to number pages in Word in order to assign numbers to the pages of a document. If you have a number, it is easier to find the information you need in a multi-page document; to do this you will need to go to a specific page.
Most users do without page numbers because they work with small documents. If a document has many pages, numbering will make it much easier to navigate and work with the document.
Page numbering in Word is often used for the following types of documents: coursework, abstracts, dissertations, various instructions and manuals. Based on this, users have questions about how to number pages in different cases.
Word has several ways to insert numbers in a document. This guide contains instructions on several ways to insert numbers in a Word document: automatically number pages, number pages in Word without a title page, number pages starting from a specific sheet.
The information in this article works in the following versions of Word: MS Word 2022, MS Word 2016, MS Word 2013, MS Word 2010, MS Word 2007.
How to number pages automatically in Word
First, let's look at how to do page numbering in Word in the simplest way. This is an automatic way to add numbering to all pages of a document from start to finish.
Follow these steps:
- Open the desired document in Word.
- Go to the "Insert" tab.
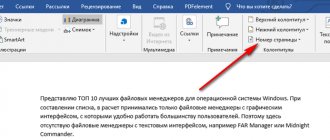
- In the “Header and Footers” group, click on the “Page Number” button.
The drop-down context menu provides options for selecting the location of numbers on the page:
- Top of the page.
- At the bottom of the page.
- In the margins of the page.
- Current position.
- It is necessary to select the appropriate option for the arrangement of numbers on the sheets of the document. To do this, click on the corresponding menu item.
- A window will open with examples of the location of the number on the document page. Click on the appropriate template.
Numbers will be added to the pages of the Word document in accordance with the previously selected location.
- Click on the “Close Header and Footer Window” button to exit insert mode.
Changing the font and color of the number
Page numbers have the same formatting tools as any other text in Word. To go to them:
- Double left click on a number on any page.
- Select a number and move the cursor over it.
A window with formatting settings will appear on the screen. Here you can:
- Change font style and size.
- Make characters lowercase or uppercase.
- Apply one of the standard styles or clear the style.
- Use bold or italics.
- Center the symbol.
- Add highlight color.
- Change symbol color.
- Increase or decrease the margin from the edge of the page.
After editing is complete, click “Close Header and Footer Window” or double-click with the left button anywhere on the page. Changes will be saved automatically.
How to number pages in Word starting from a specific number
Sometimes, users have questions about how to number pages starting from a certain number in order, and not from the first, as is usually done in most cases.
The following settings need to be made:
- In the Microsoft Word window, go to the “Insert” tab.
- Click on the "Page Number" button located in the "Header and Footer" group.
- Select the numbering location on the document page.
- In the context menu, click on the “Page Number Format...” item.
- In the Page Number Format window, in the Page Numbering option, enable the "start at:" option, and then select the appropriate page number.
- Click on the "OK" button.
In this case, the number you selected will be displayed in place of the first page, and then the numbers in ascending order.
What to do if Word numbers the pages incorrectly
Often Word does not number correctly, and after several sheets the counting starts again. For example, after 17 comes 15, then 16, and so on again and again.
Most often the failure is due to a broken partition that you cannot see. On the panel, click “Show all signs”, you will notice whether there is a gap or not (it is indicated by a number of dots). If there is one, remove it and everything will work correctly.
Sometimes such breaks are transferred from the Internet along with the text. To avoid this, when pasting, click on the “Keep text only” icon (not available in all versions, look in File, then Options).
You can also look at the “Page Number Format” settings, do this from the desired page.
If all else fails, create a new document and start moving piece by piece. As soon as you see that strange space has appeared again, retype the text manually and then start copying again, the numbers should come out as expected.
How to number pages in Word without a title page
Quite often, users have a question about how to number pages without a title page. There is no page number on the title page, although it may be included in the numbering of the Word document.
When inserting page numbers, we need to fulfill the requirement: number the pages, starting from sheet 2. Go through the following steps:
- Perform page numbering automatically.
- Double-click the left mouse button on the number “1” on the first sheet of the document.
- In the “Design” menu, in the “Options” group, check the box next to “Special header for the first page.”
- Close the Header and Footer window.
After this, the number display will disappear from the first page of the document, and on the second page the numbering will continue from number “2”.
If you want to continue numbering on the second page from number “1” without taking into account the title page, follow these steps:
- Enter the “Insert” menu, go to the “Header and Footers” group, click on the “Page Number” button.
- In the context menu, click on “Format page numbers...”.
- In the “Page Number Format” window, in the “Page Numbering” option, in the “start with:” parameter, select “0”.
- Click on the "OK" button and then close the Header and Footer window.
What checks will you have to go through before defending?
Before defending a thesis, the student will have to undergo quite a few checks. First, the work will be checked by a supervisor. Afterwards, other teachers will continue checking. It will be necessary to undergo regulatory control.
After this, you must undergo pre-defense of your work. This, one might say, is a dress rehearsal for the defense.
After this, you need to pass an anti-plagiarism check. The student submits an electronic version of his text. Usually the check is carried out in the dean's office or department. 95% of universities use the Anti-Plagiarism University service. This is a closed system that is accessible only to university employees.
In the freely accessible network, a student can independently use the Antiplagiat ru website. However, the free version is only a demo. It does not conduct a complete check and produces an inflated result. To bring the originality indicator closer to a more accurate one, you need to purchase a full package, which costs 270 rubles.
Or you can order a check at the Antiplagiat University on the Killer-antiplagiat.ru service. For only 249 rubles you can find out the result of the originality check, a full report and an Anti-Plagiarism certificate.
The student will be able to independently remove all found borrowings, thanks to the full report. The resulting uniqueness indicator will be the same as at the university. Thus, the student will be able to immediately prepare for a serious event.
How to number pages from sheet 3 or subsequent sheets - 1 way
There are situations when it is necessary to number pages from sheet 3 or any other subsequent sheet. At the beginning of the document there is often a title page or table of contents, so the numbering on these pages looks inappropriate.
You may also be interested in:
- How to remove numbering in Word
- How to make a background in a Word document - 5 ways
We use the following solution to the problem with two options:
- In a Word document, automatically insert numbers onto pages.
- Click the mouse cursor below, after the last line on the first sheet of the document.
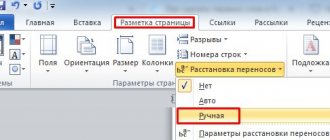
- Open the "Layout" tab (in Word 2007 and in Word 2010 - the "Page Layout" tab), in the "Page Setup" group, click on the "Breaks" button.
- From the Page Breaks menu, in the Section Breaks group, select Next Page.
- Go to the second page of the document, place your mouse cursor at the end of the page, select "Breaks" and then "Next Page".
- Repeat this operation for those pages that should not have numbers.
- Go to the first page of the document, and then click anywhere with your mouse cursor.
- Go to the “Insert” menu, in the “Header and Footers” group, click on the “Page Numbers” button.
- In the context menu, select “Format page numbers...”.
- In the “Page Number Format” window, in the “Page Numbering” setting, in the “start with:” option, put the number “0”.
- Click on the "OK" button.
Go to the second page of the document and do the same. If you need to start numbering from “4”, “5” or another page, perform the same operation for each page.
In our document, on the first two pages there is the number “0”, and the numbering in Word starts from the third page, where the number “1” is now located. We need to remove the “0” from the first two pages of the document.
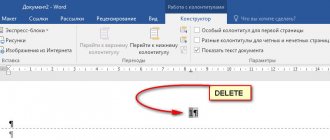
- Double-click on the number “0”, a footer will appear on the page.
- In the "Design" tab, in the "Options" group, select "Special header and footer for the first page."
- The number “0” will disappear from the document page. Repeat these steps on the second page of your Word document.
- Finally, click on the “Close Header and Footer Window” button.
As a result, there are no numbers on the first and second pages, and numbering starts from the third sheet of the Word document.
To change the numbering order, for example, if you want the third page to display "3" instead of "1", change the numbering order.
- Click on the number "1".
- Open the “Insert” menu, click on the “Page Number” item.
- From the open menu, select “Format Page Numbers...”.
- In the “Page Numbering” section, in the “start with:” setting, set the number “3”, and then save the changes.
Correct preparation of coursework and diploma
However, the correct design of a coursework or dissertation does not end with page numbering. There are a few more steps you need to take to pass the regulatory check. We will help you correctly format your work in Word. To do this, you need to immediately open the document with the text. Follow our instructions immediately and edit your text. We recommend that you start in order.
How to design a title page
It is strictly prohibited to prepare the title page yourself. The student must receive an electronic version of the template, in which the header is already written, and instructions for filling out information are also provided.
The student only needs to enter his data, his supervisor, the head of the department, and most importantly, the title of his work.
The design of the title page is the most critical moment, so we recommend checking it several times. The title page design changes every year, so you must wait for the most recent change made to the title page template.
Typically, the Ministry of Education approves all recent changes to the thesis design in May. Therefore, students are in no hurry to complete their work. Only at the end of the assignment and before the start of the tests do students begin to hastily revise their coursework and dissertations.
How to properly format text inside a work
Before you start formatting your text, be sure to double-check the grammar and spelling of the text. If the teacher notices with the naked eye that you made mistakes when writing, he will force you to rewrite.
Also pay attention to the text if you used borrowings. Many sites have learned to combat copying someone else's text. They introduce logical fallacies or outright errors. Someone adds the name of the source to the text. Some sites have learned to specifically remove a few words and add extra characters in order to catch a person plagiarizing. In fact, teachers already know about such tricks and, even without reading the text, can identify “introductory signs.”
Remember that all your text should be in the same style. There must be one font, Times New Roman. The font size should be 14 pt throughout. Even if you want to highlight headings, you can place them at the top of the page. Sometimes it is permissible to highlight headings in bold.
In the text, bold, italics, or underlining are not permitted. Only in exceptional cases can you enter italics to mark words.
Remember that teachers already have a keen eye for checking the design. If the text is not justified, they will notice it immediately.
This way you can format all the text correctly.
How to format references and citations
Links and citations also need to be formatted correctly. Most often, students fail themselves precisely in their design. The fact is that links and citations are very different from each other.
The main test for students today is anti-plagiarism. Quotes pass through anti-plagiarism and do not add to the plagiarism percentage. But links can be defined as borrowings. Why is this happening?
If you add a direct copy of a phrase to the link, but put the source after it and indicate the author, then the teacher will count your link. And the anti-plagiarism program will not be able to recognize it. Direct borrowing without quotation marks for a program is plagiarism. Therefore, if you want to enter a quote, we recommend that you immediately put it in quotation marks. And if you want to add a link, then use paraphrasing.
Don't forget that before writing your work, you must choose how you will indicate the source: using references or using footnotes. It is best to use footnotes. This will help increase the amount of work.
If you want to use links, you also need to choose whether you will use square or parentheses. You will indicate the source using the serial number in the list of references used or write the author's name and page number.
You will have to use the selected option throughout the text. It cannot be changed. Only round brackets or only square brackets - and nothing else.
It's the same with quotation marks in quotations. Only one version of quotes is allowed to do the whole job.
Now you know everything about designing links and citations. By the way, if you use footnotes. Then do not forget to copy the full name of the source from the bibliography of your work. And also indicate the pages from which this or that information was taken.
How to create a list of used literature
A list of references used should be prepared from the very beginning. This will make it easier for you to format your footnotes. We recommend that you immediately open GOST or the list of rules for preparing a bibliographic list.
Examples for different types of sources will be provided here. You will quickly learn how to put information in order if you do it yourself. Don't assume that copying from articles and scientific sources suits your design. Many articles in open resources are incorrectly formatted. It all depends on the correct order.
This is what the correct order template looks like:
Surname and initials. Title of literature. Type of book. Publishing house. City of publication and year. Number of pages or page numbers read.
If you keep this template in mind, you will be able to properly format your bibliography.
How to make numbering in Word from page 3 - method 2
Now we will look at a similar option:
- Set automatic page numbers to Word document pages.
- Click after the last line on the first page of the document.
- In the "Layout" tab (in Word 2007 and in Word 2010 - "Page Layout"), click on the "Breaks" button located in the "Page Setup" group.
- In the “Page Breaks” context menu, in the “Section Breaks” group, click on “Next Page”.
- Double click on page 3 where you want the numbering to appear.
- In the “Transitions” group, click on the “Same as in the previous section” button.
- In the "Options" group, uncheck the box next to "Custom footer for first page."
- In the "Header and Footer" group, click on "Page Number".
- Select the location of the numbering elements, and then click on the “Page Number Format...” item.
- In the “Page Format” window, in the “start with:” numbering parameters, put the number “1” or the number “3”, depending on which number you want to start numbering on page 3 of the document.
How to format content
In addition to numbered pages, one useful navigation method is a table of contents. To issue it you need:
- Create breaks (sections).
- In each section, format the heading in the appropriate style: “Heading 1”, “Heading 2”, etc.
- Go up to the top of the document and press the Ctrl+Enter key combination, thereby creating a new sheet: after all, the content should be located separately: either at the top or bottom.
- Go to the “Links” tab and click on “Table of Contents”.
- A context menu will open, select the desired type of table of contents.
- If everything is done correctly, the content will appear immediately.
How to make numbering from page 3 of a document - method 3
Using this simple method, you can remove numbering from the first pages of a document, starting to display numbers from page 3 or the next one. We use the insert shapes feature, which covers the numbers on the document page.
This method is best used when the user has already finished editing the document, in order to avoid formatting violations. Otherwise, with further editing, the formatting of the document may change, because of this, the figures may shift in space, and hidden numbers may become visible again.
In the Word file window, do the following:
- Click on the first word on the document page.
- Go to the “Insert” menu, in the “Illustrations” group, click on “Shapes”.
- Select rectangle from the context menu.
- Place a shape outline (rectangle) around the number.
- Click on the "Shape Fill" button.
- From the Theme Colors menu, select white.
The number will disappear because it is covered by the figure. On the page we still have the outline of the figure that needs to be hidden.
- Click on the "Shape Outline" button, select white color for the outline.
- Click in the Word document window.
An empty space will appear in place of the number. We hid the number with a white figure.
Do similar actions for the next, or for the next few pages. As a result, the numbering in the document will be displayed from 3 or another subsequent page.
How to change the format of numbers in pagination
If necessary, the user can change the number format used when numbering the pages of a Word document. By default, the program uses regular (Arabic) numbers.
The application provides Roman numerals, lowercase or uppercase letters of the Latin alphabet, which can be used when numbering pages, instead of regular numbers.
According to GOST, the following requirements are imposed on the numbering of documents:
- Arabic numerals are used;
- numbers are placed above the text at the top of the page;
- The numbering includes appendices and a list of references.
Some institutions and organizations use different rules for page numbering in Word.
To change the number format, follow these steps:
- Open the “Insert” tab, in the “Header and Footers” group, click on “Page Number”.
- In the menu that opens, select “Page Number Format...”.
- In the “Page Number Format” window, in the “Number Format:” parameter, select the desired format, and then click on the “OK” button.