Active users of Rambler Mail can use all the capabilities of the service not only in the browser on their computer, but also on their mobile devices. To do this, you can install the appropriate client application from the company store or connect the mailbox in the system settings, having previously performed certain manipulations on the official website of the mail service. Next, we will tell you how to set up Rambler Mail on iPhone.
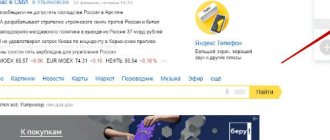
HONOR cuts prices and gives away gifts for Black Friday
On the eve of Black Friday, the HONOR brand announced a new promotion.
Thus, from November 28, the manufacturer’s devices will be available at a discount of up to 50%. In addition, users will be able to receive coupons for increased benefits and valuable gifts for purchasing smartphones .
Further
111 2.12.19
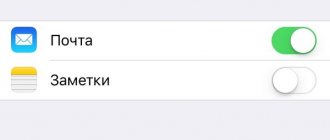
Notification options
In Safari app
on your Mac, do any of the following:
Opt out of receiving site notifications: Select Safari > Preferences, select Websites, then click the notification button. Find the site in the list, then select Deny.
Change how notifications appear on your website: Select the Apple menu
> "System Preferences", select Notifications, select Site on the left, and then change the alert style and other settings on the right.
Stop seeing requests for permission to send you notifications in Safari: Select Safari > Preferences, select Websites, then select the notification button. Uncheck "Allow websites to ask for permission to send push notifications."
From now on, when you visit a website that may send you notifications, you didn't ask for it.
Source
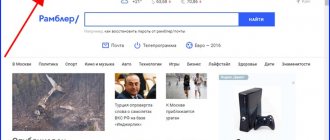
Xiaomi will add one of the iPhone features and other new features to MIUI 11
Xiaomi has already released stable versions of the proprietary MIUI 11 software shell for a number of smartphones, but continues to expand the functionality of the popular firmware.
In the new test build, enthusiasts of the XDA-Developers portal managed to discover upcoming innovations that owners of Xiaomi and Redmi gadgets will soon receive. According to the leak, the vendor is preparing to significantly “pump up” the camera capabilities of smartphones. IN
Further
213 25.11.19
How to set up Russian-language email clients on iPhone
With boxes from other companies, the situation is a little more complicated, but nothing is impossible here either. We are talking about such mailers as Rambler or Yandex, popular in Russia. To set up their mailboxes on an iPhone, the user will need to manually enter data. But at the same time, each of the mailers has its own characteristics, so we will analyze the process of setting up the mailboxes of the most famous companies in more detail.
So, to set up e-mail from Yandex on an Apple gadget, you need to repeat several steps similar to those described above - which the user performed when working with Mail.ru. But now at the bottom of the “account” you need to select the “Other” item.
Next you need to enter your email name, password and description. The mail settings manager built into the mobile device will give the user a recommendation to create an e-mail in the standard IMAP protocol. However, when trying to fill it out, the user almost always encounters an error. In such a situation, you need to exit the window of this protocol. which will start loading automatically, and go to POP. Almost all remaining data will be linked automatically.
The first Tesla pickup truck became a bestseller even before production began
The announcement of the first Tesla pickup truck turned out to be controversial - the Internet has already managed to go through the angular design of the electric car and its breakable “bulletproof” glass.
However, this does not seem to have affected the popularity of the future new product. The head of the company, Elon Musk, spoke about the number of pre-orders for various modifications of the Cybertruck - the numbers turned out to be impressive. IN
Further
184 24.11.19
Use Siri Suggestions
If you let Siri make safari suggestions and you sign up for an event on the website, such as a dinner reservation, you can quickly add it to your calendar.
Accept Siri's suggestion: Tap the notification to view the event, then tap Add to calendar.
Stop Seeing Siri Suggestions in Safari: Select the Apple Menu
> System Preferences, tap Siri, tap Siri Suggestions & Privacy, then uncheck Safari.
The timing of the presentation of the iPhone SE 2 and new details about the iPhone 12 have been revealed
Despite the recent release of three new Apple smartphones, insiders have already begun actively collecting data about next year’s model line.
In addition to the technical characteristics of the iPhone 12 Pro, informants managed to find out details about the production of the long-awaited “state employee” iPhone SE 2. In
Further
178 26.11.19
Setting up Rambler mail (rambler.ru) on iPad and iPhone?!
To set up Rambler mail on an Apple iPad or iPhone, go to the device settings. Find the “Mail, Contacts, Calendars” section:
In the “Accounts” subsection, click the Add button. A selection of email services will open:
Click on the “Other” button.
Click on the “Add account” button in the “Mail” subsection. The following window will open:
The “Name” and “Description” fields can be filled out as you wish, but in the “Address” and “Password” fields you must enter your Rambler mail address and password to access it, respectively. Click on the "Next" button. Now you need to fill out the mail server settings:
For Rambler mail, the settings are as follows:
POP3:
Incoming messages (POP3): mail.rambler.ru
Outgoing messages (SMTP): mail.rambler.ru
IMAP:
Incoming messages (POP3): mail.rambler.ru
Outgoing messages (SMTP): mail.rambler.ru
Click the "Save" button. Now you can check your mailbox for new emails.
Source
Elon Musk explains for the broken bulletproof glass of the Tesla Cybertruck
The presentation of the Tesla Cybertruck pickup truck was remembered by the audience not only for the conceptual design of the electric car, but also for the “armored” glass that broke during demonstration testing.
The head of the automaker, Elon Musk, immediately promised that the company would correct this defect, and later explained the reason for the curious incident and published a video refuting statements about the fragility of the car’s design. IN
Further
“Mail” is a famous tool from Apple that allows you to interact with email accounts in a compact client, where smart sorting of letters is available, the interface is clear, and you can enter new accounts indefinitely - important messages will arrive. This is the case, at least, with Google and Yahoo, but what if you need domestic services? It's simple! So, how to set up mail on iPhone.
Content
Ways to solve problems setting up Mail on iPhone
If nothing worked with setting up mail on your Apple gadget, follow these steps, which should help 100%:
- Go to your device's mail settings.
- Next, go to the settings of the newly created mailbox.
- In the Outgoing Email Servers section, click on SMTP.
- If your mailbox already has your mailboxes configured, click on smtp.mail.ru in the primary server section. If there are none, select “not configured”, and in the node name section you should indicate smtp.mail.ru, then save the action and click on smtp.mail.ru again.
- See if the “Use SSL” switch is activated, as well as whether the server port information is correct (it should be written 465). But it happens that everything works fine with port 587.
- Click the Done and Back buttons one after the other, and then click on the Advanced options tab.
- Recheck your inbox settings, incl. switch position. But the server port should be 993.
After you have done everything described above, the mail will work. In addition, you can configure other mailers in the same way. And all of them will be in a single standard program. It is important that the process of switching between boxes from different companies is very easy and convenient.
General algorithm
Any interaction with third-party services in the “Mail” tool built into iOS begins from the “Settings” menu, or more precisely, from the “Accounts and Passwords” section, where, firstly, information about logins and passwords saved in the system for authorization, and secondly, a special platform is available for interaction with iCloud and “electronic boxes”.
Immediately after going to the section, you need to click on the “Add account” menu item, and then you will only have to act according to the specified algorithm, depending on the service being added (mail, yandex, gmail).
Sometimes setting up a new work or corporate email takes no more than ten seconds, sometimes you will have to enter a dozen additional values, select servers and nodes, and configure protocols. Even with a strong desire, it is impossible to get lost during setup - even beginners working with the Mail tool for the first time will immediately understand all the nuances and receive a truly multifunctional, and most importantly, completely customizable platform for personal and corporate communication on the network.
Russian sector
If the owner of an iPhone prefers Russian space services, the standard application makes it possible to do this as well. In the already mentioned Mail settings section on iPhone – “Other”, the following steps are taken:
- In the “New account” item, fill in the information lines. The “name” can be anything; recipients of letters will see it as the author of the message. The “E-mail” field is filled in with the address of an existing mailbox. Enter the “Password” to access this mailbox and enter the corresponding domain in the “Description” section - Yandex.ru, Mail.ru or the domain of any other Russian service.
- Identification starts. When it passes, click “Save” and use of the service becomes available. If you still cannot receive and send letters, you will need to go through a few more steps.
- In the menu of the created account, select “Outgoing mail server”. To specify the primary server, sequentially press SMTP – “Not configured” – “Host name”. The last item is filled in in the form “smtp.example.ru”, where “example” is the name of the service being configured. By selecting “Save”, the primary server is stmp.example.ru.
- By clicking it, you should enable “Use SSL” in the options. The port value is set to 465.
- After saving the changes and returning to the account menu, you need to go to the “Advanced” section. SSL is also enabled here. The port value is set to 993.
Thus, you can add an account for the Russian sector, regardless of affiliation.
Settings options for mail.ru
You can set up Mail on iPhone as follows:
- In the “Accounts and Passwords” section, select “Add a new entry”;
- In the list that opens, click “Other”;
- Next, in the “Mail” section, select “New Account”;
- Enter real parameters, where the text fields “Name” and “Description” can be filled in any way, and “e-mail” and “Password” only as specified in the mail service;
- If the information is filled out correctly, the system will automatically enter the necessary information in the “Incoming and outgoing mail server” field and select the necessary SSL protocol parameters;
- If the messages are not loaded or the connection with mail.ru is broken, then you will have to look into the settings of the created account;
- Or rather, in the SMTP panel, where you will have to enter several additional parameters;
- The first step is to switch the “Server” icon to the on position;
- Next, enter smtp.mail.ru in the “Node name”, port – 993. Fill out the rest of the information in accordance with the data from your account at mail.ru. Save data. Proceed to immediate use.
What about Russian-language postal services?
The situation is a little more complicated with other mail agents Rambler, Mail.ru or Yandex, popular in our latitudes. You will have to manually enter the data into the existing fields. Since they all have their own characteristics, we will consider each of them separately.
So, in order to set up your Yandex , you need to partially repeat the path described above. Just select this time the item – Other – at the very bottom of the accounts menu.
Enter your name, email, password and description (the first and last are optional). The built-in mail settings manager in the iPhone will prompt you to create your mailbox in the standard IMAP protocol, but when filling it out an error will probably be displayed. You will need to exit the automatically downloaded IMAP window and switch to POP. Select the appropriate tab on the right - POP. Most of the remaining data will be linked automatically.
Then you should change the host names for the incoming and outgoing mail servers to the following:
In the server subsection for incoming mail, next to - Host name - enter pop.yandex.ru;
In the server subsection for outgoing - Host name - on smtp.yandex.ru.
After checking and confirming the entered data, save all changes made. Synchronize contacts if necessary. After this, the mailbox will work safely on the iPhone.
Now let's repeat this procedure for Rambler. Don't forget to switch to the POP protocol. When trying to set up a new Rambler service mailbox, sometimes data about the host name of the mail servers is not entered automatically after filling out the top user fields. If this happens to you, enter them manually, they should have the following names:
Settings for Yandex.ru
- The algorithm for setting up Yandex on iPhone actions is similar to what is described above. In the same way, you will have to look in the “Accounts and Passwords” section, select “New Account”, click on the “Other” menu item;
- Again, you will have to fill out all the necessary information about your profile in the yandex.ru service - e-mail, password, name, short description (if there are too many mailboxes, sometimes it is better to add a couple of lines for additional clarity - where exactly the letters are coming from);
- Starting from iOS 10, Yandex settings are automatically linked - you don’t have to enter data about servers and ports.
- If the letters do not arrive or are sent, then you will have to look again at the account settings, in the SMTP section.
- Where it is important to check the box next to “Use SSL”, enter smtp.yandex.com in the “Host name”, and set the port to 587;
- The final step is to save the entered information.
How to set up Gmail (Google) mail on iPhone 5, 6, 7, 8, X
Integration with Google is easier to do than with others. Those who limit themselves to this service will have the least hassle, because everything will happen almost instantly. Here's what owners of this mailbox need to do to set up mail on iPhone:
1. Select the “Mail” icon on the smartphone’s desktop (if mail is the first one).
2. Select "Google".
3. Enter the mailbox address and password.
That's the whole simple process. Additionally, you can specify your name and add a description, this can make using mail on iPhone more comfortable. All that remains is to save the result. It couldn't be simpler.
OutLook Mail
- You can interact with the famous service from Microsoft from a separate application, but if you really want to keep everything in one place, then you should follow the already familiar path;
- Go to the “Accounts and Passwords” section. Select the option to authorize a new account;
- In the list that appears, click on “Outlook.com”;
- Fill in the text fields with your email and password information. If two-factor authentication is enabled, then you cannot do without entering the numerical combination received on the mobile number;
- The service will work automatically if the data is entered correctly and without errors. Messages should arrive immediately, otherwise, if problems occur, you will have to go through authorization again.
Automatically set up your email account
If you use email services like iCloud, Google, or Yahoo, Mail may automatically set up your account after you enter your email address and password. To do this, you must perform the following steps.
- Go to Settings > Passwords & Accounts.
- Click "Add Account" and select your email service provider.
- Enter your email address and password.
- Click the "Next" button and wait until the Mail program finishes checking your account.
- Select information in your email account, such as contacts or calendars.
- Click "Save".
If the email service provider you want is not listed, click Other to manually add an account.
Rambler mail
The procedure for setting up the rambler completely repeats the instructions described for mail.ru and yandex.ru:
- Go to the adding a new account section;
- In the list that opens, click “Other”;
- Correctly fill out the text fields that appear (don't forget about the short description!);
- The system will pick up the rest of the information automatically. If for technical reasons all important text fields are empty, then you will have to enter some information manually. For the incoming mail server, the “Node name” is pop.rambler.ru (you should definitely check all the values up to the last letter!), for outgoing mail – smtp.rambler.ru;
- You will have to enter your login and password twice. Again, all entered data should be double-checked several times - this will save time searching for some imaginary errors, when in fact inattention is to blame.
Preliminary configuration of the mail service
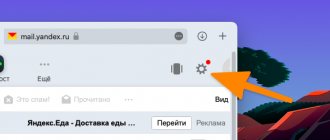
Before moving on to the direct setup and subsequent use of Rambler Mail on an iPhone, you need to provide third-party programs, which in this case are email clients, with access to work with the service. This is done as follows:
- After clicking on the link provided above, open the “Settings” of the mail service by left-clicking (LMB) on the corresponding button on the toolbar.
Enter the code from the image in the pop-up window and click “Submit”.
Done, preliminary configuration of Rambler Mail is completed. At this stage, do not rush to close the mail service page (directly the “Settings” - “Programs” section) or simply remember, or better yet, write down the data presented in the following blocks:
SMTP:
- Server: smtp.rambler.ru;
- Encryption: SSL - port 465.
POP3:
- Server: pop.rambler.ru;
- Encryption: SSL - port: 995.
Now let's move directly to setting up Rambler Mail on iPhone
Method 1: Standard Mail app
First of all, let's look at how to ensure Rambler Mail works correctly in the standard email client available on every iPhone, regardless of the iOS version.
- Open the “Settings” of your mobile device by tapping on the corresponding icon on the main screen. Scroll down the list of available options a little and go to the “Passwords and Accounts” section if you have iOS 11 or higher installed, or if the system version is lower than specified, select “Mail”.
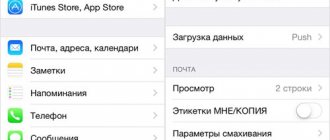
Mail settings for other services
Do you have an irresistible desire to add some exotic email account to your system, but you can’t find even the slightest details about the necessary setup on the Internet? Are the parameters not “clinging” in automatic mode? The situation is certainly complex, but solvable, there are at least two options:
- Contact your service provider. It is difficult to find an email service that does not provide parameters for authorization on different devices through third-party tools. You should look for login information somewhere in your profile settings, or rather in the section related to the network. Sometimes the service provider even posts detailed instructions on how to connect to different systems (including Mail on the iPhone), and even with screenshots. This is how things are, for example, on the website mail.ru;
- – Look at the Apple website. If you couldn’t find the much-needed information on official resources, then you’ll have to take third-party routes and contact Apple directly. A special platform is available on the support page, where in just five to ten seconds you can find a complete list of parameters that allow you to quickly put your Mail in order;
- Everything is described - the account type, ports, and important host and server names for receiving and sending emails. You can track almost all major mail services, but, however, there are exceptions. If the information is not found on the Apple website, then the best option is to return to the service provider and contact support there.
How to sign out of mail on iPhone?
You need to delete your account from iPhone as follows:
Step 1
.
Go to “ Settings
” and find the “
Mail, addresses, calendars
” section.
Step 2
.
In the “ Accounts
” block, find the mailbox you want to erase and click on it.
Step 3
.
On the next screen, click the “ Delete Account
” button.
Step 4
.
Confirm your intention to erase your account - click on “ Delete from iPhone
”.
When you delete your account from your mobile device, all information that was synchronized with your account will also be lost. Therefore, before erasing your account, make sure to transfer valuable information to a reliable medium.
Deleting emails from the server
Until recently (on iOS version 7+), Apple developers made it possible to transfer to an archive any messages appearing on Mail, both on a smartphone or tablet, and directly on the mail service’s servers. After iOS 10, the situation has changed - from now on, users can only choose where exactly to transfer old and unused messages - either to the trash bin or to the archive. This parameter is configured in the “Accounts and Passwords” section in the settings of the selected service.
Immediately after going to the “Additional” menu, in the “Destination for moving unnecessary messages” item, select “Deleted”. Then, within a few weeks (or a month), the trash can will be cleared of accumulated garbage.
Possible errors during settings
Serious errors rarely occur when setting up Rambler mail, but it does happen. Let's look at the most popular of them, which most users encounter.
“It’s impossible to connect to the server” is a rather uninformative error that can have a variety of reasons. If everything is fine with your Internet connection, other resources work without problems, then most likely the problem is that during automatic configuration, port 25 was selected for outgoing mail. Port 25 is often blocked by providers in order to reduce the level of spam in the mailbox. The solution to the problem is to change port 25 to port 587 (or TSL encrypted port 465).
"Error 530 - authorization required." Most often it occurs if you made a mistake when entering your login (email address) and password (chosen during registration). Check if you made any typos when entering data. If after checking the error does not disappear, then it is possible that when setting up your email client you did not enable authentication on the outgoing message server. In some clients, when setting up an SMTP server, you also need to enter your username and password.
Another problem that prevents many from sending messages. This is a discrepancy between the sending form (where the address from which the letter is sent) and the address used for authorization on the server are indicated. It is important to re-check all settings entered in the third-party email client.
Mail apps on iPhone
The App Store, Apple's official app and entertainment store, is bursting with feature-rich email clients that make it easier to work with any email account. But, if you really choose the best mail application, then you should focus on three options:
- myMail. Smart sorting of letters, and integration of third-party services (for example, developers allow phone numbers to be immediately saved to the address book, and dates to be transferred to the calendar), amazing optimization and support for the gesture system, as well as drafts, platforms for quick replies and history, where you can save an entire library. If the classic “Mail” has long been boring and changes are needed, then myMail is the best option;
- Gmail. And although there are no problems with authorizing a Google email account in iOS, the third-party application, Gmail, from a functional point of view, looks richer and more convenient than what the guys from Apple came up with. Everything here is of the highest standard - quickly, clearly, with gestures and integration. And you don’t have to worry about quick updates for new iPhones and iPads - Google always keeps an eye on new products;
- Mail.ru. Surprisingly, the domestic service copes with all its responsibilities perfectly - it has the same user-friendly interface as its competitors, the same ability to quickly transfer any data to third-party applications. There were even interesting additional technologies - like password-protected addresses and a schedule for sending letters throughout the day. The only thing that spoils the atmosphere is advertising that appears at a completely inconvenient time.
Additionally, it is worth noting the following clients - Yandex.Mail (interaction with other services of the famous search engine is perfectly configured - here you can search for hotels, call a taxi, and the ability to attach an account directly from your wallet), CloudMagic (simple, but tasteful), Boxer (very nice, but when working with several accounts you will have to pay at once).
We all love and respect Apple products, since using them brings us real pleasure. But sometimes it happens that setting up even simple things with a user-friendly interface causes a lot of negative emotions and headaches. And the reason for everything is “it just doesn’t work out.”
In this article, we will explain to you in detail how to install Rambler mail on iPhone. You can read about setting up other email services here
Box liquidation
Removing any of the email accounts added there from your phone is even easier than adding it. It should be taken into account that all data associated with the deleted account will be lost.
- In “Settings”, select the “Mail, Addresses, Calendars” submenu, just like before binding an email address. In the list that opens, click the address intended for deletion.
- At the bottom of the screen, the user sees the “Delete account” option. But even by clicking on it, you still have the opportunity to change your mind - the system will ask for confirmation “Delete from iPhone.” If the decision is irrevocable, it is confirmed and all information associated with the box disappears.
The iPhone's focus on maximum convenience allows you to freely add and delete email accounts. But the user needs to be careful not to lose useful information when eliminating an extra box. Once deleted, this information can no longer be restored.
Setting up email on Apple devices is a very simple procedure that even a novice user can do. Moreover, all i-mans have at their disposal our detailed instructions, which describe all the necessary steps step by step. Let's get started?
To configure email settings on your iPhone/iPad/iPod Touch, you can just open this service and select the email service that you want to use in the future. But if after this the mail does not work, then you need more detailed settings.
Go to the settings menu, select Mail, Contacts, Calendars, and then Add an account. Now fill in all the available fields one by one. The first columns in line are POP and IMAP. How they should be filled out is described on the official website of the relevant postal service. Visit the web resource and transfer the sample data from there. Immediately after this, open the Settings menu again and click on the bottommost Advanced button. Here you must provide information about your email account, that is, enter your email address and password.
For a more clear explanation, below we provide you with examples of filling out settings for the most common email services. Provided that your name is Boris Kanarin, the settings for yandex.ru will look like this:
Bookmark: POR
- Address: (Your current email address)
- Description: (this address will take place in the “name of postal service” paragraph)
Incoming mail server
- Host name: pop.yandex.ru
- Login: Kanarin_Bor (without the @yandex.ru part)
Outgoing mail server
- Host name: smtp.yandex.ru
- Login: Kanarin_Bor (without ending @yandex.ru)
- Password: *********** (password for personal mailbox)
Additional Inbox
- Use SSL: disabled
- Server port: 110
Additional Outbox
- Use SSL: disabled
- Identification: enter your password
If you are still the same Boris Kanarin, but want to use the rambler.ru service, then here are the settings you need:
Bookmark: POR
- Name: Kanarin Boris (this is the name that will appear in the “from” line for all recipients of your letters)
Incoming mail server
- Node name: mail.rambler.ru
- Login:
Outgoing mail server
- Node name: mail.rambler.ru
- Login:
- Password: ************ (password for personal mailbox)
Additional Inbox
- Use SSL: enabled
- Identification: enter your password
- Server port: 110 or 995
Additional Outbox
- Use SSL: enabled
- Identification: enter your password
- Server port: 25 or 587
Bookmark: IMAP
- Name: Kanarin Boris (this is the name that will appear in the “from” line for all recipients of your letters)
- Address: (your current email address)
- Description: (this address will take place in the “name of postal service” paragraph)
Incoming mail server
- Node name: mail.rambler.ru
- Login:
- Password:************ (password for personal mailbox)
Outgoing mail server
- Node name: mail.rambler.ru
- Login:
- Password: ************ (password for personal mailbox)
Additional Inbox
- Use SSL: enabled
- Identification: enter your password
- Server port: 993
Additional Outbox
- Use SSL: enabled
- Identification: enter your password
- Server port: 25 or 587 (optional)
If you, Boris Kanarin, intend to use the services of a Mail.ru agent, then in your mail application the picture will be as follows:
Bookmark: POR
- Name: Kanarin Boris (this is the name that will appear in the “from” line for all recipients of your letters)
- Address: (Your current email address)
- Description: (this address will take place in the “name of postal service” paragraph)
Incoming mail server
- Host name: pop.mail.ru
- Login: Kanarin_Bor (without the @mail.ru part)
- Password: *********** (password for personal mailbox)
Outgoing mail server
- Host name: smtp.mail.ru
- Login: Kanarin_Bor (without ending @mail.ru)
- Password: *********** (password for personal mailbox)
Additional Inbox
- Use SSL: disabled
- Server port: 110
Additional Outbox
- Use SSL: disabled
- Identification: enter your password
- Server port: 25 or 2525 or 587 (to choose from)
For the future client of the gmail.ru mail service Boris Kanarin, the following parameters are relevant:
Bookmark: POR
- Name: Kanarin Boris (this is the name that will appear in the “from” line for all recipients of your letters)
- Address: (Your current email address)
- Description: (this address will take place in the “name of postal service” paragraph)
Incoming mail server
- Host name: mail.gmail.ru
- Login:
Outgoing mail server
- Host name: mail.gmail.ru
- Login:
- Password: ********** (password for personal mailbox)
Additional Inbox
- Use SSL: disabled
- Identification: enter your password
- Server port: 110
Additional Outbox
- Use SSL: disabled
- Identification: enter your password
- Server port: 25 or 2525
For mail services bk.ru, list.ru and inbox.ru, the settings must be set similarly to the given parameters of the Yandex or mail client. Please pay special attention to the fact that the data in some fields is not repeated, but is filled in according to the same principle. That is, if in Yandex in the “Node name” item we see “pop.yandex.ru”, then for, for example, list it will be pop.list.ru, for bk pop.bk.ru and so on. In fact, only this node name, which we have already paid attention to, and the “tail” of the email after the @ icon change. The rest of the settings are unchanged, you can simply rewrite them.
When all fields of the new account are filled out correctly, click “Save”. That's all, now you can send and receive electronic messages using your i-player, smartphone or tablet. As you can see, creating an account for the postal service yourself is not difficult at all.
Now you can move on to working directly with mail, for example, select the optimal operating mode (black list or white list). You can activate the desired option through the main mail menu.
Adding a mailbox registered with Google (Gmail), AOL or Yahoo to your Apple gadget is not a difficult task. However, when there is a need to add an account for a Russian-language mail service - for example, Rambler
– the user of a mobile device has to rack his brain.
The difficulty lies in the fact that when setting up mail on an iPhone, it is not enough to enter your username and password - the Mail
requires you to provide information that is usually unknown to the average user. You will learn where to get such information and how to set up mail on iPhone successfully from this article.
If you are the owner of the now popular “ Google Mail”
", you can consider yourself lucky - in the iPhone, the settings of this email client are “hammered” by default, so you can do without “dancing with a tambourine.”
Adding a Google mailbox goes like this:
Step 1
.
Go to the Mail
on your gadget.
Step 2
.
Select " Google
" from the options.
Step 3
.
Fill in the fields “ Name
”, “
E-mail
”, “
Password
”.
Gmail
label will appear in the “ Description . You can change the text in this field yourself.
Step 4
.
After entering all the data, click “ Next
” - this will start the information verification procedure.
Step 5
.
At the next stage, the system will offer to synchronize contacts, calendars and notes between the mobile device and the email client. Move all sliders to the active position and click “ Save
”.
After this, Google mailbox will be added to iPhone. Mail app
" will immediately notify you of an incoming letter, which indicates that Google Mail was accessed from an iOS device.
How to set up Rambler mail on iPhone
1. Well, let's get started. I'm thinking about how to use the touchskin You already know (poke on the screen with your fingers, toes, and other parts of the body), so let's just go to “ Settings ”.
2. In the settings, quickly find the “ Mail, addresses, calendars ” menu and go into it.
3. If you have already tried to set up mail yourself, and nothing worked for you, then delete all accounts and click on the “ Add… ”
4. In the new window we see a list of postal services (we don’t need them at the moment), scroll to the very bottom and click “ Other ”
5. Next go to the “ New account ”
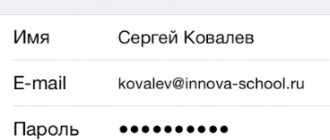
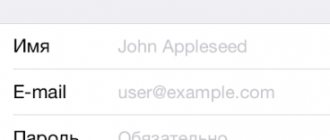
6. The “New” window appears in which we must enter data in the following fields:
- Name - enter the name of the account (you can enter anything, the main thing is that you know that this is a Rambler mail account)
- Address - enter your previously registered mailing address on Rambler
- Password - enter the password for your email address
- Description - just like in the “Name” field, you can enter anything
After filling out all the fields, click the “Forward” button
7. Since Rambler mail on iPhone works through an IMAP server, in the “New” window click on the “IMAP” button. The Name, Address and Description fields are already filled in. There is no need to change them.
8. Scroll a little lower and fill in the fields for the incoming mail server:
- Node name - write exactly as in the picture - mail.rambler.ru
- Username - enter your registered postal address - user_name@rambler.ru (the postal address that you don’t need to write in the picture)
- Password - Your password for mail on Rambler
9. Next, in the “Outgoing Mail Server” section, as in the picture, we enter only “Node Name”. The remaining fields are optional.
- Host name - here you must enter mail.rambler.ru
- Username - you don’t have to enter anything
- Password - also optional
Next, click the “Forward” button
10. Next, the data verification begins, and if everything is entered correctly, a beautiful bird will appear in front of each field. Which serves as a sign to us that Rambler mail on iPhone is configured correctly.
11. If we see this window, without any warning or error pop-ups, our mail is registered correctly.
Manually setting up an email account
To manually set up an email account, you will need the email settings used for your account. If the required settings are unknown, try to find them or contact your mail service representatives. Then follow these steps.
- Go to Settings > Passwords & Accounts.
- Click New Account, Other, and New Account.
- Enter your name, email address, password and account description.
- Click Next. Mail will attempt to find the correct email settings and complete account setup. If you find the email settings you want, click Finish to complete your account setup.
Is your email account set up? Learn more about using the Mail app on iPhone, iPad, or iPod touch.
Entering account settings manually
If Mail can't find your email settings, you'll need to enter them manually. Click Next and follow these steps.
- Select the new account type - IMAP or POP. If you are not sure which type to choose, contact your postal service representative.
- Fill in the “Incoming mail server” and “Outgoing mail server” fields. Then click the "Next" button. If you don't know the information you need, try searching for it or contact your mail service representative.
- If the settings entered are correct, click the "Save" button to complete. If your email settings are incorrect, you will be prompted to change them.