Setup via built-in program
This method does not involve downloading additional applications. All you need is an iPhone and registered Yandex Mail.
To configure, follow a few simple steps:
- Find the Mail, Addresses, Calendars program and launch it.
- Select "Add Account".
- From the list of email clients, select "Other".
- Next, go to the “New Account” tab.
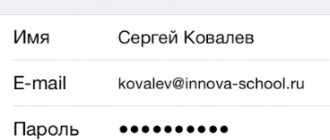
- In the form that appears, enter the basic data that is used to log into your email mailbox (name, login, password and description).
- After all fields are filled in, click “Next”. Account setup will begin, which may take a few minutes;
- A window will open where we click “Save”.
The standard settings are generally sufficient for Yandex Mail to work correctly on an iPhone. Close the Mail program and open it again after a while. All your letters, drafts, etc. should appear there. To check, send a test email. If everything works correctly, then the setup is completed successfully.
Method 2: Setup via the official client
In the App Store, the user can download the official Yandex Mail client, with which you can also send or read letters.
Setting up will not take much time, just follow a few simple steps:
- Visit the App Store and download the Yandex Mail application.
- Launch the program and enter your account login and password.
The setup is complete. All received and sent letters will be displayed in the Yandex Mail application.
Possible problems and their solutions
Sometimes standard settings are not enough for Yandex Mail to work correctly through the built-in application and letters are not displayed in the program. In this case, you will need to perform the following manipulations:
- Go to settings and find the “Accounts and Passwords” item. Select the mailbox you added to the Mail app and go to account management.
- Find the "SMTP" section and go to it. The primary server is located there. There should be one and have the name smpt.yandex.com. If it is there, then click on it. If there is no server, select “Not configured” and enter smpt.yandex.com in the “Node name” field. Save all changes and go to server settings.
- If the “Use SSL” option is disabled, activate it. After this, make sure that the “Server Port” field is set to 465.
- In some cases, Yandex Mail may still not work after the manipulations have been performed. If you have a similar problem, then you need to enter 587 in the “Server Port”.
- Click “Finish” and return to the previous page. Find the “Advanced” tab and go to it. Then we activate “Use SSL” and check that the server port is 993.
- After these steps, there are no problems with the operation of Yandex Mail on the iPhone, and the user can read and send emails.
general information
When you send a letter via regular mail, bring it to the branch. It is redirected to the post office at the addressee's place of residence, and then it is delivered to him.
The situation is approximately the same with an email account. When sending a message, it arrives at the Internet provider’s server, then goes to the recipient’s mail server, and then it is received directly by the person who is supposed to. But spammers and spyware creators are increasingly dangerous because they create zombie programs that send emails without your participation.
Therefore, providers actively use port 587 when sending messages. Ports are invisible channels through which a computer connects to the Internet. One is responsible for mail, the other for the Internet, and so on. Many PCs use port 25 to send letters.
But to block spam sent by zombie programs, large networks have configured their work so that emails sent through port 25 go only in one direction - to the server to the provider. As a rule, the zombie programs themselves send letters directly to the recipient, which is why they are so easy to block.
- Solving the problem with sending mail
- If your iPhone sends an email through the correct port, but it is blocked, then this needs to be fixed.
- First, select a different port. On the home page, select Settings - Mail, contacts, calendars and select the name of your account
- Click on the address to edit it
- Click on enable SMTP section
- At the bottom there is a line server port. Change its value to 587 Repeat writing the message again. If nothing works, then change the port to 465
How to set up Yandex Mail for a domain on an iPhone
You can use domain mail on your iPhone either through a downloaded or built-in application.
If you decide to install the official client and use domain mail through it, you only need to download it from the App Store, open the Yandex Mail application and log in with your details (enter your login and password).
To use domain mail through the built-in Mail application, follow these steps:
- Open the program and select "Other".
- Then click “Add an account” and enter the information from it. Add a description of the email address there (for example, Yandex domain mail).
- Click Next and wait for the setup to complete, which may take a few minutes.
- After these manipulations, Yandex Mail for the domain will work on your IPhone.
We invite users to share their ways to solve this problem in the comments. We hope the article helped solve any difficulties encountered with connecting or setting up this email service.
Preparation
Several conditions must be taken into account.
- iOS device data backups to iCloud and iTunes contain your email settings, but not the messages themselves. If you delete or change your email account settings, previously downloaded messages may be deleted from your iOS device.
- Make sure your device is connected to the Internet. To test your cellular data or Wi-Fi connection, launch the Safari browser and open any web page.
- Check with your email service provider to see if their web page is experiencing a temporary outage.
Manually
Checking email manually is entirely the responsibility of the user. We opened the application, pulled the work area down and waited for new messages to load. If you rarely receive letters or rarely use mail, then this is your option.
Setting up email on iPhone and iPad is not difficult if your mailbox is registered with iCloud, Google (Gmail), Yahoo!, AOL or Outlook.com. It all comes down to entering user data in just 4 fields; the email client will do the rest itself. But if you need to set up a mailbox in Mail.ru, Yandex, Rambler or Meta.ua, the situation changes somewhat.
Today we will tell you how to set up a standard email client (Mail) on iPhone for email services pre-installed in iOS (iCloud, Gmail, Yahoo!) and non-standard ones like Yandex or Mail.ru.
In order to set up a mailbox in iOS, you need to connect your iPhone to the Internet (a 3G connection is sufficient, but it is better to use high-speed wireless Wi-Fi access). True, this is not necessary, mail can be configured offline, an account will be created, but the username and password will be verified after connecting the device to the Internet.
Check for unsent email messages in your Outbox
A notification that an email message has not been sent means that the message has been placed in your Outbox. Check your outbox and try sending the email again.
- In Mail, click Mailboxes in the top left corner.
- Select Outbox. If there is no Outbox folder, the email has been sent.
- Tap the desired email message in your Outbox. Make sure the recipient's email address is correct.
- Click "Submit".
Spam
But this is not the most common problem. Are your emails not coming to Yandex? Most often, the messages actually reach the user's mailbox. All letters are simply placed not in the “Inbox”, but in the “Spam” folder.
If you are expecting to receive a message, but it does not arrive for a long time, it is recommended to check the specified folder. Most likely, this is where the lost letter will be. A very common occurrence related to email settings and filters.
So it is advisable to check your Spam folder in advance. As practice shows, half of users stop complaining about the problem. But these are not all the options for the development of events. There is another reason why letters do not arrive at Yandex mail.
Checking mail download and notification settings in iOS
By default, the settings in the Data Download section are based on your email settings. If the Push option is not available, the Push option will be enabled by default. This determines how your device will receive email. To change these settings, follow these steps:
- Go to the "Settings" section.
- Click Passwords & Accounts.
- Click "Download Data".
- Choose an option (such as Automatic or Manual) or set a schedule for downloading data in Mail.
In iOS 11 and later, the default setting is Automatic. Your device will only download data in the background while it's charging or connected to a Wi-Fi network.
Make sure your notification settings for Mail are correct.
- Go to Settings > Notifications.
- Click Mail.
- Click your email account.
- Customize your Alerts, Sounds, and Stickers settings.
Checking Mail settings
On an iOS device, many email service providers automatically select the correct account settings.
To see if this is the case, compare the settings in Mail and your email account.
- Go to Settings > Passwords & Accounts, then your email account.
- Click your email address next to Account to view account information, such as incoming and outgoing mail server addresses.
- Review the recommended settings for your email account using the Find Mail settings tool and make sure they match yours. If your email account settings are not displayed, contact your email service provider or system administrator.
If you use a POP3 email account, you can only check email on one device. Close other email programs and end sessions on open email websites in your browser. To check if your email account uses POP3, go to Settings > Passwords & Accounts, select your account, and look for the POP Account Information shortcut. You can also find the recommended email settings for your POP3 account by using the Mail app's Find Settings tool.
How to use the carrier's server?
What to do if mail is not sent from iPhone?
When you have a direct connection to the Internet at home, the provider has already remembered you and trusts you, but when you are in another place, you are already using, for example, the EDGE network and the provider can no longer recognize you. That's why mail is blocked, as it is considered spam.
Each provider has a mailing address that can be used when leaving. But an easier method is to use the operator's mail server.
- Go to mail settings
- Select your account
- Enter the sending mail server to your operator's address
This change will help you use mail and send messages through your mobile operator's network without any problems.
iPhone email problems after update and other problems
Posted by Jane Winston December 07, 2022 17:30
There are many similar questions raised among most forums such as
“My email on my iPhone has stopped working.”
"Why am I not receiving my emails on my iPhone?" and more.
People feel frustrated when they have an issue with their iPhone mail app not working.
Since sending emails has been one of the common ways of communicating and working, the “Unable to Send Mail” error is of great significance. Thus, this article talks about related iPhone email problems today and solutions to fix them.
Blocking
It is likely that messages from certain domains or addresses will not reach the recipient. Moreover, it is not necessary to have mail on Yandex; the problem can happen with any hosting. The reason lies in the automatic settings of the service, which include blocking of certain emails.
In this case, it is recommended to write to Yandex technical support. Although many users advise simply setting up an email account on a different hosting. Unblocking is not easy. But you can try to resolve the situation on your own. Are you not receiving emails from Yandex from GMail? Just try to work a little with the filters. Maybe it will be possible to remove the blocking without much difficulty.
iPhone 2 email problems: Mail app keeps crashing
- "Since I update to iOS 12/11, my mail app keeps crashing."
Some people are reporting the issue of not receiving emails on iPhone 6 after iOS 12/11 update. Slow performance of the Mail app and other iOS apps may be caused by the new iOS update. Otherwise, internal system failure may also cause iPhone email problems. So you can quit and relaunch the Mail app for a second try, or you can restart your iPhone to freshen it up. Otherwise, you may have to downgrade iOS 12/11 to an earlier version to fix iPhone email issues.
The fastest way to fix iPhone Mail app problems is to force restart the Mail app. Double-click the Home button and select Mail when the multitasking view appears. Swipe the email app to force close it. Then press the Home button again to restart the Mail app. If your email app is still stuck in the unresponsive screen, you need to restart your iPhone to troubleshoot iPhone email stop working problems.
Restarting your iPhone can also help fix iPhone not moving email messages to trash.
iPhone 4 email problems: Email won't sync
- “My emails stopped syncing with my iPhone iOS email, I don't know how to fix iPhone email won't update on iPhone 6.”
This is one of the most common email problems where iPhone mail is not updated automatically. Poor Wi-Fi network or incorrect email settings should also factor in iPhone email sync issues.
So check your email and password first. After entering the correct email account, you should check your Wi-Fi network by opening a new page to see how long it costs. If necessary, change to another strong wireless cellular network. Later, you can fix the error of email not syncing successfully on iPhone.
These are secure solutions that you can choose when your iPhone email is not working or you have other iPhone email problems. You can then activate your email account to send or receive emails as usual.
Email clients from the App Store
Despite the availability of quite high-quality standard ones on iOS, good alternative options can be: Mailbox, myMail, Boxer (lite version available) and standard clients from Google, Yandex, Yahoo and so on.
Each application has a unique design and boasts interesting features that will make working with emails much easier and more convenient. The choice is yours. If you haven’t found an answer to your question or something didn’t work out for you, and there is no suitable solution in the comments below, ask a question through ours. It's fast, simple, convenient and doesn't require registration. You will find answers to your and other questions in the section.
Mail doesn't work on iPhone
4. Tap Next. Automatic mailbox setup will begin.
5. On the screen that appears, tap “Save.”
After connecting your mail, you need to set additional settings.
6. Go to Settings → Accounts & Passwords and open the account you just connected.
7. Proceed to edit your account.
8. Tap SMTP in the Outgoing Mail Server section.
9. Proceed to edit the primary server.
10. Fill in the fields:
11. Click "Done".
12. Return to the Account menu. entry" and go to the "Advanced" section.
13. Check that in the “Inbox Settings” section the “Use SSL” setting is enabled and the server port is specified 993.
Configure via POP3 protocol
1. Open the default Mail app on your iPhone or iPad.
2. Select Other.
3. Fill in the fields:
4. An error message will appear. Select Continue.
5. Go to the “POP” tab.
6. Change data:
7. Tap Save.
After connecting your mail, you need to set additional settings.
8. Go to Settings → Accounts & Passwords and open the account you just connected.
8. Tap SMTP in the Outgoing Mail Server section.
9. Proceed to edit the primary server.
10. Fill in the fields:
11. Tap Done.
12. Return to the previous screen and go to the “Advanced” section.
13. Check that in the “Inbox Settings” section the “Use SSL” setting is enabled and the server port is specified 995.
Changing SSL settings
1. Go to Settings → Accounts & Passwords and open the account you connected.
2. Look at what you have in the “Host Name” field in the “Incoming Mail Server” section.
If pop.mail.ru , go to settings with the POP3 protocol, if imap.mail.ru - to settings with the IMAP protocol.
The mail program is configured using the POP3 protocol
1. Tap "SMTP" in the "Outgoing Mail Server" section.
2. Proceed to edit the primary server.
Mail.ru
The procedure for adding a Mail.ru account is practically no different from the similar process for the Yandex service. Settings - “Mail, addresses, calendars” - “Add account” - “Other” - “New account”. Here, as usual, you need to enter your mailbox, password, name and description.
Then, as in the case of Yandex, you need to select the POP server tab and change the incoming and outgoing mail server.
Host name (incoming mail server) - pop3.mail.ru
Host name (outgoing mail server) - smtp.mail.ru
Carefully check the entered data and click “Save”.