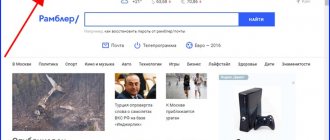
Active users of Rambler Mail can easily use all the capabilities of the service not only in the browser on their computer, but also on their mobile devices. For these purposes, you can install the appropriate client application from the company store or connect the mailbox in the system settings, having previously performed certain manipulations on the official website of the mail service. Next, we will talk about how to set up Rambler Mail on iPhone.
Gmail
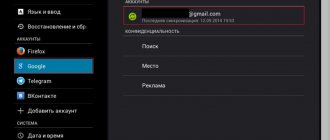
Integration with the Google email service is the easiest to set up. First you need to go to Settings and go to the “Mail, Addresses, Calendars” tab. Here select “Add account” and click on Google.
Now all you have to do is enter your name, email, password and description. The name and description are optional parameters, but, of course, you can’t do without specifying your email address and password.
On the next screen you need to choose which services to sync. If you only need mail, you can turn off calendars, contacts and notes.
OutLook Mail
- You can interact with the famous service from Microsoft from a separate application, but if you really want to keep everything in one place, then you should follow the already familiar path;
- Go to the “Accounts and Passwords” section. Select the option to authorize a new account;
- In the list that appears, click on “Outlook.com”;
- Fill in the text fields with your email and password information. If two-factor authentication is enabled, then you cannot do without entering the numerical combination received on the mobile number;
Yandex
With Yandex, things are a little more complicated. To add a new mailbox, you also need to go to Settings - “Mail, addresses, calendars” - “Add account”. Now you need to select “Other” and then “New Account”. Since Russian email services are not included in iOS by default, you will have to add them manually.
The second stage is no different from the same in Gmail. You need to enter your name, email address, password and description. Pay special attention to entering the password correctly, since the device will create a mailbox in any case, even if the password was entered incorrectly.
By default, we will be asked to create a mailbox in the IMAP protocol, but we need to change it to POP. To do this, select the right one from the top two tabs. Almost all other information will be filled in automatically. You only need to change the host name for the incoming and outgoing mail server.
Host name (incoming mail server) - pop.yandex.ru
Host name (outgoing mail server) - smtp.yandex.ru
That's all, we confirm the entered data, wait until the device checks them and we can use mail.
Settings for Yandex.ru
- The algorithm for setting up Yandex on iPhone actions is similar to what is described above. In the same way, you will have to look in the “Accounts and Passwords” section, select “New Account”, click on the “Other” menu item;
Mail.ru
The procedure for adding a Mail.ru account is practically no different from the similar process for the Yandex service. Settings - “Mail, addresses, calendars” - “Add account” - “Other” - “New account”. Here, as usual, you need to enter your mailbox, password, name and description.
Then, as in the case of Yandex, you need to select the POP server tab and change the incoming and outgoing mail server.
Host name (incoming mail server) - pop3.mail.ru
Host name (outgoing mail server) - smtp.mail.ru
Carefully check the entered data and click “Save”.
Contact your email service provider or system administrator
- Contact your email service provider or go to their system status web page to check if your email service is working.
- Check with your email service provider or system administrator to see if your email account has security features or restrictions enabled, such as two-step verification. To be able to send and receive email messages on your device, you may need a special password or require authorization from your email service provider.
- Check that your email account settings are correct by contacting your email service provider or system administrator.
Below you will need to fill in the data for incoming and outgoing mail servers
| Field name | Meaning for POP | Meaning for IMAP |
| Incoming mail server | ||
| Hostname: (incoming mail server address) | pop3.megagroup.ru | imap.megagroup.ru |
| Username: (must match your email address) | [email protected] | [email protected] |
| Password: (password for your mailbox) | 123456 | 123456 |
| Outgoing mail server | ||
| Hostname: (outgoing mail server address) | smtp.megagroup.ru | smtp.megagroup.ru |
| Username: (must match your email address) | [email protected] | [email protected] |
| Password: (password for your mailbox) | 123456 | 123456 |
Rambler
Adding a Rambler service mailbox has one small difference. For some reason, in some cases, the data is not entered automatically, so you will need to enter it yourself. Go to Settings - “Mail, addresses, calendars” - “Add account” - “Other” - “New account” and add a new mailbox.
Now, if the fields only with the node name are not filled in, we enter the necessary data, but if the user name and password are left blank, then you will have to register your mailbox and password for it again.
Host name (incoming mail server) - pop.rambler.ru
Host name (outgoing mail server) - smtp.rambler.ru
In addition, you can use the IMAP protocol to receive mail, which has a number of advantages over POP3, but can be somewhat more difficult to set up for novice users. In this case, you need to activate the use of this protocol in the mail server settings. How to do this, you will find in the help article of the corresponding service. After that, enter the following data in your phone settings:
Gmail
Incoming mail: Protocol - IMAP; IMAP server - imap.gmail.com; Port - 993; SSL - SSL/TLS; Authentication - Regular password
Outgoing mail: SMTP server - smtp.gmail.com; Port - 465; SSL - SSL/TLS;
Yandex Mail
Incoming mail: Protocol - IMAP; IMAP server - imap.yandex.ru; Port - 993; SSL - SSL/TLS; Authentication - Normal password.
Outgoing mail: SMTP server - smtp.yandex.ru; Port - 465; SSL - SSL/TLS;
Mail.ru
Incoming mail: IMAP server - imap.mail.ru; Security type - SSL/TLS; Port - 993
Outgoing mail:: SMTP server - smtp.mail.ru; Security type - SSL/TLS; Port - 465
Rambler
Incoming mail: IMAP server - imap.rambler.ru; Security type - SSL/TLS; Port - 993 or 143
Deleting emails from the server
Until recently (on iOS version 7+), Apple developers made it possible to transfer to an archive any messages appearing on Mail, both on a smartphone or tablet, and directly on the mail service’s servers. After iOS 10, the situation has changed - from now on, users can only choose where exactly to transfer old and unused messages - either to the trash bin or to the archive. This parameter is configured in the “Accounts and Passwords” section in the settings of the selected service.
Immediately after going to the “Additional” menu, in the “Destination for moving unnecessary messages” item, select “Deleted”. Then, within a few weeks (or a month), the trash can will be cleared of accumulated garbage.
Setting up gmail, yandex, rambler, mail.ru mail
In principle, like all actions performed on the iPhone, setting up mailboxes has its own characteristics. It is not complicated, it is enough just to know some of the nuances when adding each of the services. It is advisable to connect your iPhone to the Internet before the procedure so that you can immediately check the correctness of the entered data and the presence of a box with the same name. And also to make sure that the created setting works. But this is not mandatory; everything can be done remotely. The first time you connect to the network, all necessary checks will be carried out.
If we are talking about our own (iCloud) or Apple-friendly resources - Yahoo, Outlook.com or Gmail, then even an inexperienced user can set them up without any problems. This is due to the fact that the standard client built into the iPhone operating system - iOS - Mail.app, can automatically add server settings for incoming and outgoing mail services. It will be enough to simply enter your information into your account and add the existing mailbox to the smartphone’s memory.
To do this, from the settings menu, go to the mail, addresses, calendars tab. Click on the item - Add account.
In the dialog box provided, select one of the automatically configured accounts. At the moment, the user is offered six options. Such a selection once again shows that iPhones are “tailored” for the American market.
After this, you will need to fill in your data in the standard four fields: username, E-mail address, password, as well as a description (the name of the future link is indicated here, you can simply duplicate your address here), and the mail manager can do everything else itself.
For example, this is what the process of setting up the Gmail service will look like.
After entering personal data into the dialog boxes, the system will offer to save everything and synchronize mail, all contacts and calendars with notes between the mailbox and the iPhone. To do this, activate the slider opposite the desired action, if necessary. Ready.
If you suddenly want to make any changes after installation, this option is available at any time. All you have to do is select a specific account and adjust the data.
For all other services offered by the manufacturer in accounts, the settings algorithm is exactly the same.
Rambler mail
The procedure for setting up the rambler completely repeats the instructions described for mail.ru and yandex.ru:
- Go to the adding a new account section;
- In the list that opens, click “Other”;
- Correctly fill out the text fields that appear (don't forget about the short description!);
- The system will pick up the rest of the information automatically. If for technical reasons all important text fields are empty, then you will have to enter some information manually. For the incoming mail server, the “Node name” is pop.rambler.ru (you should definitely check all the values up to the last letter!), for outgoing mail – smtp.rambler.ru;
- You will have to enter your login and password twice. Again, all entered data should be double-checked several times - this will save time searching for some imaginary errors, when in fact inattention is to blame.
What about Russian-language postal services?
The situation is a little more complicated with other mail agents Rambler, Mail.ru or Yandex, popular in our latitudes. You will have to manually enter the data into the existing fields. Since they all have their own characteristics, we will consider each of them separately.
So, in order to set up your Yandex , you need to partially repeat the path described above. Just select this time the item – Other – at the very bottom of the accounts menu.
Enter your name, email, password and description (the first and last are optional). The built-in mail settings manager in the iPhone will prompt you to create your mailbox in the standard IMAP protocol, but when filling it out an error will probably be displayed. You will need to exit the automatically downloaded IMAP window and switch to POP. Select the appropriate tab on the right - POP. Most of the remaining data will be linked automatically.
Then you should change the host names for the incoming and outgoing mail servers to the following:
In the server subsection for incoming mail, next to - Host name - enter pop.yandex.ru;
In the server subsection for outgoing - Host name - on smtp.yandex.ru.
After checking and confirming the entered data, save all changes made. Synchronize contacts if necessary. After this, the mailbox will work safely on the iPhone.
Now let's repeat this procedure for Rambler. Don't forget to switch to the POP protocol. When trying to set up a new Rambler service mailbox, sometimes data about the host name of the mail servers is not entered automatically after filling out the top user fields. If this happens to you, enter them manually, they should have the following names:
Preliminary configuration of the mail service
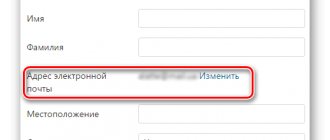
Before moving on to the direct setup and subsequent use of Rambler Mail on an iPhone, you need to provide third-party programs, which in this case are email clients, with access to work with the service. This is done as follows:
- After clicking on the link provided above, open the “Settings” of the mail service by left-clicking (LMB) on the corresponding button on the toolbar.
Enter the code from the image in the pop-up window and click “Submit”.
Done, preliminary configuration of Rambler Mail is completed. At this stage, do not rush to close the mail service page (directly the “Settings” - “Programs” section) or simply remember, or better yet, write down the data presented in the following blocks:
SMTP:
- Server: smtp.rambler.ru;
- Encryption: SSL - port 465.
POP3:
- Server: pop.rambler.ru;
- Encryption: SSL - port: 995.
Now let's move directly to setting up Rambler Mail on iPhone
Method 1: Standard Mail app
First of all, let's look at how to ensure Rambler Mail works correctly in the standard email client available on every iPhone, regardless of the iOS version.
- Open the “Settings” of your mobile device by tapping on the corresponding icon on the main screen. Scroll down the list of available options a little and go to the “Passwords and Accounts” section if you have iOS 11 or higher installed, or if the system version is lower than specified, select “Mail”.
Automatically set up your email account
If you use email services like iCloud, Google, or Yahoo, Mail may automatically set up your account after you enter your email address and password. To do this, you must perform the following steps.
- Go to Settings > Passwords & Accounts.
- Click "Add Account" and select your email service provider.
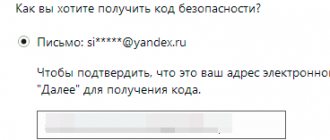
- Enter your email address and password.
- Click the "Next" button and wait until the Mail program finishes checking your account.
- Select information in your email account, such as contacts or calendars.
- Click "Save".
If the email service provider you want is not listed, click Other to manually add an account.
How to clear mail on iPhone
Cleaning is carried out in several ways: you can delete either a single letter or several at the same time.
Clear all emails
You need to open the email and go to the “Inbox” folder. In the upper right corner there is a shortcut “Change”, after it press the “Select all” key. Selective deletion of letters by checking the boxes next to the ones you are looking for is also allowed. After pressing the “Archive” or “Trash” key, you need to hold it down, this will allow you to select the entire list. “Delete selected notifications” will appear on the screen. After confirming the actions, unnecessary information will disappear.
Important! To cancel the procedure, just shake the device and select “Cancel”. The information will be returned automatically.
How to delete all incoming emails
Deleting a single email
After logging into your mail, you need to go to the “Inbox” subsection. Clicking the “Changes” button will display the entire list of saved emails. Select what you don’t need from it and click “Archive” or “Trash.” Another way is to quickly swipe to the left over the selected notification and confirm the desired action.
Change settings to manage your account in iCloud Utility (icloud.com, me.com, or mac.com):
- Go to the “Settings” subsection, from there move to “Accounts and codes”.
- Touch the mail label that requires changes.
- After clicking, scroll to the bottom of the page and select “Mail”.
- Find the “Advanced” subsection.
The user can choose further actions - delete or move their letters to the archive.
Note! Some service providers provide the option to automatically delete emails after a certain period of time. In most cases, notifications are stored on the service provider’s resource for no more than one calendar month.
Manually setting up an email account
To manually set up an email account, you will need the email settings used for your account. If the required settings are unknown, try to find them or contact your mail service representatives. Then follow these steps.
- Go to Settings > Passwords & Accounts.
- Click New Account, Other, and New Account.
- Enter your name, email address, password and account description.
- Click Next. Mail will attempt to find the correct email settings and complete account setup. If you find the email settings you want, click Finish to complete your account setup.
Is your email account set up? Learn more about using the Mail app on iPhone, iPad, or iPod touch.
Entering account settings manually
If Mail can't find your email settings, you'll need to enter them manually. Click Next and follow these steps.
- Select the new account type - IMAP or POP. If you are not sure which type to choose, contact your postal service representative.
- Fill in the “Incoming mail server” and “Outgoing mail server” fields. Then click the "Next" button. If you don't know the information you need, try searching for it or contact your mail service representative.
- If the settings entered are correct, click the "Save" button to complete. If your email settings are incorrect, you will be prompted to change them.
Mail settings for other services
Do you have an irresistible desire to add some exotic email account to your system, but you can’t find even the slightest details about the necessary setup on the Internet? Are the parameters not “clinging” in automatic mode? The situation is certainly complex, but solvable, there are at least two options:
- Contact your service provider. It is difficult to find an email service that does not provide parameters for authorization on different devices through third-party tools. You should look for login information somewhere in your profile settings, or rather in the section related to the network. Sometimes the service provider even posts detailed instructions on how to connect to different systems (including Mail on the iPhone), and even with screenshots. This is how things are, for example, on the website mail.ru;
— Look at the Apple website. If you couldn’t find the much-needed information on official resources, then you’ll have to take third-party routes and contact Apple directly. A special platform is available on the support page, where in just five to ten seconds you can find a complete list of parameters that allow you to quickly put your Mail in order;
Other features of the Mail app
- Learn how to delete email messages on iPhone, iPad, or iPod touch.
- Find and view email messages in the Mail app on iPhone, iPad, or iPod touch.
Information about non-Apple products or independent websites not under the control or testing of Apple is not intended to be a recommendation or endorsed by Apple. Apple is not responsible for the selection, functionality, or use of third party websites or products. Apple is also not responsible for the accuracy or reliability of data contained on third party websites. Please be aware that there is a risk in using any information or products found on the Internet. Please contact your supplier for more information. Other company or product names may be trademarks of their respective owners.
How to set up Rambler mail on iPhone
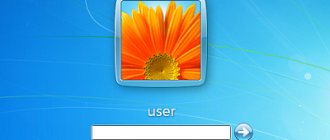
1. Well, let's get started. I’m thinking about how to use the touchskin You already know (poke on the screen with your fingers, toes, and other parts of the body), so let’s just go to “ Settings ”.
2. In the settings, quickly find the “ Mail, addresses, calendars ” menu and go into it.
3. If you have already tried to set up your mail yourself, and nothing worked, then delete all accounts and click on the “ Add” button. “
4. In the new window we see a list of postal services (we don’t need them at the moment), scroll to the very bottom and click “ Other ”
5. Next go to the “ New account ”
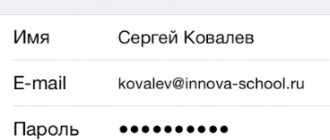
6. The “New” window appears in which we must enter data in the following fields:
- Name – enter the account name (you can enter anything, the main thing is that you know that this is a Rambler mail account)
- Address – enter your previously registered mailing address on Rambler
- Password – enter the password for your email address
- Description – just like in the “Name” field, you can enter anything
After filling out all the fields, click the “Forward” button.
7. Since Rambler mail on iPhone works through an IMAP server, in the “New” window click on the “IMAP” button. The “Name”, “Address” and “Description” fields are already filled in. There is no need to change them.
8. Scroll a little lower and fill in the fields for the incoming mail server:
- Node name – write exactly as in the picture – mail.rambler.ru
- Username – enter your registered postal address – user_name@rambler.ru (the postal address that you don’t need to write in the picture)
- Password – Your password for mail on Rambler
9. Next, in the “Outgoing mail server” section, as in the picture, we enter only “Node name”. The remaining fields are optional.
- Host name – here you must enter mail.rambler.ru
- Username – you don’t have to enter anything
- Password – also optional
Next, click the “Forward” button
10. Next, the data verification begins, and if everything is entered correctly, a beautiful bird will appear in front of each field. Which serves as a sign to us that Rambler mail on iPhone is configured correctly.
11. If we see this window, without any warning or error pop-ups, our mail is registered correctly.
Mail apps on iPhone
The App Store, Apple's official app and entertainment store, is bursting with feature-rich email clients that make it easier to work with any email account. But, if you really choose the best mail application, then you should focus on three options:
Gmail. And although there are no problems with authorizing a Google email account in iOS, the third-party application, Gmail, from a functional point of view, looks richer and more convenient than what the guys from Apple came up with. Everything here is of the highest standard - quickly, clearly, with gestures and integration. And you don’t have to worry about quick updates for new iPhones and iPads - Google always keeps an eye on new products;
Additionally, it is worth noting the following clients - Yandex.Mail (interaction with other services of the famous search engine is perfectly configured - here you can search for hotels, call a taxi, and the ability to attach an account directly from your wallet), CloudMagic (simple, but tasteful), Boxer (very nice, but when working with several accounts you will have to pay at once).
Source