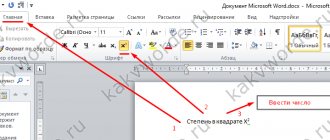
Microsoft Office Word has many ways to format and decorate a file: choose a font style and color, add a graphic or table, fill the background, and more. This includes creating the edges of an element or page.
Technical documentation uses special text formatting
Borders in Word allow you to give parts of a document expressiveness or a more interesting appearance. The frame can be applied to an entire sheet, a paragraph of content, a picture, a graph, or a table cell. This function is used when creating teaching materials, manuals, reports, reports and other works. Lines can be set on all sides of an element or page, or only on those selected by the user. It can be given the style and color of the stripes.
In addition, in some cases the use of separating lines in the file is mandatory. For example, when preparing legal documents or work for an educational institution. Edges are used to separate part of the content from the rest, highlight tables or pictures and drawings. In this case, it is important to know how to apply this or that edging that is required by the conditions.
There are two types of separator bars in Word:
- For the page. They are used to decorate a file or give it a look that complies with some mandatory standard.
- For an element, that is, a part of a sheet, this is everything else, including borders for content or images.
There are also opposite situations when it is necessary to remove edges due to unnecessary use or due to a Word display error. We will consider all these actions further.
Removing borders in Word 2003: through the “Format” section
It allows you to get rid of lines around any element except the frames along the edges of the page. The procedure is as follows:
- Select text, a picture, or another object inside a frame.
- On the menu bar, in the “Format” section, go to “Borders and Shading.”
- Switch to the first tab and click on the button next to “No”.
The method of removing frames from the margins of a sheet in Word contains only one difference compared to the previous one. To remove them in the dialog box called up by the “Borders and Fill” command, you need to put a similar checkbox in the second tab.
If the border around the page should be missing only on certain sheets of the document, then you need to insert a “Section Break” before and after them. This is done using a sequence of commands: “Insert” => “Break” => o.
Then you need to place the cursor on the sheet where there should be no frames and call up the “Borders and Shading” dialog box. In the “Apply to...” drop-down list located in the lower right corner, select “To this section.”
This tip also applies to newer versions of the editor.
Removing the frame in Microsoft Word yourself
Skillful handling of a program such as Microsoft Word is akin to using the already legendary Adobe Photoshop program, at least in terms of the number of possibilities. At first glance, Word looks like a regular text editor, the only difference is the ability to highlight individual semantic blocks in bold or paint them in the desired color.
However, first impressions can be deceiving; this program can be described as easy for beginners, but with great learning potential. Edit the text as you please, upload the necessary photos, edit the same photos and merge them into one whole, easily! And this is only a small fraction of all the capabilities of this tool.
In this article we will touch on the topic of frames, talk about how to add a frame, how to remove a frame in Word and leave the text, as well as some other features of this tool from Microsoft.
Addition
Many users don't think about adding a border to their document and try to fit all the text into a table. Yes, this option is not canceled, but in this situation, editing becomes unbearable torture.
The functionality of the editor is expanding geometrically from version to version, it is noticeable how the developers listen to their users and add more convenient solutions to pressing issues. How to perform such a manipulation without using tables? The answer is simple - “Page Borders”.
Wrapping all text:
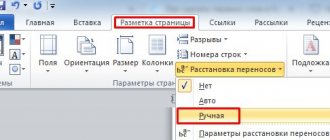
- To go to the required section, we need the design tab (in some variations, depending on the release date of the program, the section is called “Page Layout”).
- Then in the window that opens we find the treasured “Page Borders” section.
In this section, all the necessary parameters for the future visual design are set. Dotted line required? Please! Set a different frame width, adjust the visual style, set an artificial shadow, no question! Moreover, this is only a small fraction of the entire set of tools. The freedom of choice is amazing and first place in the competition for the most beautiful report is yours! It's a pity that such competitions are not held.
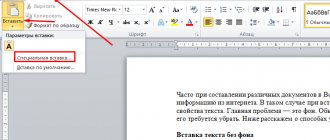
Naturally, it is possible to work with individual paragraphs or lines. To do this, follow the same procedure to return to the “Page Borders” section, and select the format we need from the drop-down menu in the lower right corner. For a clearer description of finding this function, look at the screenshot below.
Attention: the location of all elements may not change radically, depending on program versions. Why developers constantly change the location of elements remains a mystery, apparently to move new features to a more accessible location. However, this causes unbearable pain for legacy clients. Do not laugh!
It may not seem difficult to you to remember the location of this or that section, but imagine if your job involves working with texts. After a year or more of performing the same manipulations, moving any functionality to an unusual place is stupefying.
Removal
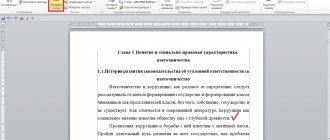
For inexperienced users, removing this very frame can be a problem. For example, unpretentious university teachers turn a blind eye and accept abstracts downloaded from the university. A happy student downloads the first essay he comes across on the required topic and encounters a text with a frame; it is not a fact that the teacher will appreciate this method of self-expression.
In fact, there is nothing difficult about removing the frame.
- Let’s move on to the already familiar “boundaries” section.
- On the left side of the screen, select type: NO.
With this option, all changes in the document will disappear, and you will achieve the desired result.
Separate page
To format a specific sheet of a Word document, you will have to get acquainted with the new tab of this program.
- Click on “Insert”.
- Select the “Break” option.
An easier way
Regardless of the version you are using, starting from the outdated Microsoft Word 2003, there is a faster way to solve this problem. The algorithm of actions will be as follows:
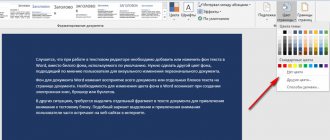
- Select the required part of the text and click on “Home”.
- Select the icon located next to the “Fill” function shown in the screenshot below.
- Then select “No borders”.
Yes, it's as simple as that. But that is not all! Don’t forget about the frame around elements such as pictures, screenshots, graphs, etc.
Let's figure out how to fix this problem. In fact, here too everything can be solved in a couple of mouse clicks.
- First you need to select an object (click with the left mouse button on the picture).
- Find a section on the left side of the screen called “Format”.
- A menu will open below.
- In it we find the icon of an underlining pencil (in some versions it is not signed, in normal versions of the program you will see the name “figure outline”. This is exactly what we need.
- When you click on it, a drop-down menu will appear; you need to select the line “no outline”.
Context menu
Are the above options too complicated? Here is the most stress-free way to solve the problem.
- Again, select the element to edit and right-click on it.
- A context menu opens, where the last line contains the line we need.
- It’s just a matter of small things, select “Line Color” and check the “No Lines” option.
There is no simpler way than this. Avid Word users may be outraged by this method, since it has a number of “buts”, but it still copes with the task.
As you can see, there are simply a lot of ways to solve how to remove the frame in Word and leave the text. There is a way for every taste. We hope that we have opened up for you a little the possibilities of the wonderful text editor Microsoft Word, which has no worthy analogues. Disputes on this issue do not subside to this day, however, in terms of the ratio of capabilities and convenience, Word remains the undisputed leader.
Removing borders in Word 2003: through the quick access panel
This method is easier and faster than the previous one, since it uses the Quick Access Toolbar. But it is only effective for removing borders around objects. It is not suitable for removing a frame on the margins of a sheet. The algorithm of actions is as follows:
- Select the part of the document surrounded by a frame.
- In the Formatting panel (enabled by default), find the Outer Borders button. She's third if you count from the right end.
- Click on the inverted triangle and select an empty one from the list of icons that appears. It's called "Remove Borders".
For inserted pictures, there is a special way to remove frames in Word. It consists in the fact that the dialog box that controls them is called up from the context menu using the “Borders and Fill” item.
What needs to be done?
So, you are faced with the problem that you cannot figure out how to remove frames in Word. For example, you downloaded a file that interested you, and in it some words and even sentences are circled. Or, each page of the document also contains its own frame. How to get rid of this? It turns out that everything is quite simple. First of all, you need to decide where exactly you need to look. Regardless of the version of Word, the section you need will be called “Borders and Filling”. If you are using the latest, most current version of a text editor, then you need to go to the tab called “Home”, and there select the “Paragraph” section, in which there is a button called “Borders and Filling”.
However, not every person uses the latest version of this text editor. How to remove frames in Word of other versions? If you have the 2007 version installed, then you need to find the “Page Layout” tab, and then go to the “Page Background” section, where the “Page Borders” button you need will be. Well, in the oldest version of 2003, you should be interested in the “Format” tab, on which you will find the “Borders and Fill” section.
Well, now you know where you need to look, but that's not all. After all, you need to understand exactly how to get rid of the annoying frame.
Removing borders in Word 2007, 2010: through the “Page Layout” tab
This procedure in versions 2007 and 2010 is performed as follows:
- Switch to the “Page Layout” tab.
- Select an object that has a frame around it. If you want to remove lines in the margins of the sheet, then you do not need to select anything.
- Click the “Page Borders” button located in the “Page Background” block.
- In the dialog box, switch to the “Border” or “Page” tab, depending on where you want to remove the frame: around the object\text or in the margins of the document.
- Left-click on the button next to “No”.
This is the way to remove the frame in Word 2007 or 2010.
Removing frames in a Word document
A frame allows you to make a document more readable and, if necessary, give it a more beautiful design. However, in many cases the frame is not needed in a text document, so it becomes necessary to remove it.
How to remove a border in a Word document
The process of removing a frame depends on what object it frames: a paragraph, all text on a page, or simply inserted as an arbitrary shape. Let's look at how frames are removed in all the described cases.
Case 1: Full Page Frame
It was most likely created using the Borders and Shading toolboxes. It frames the entire page, even if it is completely empty.
Instructions for removing borders in this case are as follows:
- Open a document where you have set borders for one or more pages. Navigate to this page.
- In the top menu, open the “Design” tab. There, select the Page Borders tool. In older versions it may be called “Borders and Shading”.
After this, the frame on the page will disappear. If you have several pages with frames, then you need to do the same procedure with them if you need to remove the frames on them too.
Case 2: Frames around a paragraph
In Word, you can set frames not around the entire text on the page, but around a specific paragraph. If there is a similar type of frame in the document, then you can easily remove it:
- Scroll down the document to the paragraph where there are frames that you want to remove. It is not necessary to select the entire paragraph, but you must place the cursor inside it.
- Now switch to the "Design" tab in the top menu. There, click the “Page Borders” button.
- A window for setting borders and fill will open. While in the “Border” tab, in the “Type” block, set the value to “None”.
- Now pay attention to the right side of the window. There, in the “Apply to” field, select the “paragraph” option.
- Click "Ok" to apply the settings. After this, the paragraph border will disappear.
Case 3: Frame in the footer
All objects located in the header and footer are displayed automatically on all pages of the document. You can remove frames from there using the following instructions:
- Enter the header and footer editing mode by double-clicking on its area. It is located at the top and bottom of the pages.
- While in header/footer mode, switch to the “Design” tab at the top of the interface.
- Pay attention to the "Header and Footer" tool group on the left side. There, click on the “Header/Footer” button (the exact name depends on what part of the pages you are working with).
Case 4: Frame as an object
The frame can be an independent object drawn using the built-in tools of the program. In this case, it is even easier to remove:
- Select the desired frame by clicking on it once with the left mouse button.
- Click Delete to complete the deletion. If deletion does not occur, then right-click on the frame and select the appropriate item from the context menu.
As you can see, there is nothing difficult in getting rid of an unnecessary border in a document. In some cases, you can literally remove all frames in a document in just a couple of mouse clicks.
Removing borders in Word 2007,2010: through the “Home” tab
In these versions, as in Microsoft Word 2003, there is an easier way. It comes down to the following algorithm:
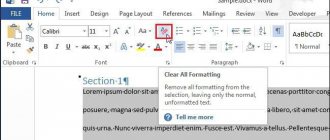
- Select text or part of the contents of a table.
- In the “Home” tab, in the “Paragraph” block, click on the inverted triangle next to the “External Borders” button. It is located in the lower right corner of the block.
- In the drop-down list, select “No border”.
To remove the outer border around pictures, graphs, or SmartArt charts:
- Click on the object.
- Go to the last tab called “Format”.
- In the “Shape Styles” block, click on the inscription “Shape Outline”.
- In the drop-down list, click “No outline”.
Note: By default, inserted images and diagrams do not have an outer frame.
In addition to using the “Format” tab, there is another way to remove borders from such objects. After selecting the contents of the frame you need to:
- Right-click and in the context menu that appears, select the “Picture/Object Format” sub-item.
- In the new dialog box, go to the “Line Color” section and check the box next to the “No lines” line.
This completes the description of how to remove frames in Word 2010 or 2007.
Removing frames in a Microsoft Word document
We have already written about how to add a beautiful frame to an MS Word document and how to change it if necessary. In this article we will talk about a completely opposite task, namely, how to remove a frame in Word.
Before you start removing a frame from a document, you need to understand what it is. In addition to the template frame located along the outline of the sheet, frames can frame one paragraph of text, be located in the header and footer area, or be presented as the outer border of the table.
Removing the regular frame
remove a frame in Word created using the standard tools of the Borders and Fill through the same menu.
1. Go to the “Design” and click the “Page Borders” (formerly “Borders and Shading” ).
2. In the window that opens, in the “Type” , select the “None” instead of “Frame” that was previously set there.
3. The frame will disappear.
Removing the border around the paragraph
Sometimes the frame is not located along the contour of the entire sheet, but only around one or several paragraphs. You can remove a frame around text in Word in the same way as a regular template frame added using the “Borders and Fill” .
1. Select the text in the frame and in the “Design” , click the “Page Borders” .
2. In the “Borders and Shading” , go to the “Border” .
3. Select the type “None” , and in the “apply to” select “paragraph” .
4. The frame around the piece of text will disappear.
Removing frames placed in headers and footers
Some template frames can be placed not only along the borders of the sheet, but also in the header and footer area. To remove such a frame, follow these steps:
1. Enter the header and footer editing mode by double-clicking on its area.
2. Remove the obsessive header and footer by selecting the appropriate item in the “Design” “Header and Footer” group .
3. Close the header and footer mode by clicking on the corresponding button.
4. The frame will be removed.
Removing a frame added as an object
In some cases, a frame can be added to a text document not through the “Borders and Shading” , but as an object or shape. To delete such a frame, just click on it, opening the object working mode, and press the “Delete” .
That's all, in this article we talked about how to remove any type of frame from a Word text document.
We hope this material was useful to you. Good luck in your work and further study of the office product from Microsoft. We are glad that we were able to help you solve the problem.
In addition to this article, there are 12,312 more instructions on the site. Add the Lumpics.ru website to your bookmarks (CTRL+D) and we will definitely be useful to you.
Thank the author and share the article on social networks.
Describe what didn't work for you. Our specialists will try to answer as quickly as possible.
Did this article help you?
Share article on social networks:
More articles on this topic:
what should I do? I downloaded a recap from the Internet, opened it and there were frames that I didn’t need. I wanted to delete it according to your article, but I can’t do anything in the downloaded abstract. Neither open the window with borders and fills, nor change the font color, nor simply change the font. I can’t do anything with these abstracts, tell me aaaaa faster please
What is the format of the abstract? What version of Word are you using on your computer?
Perhaps the document is protected from editing, or more precisely, it is opened in limited functionality mode (this happens with files downloaded from the Internet). If so, disable it, here are the instructions.
Good day! I installed Office 2016. When I open any Word document, a dotted frame glows along the outline of the printable area. Can you tell me how to turn it off? Have you looked everywhere for clues? but there's no way I can handle it). Thank you.
Hello. First, tell me, does the frame always light up (in viewing/editing mode) or only when you try to print a document?
Removing borders in footers: “Word 2007, 2010”
To remove borders around content inside a footer or header, you must first make it editable. This is done in 2 ways. The first is to double-click LMB at the top or bottom of the sheet. The second is to click on the “Header\Footer” button (section “Insert”) and select “Change Header/Footer” from the drop-down list.
Next, you can use the first or second method of how to remove the frame in Word 2007 or 2010.
If the contents of the header/footer are not needed, then you can delete the entire header using the command of the same name, located in the list called up by the “Header/Footer” button. You can find them in the “Insert” or “Design” tabs.
To summarize, we can say that the methods of how to remove frames around a page or other objects in Word in versions 2003 and 2007/2010 differ only in the sequence of actions, the reason for which is the different program interface.
How to change border options and properties
If you are working with text that was created by another author, you may need to correct the lines he set in the file. As with creation, edges in this case are divided into 2 types - object and sheet edges.
Changing the boundary of an object
To edit the edges of a piece of text, picture, table or graph:
- Select a fragment of the file.
- Go to the “Design” tab - “Page Borders” - “Border”.
- Configure options.
- Save your changes.
Changing sheet edges
To edit the edges of an entire sheet:
- Select a fragment of the file.
- Go to the “Design” tab - “Page Borders” - “Page”.
- Configure your settings.
- Save your changes.
Clear text from formatting in Notepad
To clear text from a frame or other unnecessary formatting elements, instead of Word, you can use the classic Notepad application, which is available in any Windows operating system.
You can find the notepad through Search on your device, or in standard applications: more details.
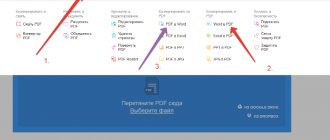
1) Select and copy to the clipboard the text that needs to be cleared from the frame or other decor.
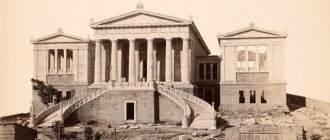
2) First open the “Edit” option in Notepad, and then “Paste” in the drop-down menu.
Rice. 3. Option to “Paste” text from the clipboard into Notepad
3) After pasting the text into Notepad, all excess formatting will be automatically removed, no additional actions are required.
After this, the “clean” text can be selected again in Notepad and copied to Word or another location.
Bottom line
A frame in Word is a means of adding expressiveness to a file. Some users need it in order to format content in accordance with a certain standard. To work with edges, it's important to know how to create, edit, and delete them.
Headers and footers in Word are text and images placed on the pages of a document that are not related to the main text, but are of an informational and design nature. If used correctly, you will be able to draw up a document that only needs to be sent for printing.