iPhone is a multifunctional device from Apple. However, the iOS platform, on which all Apple gadgets run, is not always simple and easy to use. On this axis you cannot simply take and transfer music, movies, photos, documents and other files, as, for example, on Android. iOS is a closed system that does not allow you to dig into the device’s memory. Therefore, when the need arises to transfer data from iPhone to computer, users are faced with the fact that it is not so easy to do.
Of course, there is a way out in the form of a Mac - PC, with which you can create a pair and an ecosystem. Then all the necessary files will almost immediately appear on another device. But not everyone will agree to pay money for an expensive computer just for this.
In this article, we will look at all possible options for transferring data from iOS to another platform - through additional utilities, cloud storage, or simply using a USB cable.
Why transfer files
There may be several reasons for this, and here are some of them:
- Importing audio files from iPhone to PC can be useful if all your favorite music is saved on your phone. Typing one track at a time, looking for a suitable one (not a remix, not a cover or a remade track), and then waiting for it to load will take a lot of time. It’s easier to transfer ready-made files to your computer than to bother with a tedious procedure;
- The need to move photos or videos from an Apple gadget to Windows or Mac may arise if you need to send a lot of files via your computer, but there is no Internet on your smartphone (neither mobile, nor Wi-Fi, but the PC is connected to a local network). And also - if the user is afraid of losing important captured moments, not having memory to save a backup copy (not everyone is able to pay for space in iCloud);
- Transferring documents to a computer can be useful if you need to show a presentation, diagrams, tables, through a projector, or print a text document. You don’t always have a flash drive at hand, and the methods listed below will help you avoid the situation when you only have an iPhone, a cable, a PC, and the desire to transfer important information to the hard drive of the carrier.
And the most common thing is the lack of internal memory of the smartphone. If there are too many photos, music, documents, videos, then you can transfer all or some of them to your computer to free up memory for new files.
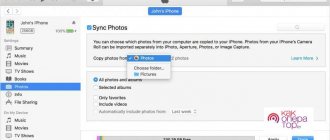
Transfer Music to PC via iTunes
The easiest way is to transfer purchased music through a proprietary utility. You can download iTunes on the official Apple website; the program is free to download on both Windows and Mac (usually installed by default). The company recommends using this method.
- Make sure that the tunes you are going to send to your computer are in your Library and have been purchased. To do this, go to “Music”;
- Connect the device to the PC via a USB cable;
- Run the program, update the utility as necessary for correct operation and restart the computer;
- Check if iTunes recognizes your device (information about your iPhone should be displayed on the side of the application window);
- Next, click on the “File” section (located in the upper left corner);
- The next step is to select “Device” from the drop-down list and tap on “Transfer purchases from (device model).” After this, the process of transferring the purchased tracks to the computer’s memory will begin. All information about the current transfer is in the top line;
- Wait for the synchronization to complete. Next, select “Recently Added” from the left menu. A list of transferred audio files will be displayed, from which you need to select the ones you need. To download tracks, you need to click on the cloud and arrow icon. The icon is located to the right of the song or album. By clicking on the icon, the selected tracks will be copied to the computer, thereby creating a kind of backup copy of the music.
If the cloud icon is missing, it means that all the tracks are already on the PC. To find the folder with downloaded audio files, click once on the track in the library, then select “File” and click on “Show in Explorer”.
Attention! Do not delete iTunes after completing the procedure. The program is very useful for those who use Apple devices - it has many more interesting functions.
Sync without iTunes using iCareFone
If for some reason you cannot install the official software or launch it, then try using the third-party program Tenorshare iCareFone . Moreover, it is not necessary that the tunes were purchased through a music store. It is enough for them to be uploaded to the library. You can download the software using the link from the official website.
- After downloading the utility, run it. Connect your smartphone to your computer via a USB cable;
- Once Tenorshare recognizes your iPhone, select the appropriate data transfer type;
- Next, go to the “Management” tab, select “Music” in the left menu and click on “All music”;
- Select the necessary tracks from the list by checking the required ones;
- The next step is to click on “Export” and select the folder where you want to send the tracks. After this, the process of transferring data to Windows or Mac will begin.
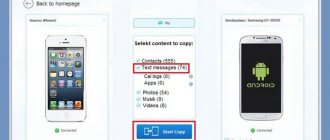
Method 7: Transfer Files from Windows PC to iPad Using iPhone Software
Apeaksoft MobieTrans has no file size limit or other restrictions. You can get fully customizable features to transfer any file from PC to iPhone, iPad or iPod with the latest iOS 12. You can easily transfer selected files instead of an entire folder to iDevice. The most important thing is that it can break all iTunes restrictions. This way, you can organize your iTunes library without overwriting data, iTunes errors and other annoying problems.
MobieTrans
- Transfer files from computer or iOS device to iPhone/iPad/iPod, including 21 file types.
- Sync files from your iOS device to iTunes directly.
- Move files from iPhone/iPad/iPod to Windows PC or Mac.
- Preview and select any file to transfer for free.
- Work with iPad Pro, iPad Air, iPad mini, iPad, iPhone XS, iPhone XR, iPhone X, etc.
- Support file transfer on Windows 10/8.1/8/7/Vista/XP.
How to safely and quickly transfer selected files from PC to iPad without Internet
Step 1. Connect iPad to PC
Free to download, install and run iPhone Transfer Software, then connect iPad to Windows PC via USB cable.
Step 2. Create a new folder
iPhone Transfer has organized all available file types into categories in the left pane. Select the "Add" icon at the bottom. Select Add Folder or other options depending on your needs.
Step 3. Transfer Files from Windows PC to iPad without iTunes
You can now add files to this folder selectively. All iPad compatible formats are welcome. Finally, you can click "OK" to transfer files from PC to iPad offline in a short time.
Similar tools that can help you transfer files from PC to iPad are iCopyBot, SynciOS Manager, CopyTrans, Leawo iTransfer, etc. which can also help you complete the tasks successfully.
Importing photos without third-party software on Windows
Before proceeding with other methods, try following a simple sequence of steps without the need to install additional utilities.
- Connect your iPhone to your Windows computer via a cable (preferably the one that comes in the box and is original);
- If iTunes is installed, it may launch automatically, so close it as the application will not be useful. A window with several actions should pop up. Select “Import pictures and video” from the list. If such a menu does not appear, then go to “This Computer”, find your gadget in the list of connected devices, right-click on it and select the above item;
- Select the images you would like to import to your computer;
- After this, the PC will offer to set additional parameters for the images that will be imported into the selected folder. For example, you can organize files by date or create captions. If you do not want to apply the adjustments, you can simply transfer without making changes. To do this, when transferring, click on the “Import settings” value;
- Next, you will be asked to save the transferred photos and/or videos or delete them from the device from which the import was made. Next, wait until the process is completed - the time depends on the number of photos moved.
Additional Information
- Back up all your files, including photos and videos, to an external hard drive using Time Machine
- Import photos and videos from a storage device, such as a hard drive or SD card, into the macOS Photos app
- Importing film photos using a scanner and Image Capture
- Transfer photos from your Android device to your iOS device using Move to iOS
- Import images directly into a folder on your Mac using Image Capture
Move Images Without Third Party Software on Mac
If it was not possible to synchronize devices (create an ecosystem) or a PC running macOS is tied to another account, then you can also easily transfer photos without unnecessary programs. The algorithm of actions is almost identical to the previous one:
- In the same way, connect the original cable to your laptop or macOS computer;
- Open the image capture program (“Image Capture”), which can be found in the “Programs” (“Applications”);
- In the new window, click on the icon of your gadget (a picture in the shape of a phone);
- A window will appear below where you need to transfer the images. Select your destination;
- The next step is to select all the images that you would like to transfer. To select multiple files at once, use the Command key. Hold it down to highlight photos of interest;
- The last step is to click on “Import”. The button is located at the bottom of the screen. Wait until synchronization finishes. After this, all selected photos will be in the folder that you selected before transferring.
Transferring Photos via Documents by Readdle
Another alternative is Documents by Readdle, a feature-rich file manager. It is enough to connect to one wireless Internet Wi-Fi network to transfer information from your iPhone to your computer in a matter of minutes. This method is suitable if you do not have a USB cable with a suitable connector at hand.
Pre-download the program on your iPhone https://apps.apple.com/us/app/documents-by-readdle/id364901807. The application weighs a little.
- Launch the application on your smartphone. Next, you need to connect to a wireless network to transfer files. Click on the gear at the top of the screen and select the “Wi-Fi Drive” tab;
- Swipe right on "Enable". After this step, an active link with your personal IP address will appear below, which you need to enter into the address bar of your browser on your computer. It starts with https://, followed by a unique set of numbers;
- After you click on the link, the program will display a notification about whether you should trust the computer. Click on “Yes”;
- Then, after confirming the action, access to all files will be opened. Download photos in the appropriate folder (they may simply be scattered across the internal memory) by clicking on the photos or videos of interest.
Documents by Readdle is a very useful utility, so we recommend that you do not uninstall this application. This is the simplest, safest and most convenient file manager available to all users for free. There are many useful features here, but the most important is the ability to directly access a library of files, just like on Android, for example.
Using third-party programs in the Files app
The Files app lets you add third-party cloud services like Box, Dropbox, OneDrive, Adobe Creative Cloud, Google Drive, and more so you always have access to all your files on all your devices. Files stored in iCloud Drive appear automatically in the Files app, but accessing files in other cloud services will require additional setup.
Adding Third Party Programs
- Download and set up the program to access a third-party cloud program.
- Open the Files program.
- Go to the Review tab.
- Click More > Edit.
- Enable third-party programs that you want to use in the Files app.
- Click "Done".
In iOS 12 or earlier, open the Files app, then tap Places > Edit to add third-party apps.
If Files is missing any of the third-party cloud services, contact the appropriate developer for assistance.
Moving files from third party cloud services
- Open the file you want to move.
- Click Share > Copy.
- Open the folder where you want to move the file.
- Press the screen firmly.
- Click "Insert".
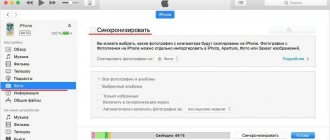
Sync photos via iCloud
Using Apple's cloud storage, you can transfer photos and videos in seconds. Users can access the content both on the website https://www.icloud.com/ and through a downloaded program on a Windows computer. After completing the steps, all pictures will be automatically synchronized between devices as they are added, and changes on any of the devices will be adjusted on all platforms linked to a single Apple ID account.
Before you begin, make sure your iPhone has the latest firmware to work correctly. Download the iCloud utility from the official website https://support.apple.com/ru-ru/HT204283.
Note: if you previously synchronized files through iTunes, and then activate this function, a message like “Photos and videos synced with iTunes will be deleted” will appear. As a result, all photos from the gallery will remain on the computer on which the transfer was made, and photos from the iPhone will be deleted.
- Check if both devices are connected to your Wi-Fi network. If yes, then continue to follow the instructions;
- Log in to the downloaded iCloud application on your PC using the same account as on the device from which you want to synchronize the gallery;
- Launch iCloud Photos if it's not already activated. To do this, launch “Settings” on your iPhone, go to the very first tab where your name is written, then to “iCloud” and set the toggle switch to the active position on the line “iCloud Photos”;
- Open the downloaded program and enable the same function. After this action, all photos and videos will be displayed on your computer or browser. In addition, you can access them on your computer - on Windows a special folder will be created where you can find all the files of interest. It will still be called “iCloud Photos”.
Using messengers
The situation with instant messengers is similar to that with email, only now you will need an additional person or a second account as a friend of the user. Here everything will not look too fast and not difficult. However, the road will be open for future similar operations. You need to send files directly to yourself and that’s it. The algorithm below explains how to implement this:
- First, create a conversation with 2 people in VK (or another similar messenger). The second user will be either his own fake page, or a friend (maybe an acquaintance) who was notified of what needs to be done;
- Then all that remains is the original account of the person who needs to send files to the PC. The third-party user leaves the conversation;
- All that remains is to upload everything you need – mainly, it will be videos and photographs. But if the situation requires it, then it is possible to take documents from the VK;
- At the end, you need to log into your account on your PC using the browser version or a separate application. After that, go into the conversation and download the files that were sent from the iPhone. Now they are located in the downloads folder or in any other folder designated in advance.
Uploading images via DropBox cloud storage
If none of the above methods helped, then try this one. DropBox is one of the best cloud services that works seamlessly on all Apple devices and syncs with any gadget in a matter of seconds. In general, DropBox is a utility in which you need to pay monthly for space to store all your information. But, if the total file size does not exceed 2GB, then choose the “Basic” tariff plan: it is free and there are no fees. You can download file hosting for free on your PC using the link https://www.dropbox.com/. Also, download the storage on your iPhone in advance via the App Store https://apps.apple.com/ru/app/dropbox/id327630330.
Register on your PC and smartphone in the application using one login and password. Next, follow these simple steps:
- Open the application on your smartphone and transfer photos or videos to the cloud storage memory. For convenience, you can create a new folder by clicking on “Create” in the bottom panel. Wait for the synchronization to occur. The time depends on the Internet speed and the amount of information transmitted;
- Launch Dropbox on your computer. In the corresponding folder you will find all the transferred files.
Transfer documents via Documents by Readdle and iTunes
Two utilities can work in tandem! To carry out the procedure, you will need to have iTunes downloaded on your computer and Documents by Readdle on your iPhone. Both programs are free, and it is better to download them from the official website and the App Store. Transfer the necessary files from your device memory to the Documents application in advance. This method differs from the past in that you can transfer a large number of files at a time without having a volume limitation (one message in the mail allows you to download a limited number of documents).
- Once both programs are downloaded, connect your iOS device via cable to your Windows computer. The PC should immediately recognize the device, and iTunes will launch automatically. If this does not happen, open the program manually;
- A phone icon will appear on the left side of the utility, click on it;
- Next, click on “Shared Files” in the left panel and select “Documents by Readdle”;
- The next step is to drag the necessary files from the Documents window to your desktop. After completing these steps, the document will be copied to the computer, and the file will not be deleted from the device memory.
If the program fails to recognize the transferred documents, try importing the file into Documents again. It is possible that the application simply does not support the specified format or the file is broken.
Delete a shared file from an iOS device
To delete a file that you copied to an app on your iOS or iPadOS device using Files Shared, follow these steps:
- Launch iTunes on your Mac or Windows PC.
- Connect your iPhone, iPad, or iPod touch to your computer using the USB cable that came with your device.
- Then select your device in iTunes. See this article if you can't find your device.
- Select a program from the list in the "Shared Files" section.
- In the list of documents, select the files to delete and press the Delete key on your keyboard.
- When iTunes asks for confirmation, click Delete again.
There may be other ways to remove files from a program. Detailed information can be found in the user manual for the program.
View and manage your files from any iPhone, iPad, or iPod touch. The Files app makes it easy to find the files you need, no matter where they're saved or what device you're using.
The Files app brings all your files together. It is very convenient here to view, search and organize your files located not only on the device you are currently using, but also in programs, iCloud Drive storage and other cloud services.
Storing and transferring documents from iPhone to computer via cloud storage
If for some reason there is no memory in iCloud, and you don’t want to pay for additional space, then use one of the file managers. The main thing is that there is a suitable application for the desktop version on the iPhone in the App Store. Popular and good services include Yandex.Disk, OneDrive, Google Drive and DropBox. Choose any one that suits your taste. All have paid tariffs, use the one that is more suitable in terms of volume.
Having analyzed all 4 popular services, we declare that Google Drive has the largest volume - it provides all users with up to 12GB of free memory. If you have a Yandex.Plus subscription (there is a free trial period), then up to 20GB will be available in Yandex cloud storage (+ 30% discount on all paid plans). DropBox has only 2GB of free memory, while OneDrive has up to 5GB (if you buy a subscription for 269 rubles, users will have access to up to 1 terabyte of memory, which is the most inexpensive and advantageous tariff from the list).
To upload files from an Apple smartphone to a PC, use these instructions:
- Download the selected service to your iPhone (this is not necessary to do on your computer, since all storage sites have a convenient web browser version);
- Log in to the desktop and mobile versions under one account.
- Transfer files from iPhone memory to the downloaded cloud storage application. Wait until all documents are transferred;
- After that, open the cloud storage on your PC - everything you need will already be displayed on the screen.
More features in Files on iPadOS
In iPadOS, you can use the Files app to access files on USB drives, SD cards, and hard drives. Just connect the drive you need and you can select it on the Locations screen. You can also connect to file servers in APFS (Apple File System), Mac OS Extended, MS-DOS (FAT) and ExFAT formats. You can also view files in Columns view, which is useful for working with files across multiple levels of folders. Columns view provides file previews and offers access to tools such as markup and rotation, even without opening the file.
Connecting to a file server
- Go to the Review tab.
- Click More.
- Select "Connect to Server".
- Enter the SMB address.
- Click "Connect".
- The server name appears in the General section of the Review menu.
Transfer a file of any format from iPhone via mailbox
Before proceeding with the following instructions, use the easiest method. The method will work if the iOS device and PC have Internet access, as well as the ability to log in to your mailbox. You can send documents to yourself, or to another person - the main thing is to know the exact address.
Just launch any application or go to the mail website (for example, mail.ru mail.google.com), then select “Write a new message”, enter the recipient’s address and attach a file of any format - text, tables, PDF and others. Click on “Send” and the message will be sent instantly.
By email
Transferring media files via email is also a fairly simple method. All you need to do is send the files to your email address. This method is recommended if the data you want to transfer is small, for example, it weighs 5-10 MB.
If this method works for you, follow these steps:
- Select the file you would like to transfer.
- Tag it and click on the “Share” button.
- Select "Mail" from the available options.
- Next, send the selected file to your own email address.
- Finally, log into your account via your computer.
- Open an email you recently sent to yourself to download the attachments to your computer.
Using iMazing to Import Tracks
An excellent alternative to iTunes, allowing you to open complex files that are protected in the official utility. Allows you to copy messages, files, and, of course, music very quickly. The iMaizing utility finds all downloaded ringtones on the iPhone and allows you to transfer even those that were downloaded through an Apple Music subscription (or any other, for example, through BOOM or Yandex.Music). As the creators themselves note, the program maintains attention to detail: it transfers not only music, but also cover art, ratings, track sources and other metadata.
You can download the application for free using the link from the developers https://imazing.com/ru. After downloading the program to your computer, follow these steps:
- Connect iPhone to PC via USB cable;
- Wait for iMaizing to recognize your device. This usually doesn't take long;
- In the left menu, select the “Music” sub-item;
- In the same way as in the previous instructions, select the tracks you need and select your destination.
Via USB
In addition to using Apple's special features, you can move information to your PC by connecting your smartphone via a USB cable. When the connection is established, the iPhone will be treated as a storage device by the computer. It will be possible to download files from the smartphone gallery.
If you are interested in other methods, you can also use third-party programs. For example, download to a Google or Yandex.Disk gadget, upload all the files to it and download them to your computer. But we note that you can only copy photos, videos, text documents, but not system documents. You can copy information not only to a desktop device, but also transfer data from iPhone to iPhone.
Another universal way is to import files through a social network
You can send almost all files of any format to yourself in private messages or create an entire album (for photos). They are downloaded through the mobile application on iTunes, and you can open them on any computer through a browser, logging in with the same username or password. For example, you can use VKontakte, Odnoklassniki, Facebook or any other social network. network.
However, this method has three disadvantages:
- Lack of anonymity if the photos are too personal (since all uploaded files, even after deletion, remain on the servers and can be restored through an archive, for example, such a function appeared on VKontakte);
- You cannot transfer ringtones from iPhone memory;
- Restriction on attached files. You can upload a limited number and volume of documents per message at a time.
To gain anonymity, use Telegram and create a secure chat. Download the desktop application from the link https://tlgrm.ru/, through which only you can log in (a unique code will be sent to your smartphone).