Adding a mailbox registered with Google (Gmail), AOL or Yahoo to your Apple gadget is not a difficult task. However, when the need arises to add an account for a Russian-language mail service - for example, Rambler – the user of a mobile device has to rack his brain. The difficulty is that when setting up mail on an iPhone, it is not enough to enter your username and password - the Mail application requires you to provide information that is usually unknown to the average user. You will learn where to get such information and how to set up mail on iPhone successfully from this article.
How to set up Gmail?
If you are the owner of the now popular Google Mail, you can consider yourself lucky - in the iPhone, the settings of this email client are “hammered” by default, so you can do without “dancing with a tambourine.”
Adding a Google mailbox goes like this:
Step 1 . Go to the Mail program on your gadget.
Step 2 . Select "Google" from the options.
Step 3 . Fill in the fields “Name”, “E-mail”, “Password”. “Gmail” will appear in the Description field. You can change the text in this field yourself.
Step 4 . After entering all the data, click “Next” - this will start the information verification procedure.
Step 5 . At the next stage, the system will offer to synchronize contacts, calendars and notes between the mobile device and the email client. Move all sliders to the active position and click “Save”.
After this, Google mailbox will be added to iPhone. The Mail application will immediately notify you of an incoming letter, indicating that Google Mail was accessed from an iOS device.
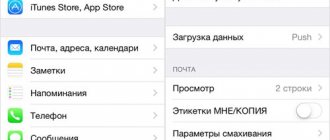
Checking mail download and notification settings in iOS
By default, the settings in the Data Download section are based on your email settings. If the Push option is not available, the Push option will be enabled by default. This determines how your device will receive email. To change these settings, follow these steps:
- Go to the "Settings" section.
- Click Passwords & Accounts.
- Click "Download Data".
- Choose an option (such as Automatic or Manual) or set a schedule for downloading data in Mail.
In iOS 11 and later, the default setting is Automatic. Your device will only download data in the background while it's charging or connected to a Wi-Fi network.
Make sure your notification settings for Mail are correct.
- Go to Settings > Notifications.
- Click Mail.
- Click your email account.
- Customize your Alerts, Sounds, and Stickers settings.
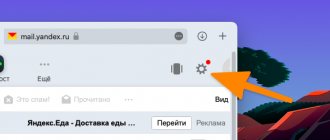
How to set up Yandex.Mail or another Russian-language email service?
Adding Yandex.Mail is easier than other Russian-language service. The setup is performed as follows:
Step 1 . Go to “Mail” and click on the “Other” option.
Step 2 . Proceed to the “New Account” section.
Step 3 . Fill out the same fields as when installing Gmail .
Step 4 . Set up synchronization of mail and notes - activate two toggle switches. Then click "Save".
There is no need to specify anything else - the Yandex mailbox will be added.
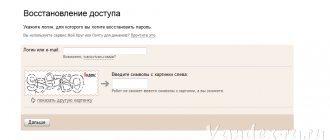
Rambler and Mail.ru clients, everything is more complicated: after filling out the required fields, the Mail application asks you to provide mail server data.
Where can you get such information?
Sample
Sampling” mode as the schedule
", be sure to select the appropriate value:
- Automatic
: iPhone or iPad will download emails in the background as long as the device is connected to a charger and Wi-Fi. - Manually:
Data will be downloaded to the device only when the application is launched. - Hourly, 30 minutes and 15 minutes:
Data will be downloaded automatically according to the selected check interval.
It is worth considering that the battery will be used more economically if you sample less frequently.
How to find out your mail settings through the Apple website?
Mail.ru clients can obtain information about servers through the service on the official Apple website. The service is called “Mail Settings Lookup” and is located at https://www.apple.com/ru/support/mail-settings-lookup/.
All that is required from the user is to “drive” the email address into the (only) field and press the blue arrow button.
Please note the note in small print below. According to this note, Apple may use the data users provide to it to improve the experience. This essentially means that the email address you enter will be saved in the company's database.
After a second of waiting, the service will display all the client data.
Which data is actually useful?
- In the “Incoming mail server” block, in the “Node name” field, you need to transfer the server host name ( imap.mail.ru ). In the “Username” field you should enter your email address – again. The password must be re-entered - this is an important point.
- In the “Outgoing mail server” block, you can fill in only one field – “Node name”. You should copy the server hostname here ( smtp.mail.ru ). The remaining fields do not need to be filled in.
When you have completed the server settings, click “Next”. At the final stage, you need to switch the toggle switches to synchronize notes and mail and click on “Save”.
The described method will give results if you are setting up a Mail.ru mailbox - but with Rambler it is more difficult. The “Search for Mail Settings” service on the Apple website will not show information about Rambler Mail servers.
When setting up Rambler , you need to proceed like this:
- In the “Incoming Mail Server” block, in the “Node Name” field, you should enter pop.rambler.ru , in the “Username” and “Password” fields - respectively, the email address and password for it.
- In the “Outgoing mail server” block, in the “Node name” field, you need to enter smtp.rambler.ru . Other fields in this block can be left blank.
Mail.ru
Email client Mail.Ru, which supports Yandex, Gmail, Rambler, Yahoo! and iCloud.
Let's set up the client from Mail.Ru for iPhone (you first need to download it from the Apple application store by clicking on the icon located above).
- After launch, the application offers you data filling templates for popular services: Google, Yandex, Rambler, or we can create our own template ourselves.
- Select the service you need, enter your email and password and click Login.
- We are waiting for the letters to load.
- To add additional accounts, click the Menu button in the upper left corner.
- Click on the round button with a cross and enter data from another account.
Graphic instructions
Everything is ready to work with mail. Frequent problems if you cannot log into your account: the email or password is entered incorrectly, there is no Internet connection or it is not of very good quality.
How to adjust email on iPhone?
The Apple device leaves the opportunity to customize email to suit the user's needs. It’s easy to find out what options are available to the owner of an iPhone by going to “Settings” - “Mail, addresses, calendars” and clicking on the name of the mailbox.
At the very bottom of the “Account” section there will be a subsection “Advanced” - you need to go there.
The “Advanced” subsection contains the following mail settings blocks:
Behavior of boxes. Through the “Mailbox Behavior” block, the correspondence between mailboxes on the iPhone and on the server is configured. For example, with this configuration, which is shown in the figure below, emails sent to the Trash from the iPhone will be saved in the Outbox folder on the server.
Place where unnecessary messages are moved. If you select “Archive mailbox” in this block and not “Deleted”, emails erased via iPhone will be transferred to the archive on the server - just in case .
Deleted messages. In this block you can set after what period of time letters from the mailbox will be permanently . There is an option “Never” - for the most cautious users.
Setting up inbox. This block contains several parameters:
- Use SSL. If the slider is activated, emails are sent over a secure channel - as a result, you don’t have to worry about confidentiality.
- Authentication. You can configure the iPhone so that the user is authorized by mail not by entering a username and password, but in other ways - say, through an MD5 Challenge response. It’s better not to mess with the authentication settings: entering a password is the easiest way to access your email.
- S/Mime. S/Mime option allows you to send encrypted messages. Let’s note right away: to use S/Mime , you need to have a digital certificate.
There is no need to change anything in the “IMAP Path Prefix” and “Server Port” fields. The first field does not need to be filled in at all; the second field is filled in automatically when the user adds a mailbox.
How to sign out of mail on iPhone?
You need to delete your account from iPhone as follows:
Step 1 . Go to “Settings” and find the “Mail, Addresses, Calendars” section.
Step 2 . In the “Accounts” block, find the mailbox you want to erase and click on it.
Step 3 . On the next screen, click the “Delete Account” button.
Step 4 . Confirm your intention to erase your account - click on “Delete from iPhone”.
When you delete your account from your mobile device, all information that was synchronized with your account will also be lost. Therefore, before erasing your account, make sure to transfer valuable information to a reliable medium.
Yandex Mail
The program from Yandex has a lot of settings and capabilities. The offline email viewing feature is especially good.
Setting up the Yandex program for iPhone. Before you start setting up, you need to download the application.
- Click on the icon above to go to the App Store and download the program.
- We wait for the application to download and go into it.
- The program immediately prompts you to log in.
- Enter the data from the Yandex service (login and password) and click Login.
- If you have several accounts in Yandex, then in the upper left corner we find a button in the form of three lines and click on it.
- In the main menu, find the circle with a plus sign inside and click on it.
- We enter the details of another Yandex account and wait for authorization.
Graphic instructions
What problems may arise during authorization? The main mistake is that the login data may have been entered incorrectly or there may be an error in the password, so the main thing is to check whether you entered the data accurately. The program does not support third-party services such as Google, Rambler, Yahoo! and others. This application only works for Yandex.