Hello! You, of course, have noticed that the coolers in your computer or laptop do not always rotate at the same speed. When more system resources are used and, accordingly, the heat dissipation of your computer or laptop is higher, the fan speed increases automatically. But sometimes it is necessary to force the fans to spin faster. Today we will touch on the topic, how to increase the rotation speed of the cooler on a laptop or computer.
A little about speed control
The fan speed in the computer is controlled by the motherboard.
This parameter is determined by the settings in the BIOS. In turn, the motherboard controls the cooler by changing the supplied voltage, and this is achieved by adjusting the resistance and other nuances.
The “mother” relies both on the parameters set by the user and on the temperature indicators of the processor and inside the case. However, it is not always possible to configure these parameters correctly, even using “smart” utilities from the motherboard developer and the like.
For this reason, the propeller rotates either at insufficient or excessive speed. In any case, this is unacceptable - either the processor overheats or there is excessive noise during its operation.
Before you reduce the speed, keep in mind that the propeller may not always be plugged into the motherboard, so the BIOS will not detect it. Accordingly, it will not be possible to configure this parameter (however, such a case occurs very rarely).
We will not consider the option with a rheobass - a special “gadget” that can speed up the speed of rotation of the propeller blades. This is too exotic a method that is almost never used.
Why don't the methods work and what can be done?
In the case of a desktop PC, most often the CPU cooler setting may not work. Coolers have different connectors for connection: 3-Pin and 4-Pin (PWM). It is the latter that allow you to control the speed through programs, but the three-pin ones do not. Personally, I found out about this when I replaced my old cooler (4-pin PWM) with a new one (3-pin) and discovered that for some reason it could not be configured through the same Speedfan, although before everything was fine. Therefore, take this point into account when choosing a cooling system for your processor. connectors for connection If we are talking about a laptop, then there are 2 options:
- The manufacturer himself could block the opportunity - there is nothing to be done about it.
- Laptops not intended for gaming have one cooler common to the processor and video card. The same applies to the graphics built into processors (the same Intel HD Graphics). In such cases it is useless to use
Conclusion Desktop PC owners are in the best position: if the processor cooler is not adjustable, replacement will be cheap. There are even fewer problems with video cards. Among laptops, gaming ones have the best chance, average-priced “office” graphics are a lottery, but owners of integrated graphics will most likely be disappointed.
There are two main reasons for overclocking the fan. The first is the temperature of the components inside the system unit is too high, which is not associated with dust contamination of the computer or a malfunction of the cooling systems. In this case, it is logical to increase the speed of the cooling fans within the acceptable range.
The second reason, on the contrary, requires a reduction in this very speed - increased noise. It is important to find a reasonable compromise in all this - the quietest possible operation with sufficient cooling of the component elements. Therefore, you need to somehow change the fan speed. How to do this will be discussed further.
Initially, the speed of revolutions is indicated in the BIOS settings, based on which the computer motherboard sets the specified parameters, in particular by changing the voltage supplied to the fans, thus controlling the number of revolutions. However, this speed cannot be controlled on all coolers, but only on three output ones; two-terminal ones will always operate at the highest speed.
You can also adjust the speed of the fans installed on the video adapter and the central processor.
This can be done using the BIOS (UEFI) or using third-party programs, and some manufacturers produce their own proprietary utilities for monitoring cooling systems for laptops.
When you may need to adjust the cooler speed
The rotation speed is adjusted in the BIOS, taking into account the settings and temperature on the sensors. In most cases this is enough, but sometimes the smart adjustment system fails. Imbalance occurs under the following conditions:
- overclocking the processor/video card, increasing the voltage and frequency of the main buses;
- replacing the standard system cooler with a more powerful one;
- non-standard connection of fans, after which they are not displayed in the BIOS;
- aging cooling system with noise at high speeds;
- contamination of the cooler and radiator with dust.
If the noise and increase in cooler speed are caused by overheating, you should not reduce the speed manually. It is best to start by cleaning the fans from dust; for the processor, remove them completely and replace the thermal paste on the substrate. After several years of use, this procedure will help reduce the temperature by 10–20°C.
A standard case fan is limited to around 2500–3000 revolutions per minute (RPM). In practice, the device rarely operates at full power, producing about a thousand RPM. There is no overheating, but the cooler still continues to idle several thousand revolutions? You will have to correct the settings manually.
The heating limit for most PC elements is about 80°C. Ideally, you need to keep the temperature at 30–40°C: cooler hardware is only interesting to enthusiastic overclockers; this is difficult to achieve with air cooling. You can check information on temperature sensors and fan speeds in the AIDA64 or CPU-Z/GPU-Z information applications.
Adjustment methods
There are several methods you can use to correct errors. You can use one of the following ways:
- Adjust the rotation speed in the motherboard's basic input/output system (BIOS). This method is associated with certain inconveniences due to the need to restart the device and enter the BIOS. Thus, if it is necessary to quickly increase the rotation speed, this method becomes unjustified.
- How to change the cooler rotation speed? There is also a large amount of software that can speed up or slow down the speed of rotation of the blades. These include SpeedFun, Msi Afterburner, OverDrive and other programs.
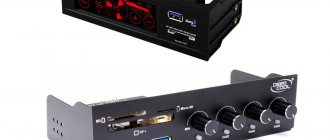
- The most expensive way is to buy a reobass and attach turntables to it. In this case, you can regulate the rotation speed by rotating the built-in controls in real time, each of which is responsible for a specific fan.
It is up to the user to decide which method to use. However, the most universal and accessible is the use of software.
Cooler connectors and their photos
The correct connector and the correct socket (the socket in the picture is 4-pin, and the connector is 3-pin), so that you can watch and adjust the rotation speed:
“Wrong” connector, i.e. power supply from the power supply, which does not allow (see note above) to monitor and, often, change the rotation speed using a program, BIOS or anything else:
You mean, if during assembly you have some of the coolers (for example, case coolers) powered from the power supply by the connector shown above, then I recommend getting into the computer and plugging them into the motherboard so that you can control the fans as you please.
To the right of the above values, as I already said, temperatures are indicated. Personally, for me, they are not captured accurately and adequately enough, and therefore I recommend using analogues like HWMonitor or AIDA64 and drawing conclusions based on them.
And now the best part. Below, opposite each inscription Speed01-06 (or in later versions of the program it can be Pwm1-3, Pwm1-3), there are arrows, by clicking on which we can adjust the rotation speed of a particular fan. Actually, that's what we need. Try to play with them, moving them up and down and you will see how quieter/louder your computer can work.
By the way, to understand which graph regulates the speed of which cooler, just watch the change in RPM values. Naturally, it is not recommended to turn off the fans completely, so as not to burn something and, of course, it is necessary to simultaneously look at the temperatures when adjusting the values.
Programs for adjusting cooler speed
The easiest way to accomplish the above task is to use special software that allows you to manage the settings of cooling systems. You can find many programs of this kind on the Internet - both paid and free.
Let's look at the best of them below.
Speed Fan
This small application has a lot of useful functions for the user.
It collects information from temperature sensors in real time, allowing you to detect overheating, shows the load on the processor and the frequencies of system components.
She can also reduce the speed of the processor fan or increase its speed.
The sequence of actions is extremely simple:
- Install the program by downloading the distribution package from the official website.
- Run the program as an administrator (right-click on the executable file and select the item of the same name in the drop-down list) and do not switch from the English version to the Russian one. This way you will be sure that all parameters will be displayed correctly.
- Wait a while - the program will collect the necessary information about the hardware of your PC.
- Choose one of two options. The first method is to automatically adjust the rotation speed of the processor cooler (just check the box next to the “Automatic Fan Speed” item in the main menu).
The second is manual control.
Go from the main page to the “Configure” section, and from there to the Fan Control tab.The rotation speed is set by a percentage value. Select what you need and save the changes by pressing the “Ok” button.
MSI Control Center
A proprietary utility from a well-known motherboard manufacturer that allows you to overclock a processor from Windows, monitor its temperature, and collect information about other components.
We are interested in the design of coolers. How to reduce the fan speed in a computer using MSI CC will be described below:
- Install and launch the program.
- Go to the Green Power section, and from there to the Advanced tab – Motherboard.
- We are looking for the point responsible for controlling the coolers (there is only one there, so you can’t really make a mistake).
- Change the value to your liking and save the profile to a file.
The program has two disadvantages. Firstly, it is built-in “foolproof”, which prevents the rotation speed from being reduced by more than 50%.
Secondly, the new settings are not applied at Windows startup. You will have to open the program each time and repeat steps 2-4.
Asus Eectl
Eeectl is a laptop fan speed control program that allows you to easily and effortlessly change the rotation parameters of the blades on Asus devices.
If you have a gadget from another company, look for similar software on their official website.
In this case, you need to act as follows:
- Install and run the application.
- Find its minimized tray icon, located in the right corner of the START panel next to the clock, and right-click on it.
- In the drop-down list, find the FAN item, click on it and select one of the values expressed as a percentage of the maximum rpm speed.
We described even more programs for adjusting the fan speed in our article “The Fan Is Humming in a Laptop What to Do”
MSI Afterburner
Free software for overclocking cards from MSI. Provides many functionalities for testing board status and GPU voltage. Enables the cooler adjustment function. Suitable for Intel and AMD.
Basic settings are located on the main screen. Move the sliders in the desired direction and adjust the parameters yourself. To control the cooling system, the speed is changed in the “Fan Speed” section. The “Auto” button automatically changes the speed of revolutions, depending on the computer load.
Riva Tuner
Suitable for all versions of Windows to control the operation of the cooler. The utility is easy to use and free. To change fan settings, follow a few simple steps:
- Open Riva Tuner
- Find advanced settings
- Fan section
- There are sliders for three positions, move them
After the changes, click “OK” and exit.
Adjust the cooler speed based on the state of the computer. Maintain the optimal temperature by changing the program.
Ways to overclock a CPU cooler
Adjusting cooler speed is a useful procedure that can reduce operating noise or improve cooling quality. It was mentioned above that this process is carried out by the motherboard along with the BIOS. Therefore, the obvious solution would be to change the BIOS settings to control the cooler.
Adjustment in BIOS
The first stage is entering the Bios. In most situations on a laptop, when booting, you should press the Del button or one of the F buttons. Often during boot, a black screen with white inscriptions flashes, where you can see the desired button in the corner.
Next, you need to enter the Advanced item and take a closer look at what is written. It is worth understanding that different BIOS versions may differ in the names of certain modes, so this text contains common solutions. In addition, the BIOS has several speed control modes. Which one to choose depends on the personal needs of the users.
- CHA Fan Duty Cycle – setting the cooler speed as a percentage (from 60 to 100%).
- Chassis Fan Ratio is a mode that allows you to configure the operation of an additional cooler, provided that the internal temperature of the system unit is not higher than the set one. Auto – speed will be adjusted automatically. 60-90% - manual adjustment, based on the maximum possible.
- Chassis Q/ System FAN (Speed) Control is the same utility that “intelligently” selects the speed of the blades. It has two states – Disabled and Enabled. If the utility is disabled, the rotation is performed at maximum.
- CPUFAN2 Tmax sets the chipset temperature, after reaching which the cooler will accelerate to the maximum level (adjustable from 55 to 70 degrees).
- CpuFan Start Temperature sets the minimum temperature at which the blades rotate at low speed.
- CpuFan Duty Cucle is a direct adjustment that will help increase or decrease rotation speed. The setting is carried out as a percentage of the maximum (60-100%). May also be called ManualFanSpeed.
- CpuFan Control is an intelligent control that can lower or increase the speed of the cooler on the processor depending on the heating level of the latter. There are no settings here; the function can be enabled or disabled.
- CPU Fan Ratio – setting the number of rotations of the blades before the chipset heats up to the set (initially) maximum temperature. Percentage setting – from 20 to 90%. That is, in this case, you can reduce the speed of the cooler if it is very loud, but at the same time the chipset does not heat up.
- Smart FAN Idle Temp – ability to set the lowest speed.
- Smart Fan Target is similar to point 7. Found in motherboards from the MSI brand. Additionally, here you can set the parameter from which processor temperature the BIOS begins to independently adjust the speed.
As the list above shows, there are many settings for fan operation in the BIOS, but practice shows that using them is not very useful, since most often they do not work correctly. In addition, to change the settings, you will have to enter the BIOS each time and change something, then start the device and check the effectiveness of the changes. It’s much easier to install special software and adjust the speed without unnecessary complications and immediately see the result.
Another point that makes it impractical to configure via BIOS is that the fan is not always connected to the motherboard. Some not-so-successful assemblies are made in such a way that there is no connection between the board and the cooler, which means that it will definitely not be possible to regulate its operation in the BIOS. In this case, special programs will come to the rescue, and the most popular of them is SpeedFan, which is described below.
Important! To set up a computer cooler for accurate operation using third-party utilities, it is recommended to disable automatic adjustment in the BIOS, otherwise it will interfere with the operation of special software.
Setting the speed in SpeedFan
It is much more convenient to regulate the speed of the processor cooler in special programs. If you study the forums, most often experienced users mention SpeedFan. The software is free, takes up minimal space, but works very effectively. The only drawback of the program is that it is not Russified, but this should not be a serious problem, since the interface is intuitive.
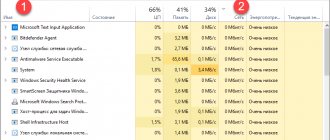
After installing the program, the user will see a small window with several tabs. In order to change the rotation speed of the cooler, you do not need to go anywhere. All the necessary information is contained in the first window, which is called Readings.
The CPU Usage line shows the load on the chipset and cores. Next to it is the inscription Automatic fan speed with the ability to check a box - this will activate the automatic adjustment mode, but it is not interesting, since there was no point in installing the software in this case.
Next you can see two blocks. In the first there are inscriptions Fan 1-5. The current cooler speed is displayed here.
It is important to understand that Fan 1 does not necessarily correspond to the CPU fan . It all depends on which socket it is connected to. This could be a fan on the power supply or video card. You can understand what relates to what only experimentally: by adjusting the speed, see which node’s temperature changes. You can do this visually by removing the cover of the system unit and monitoring which cooler accelerates as the speed increases.
Having calculated the correspondence between the inscriptions and the fans, we look at the second block with the inscriptions Temp 1-5. The current temperature of the node that corresponds to the cooler is displayed here.
Next, we lower our eyes and see the inscriptions Pwm 1-6 (the inscriptions may change in different versions of the program, for example on Speed 01-06) with up and down arrows. It is very simple to understand how to lower and increase the speed - just click on the desired arrow and select the appropriate values. There is no need to save the result or reload anything. The utility immediately changes speed, and this is its beauty - you can understand how the indicators are changing immediately at the time of setup.
Important! It is not recommended to set the minimum and maximum cooler speeds - in the first case something may burn out, in the second it will be too loud.
Working with BiosBIOS
Most modern motherboards have the function of monitoring and controlling the speed of air cooling systems. In most cases, this is controlled through the use of drivers supplied with the device. If available and correctly installed, it is possible to adjust the rotation speed of the cooler blades through the BIOS.
How to increase the rotation speed of the cooler on a laptop or computer
The method is universal for all electronic computers on which air cooling systems are installed. In order to change the rotation speed, you need to:
- Restart the system and enter the BIOS shell. The keys or their combinations depend on the motherboard manufacturer.
- Go to the Power section, find the Hardware Monitor tab.
- In the item “CPU Min. Fan speed (%)" adjust the fan speed as a percentage.
- Make the same adjustment with the remaining points.
- Then save the changes and exit the BIOS using Exit.
Why are fans noisy and what are the ways to fix it?
With the exception of special fanless modifications, each computer has two or more coolers installed: in the power supply, on the processor, video card, in the case, and others.
And everyone makes noise in their own way, and that's bad news. Many people are simply accustomed to the noise of their system unit and believe that this is how it should be. Maybe it should, but it doesn't have to! In 99% of cases, computer noise can be reduced by 10%-90%, which is good news. As you already understand, quietness is achieved by reducing the noise from coolers. This is possible by using coolers that are quieter by nature, or by reducing the speed of existing ones. Naturally, you can reduce the speed to values that do not threaten overheating of the computer! This article will discuss exactly this method. Programs to reduce crackling noise from a hard drive will help reduce noise even further.
So, to reduce the cooler rotation speed, you can use one of the options:
- Program for controlling the rotation speed of coolers
- “Intelligent” speed control system built into the BIOS
- Utilities from the manufacturer of the motherboard, laptop or video card
- Use a special device - reobass
- Artificially lower the fan supply voltage
Those who have normal control from the BIOS may not read further. But often the BIOS only superficially regulates the speed, without lowering it to silent, and at the same time still acceptable, values. Utilities from the manufacturer are sometimes the only way to influence the fans because third-party programs often do not work on unusual motherboards and laptops. Let's look at the most optimal - the first method.
Increasing CPU cooler speed via BIOS
Users asking questions about how to increase the speed of a cooler through the BIOS should be aware of the following:
- To implement the method, you need to have a general understanding of the BIOS system and how to work with it. This is due to the wide variety of BIOS graphical interfaces, which have significant differences in terms of data location;
- The option will not allow you to set any number of revolutions you want. The range of available values is small;
The basic algorithm of actions, suitable for most BIOS interfaces, looks like this:
- We launch the BIOS by pressing the Del button or one of the function keys F1 - F12. The activator button is different for different versions;
- After starting the BIOS, go to the Power section;
- In the window that appears, look for the phrase Hardware Monitor. If it could not be found, go to any tab containing the word Hardware;
- Now you need to decide which option for overclocking the cooler is preferable for you - overclock it to maximum on a constant basis, or increase the rotation power only depending on the current processor temperature;
- To implement the first option, click on the CPU min Fan Speed item and select the number of revolutions from the available values. This method is energy-consuming, but allows for maximum processor cooling;
- Another option is realized by clicking on the line CPU Smart Fan Target. With its help, the owner of a personal computer sets a certain temperature value, the achievement of which by the processor will trigger the accelerated operation of the cooler. This mode allows you to reduce power consumption, but this protection against overheating is worse, since the activation does not work immediately. Constant jumps in the number of revolutions can also cause discomfort for some users;
Note! The recommended operating temperature of the system is 50 C.
- To exit the BIOS and save the settings as they are, click the Save&Exit;
Setting the maximum cooler rotation mode is recommended only in extreme cases, since changing the fan speed reduces the operating life. If this method is not for you, pay attention to another solution to the problem - installing software to adjust the fan speed.
Disable/enable automatic speed control in BIOS
Depending on the type of motherboard, version and type of its BIOS and other factors, the program may not work if adjustment is enabled or disabled in the BIOS automatically or based on specified templates.
Therefore, it is possible that if you encounter problems with the program and it works (or does not work), or you want to entrust control to the motherboard, you may need to enable or disable the adjustment system built into the BIOS. Approximately, depending on the version, it is done like this:
That is, Q-Fan in the Enable position enables automatic control based on the specified parameters in the BIOS, and Disable disables this parameter. Depending on the BIOS type, as you can see in the screenshots above, this parameter may be located on different tabs and look different. It is also possible that you need to switch the CPU Fan Profile from Auto to Manual or vice versa.
Unfortunately, it is impossible to consider all the variations, but one way or another, this tab is necessarily present on any computer (except, perhaps, laptops) and you can find it there. In particular, it is not always called Q-Fan, it could be something like CPU Fan Contol, Fan Monitor and similar.
In a nutshell, something like this. Let's move on to the afterword.
Rotation speed control software
If it is impossible to work with the BIOS I/O environment or there are no necessary items in the section, you can use software that is designed to control the air cooling system.
How to increase the rotation speed of the CPU cooler? To do this, you can use the following software:
- SpeedFan;
- AMD OverDrive;
- Riva Tunes.
You can download any of them from the manufacturer’s website. After installation, you can begin adjusting.
How to configure the cooler in Msi Afterburner
This program is easy to work with because it has tooltips.
- Open the program properties (Settings).
Open the program settings - Go to “Cooler” in the top panel and check the software user auto mode box.
Check the box for software user auto mode
The graph with a scale displays the cooler speed as a percentage and the lower scale shows the chip temperature. By moving the gray dots on the graph curve, you can control the speed of the coolers, setting the values according to your hearing and experience. If noise occurs, lower the curve to reduce fan speed. There is no universal curve setting in the graph.
Find out effective ways to increase the speed of the cooler on your laptop from our new article.
Controlling cooling systems with SpeedFan
How to increase the rotation speed of a cooler with SpeedFan? The program is completely free and allows you to adjust the rotation speed of the cooler on both a laptop and a laptop. To increase the rotation speed of the cooler using SpeedFan, you need to:
- Download and install this program on your device. The program does not take up much disk space, which can be an advantage for older laptops;
- The initial language of the program is English. To change it, you need to go to the Configure tab, then to the Option section, and in the “Language” section select the desired one.
- After which you need to go to the “Indicators” tab, which shows the current temperatures of the processor, hard drive and other parts. On this screen you can set the fan speed using the Pwm1 text field.
- For automatic configuration, in the “Configuration” section it is possible to set the minimum temperature that the device will try to maintain.
CPU cooling control
We use Speedfan(). After launching the program, in a few seconds it will collect information about all found coolers in the system and display it in a list. We are interested in 2 blocks: In the first, we are shown the number of revolutions per minute, in the second - the available regulators for them. The program automatically quite accurately determines where the fan is, so it can find and sign some (CPU - processor, and GPU - graphics) itself. But this is the best option. The picture may be the same as in the screenshot below. In this case, 3 unknowns and a GPU are available for control. If you know which cooler you have the most noise, then you can simply change the values of each Pwm until you hear a difference in noise. In my case, the CPU allegedly does not have a cooler, but there is some unknown Fan2 (by the way, identical to CHASSIS, i.e. motherboard). This is due to the fact that I have a fan that does not support software speed control. Why this is so and what to do is at the end of the article. Please note: the percentage value you set will be constant both when idle and under any load. If you want these settings to take effect immediately after Windows starts, check the corresponding box in the Configure → Options: Autorun section
Features of marking of various fans in SpeedFan
How to change the CPU cooler rotation speed? On laptop computers, the program allows you to adjust the rotation speed of several connected fans, each of which is connected to a separate connector. These include:
- SysFan (Fan1) – this parameter indicates the rotation speed of the cooler, which is attached to the SysFan connector on the motherboard. Fans of a discrete air cooling system, which are installed on the northbridge or any other, can be connected to this connector.
- CPU0 Fan – this item corresponds to the rotation speed of the processor cooler.
- PWR Fan – the section is responsible for the rotation speed of either the cooling system of the power supply or the fan that is connected to a given socket on the motherboard.
- CPU1 Fan – section is intended for dual-processor server motherboards and corresponds to the cooler of the second computing unit.
Adjusting the cooler speed using additional devices
You can control the processor cooling system using third-party equipment, which allows you to set the required speed through a control panel installed in the system unit case. Such equipment is used when assembling powerful personal computers and is installed instead of a DVD drive, or in the free space under it.
Such devices are called reobass, and their installation allows you to achieve the following effect:
- Cooling is quieter than other methods;
- Coolers work without interruption;
- You can control the speed either manually, through a panel on the system unit case, or using programs, in automatic mode;
Some risky owners who want to save money assemble homemade versions of devices according to diagrams provided on the Internet. This approach is extremely risky and threatens the failure of all elements of the system unit. In this case, you will have to spend much more money than in the case of purchasing normal, licensed equipment.
As a final recommendation, I would like to give a couple of tips that, if followed, will keep your computer in working condition without overheating the processor:
- Clean the inside of your PC regularly, paying special attention to the cooler blades;
- Do not adjust the speed down unless necessary;
- You should not rely on the programs to work 100%. Some of them do not work correctly with sensors inside the computer, which is why the displayed processor temperature differs from the current one. Monitor this by periodically checking the temperature by other means;
Preparation
If the computer used to work quietly and only recently began to create a lot of noise, it is likely that the problem can be solved by simply cleaning the system unit from dust. You may also need to lubricate the coolers. Read
about it . In some cases, it is possible to improve the cooling of the processor and significantly reduce the noise of its fan by replacing the thermal paste. If the above actions do not solve the problem, you can reduce the rotation intensity of one, the “noisiest”, or several fans in the system unit.
But before that you need to:
1.
Install on your computer programs that allow you to control the temperature of its main “heating” devices, namely: •
Speed Fan
- a program that allows you to control the temperature of all computer devices in real time;
• Prime 95
is a program that creates a high load on the central processor.
Allows you to check the stability of the processor and the efficiency of its cooling system in extreme conditions. Read more about checking the processor using this program here. • FurMark
is a program for testing the computer graphics system.
It creates an increased load on the video card, while controlling its temperature and stability. 2.
Using these programs, check the temperature conditions of the processor, video card, hard drive and chipset of the computer motherboard.
In most cases, at maximum load, the temperature of the hard drive should not exceed 45 degrees C, the processor and motherboard chipset - 60 degrees C, the video card - 85 degrees C. You can “load” the hard drive without special programs, for example, by starting the archiving or copying process there is a large file on it (movie, disk image, etc.). If the temperature of a device is close to the above values, you should not reduce the speed of the cooler cooling it. In the case where the maximum performance is still far away, the intensity of fan rotation can be reduced using the methods described below. IMPORTANT
. After reducing the speed, do not forget to check the temperature of the devices cooled by the coolers. Do not allow them to overheat. Remember that operating your computer for long periods of time in unfavorable temperature conditions will reduce its longevity.
How to increase or decrease the rotation speed of coolers with AMD OverDrive
The software is only suitable for air cooling systems that work in conjunction with AMD hardware. This utility is completely free and allows you to overclock hardware. At the same time, the temperature increases significantly, so it is necessary to increase the efficiency of the cooling system accordingly. In order to increase the rotation speed in the utility, you will need:
- Open the application and in the main window open the Performance Control tab. In most cases, the version is located in the upper left part of the interface.
- Go to the Fan Control section.
- Switch the fan speed to manual mode, then use the sliders to adjust. This way you can increase or decrease the speed of rotation, providing a lower temperature or noise level.
Change the rotation speed of the cooler on the video card
To change the rotation speed of the cooler on a video card, it is better to use the msi afterburner program. When you first start it, you will see settings for adjusting the video card. Find the Fan Speed column and click on Auto in the corner to be able to make changes. Use the slider to set the percentage speed of the cooler on the video card and click on the checkbox to check the specified parameters.
Additional information on speed
Again, not all coolers are plugged into the motherboard (this is especially true in the case of case coolers), i.e. the BIOS does not know about their existence, and therefore cannot control them, i.e. they spin at full power, often idling and, again, increasing the overall noise level (about this, i.e. about the connection, see below in the text).
The option with a physical solution is quite... Cruel, because cutting the wires is inhumane, and this is more likely not a method of adjustment, but a forced reduction in characteristics, because, again, you can’t adjust according to your needs - you’ll be tortured by picking the wires every time.
You can, of course, buy a rheobass (as in the screenshot below), to which you connect everything and enjoy life, but this, again, costs money, and reaching for the body every time you need to change the rotation speed can be lazy.
Therefore, in connection with the above, for many the option of using specialized programs will be relevant, fortunately they exist and they are free. In this article, I will talk about an old and very famous utility called SpeedFan.
Fan control using Speedfan software
This is, in my opinion, one of the best utilities for adjusting the propeller frequency. The utility is free, but does not have Russification (on the official website). However, even a beginner can easily understand its functionality.
What criteria should you pay attention to:
- The Cpu Usage field and the indicators located nearby display the level of current load on the CPU.
- By checking the Automatic fan speed checkbox, you can set automatic adjustment of the blade rotation speed. You can also use it, but the function simply duplicates Q‑Fan.
- CPU0 Fan (Fan0) - displays the rotation speed of the fan that was connected to the CPU0 Fan slot when the computer was assembled. As a rule, this is a fan for cooling the processor.
All other propellers are marked by the utility according to the occupied slot - SysFan, Aux0 Fan, CPU1 Fan (if any), Aux1 Fan and PWR Fan.
If one of the slots is not occupied and the cooler is not connected to it, the corresponding fields in the program remain empty.
You can adjust the rotation speed of any cooler using the up and down arrows opposite its serial number. The only drawback of the program: if you find that after installing it, the rotation speed of some propeller is already 100%, you will not be able to increase it.
If you start playing tricks with lowering the rotation speed, in order to avoid overheating, I also advise you to use a program to monitor the computer’s operating parameters. For example, AIDA64, Everest or Speccy.
SpeedFan cooler management software
This is a multifunctional and completely free program. I’ll probably upset you a little right away by saying that this program does not work on all laptops, but you can try, and it will not regulate the speed of those fans that the motherboard cannot control from the BIOS. For example, from my BIOS I can enable the SmartFan cooler control feature for the CPU only. Although you can look at the current revolutions for two more. There is another program to control the laptop cooler.
Attention: before using the program, disable cooler management from the BIOS!
Otherwise, the following situation may occur. When the SpeedFan program is loaded, the current speed is read and taken as the maximum. Accordingly, if by this time the BIOS does not spin the fan to maximum speed, then the program will not be able to do this.
It happened to me once that when the program was loading, the cooler on the processor was spinning at a speed of 1100 rpm, and SpeedFan could not set a higher value. As a result, the processor heated up to 86 degrees! I noticed this by accident when, at a moment of heavy load, I did not hear any noise from the fan. Fortunately, nothing burned, but the computer might not turn on again...
Launch and appearance of the program
Download and install the application from the official website.
When you first start it, a regular window will appear offering help on the program’s functions. You can check the box so that it does not appear again and close it. Next, SpeedFan reads the parameters of the microcircuits on the motherboard and the values of the sensors. A sign of successful completion will be a list with the current values of fan speeds and component temperatures. If the fans are not detected, then the program cannot help you. Immediately go to “Configure -> Options” and change the language to “Russian”.
As you can see, the processor load and information from voltage sensors are also shown here.
Block “1” contains a list of detected cooler rotation speed sensors with the names Fan1, Fan2..., and their number may be greater than it actually is (as in the picture). Pay attention to the values, for example, Fan2 and the second Fan1 have real indicators of 2837 and 3358 RPM (revolutions per minute), and the rest are zero or with garbage (in the picture 12 RPM is garbage). We'll remove the extra ones later.
Block “2” shows detected temperature sensors. GPU is the graphics chipset, HD0 is the hard drive, CPU is the central processor (instead of the CPU in the Temp3 picture), and the rest is garbage (cannot be 17 or 127 degrees). This is the drawback of the program, that you need to guess where everything is (but then we ourselves will rename the sensors as needed). True, you can download well-known configurations on the site, but the procedure is not simple and is complicated by the English language.
If it is not clear which parameter is responsible for what, then you can look at the values in some other program for determining the parameters of the computer and sensors, for example AIDA64 and compare with those determined by the SpeedFan program in order to know exactly where what speed and temperature readings are (in the video under the article I'll show you everything).
And in block “3” we have speed adjustments Speed01, Speed02..., with which you can set the rotation speed as a percentage (can be shown as Pwm1, Pwm2..., see the video for more details). For now, we need to determine which Speed01-06 affects which FanX. To do this, change the values of each from 100% to 80-50% and see if the speed of any Fan has changed. We remember which Speed influenced which Fan.
I repeat that not all fans will be regulated, but only those that the motherboard can control from the BIOS.
Setting up SpeedFan
Now we get to the settings. Click the “Configuration” button and first of all, let’s call all the sensors with clear names. Using my example, I will programmatically control the processor cooler.
On the “Temperatures” tab, we find the processor temperature sensor defined in the previous step (I have Temp3) and click on it first once, and then a second later again - now you can enter any name, for example “CPU Temp”. In the settings below, enter the desired temperature that the program will maintain with the minimum possible cooler rotation speed, and the alarm temperature at which the maximum speed is activated.
I set it to 55 and 65 degrees respectively, but this is different for everyone, experiment. At a very low set temperature, the fans will always spin at maximum speed.
Next, expand the branch and uncheck all the boxes, except for the Speed0X one, which regulates the FanX of the processor (we have already defined this earlier). In my example it is Speed04. And we also uncheck all other temperatures that we do not want to see in the main program window.
On the fans tab, we simply find the fans we need, name them as we want, and turn off the unnecessary ones.
Let's go further to the "Speeds" tab. We go to the Speed0X that is responsible for the desired cooler, rename it (for example, CPU Speed) and set the parameters:
- Minimum – the minimum percentage of maximum speed that the program can set
- Maximum – respectively, the maximum percentage.
For me the minimum is 55%, and the maximum is 80%. It’s okay that the program will not be able to set the value to 100%, because on the “Temperature” tab, we set an alarm threshold value at which the speed will be forced to 100%. Also, for automatic adjustment, do not forget to check the “Auto change” box.
In principle, that's all. Now go to the main SpeedFan window and check the box “Auto fan speed” and enjoy the automatic adjustment of the rotation speed. You won’t be able to optimally configure it for yourself the first time, experiment and leave the appropriate parameters, it’s worth it!
Extra options
The SpeedFan program has a bunch of other functions and parameters, but I won’t delve into them, because... this is the topic of a separate article. Let's check a few more necessary boxes on the “Configuration -> Options” tab
- Launch minimized – so that SpeedFan starts immediately in minimized form. If you do not install it, then when Windows starts, the main program window will hang on the desktop. If the program does not start with Windows, then simply add its shortcut to startup.
- Static icon – I prefer to set it to display just the program icon in the system tray instead of numbers
- Minimize when closing – set so that when you click on the “cross”, the program does not close, but is minimized to the system tray (near the clock)
- Full fan speed upon exit – if not set, then after exiting the program the cooler speed will remain in the state it was in at the time of closing. And since there will be no one else to manage them, the computer may overheat.
Well, did everything work out, the program works, the speed is adjusted automatically? Or maybe you use other methods? I hope you found the information useful. Don’t be lazy to share it with your friends, I will be very grateful to you!
And now a video with detailed setup of SpeedFan. Note: There was a slight glitch in the video. After manually adjusting the processor fan Fan1, its value did not return to 3400 RPM, but for some reason remained at 2200 RPM. After restarting the program everything returned to normal. This was not the case in recent versions of SpeedFan on my computer.
What else will be useful to know about fan speed?
The higher the cooler rotation speed, the higher the wear and tear of the device and its noise, of course. The power consumption of your computer also depends on the speed of the fans. In any case, it is better to sacrifice the fan than other more expensive components, so do not spare the fans, because the computer loves the breeze and coolness. The computer loves the breeze
Sources
- https://infotechnica.ru/pro-kompyuteryi/ob-ohlazhdenii/upravlyaem-skorostyami-ventilyatora/
- https://pcpro100.info/kak-nastroit-skorost-vrashcheniya-kulera/
- https://FB.ru/article/464809/kak-uvelichit-skorost-vrascheniya-kulera-prostyie-metodyi-spetsialnyie-programmyi-i-sposobyi-nastroyki
- https://laptop-info.ru/uvelichit-umenshit-oboroty-kulera/
- https://allomart.ru/nastroyki-kulera-v-reyestre/
- https://wi-tech.ru/protsessory/kak-uvelichit-skorost-kulera/
- https://mywebpc.ru/windows/speed-fan/
- https://digital-boom.ru/hardware/kak-uvelichit-skorost-vrashheniya-kulera.html
[collapse]