Previously, on Windows it was possible to create a home group - to unite several computers with access to files and folders. In the top ten, starting with build 1803, the developers removed this feature. In their opinion, this is an outdated method, and new cloud services like OneDrive are offered as an alternative.
You can read our article for more information about homegroup on Windows 10. We also analyzed the main difficulties that the user of the ten faces when creating it.
But in general, creating a home network between two or more computers is possible. This will allow you to unite devices connected through a common router - for exchanging and viewing files, for playing games, etc.
In this instruction, we will walk you through step-by-step how to create a local group between computers on the same network and how to set up shared access in it.
Setting up a home network on Windows 10
The first step is to create a local group name. It must be the same for all computers that will connect to the network. Call up the system properties: key combination Win+R and the sysdm.cpl command.
By default, the local network name is the same for everyone - WORKGROUP. Check on each computer. To change the name, click on the corresponding icon.
Next is setting up sharing for files, folders and computer devices. Go to the Windows 10 settings (Win+I key combination), select the “Network and Internet” section and in the first “Status” tab click on the active link “Network and Sharing Center”.
Next – “Change additional settings...”.
- Homegroup on Windows 10: creation and configuration
Open the “Private” tab and set the checkboxes to enable network discovery and sharing of folders, printers and files.
Next, open the “All networks” tab and in the final option select “Disable password protected sharing”.
So, for all computers that will be on the local network, we need to do:
- set the same local network name (necessarily in Latin);
- enable network discovery for all computers (read more about network discovery on Windows 10 here);
- connect shared access to the file system and devices;
- disable password protection for connecting to the local network.
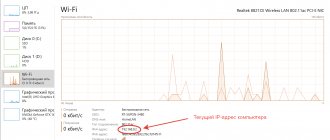
All of the above steps will be effective if each computer on your home network is connected through the same router. Otherwise, you will need to additionally register a static IP address in the LAN connection properties.
A common problem with connecting over a local network is the inability to identify a PC. The computer name is not displayed and you cannot log into your home network. The point is the computer name: it is set automatically by the system when Windows is installed and usually has a rather clumsy name.
We recommend that you read our detailed article on how to change the computer name.
Launching "Local Users and Groups"
The functional complex that connects the internal profiles of a personal computer launches quickly. No special skills or knowledge are required. Action steps:
- simultaneously click the combination of hot buttons “Windows” and “R” (Russian layout – “Win” and “K”);
- in the “Run” field that opens, type lusrmgr.msc;
- confirm the request with the “Enter” key on the keyboard or “OK” in the window field;
- An additional interface will open - groups and users of the operating system in the local designation.
The open field is divided into several active blocks. At the top there are possible actions and settings (standard – file, help, view and others). The main part contains the required sections and profiles.
Setting up file and folder sharing
The next step in creating a home network is changing the sharing settings. We need to “share” files, folders and devices so that they are accessible to every member of the local group.
- How to find out the homegroup password in the Windows 10 operating system?
Read our article, where we discussed in detail how to set up sharing in Windows 10.
Basically, that's it. Further steps - go to Explorer, open the “Network” tab - and connect to your home network. You may find the following articles useful, which tell you in detail about network folders and working with them:
- How to create a network folder?
- Learn more about problems with detecting network folders.
If you are unable to create a local group on Windows 10 (especially builds 1803 and higher), try using other means of combining computers. The already mentioned OneDrive cloud service is a good alternative for general work with files and folders.
Home›Windows 10›Setting up a home network in Windows 10
Why do you need to set up a home network? It would seem that a laptop, a computer and a couple of smartphones are working at home and are periodically used to access the Internet. What else is needed? But remember how often you have to transfer files from one device to another? You have to copy it to a flash drive and back or use Bluetooth.
Even if you do this no more than once a month, with a home local network everything will become much easier. In addition, its customization will open up a lot of new opportunities. For example, files can not be transferred, but can be launched directly on another computer or even a TV (if it has the ability to work on a local network with Windows 10). It will be possible to run games “on a grid”, print documents from any computer on one printer, and use many other features.
Local network capabilities
Setting up a Windows 10 network allows you to get a number of convenient features that will be useful for users who have several computers at their disposal.
- Sharing files from different computers. Fast data transfer regardless of volume.
- Share a printer, scanner, or other network device.
- Setting up online games and entertainment.
These are the main directions, each of which contains a number of possibilities. For example, fast data transfer allows you to back up important information so that if one machine stops working properly, the information you need can still be accessed from another computer.
To start using all these functions, you first need to properly configure the local network in Windows 10. You can connect machines that have the same versions installed, a PC and a laptop with different versions of Windows - between “seven” and “ten” there are no compatibility restrictions.
Basic Concepts
A home local network is several computers connected by one network cable for data exchange. Today, most apartments have routers that distribute Wi-Fi. Thanks to them, setting up a local network has become a simple task.
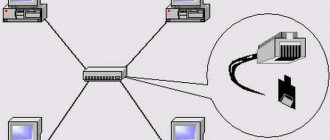
An approximate diagram of a home local network with Windows 10 might look like this:
- Creating, setting up, deleting a homegroup on computers with Windows 10
As you can see in the figure above, the Internet is supplied via an Ethernet wire to the router, to which the PC is connected via a patch cord (the same wire with double-sided connectors). Laptops and smartphone are connected to the router via Wi-Fi. Of course, such a connection does not create a local network by default. Specific settings are required on each device. In the above example, the various machines and gadgets, if they are not configured properly, will not be able to “see” each other.
The most important term in this whole process is the so-called groups. A Windows 10 workgroup can include a maximum of 20 machines, which are nodes of the same level, that is, they cannot control each other. In other words, in such a network all computers are equal - there is no main server.
See also: Assess Windows 10 performance on your own
In addition, there is the concept of a home group, which can be formed if computers already belong to a work group. HomeGroup makes it easy to share photos, music, movies, and documents from other devices. This group, unlike a working group, has a password, but you only need to enter it once to add a new device.
Catalog "Users"
The left side of the interface displays the name of the subgroups - users and, directly, groups of them. The first block displays the following profile names:
- Administrator - a profile that is installed by the developer, is inactive by default (an additional security item for the operating system), account features: cannot be deleted or reflashed, has advanced functionality and access to system files (settings) of a personal device;
- Guest is an additional account, also created by Microsoft developers, second after the administrative profile, rights are limited (the main ones are viewing, using standard groups of programs). Attention! The "Guest" type profile is used one-time. Limited operating time and a small set of functions are provided to protect the internal data of a computer or laptop;
- WDAGUyilityAccount is an account whose capabilities are used by Windows Defender if the user tries to follow an unsafe link or open folders (documents, archives, photos, etc.) that threaten the security of the PC.
In addition to those indicated, accounts named “User” (appears during the first activation of the system) and HelpAssistent (temporary account, used one-time by the Remote Desktop Help Session Manager application) are displayed.
conclusions
After these manipulations, your Windows 10 should see the computers in its group and gain access to all open folders. This is how to briefly set up a local network using Microsoft operating systems. In reality, everything may look different: the article provides only general principles.
For example, without a router (with a DHCP server enabled and automatic distribution of addresses), two computers can be connected by a patchcord. In this case, after the first stage of setup, you will need to register IP addresses manually. This is done in the properties of the network adapter and the properties of Internet Protocol version 4. It's the same for Windows 10, 8, 7 and even XP.
An IP of the form 192.168.0.* is registered (for each computer the last digit is unique, except for 0 and 1. You can use, for example, 5 and 7, Subnet mask 255.255.255.0 and default gateway 192.168.0.1. 192.168 is indicated as DNS servers. 0.1 and 192.168.0.0 (optional) If the router has DHCP disabled, a similar setting must also be done.
(Visited 82,789 times, 12 visits today) Published on Windows 10
The Windows operating system has a function that allows you to easily access files for viewing or moving them. Also, devices included in the same local network have the ability to remotely control printers, faxes and other equipment. In this material, we will tell you how to connect to a Windows 10 homegroup. Additionally, we will touch on the topic of deleting the partition in question from the operating system version 1803 and higher.
How to create a homegroup in Windows 10
The initial setup process is no different on all Windows, starting with Windows 7. At the same time, the instructions will be relevant until Windows 10 version 1803. In later editions, “HomeGroup” was removed from the functionality (the ability to share files was retained - more on this below).
Preliminary preparation:
- Visit “Control Panel” , set the display mode to “Icons”.
- Find and open the “HomeGroup” section.
If the computer is set to a public network, the system will require you to switch to “Private”. The notification will be highlighted with a yellow stripe, and there will also be a link for making changes. After clicking on it, you need to confirm the permission. Return to the section and click on the line “Change additional settings...”. Set the values as shown in the screenshots:
Save the changes made. Right-click on the “My Computer” shortcut and select “Properties”. View and remember the value from the “Work group” line. In Windows 10, the default value is “WORKGROUP” - this value must be set for all computers connected to the local network. It will be useful for setting up the second and all subsequent devices.
Now you can start creating a homegroup. To do this you will need:
- Repeat steps 1-2 of the previous list.
- The system will scan the network; if the local network is just being created, a message about the absence of a home group will be displayed. At the bottom of the window, click the “Create...” button.
Mark files and devices that will be accessible. You can add your own directories later, but for now only those suggested by the system are displayed.
Windows will perform the setup. At the end of it, the password that is used to connect other PCs will be displayed - it should be written down on a piece of paper.
The condition for connecting other computers is to have Windows 7, 8 or 10 (up to version 1803) installed, as well as being connected to the same network via Wi-Fi or cable.
note
The name of the working group can be changed to anything you like. The main requirement is that it must be the same on all PCs. Detailed instructions for the change are provided below.
Creating a local space step by step
Working group
First of all, make sure that all computers have the same workgroup name. It can be anything - you set it at your discretion. On Windows 10:
- Open Start and go to Utilities.
- Launch the classic Control Panel.
- Open “System and Security”.
- Go to the “System” section.
- On the left, select “Advanced system settings.”
- A small window will open in which you need to select “Computer name” and click on the “Change” button.
- In the new window at the bottom there will be an item “The computer is a member of...”: select “workgroup” and enter the desired name.
This setup must be done on all computers with Windows 10 (for 7 and 8 everything is done in the same way) that will be on the home network.
Visibility of computers on the network
The fact that computers with Windows 10 or other versions of the OS are part of the same group is not enough for them to start “seeing” each other. Additional configuration required. To enable visibility, follow these steps on each machine:
- Open Control Panel.
- Select “Network and Internet” and go to the Network and Sharing Center.
How to Join a Windows 10 HomeGroup
If there is a computer on the same local network from which a homegroup was previously created, other devices automatically detect it and offer to join. To implement your plans you should:
- Open the properties of the My Computer shortcut.
- Compare the value in the “Workgroup” with the one that was indicated on the first PC. If it matches, no further action is required. Otherwise, you need to do the following:
- In the menu on the left, click on the line “Advanced system settings”.
On the first tab, click “Edit”.
Save your changes and agree to reboot. Open the “HomeGroup” section in the control panel, as described above. At the bottom of the window there is a “Join” , which you should click.
Set the categories of files and devices that will be shared.
Enter the code you received earlier.
Click on the “Done” button.
Connection to Windows 10 homegroup was successful. The computer has been added to the local network and can be used to access “shared” files.
Opening access to documents
Loading …
Since at the time of connection or creation the user can only mark standard directories, it becomes necessary to add arbitrary folders to the local network. The action is quite simple:
- Right-click on the selected folder.
- In the context menu, hover over “Give access to”.
- Click on one of two options:
“Home group (view)” - other users will only be able to view documents located in the directory. - “Home group (view and change)” - full access to files with the ability to edit and delete them.
now appear in the shared list. To deny access, you need to repeat the steps described and select the “Make inaccessible” option.
Will be useful
You can view all folders that you can access in Explorer using the side menu. Just click on the “Network” and select one computer from the list - the system will show the public directories located in its memory.
Other problems
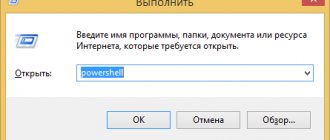
There may be other problems that prevent you from connecting to a Windows 10 homegroup. If you receive the error “Windows cannot set up a homegroup on this computer,” you can try resetting the function responsible for saving certificate store data. Open a Command Prompt or PowerShell console as an administrator and disable the Network Member Identity Manager service by running the following command:
net stop p2pimsvc /y
Now go to the location C:/Windows/ServiceProfiles/LocalService/AppData/Roaming/PeerNetworking in Explorer, delete the idstore.sst , and then restart your computer.
Previously disabled services will start on their own.
And one moment. If problems with the Home Group occur after upgrading to Windows 10 from earlier versions of the system, open the optionalfeatures command and activate the SMB 1.0 protocol, which is disabled in the “ten,” just in case; it is also associated with network discovery.
- 12shared
- 0Facebook
- 11Twitter
- 1VKontakte
- 0Odnoklassniki
Troubleshoot common problems
At the time of creation or after completing the connection process, users may experience problems. Possible reasons include:
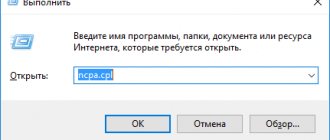
- Different times on computers. You should launch the Run , copy and paste the command “control /name Microsoft.DateAndTime” . If necessary, time synchronization is carried out with the server.
A user has created a homegroup on several computers at once. To delete, you need to go to the appropriate section of the control panel, then check the exit option. Critical services are disabled.
To check their functionality and enable them, you need to use the “services.msc” command in the “Run” application. Then check the status and startup type of services: After the group was created, the network type was changed. IPv6 was disabled in the connection. The materials presented in this article will help you understand the question of how to set up a homegroup in Windows 10 and connect to it. All computers on the network should be set to the same workgroup name, and the settings should be set to document sharing. Adding the second and all subsequent machines is done by entering the password that was generated on the first PC. It is important to consider that the required section may not appear in the control panel if operating system version 1803 or higher is installed.
Vitaly Solodky Sources used:
- https://public-pc.com/domashnyaya-lokalnaya-set-na-windows-10-kak-sozdat/
- https://windowsprofi.ru/win10/nastrojka-domashnej-seti-v-windows-10.html
- https://mobila.guru/faqsingle/nastraivaem-domashnjuju-gruppu-na-kompjutere-s-windows-10/
How to remove "Home Group"
You cannot delete the HomeGroup, but it will disappear on its own as soon as all devices leave it. Below are steps to help you leave the group.
- From the Start menu, open Control Panel.
Select View network status and tasks from the Network and Internet section.
In the “View active networks” section, click on the “Joined” line.
In the group properties that open, select “Leave HomeGroup.”
You will see the standard warning. Now you can still change your mind and not leave, or change your access settings. To leave the group, click "Leave HomeGroup".
Wait for the procedure to complete and click “Finish”.
After you repeat this procedure on all computers, you will see a window with a message about the absence of a “HomeGroup” and a proposal to create one.
Disabling a service
After deleting a Home Group, its services will still be active in the background, and the Home Group icon will be visible in the Navigation Bar. Therefore, we recommend turning them off.
- To do this, enter “Services” or “Services” in the Start menu search.
In the Services window that appears, select HomeGroup Provider and click on Stop Service.
Then you need to edit the service settings so that it does not start on its own when Windows starts. To do this, double-click on the name and the “Properties” window will open. In the “Startup type” column, select “Disabled”.
Next, click the “Apply” and “OK” button.
In the Services window, go to HomeGroup Listener.
Double click on it. In Properties, select the Disabled option. Click "Apply" and "OK".
Open File Explorer to make sure the Home Group icon has disappeared.
Removing an icon from Explorer
If you don’t want to disable the service, but you don’t want to see the “Home Group” icon in Explorer every time, you can simply delete it through the registry.
- To open the registry, type regedit in the search bar.
The window we need will open. You need to go to the section:
Now you need to get full access to this section, since even the Administrator does not have sufficient rights. Right-click on the “ShellFolder” folder and go to “Permissions” in the context menu.
Select the “Administrators” group and check the “Full Control” box. Confirm your actions by clicking "Apply" and "OK".
Let's go back to our ShellFolder folder. In the “Name” column, find the “Attributes” line and double-click on it.
In the window that appears, change the value to and click OK.
For the changes to take effect, restart your computer or log out.
Conclusion
As you can see, deleting “Home Group” is a fairly simple process that does not require much time. There are several ways to solve the problem: remove the icon, delete the “HomeGroup” itself, or disable the service to finally get rid of this function. With the help of our instructions, you will cope with this task in just a couple of minutes.
Describe what didn't work for you. Our specialists will try to answer as quickly as possible.