Landscape orientation is a type of formatting of an entire document or its individual pages, in which the sheets are arranged not vertically (portrait orientation), but horizontally (as in a classic sketchbook).
In this review, we will figure out how to make a landscape sheet in Word if you are creating a document of a combined type, and we will look at simple ways to turn one, several or all pages into landscape view.
Can you tell a cringe from a crash? Take this fun test and find out!
How to flip a landscape sheet in Word 2003
In Word 2003, landscape format for an entire file is set in 2 clicks
- In the top menu of the document through the “File” tab
- Then click “Page Options”
- You need to switch from portrait to landscape orientation and click “OK”
This will change the orientation of the entire document to landscape.
Super test on the topic “Money” and how can you be friends with it?
For all pages
There are many versions of Microsoft Word, I will show the process using the example of a 2016 program. The interface of your editor may be slightly different, but all the latest versions since 2007 are very similar to each other, so there should be no difficulties.
To change the appearance of sheets, create or open an existing text file and go to the “Layout” or “Page Layout” tab. Then we find the “Orientation” section, click on it and select the “Landscape” option from the drop-down list.
If you are using a 2003 program, then the menu in it is significantly different from the versions of 2007 and later. To change the sheet format, click on the word “File” in the top menu and select “Page Options” from the drop-down list.
A dialog box will open in front of you, with which you can make various settings for the appearance of the text file. We are now interested in the “Orientation” section, find it and switch to the desired format. You can also change margins and padding here. When you complete the settings, click on the “OK” button to confirm your actions.
We've covered a simple task, now let's move on to slightly more complex settings.
How to make landscape format in Word 2007 2010 2013 2014 2016 2022
Let's figure out how to change the orientation of one page, making it horizontal. For all versions of Word 2007, 2010, 2013, 2014, 2016, 2019, the principle of changing one page to landscape remains the same.
To change the page orientation to landscape, you need:
- In the top menu, go to the Layout tab.
- Next, follow the Orientation-Landscape path.
- Confirm your choice.
The second way to turn the page to landscape view:
- Go to File
- Find the Print tab, it contains Landscape Orientation.
There is no need to confirm the operation here. You can return to the document and continue working.
To return the pages to portrait orientation, just go back to File and switch or roll back using the arrow in the upper left corner of Word (this is relevant if changes/additions have not yet been made to the text).
Thus, you can get work with the numbering of sheets and other parameters automatically rebuilt to a different orientation. However, if the document contains graphs and multi-column tables, as well as blocks of a standard test, it is more convenient to change the orientation of the sheets with infographics. Therefore, it is necessary to format the pages selectively. In this case, the orientation of a sheet of paper in an MS Word document is set in other ways.
What instrument are you? Take the test and find out
Landscape and book pages: what are the features
When we open a text editor, by default we have in front of us a blank A4 sheet of portrait orientation, that is, it is located vertically. This option is most often used for reports, coursework and dissertations, and books.
But sometimes you need to rotate the sheet so that it is larger horizontally than vertically. This arrangement is often used for presentations, drawings, diagrams, and large tables.
More than 100 cool lessons, tests and exercises for brain development
Start developing
Now we will look at how to make all pages in a document landscape in order to beautifully arrange all objects. I will also tell you how to selectively change the orientation of sheets. This task occurs most often, for example, when we write regular text, but we need to add several pictures or tables that do not fit into standard boundaries.
How to make one page landscape in Word
When you need to get only one landscape sheet, use the following algorithm for settings:
- Open the Word document where changes are needed
- Select the sheet to which you will apply the transformation
- Select text, table, graph or all other objects on this worksheet
- In the Layout tab, next to the Page Setup option, find the arrow and click.
In this tab, change the settings and confirm the action to rotate the sheet horizontally by clicking on the “OK” button.
The page with the selected text will switch to landscape orientation. In addition to the described method, turning the sheet over in Word and making it landscape, there is another method to change the orientation of one or more pages.
Changing Page Options
Another way to make one sheet portrait and the other landscape in Word requires going to “Page Options”. The setup consists of the following steps:
- Select the text or area in the document for which you want to change the display and print format.
- Go to the "Fields" menu. To do this, on the “Layout” tab (“Page Layout”), select the appropriate command - or simply click the small arrow in the lower right corner of the “Page Settings” tab.
- Set the page orientation to Landscape.
- On the same tab, indicate that changing the format affects only the selected text.
The selected data will then appear on a page whose orientation will be different from the rest of the document. If the area does not fit on the flipped sheets, their number will increase.
Breaks
Competent design of scientific work and business documents is impossible without creating a break on the next page. This allows you to move text to a new page without repeatedly pressing Enter (which, in turn, leads to uncontrolled formatting of the document and creates printing problems due to oversight). Breaks create building blocks that remain separate regardless of editing.
Read more: Add a page break in Microsoft Word
Size
The standard sheet you work on is A4. However, you can select a different format by expanding the Size button. Most often, this parameter is used if you need to print an atypical document: a booklet, wall newspaper, health bulletin, letter, etc.
Read more: Changing the page format in Microsoft Word
Hyphenation
Most often, hyphenation is prohibited in business documents and scientific papers. However, they are widespread in journalism and when writing books to save space. It is known that justification causes the sentence to stretch out if the subsequent word is large and does not have enough space on the given line. Hyphenation allows you to avoid this trouble.
Read more: Arranging hyphens in MS Word
We are glad that we were able to help you solve the problem. In addition to this article, there are 12,719 more instructions on the site. Add the Lumpics.ru website to your bookmarks (CTRL+D) and we will definitely be useful to you. Thank the author and share the article on social networks.
Describe what didn't work for you. Our specialists will try to answer as quickly as possible.
How to change the default view to draft view in Word - Office
- 22.05.2020
- 2 minutes to read
- Applies to: Word for Office 365, Word 2022, Word 2016, Word 2013, Word 2010
In this article
Note
Office 365 ProPlus is being renamed Microsoft 365 Apps for enterprise . For more information about this change, see this blog post.
Introduction
This article describes how to change the default view to Draft view in Microsoft Office Word.
Additional Information
To change the default view to Drafts view when you open a Word 2007 document, follow these steps:
- Click the Microsoft Office Button and then click Word Options .
- Click Advanced .
- Under General , select the Allow document to be opened in Draft mode check .
- Click OK .
- On the View , click Draft in the Document Views .
To change the default view to Drafts view when you open a Word 2010 or later document, follow these steps:
- Click the File and then click Options .
- Click Advanced .
- Under General , select the Allow document to be opened in Draft mode check .
- Click OK .
- On the View , click Draft in the Document Views .
.
Set or change page margins in Word
- Go to Layout
>
Fields
. - Select an option from the gallery Margins
or select
Custom Margins
to create custom margins.
Note:
If your document contains multiple sections, the new field will only apply to the section you are in or the number of sections you have selected.
Set default fields
You can change the default settings that will be used for any new documents.
- Go to Layout
>
Fields
>
Custom fields
. - Set the fields.
- Select Default
.
- Confirm your choice.
Word automatically sets a one-inch margin around each page. With a few clicks you can select a different field or create your own. You can also set margins for fold-out pages, allow extra margin space for document anchors, and change how margins are measured.
- Go to Layout
>
Fields
. - To change margins, select any of the other options in the gallery Fields
. Each shows the size of the margin.
Note:
If your document contains multiple sections, the new field will only apply to the section you are in or the number of sections you have selected.
Set default fields
When you set a default field, it is used when creating new documents.
See also
Insert, delete, or change a section break
Add indents and spacing in Word
- Go to View
>
Print layout
.If you want to change only part of the document, select the text where you want to change the margins.
- Go to Layout
>
Fields
. - Select the required fields or select Custom fields
to specify your own field settings.
Set default fields
When you set a default field, it is used when creating new documents.
- Go to View
>
Print layout
. - Switch to Layout
>
Margins
, select
Margins
, and then select
Custom Margins
. - In the fields Above
,
Bottom
,
Left
, and
Right
, set the margins you want, and then select
Default
. - When prompted, select Yes
to change the default settings for the document layout.
See also
Insert, delete, or change a section break
Adjust indentation and spacing in Word
Use the Margins
to quickly change document margins.
- If you are not already in edit mode, select Edit document
>
Edit in Word for the web
. - Click Page Layout
>
Fields
.Margins gallery appears
.
Normal
margin , which is selected by default, sets the margin to one inch on each side of the page. - To select a different page field, select any of the other options in the gallery Fields
.
If none of the predefined fields meet your requirements, select Custom Margins
to create custom margins.
Note:
If your document contains multiple sections, the new field will only apply to the section you are in or the number of sections you have selected.
,
Columns
This is an option that allows you to split the selected text into 2, 3 or more columns. By expanding the button of the same name, you select either the proposed parameters or edit them by calling up the “Other Columns” dialog box.
Read more: Adding columns to a Microsoft Word text document
Bottom line
Very quick and easy, isn't it? This is where this short instruction “How to make a landscape sheet in Word ” comes to an end. Write in the comments how often you use this page position in Word.
Also ask questions if you have any problems related to the subject of the site. Don't hesitate - you will get answers to them.
And now I say goodbye to you. Thank you for reading the publication to the end. All the best to you and fewer problems with your computer!
Sincerely, blog author Lykov Fedor!
Adjusting position throughout the document
It is not difficult to guess that the least labor-intensive process would be to flip all the sheets in the document. To do this, you need to find the “Page Layout” area and select the desired format there from the drop-down menu, which contains 2 options - “Landscape” and “Portrait” layout. It is worth paying attention to the fact that once a provision is adopted, it will be applied to subsequent pages of the document, which indicates their strong relationship with each other.
Landscape view in Word 2003
If you are using Word 2003, then select the menu item File -> Page Setup .
Then in the Page Setup
select the
Fields
.
Under the heading Orientation
Click
Landscape
. A blue outline should appear inside the edge of the window with a picture of a leaf in a horizontal position.
If you want all sheets in your document to be in landscape orientation, then simply click the OK button at the bottom of the dialog box. If you want to apply changes only from the current sheet and to all the following, then select the option to the end of the document
in the drop-down list called
Apply
in the
Sample
, and then click OK.
In addition, you can make any pages in the middle of the document landscape. Simply select the pages you need before opening the Page Setup
"
And then, following the instructions described above, select the option for the selected text
in the drop-down list called
Apply
.
Changing the orientation of a new section
Another way to insert a landscape sheet into Word 2003, create new sections and change them. Here the instructions are almost the same, but there is a fundamental difference. First you need to create partitions.
- Place the cursor where you want the new section to begin.
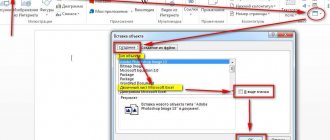
- Click the "Insert" button.
- Select "Break".
- In the window that appears, select “From the next page.”
After this, follow the instructions from the previous subheading. Now you can pre-select the area where you want to change the orientation, and when you print the document, the formatting will never change.
Changing the orientation of the entire document
If you already know how to make a landscape sheet of one page in Word 2003, then you can do this with the entire document without any problems. The fact is that these methods are quite similar. The differences lie in the choice of one option. To avoid any difficulties while completing the task, please use the detailed instructions.
- Open a document in which you want to turn all the pages.
- Click the "File" button, which, as you already know, is located in the upper left corner of the program.
- Click on the “Page Options” item in the drop-down menu.
- In the window that appears, go to the “Fields” tab.
- In the Orientation area, change it to Landscape.
- From the drop-down list in the “Sample” area, select “To the entire document.”
- Click OK.
Once you finish doing all these steps, all the sheets in the document will be flipped, that is, they will have a landscape orientation. As you can see, all points are almost the same. The only differences are that you do not need to first select the text you want to flip, and that you need to select “To entire document” from the “Apply” list. So you have learned the second method of how to make a landscape sheet in Word 2003. Meanwhile, we are moving on to the third method.
SETTING THE WORD DOCUMENT VIEW
F
Executing a task
- Click on the Maximize button in the window title area if, after calling the program, its window does not occupy the entire screen.
Also make the document window full screen .
— Make sure your document is set to Page Layout.
— If this is not the case, then you can click on the left button of Document Presentation Modes: Page Layout, Reading Mode, Web Document, Structure, Draft (from left to right).
Change the orientation of one sheet
The first way to make a landscape sheet in Word 2003 will concern the case when you need to change only one page, and not all. The fact is that these, at first glance, identical actions are performed differently. So, you have opened a document in which you need to change the orientation of one sheet. What needs to be done for this?
- Hold down the left mouse button and select a block of text on the page you want to change.
- Click on the “File” button located in the upper left part of the program window.
- In the drop-down menu, move the cursor to the “Page Options” item and press the left mouse button.
- In the window that appears, go to the “Fields” tab.
- In the “Orientation” area, click on the “Landscape” item.
- In the “Sample” area, from the “Apply” drop-down list, select “To selected text.”
- Click the “OK” button.
After doing this, you will notice that all the text you selected has been moved to the landscape page. Now you know how to make a landscape sheet in Word 2003. But what if you need to change the orientation of the entire document? Of course, turning over each sheet like this will waste a lot of time. There is a way that will allow you to do this in a few mouse clicks. Now we will analyze it.
Landscape sheet on a new Office 2016 document
First of all, we need to create a new Word text file. I will show you with my example. It's worth mentioning that I use Windows 10 and 2016 version of Office.
You can create it in two ways:
- Using the “create” context menu.
- Using Microsoft Word.
You can also create a crossword puzzle in Word.