When you may need to adjust the cooler speed
The rotation speed is adjusted in the BIOS, taking into account the settings and temperature on the sensors. In most cases this is enough, but sometimes the smart adjustment system fails. Imbalance occurs under the following conditions:
- overclocking the processor/video card, increasing the voltage and frequency of the main buses;
- replacing the standard system cooler with a more powerful one;
- non-standard connection of fans, after which they are not displayed in the BIOS;
- aging cooling system with noise at high speeds;
- contamination of the cooler and radiator with dust.
If the noise and increase in cooler speed are caused by overheating, you should not reduce the speed manually. It is best to start by cleaning the fans from dust; for the processor, remove them completely and replace the thermal paste on the substrate. After several years of use, this procedure will help reduce the temperature by 10–20°C.
A standard case fan is limited to around 2500–3000 revolutions per minute (RPM). In practice, the device rarely operates at full power, producing about a thousand RPM. There is no overheating, but the cooler still continues to idle several thousand revolutions? You will have to correct the settings manually.
The heating limit for most PC elements is about 80°C. Ideally, you need to keep the temperature at 30–40°C: cooler hardware is only interesting to enthusiastic overclockers; this is difficult to achieve with air cooling. You can check information on temperature sensors and fan speeds in the AIDA64 or CPU-Z/GPU-Z information applications.
Adjusting cooler speed using additional devices
Special programs and BIOS settings are not the only ways available to the user to reduce the speed of coolers on laptops and PCs.
Many expensive cooling systems have manual controls that allow you to reduce noise or increase airflow to the processor radiator by pressing a button or turning a wheel on the controller.
Such systems operate much quieter than budget analogues that come with a CPU and demonstrate much greater efficiency.
As an option, it is also worth considering the purchase of a mechanical regulator “Reobas”
.
This device installs in the drive bay (who needs DVD/CDs in 2022), connects to the FAN connector on the motherboard and allows you to adjust the speed of the fan blades on the CPU and case.
Usually the reobass has a screen that clearly displays the temperatures and current speed of the cooling systems - we tweaked the settings, and there is no longer any annoying noise.
Why is it necessary to change the cooler speed?
Fan rotation speed is not a random indicator. After all, it is installed by the motherboard, which receives information from the BIOS. Accordingly, certain settings are set in the BIOS. And they regulate the speed, taking as a basis the temperature indicators of a particular unit.
It should be. However, in reality it happens differently. Intelligent adjustment, unfortunately, is ineffective. And it often happens that the blades rotate at a speed that is close to maximum.
This encourages users to take action to reduce the CPU cooler speed themselves. They do this in the BIOS or using third-party utilities. There is another option, which involves tricky manipulations with the fan power supply. Not everyone likes this option. Practice shows that only the most advanced users resort to it.
Please note that all methods can not only reduce, but also increase the speed of the cooler if it seems that it is not capable of effective cooling.
Let's mention one more reason that may make it necessary to overclock the cooler. This is necessary if you forcibly increase the processor clock frequency.
IMPORTANT! There are many gamers who consider it necessary to overclock the chipset. This way they get more productivity. As a result, TDP, that is, the rate of heat release, increases. This means that if you overclock the processor, you must also overclock the cooler.
It is useful to regulate the cooler speed. After all, this procedure can lead to a decrease in noise during operation or to improved cooling quality.
We have already said that the rotation speed is set by the motherboard along with the BIOS. If so, then it becomes obvious that you need to change the BIOS settings. And then it will be possible to control the cooler.
speed controller
into the open circuit +12V, as shown in the figure. Attention! If your fan has 4 terminals, and their colors are: black, yellow, green and blue (for these, the plus power is supplied via the yellow wire), then the regulator is connected to the gap in the yellow wire.
A ready-made, assembled fan speed controller is installed in any convenient place on the system unit, for example, in the front of a plug in a five-inch bay, or in the back of a plug for expansion cards. To do this, drill a hole of the required diameter for the variable resistor you are using, then it is inserted into it and tightened with the special nut that comes with it. You can put a suitable handle on the axis of the variable resistor, for example from old Soviet equipment.
It is worth noting that if the transistor in your regulator gets very hot (for example, if the power consumption of a cooler fan is high or if several fans are connected through it at once), then it should be installed on a small radiator. The radiator can be a piece of aluminum or copper plate 2 - 3 mm thick, 3 cm long and 2 cm wide. But as practice has shown, if a regular computer fan with a current consumption of 0.1 - 0.2 A is connected to the regulator, then there is no need for a radiator, since The transistor heats up very little.
Increasing/decreasing the rotation speed of coolers
Basics, important note
In general, on a modern computer (laptop), the rotation speed of the coolers is set by the motherboard, based on data from sensors (i.e., the higher it is, the faster the coolers begin to rotate ☝) and loading data.
Parameters from which the mat is based. The board can usually be set in the BIOS.
How is the rotation speed of a cooler measured?
It is measured in revolutions per minute. This indicator is designated as rpm (by the way, it measures all mechanical devices, for example, the same hard drives).
As for the cooler, the optimal rotation speed is usually about 1000-3000 rpm. But this is a very average value, and it is impossible to say exactly which one should be set. This parameter greatly depends on the type of cooler you have, what it is used for, the room temperature, the type of radiator, etc.
Ways to regulate the rotation speed:
- in BIOS settings. This method is not always justified, because... You need to go into the BIOS to change certain parameters (that is, waste time, and changing values often needs to be done quickly). In addition, automatic adjustment technologies (such as Q-Fan, CPU Fan Control, Fan Monitor, Fan Optimize, etc.) do not always work optimally (spinning the cooler to maximum where it is unnecessary).
- physically turn off the noisy cooler or install a rheobass (a special device that allows you to regulate the rotation of the cooler). This option is also not always justified: turning the cooler off and on (when needed) is not the best idea. The same reobas is an extra expense, and you can’t install it on every computer;
- using special utilities. One such very famous utility is SpeedFan. In my opinion, one of the simplest and fastest options is to adjust the rotation speed of the coolers installed on the computer. Not all coolers are displayed in the BIOS, for example, if it is not connected to the motherboard. This is what I will focus on in this article...
How to reduce or increase the fan speed in a SpeedFan computer
You can download SpeedFan from this link. Of course, the program is completely free, although it does not support the Russian language, but it doesn’t matter because, in general, everything is clear
The installation is extremely simple and I will not dwell on it, and therefore I will go straight to use.
When you first start it, a window like this may appear:
Feel free to click the “Do not show again” checkbox and click on the “Close” button.
Next we will see the following program window:
Let's see what's what, both in the newer version of the SpeedFan program (it's in the screenshot above) and the older one (in the screenshot below). They differ slightly in the value labels, but the principle of operation is similar:
The “Cpu Usage” field and the indicators next to it show the current load on the processor and its cores. The “Minimize” and “Configure” buttons allow you to minimize the program or open its settings.
The “Automatic fan speed” checkbox enables automatic rotation adjustment. You can use it, but in general there is no point as such, otherwise why did you install this program at all if you were happy with everything as it is?
IMPORTANT! The list of indicators does not necessarily refer to a particular cooler, as it is signed in the program! That is, if it is CPU or Fan1, it does not mean that this is the speed of the processor cooler, since it all depends on which socket the fan is connected to by the assembler (or you) directly on the motherboard and how correctly the program reads the data about the fan. this connector! Ideally, determine the speed by changing the value and looking into the open case.
Next is a set of current indicators of rotation speeds of certain fans (on the left) and component temperatures (on the right).
Why are fans noisy and what are the ways to fix it?
With the exception of special fanless modifications, each computer has two or more coolers installed: in the power supply, on the processor, video card, in the case, and others. And everyone makes noise in their own way, and that's bad news. Many people are simply accustomed to the noise of their system unit and believe that this is how it should be. Maybe it should, but it doesn't have to! In 99% of cases, computer noise can be reduced by 10%-90%, which is good news.
As you already understand, quietness is achieved by reducing the noise from coolers. This is possible by using coolers that are quieter by nature, or by reducing the speed of existing ones. Naturally, you can reduce the speed to values that do not threaten overheating of the computer! This article will discuss exactly this method. Programs to reduce crackling noise from a hard drive will help reduce noise even further.
So, to reduce the cooler rotation speed, you can use one of the options:
- Program for controlling the rotation speed of coolers
- “Intelligent” speed control system built into the BIOS
- Utilities from the manufacturer of the motherboard, laptop or video card
- Use a special device - reobass
- Artificially lower the fan supply voltage
Those who have normal control from the BIOS may not read further. But often the BIOS only superficially regulates the speed, without lowering it to silent, and at the same time still acceptable, values. Utilities from the manufacturer are sometimes the only way to influence the fans because third-party programs often do not work on unusual motherboards and laptops. Let's look at the most optimal - the first method.
How to reduce cooler speed
One way to make a computer less noisy is to reduce the speed of the fans (coolers) located inside the system unit.
This problem can be solved by using special programs, installing devices in the computer that reduce cooler speed, or a combination of the two mentioned methods.
At the same time, the issue of reducing noise must be approached wisely, since a decrease in the intensity of fan rotation causes an increase in the temperature of the computer’s internal devices. This may negatively affect their performance and service life. It is important to find a balance between a comfortable noise level and the permissible operating temperature of the computer.
Fan control methods
The latest models of personal computers have three built-in coolers - for the processor, video card and hard drive. Older laptops and PCs are forced to work with one fan. You can increase the strength of the cooling device by increasing the strength of the cooler.
There are only two ways to solve the problem of fan overheating:
- BIOS Settings
- Cooler management programs
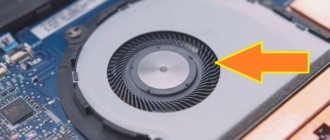
Before you start using one of the methods, you must first prepare your computer. To do this, open the lid of the laptop or system unit and carefully clean the fan between the blades, then all the elements of the motherboard. Make sure the device is not clogged with dust.
Mechanical contamination of the computer impairs the heat transfer process, which automatically increases the heating temperature of the device. If you can’t clean your laptop or PC from dust yourself, contact a service center.
Advice: clean your computer from dust at least once every six months.
Preparation
If the computer used to work quietly and only recently began to create a lot of noise, it is likely that the problem can be solved by simply cleaning the system unit from dust. You may also need to lubricate the coolers. Read about it
.
In some cases, it is possible to improve the cooling of the processor and significantly reduce the noise of its fan by replacing the thermal paste.
If the above actions do not solve the problem, you can reduce the rotation intensity of one, the “noisiest”, or several fans in the system unit.
But before that you need to:
1.
Install programs on your computer that allow you to control the temperature of its main “heating” devices, namely:
• Speed Fan
– a program that allows you to control the temperature of all computer devices in real time;
• Prime 95
– a program that creates a high load on the central processor. Allows you to check the stability of the processor and the efficiency of its cooling system in extreme conditions. Read more about checking the processor using this program here.
• FurMark
– a program for testing the computer graphics system. It creates an increased load on the video card, while controlling its temperature and stability.
2.
Using these programs, check the temperature conditions of the processor, video card, hard drive and chipset of the computer motherboard.
In most cases, at maximum load, the temperature of the hard drive should not exceed 45 degrees C, the processor and motherboard chipset - 60 degrees C, the video card - 85 degrees C.
You can “load” a hard drive without special programs, for example, by starting the process of archiving or copying a large file located on it (movie, disk image, etc.).
If the temperature of a device is close to the above values, you should not reduce the speed of the cooler cooling it.
In the case where the maximum performance is still far away, the intensity of fan rotation can be reduced using the methods described below.
IMPORTANT. After reducing the speed, do not forget to check the temperature of the devices cooled by the coolers. Do not allow them to overheat. Remember that operating your computer for long periods of time in unfavorable temperature conditions will reduce its longevity.
Setting via BIOS
The efficiency of the cooling system can be increased using settings in the BIOS. Most laptops are equipped with a function that controls the cooling process. We increase the cooler power as follows:
- Enter the BIOS by pressing the “Delete” key before booting
- Find the "Advanced" tab
- Setting up "Smart Fan Configuration"
- Opposite the CPU Smart Fan item, set the value to “Auto”
- Calibrate the cooler in the “Smart Fan Calibration” column by pressing “Enter”
- Open "Control Mode"
- Select one of three functions: “Quiet” (maintains optimal temperature), “Performance” (for heavy CPU loads), “Manual” (user mode)
- Click “Exit” and save the changes.
Finally, restart your computer and test it under load.
How to reduce CPU cooler speed through BIOS
The most common way. With its help, it is most often possible to solve the noise problem or simply reduce the number of revolutions.
p, blockquote 18,0,0,0,0 –>
The procedure is as follows:
p, blockquote 19,0,0,0,0 –>
- First, open the BIOS settings (before starting the computer, press the key indicated on the monitor screen at login).
- Click on the "CPU Fan Profile" option under the "Hardware Monitor" section.
- A blue window will appear in the middle of the screen with three items “Standard” (standard cooling mode), “Silent” (quiet with the minimum possible number of revolutions) and “Turbo” (turbo - improved cooling, but with the maximum allowable power).
- To reduce the number of revolutions, select the “Silent” item and press save – “Esc” key.
- Then “F10” and at the end “Enter”.
Cooler management programs
Users who find the BIOS inconvenient or don't have the time to understand it have the option of using an alternative method. There are special programs for controlling fans. We will present four of the best software: SpeedFan, MSI Afterburner, AMD OverDrive, Riva Tuner.
On a laptop
In most cases, laptop fan noise is caused by blocked or dirty vents. Reducing the speed of coolers can lead to overheating and rapid failure of the device.
If the noise is caused by incorrect settings, then the issue is resolved in several steps.
Via BIOS
- Go to the BIOS menu by pressing the Del key in the first phase of booting the computer (on some devices - F9 or F12). The login method depends on the BIOS type - AWARD or AMI, as well as the motherboard manufacturer.
Go to BIOS settings
- In the Power section, select Hardware Monitor, Temperature or any similar item.
Go to the Power tab
- Select the desired cooler speed in the settings.
Select the desired cooler rotation speed
- Return to the main menu, select Save & Exit. The computer will restart automatically.
Save the changes, after which the computer will automatically restart
The instructions deliberately indicated different BIOS versions - most versions from different hardware manufacturers will differ at least slightly from each other. If a line with the desired name is not found, look for one that is similar in functionality or meaning.
How to operate in BIOS
The first step is to enter the BIOS. In many cases, on a laptop, when loading, you need to press the Del button or one of the F buttons. Often, when loading, a black screen flashes with white writing on it. The required button can be found in the corner.
Then we enter the Advanced item. We look carefully at what is written there. Keep in mind that different BIOS versions may have different mode names. That's why we present the solutions that are most common.
We also emphasize that the BIOS has several modes designed to control speed. Which is better? It's up to you to choose. Of course, taking into account personal needs:
– CHA Fan Duty Cycle – cooler speed is adjusted as a percentage (from 60 to 100%).
– Chassis Fan Ratio – a mode that provides the ability to configure the operation of an additional cooler, but under one condition: the internal temperature of the system unit should not exceed the specified one. With Auto, speed control is carried out automatically. 60-90% - manual adjustment, taking into account the maximum possible.
– Chassis Q/ System FAN (Speed) Control – a utility that “intelligently” selects the speed of the blades. It has two states: disabled – Disabled and enabled – Enabled. When the utility is disabled, the rotation is maximum.
– CpuFan 2 Tmax sets the chipset temperature. As soon as it is dialed, the cooler accelerates to the maximum level. Adjustment - from 55 to 70 degrees.
– CpuFan Start Temperature sets the temperature minimum, and then the blades begin to rotate at low speed.
– CpuFan Duty Cucle – direct adjustment. Thanks to it, the rotation speed increases or decreases. The setting is made as a percentage of the maximum (60-100%). It also has another name – ManualFanSpeed.
– CpuFan Control – intelligent control. It has the ability to reduce or increase the speed of the cooler on the processor depending on how hot the processor is. There are no settings. The function is disabled and enabled.
– CpuFan Ratio – setting the number of rotations of the blades before the chipset heats up. Heated up to the specified maximum temperature. Percentage setting – from 20 to 90%. You can reduce the speed of the cooler when it is too loud, but at the same time the chipset does not heat up.
– Smart FAN Idle Temp – you can set the lowest speed.
– Smart Fan Target is similar to CpuFan Control. It can be found in motherboards from the MSI brand. It is possible to additionally set a parameter, starting from what processor temperature, the BIOS itself adjusts the speed.
There are a lot of settings for fan operation in the BIOS. However, using them is not very useful. From their own experience, many know that they often work incorrectly. Also, to change the settings, you need to enter the BIOS every time and change something. Then it launches the device and checks how effective the changes are.
But there is a simpler option: install special software and, without knowing any problems, adjust the speed in order to immediately see the result.
It is sometimes impractical to make settings through the BIOS because the fan is not always connected to the motherboard. There are some assemblies that cannot be called successful, which are made in such a way that there is no connection between the board and the cooler. That is, it simply won’t be possible to adjust its operation in the BIOS. Special programs will be required. The most popular among them is SpeedFan.
IMPORTANT! Please note that in order to configure a computer cooler to operate accurately using third-party utilities, you must disable automatic adjustment in the BIOS. Otherwise, it will interfere with the operation of special software.
How to increase or decrease CPU cooler speed through BIOS
If you don’t want to install special software on your computer or it doesn’t work correctly for some reason, it’s okay - the device itself, namely its BIOS, contains all the necessary functions for controlling the speed of the processor fan. You just need to do a chain of simple manipulations :
- Restart the computer and during the restart process, hold down the BIOS key (by standard this is Del, but some manufacturers may use other options).
If you have any questions about how to enter the BIOS, read our detailed article “here”
Enabled
(the system will automatically reduce or increase the rotation speed of the processor cooler, trying to keep the temperature and noise level within normal limits)
Disabled
(manual control, the user himself sets the value expressed as a percentage of the maximum fan speed).
SpeedFan
The utility, which has earned a good reputation among PC users, helps to overclock the cooler and test the processor and hard drive under load. The program is free and has a simple intuitive interface. Checking the fan speed at high temperatures is as follows:
- Download and open SpeedFan
- Pay attention to the cooler speed and the temperature of the main components in the “Readings” tab
- Go to the “Configure” section
- In “Temperatures” select the desired component
- The value “Desired” and “Warning” is displayed at the bottom
- Set the temperature within 40-44 degrees
- Click "OK".
In addition, if desired, go to the “Speeds” parameter and change the speed of the cooler blades. There are upper and lower limits to indicate speed.
Launch and appearance of the program
Download and install the application from the official website.
When you first start it, a regular window will appear offering help on the program’s functions. You can check the box so that it does not appear again and close it. Next, SpeedFan reads the parameters of the microcircuits on the motherboard and the values of the sensors. A sign of successful completion will be a list with the current values of fan speeds and component temperatures. If the fans are not detected, then the program cannot help you. Immediately go to “Configure -> Options” and change the language to “Russian”.
As you can see, the processor load and information from voltage sensors are also shown here.
Block “1” contains a list of detected cooler rotation speed sensors with the names Fan1 , Fan2 ..., and their number may be greater than it actually is (as in the picture). Pay attention to the values, for example, Fan2 and the second Fan1 have real indicators of 2837 and 3358 RPM (revolutions per minute), and the rest are zero or with garbage (in the picture 12 RPM is garbage). We'll remove the extra ones later.
Block “2” shows detected temperature sensors. GPU is the graphics chipset, HD0 is the hard drive, CPU is the central processor (instead of the CPU in the Temp3 picture), and the rest is garbage (cannot be 17 or 127 degrees). This is the drawback of the program, that you need to guess where everything is (but then we ourselves will rename the sensors as needed). True, you can download well-known configurations on the site, but the procedure is not simple and is complicated by the English language.
If it is not clear which parameter is responsible for what, then you can look at the values in some other program for determining the parameters of the computer and sensors, for example AIDA64 and compare with those determined by the SpeedFan program in order to know exactly where what speed and temperature readings are (in the video under the article I'll show you everything).
And in block “3” we have speed adjustments Speed01 , Speed02 ..., with which you can set the rotation speed as a percentage (can be shown as Pwm1, Pwm2..., see the video for more details). For now, we need to determine which Speed01-06 affects which FanX. To do this, change the values of each from 100% to 80-50% and see if the speed of any Fan has changed. We remember which Speed influenced which Fan.
I repeat that not all fans will be regulated, but only those that the motherboard can control from the BIOS.
Setting up SpeedFan
Now we get to the settings. Click the “Configuration” button and first of all, let’s call all the sensors with clear names. Using my example, I will programmatically control the processor cooler.
On the “Temperatures” tab, we find the processor temperature sensor defined in the previous step (I have Temp3) and click on it first once, and then a second later again - now you can enter any name, for example “CPU Temp”. In the settings below, enter the desired temperature that the program will maintain with the minimum possible cooler rotation speed, and the alarm temperature at which the maximum speed is activated.
I set it to 55 and 65 degrees respectively, but this is different for everyone, experiment. At a very low set temperature, the fans will always spin at maximum speed.
Next, expand the branch and uncheck all the boxes, except for the Speed0X one, which regulates the FanX of the processor (we have already defined this earlier). In my example it is Speed04. And we also uncheck all other temperatures that we do not want to see in the main program window.
On the fans tab, we simply find the fans we need, name them as we want, and turn off the unnecessary ones.
Let's go further to the "Speeds" tab. We go to the Speed0X that is responsible for the desired cooler, rename it (for example, CPU Speed) and set the parameters:
- Minimum – the minimum percentage of maximum speed that the program can set
- Maximum – respectively, the maximum percentage.
For me the minimum is 55%, and the maximum is 80%. It’s okay that the program will not be able to set the value to 100%, because on the “Temperature” tab, we set an alarm threshold value at which the speed will be forced to 100%. Also, for automatic adjustment, do not forget to check the “Auto change” box.
In principle, that's all. Now go to the main SpeedFan window and check the box “Auto fan speed” and enjoy the automatic adjustment of the rotation speed