With the advent of the computer audio system, the adaptation of audio peripheral devices previously used in players, tape recorders - speakers, headphones, microphones and other equipment for high-quality sound reproduction - immediately began. At the initial stage of technology development, audio adapters themselves were primitive external digital-to-analog converters, often structurally combined with sound-generating devices.
Subsequently, audio cards were mounted directly into the system unit of a computer (today a laptop) or connected to the motherboard using a standard connector. The external interface of such adapters became metal strips with 3.5 mm sockets, which we usually see on the back wall of the computer system unit. Users who do not know how to turn on headphones on a computer running Windows 7 will find the information we offer useful.
Connecting and setting up headphones is a single, relatively simple procedure.
In order to listen to high-quality sound, all such settings must be made very correctly. Often, poor sound quality in Windows is caused by incorrect settings.
What to do if there is no signal in the microphone?
If you connect your headphones to your laptop or computer, play content with sound, but there is no sound, then you need to check that the connection is correct. No sound does not mean the device is not working. It is quite possible that it is connected to the wrong connector. A black or green jack is allocated for headphones, and a red jack for a microphone. Try connecting the headphones to the correct connector and restarting the computer - everything should work.
If the device does not work even after this, then there is some possibility that it is faulty. Setting them up in this case is useless. However, before taking the headphones to the workshop or running to buy new ones, it makes sense to do all the diagnostic procedures and apply all the settings described below in the text.
Some types of devices, for example, studio-type electrodynamic headphones, are connected through an intermediate signal amplifier with a corrector. This also needs to be kept in mind. Check your device to see if it belongs to this class - maybe you own studio equipment and don’t even know it.
Connecting wired headphones
The first problem may arise already at the stage of connecting the headphone plug to the socket. Let's divide the available plugs into:
- Standard 3.5" three-pin - found on most headphones;
- Combined 3.5” four-pin – used on headphones with a microphone;
- The rare 6.5” plug looks the same, but is several times larger;
- The small three-pin 2.5” plug used to be on some mobile phone headsets.
On computers and laptops there are no connectors for 6.5" and 2.5" headphones, but they can be connected just like 3.5" headphones through special adapters. But there is always a 3.5" jack in front:
and behind the system unit:
According to the standard, it is green or with a “headphones” icon. You can insert headphones or a headset with a microphone into this jack. Sometimes, the front panel is not connected to the motherboard, and the headphones do not work when connected to the front panel, but work if they are inserted behind the system unit. In this case, you need to open the computer lid and figure out the wires and where they connect to the motherboard, according to the markings.
On laptops there are two separate or one combined connector:
If there are two connectors, then one is for headphones/speakers, and the second is for a microphone. If there is only one connector, then you can insert both regular headphones (three-pin plug) and headphones with a microphone (headset) with a four-pin plug into it.
Simply put, headphones with a microphone with a 4-pin plug can be inserted into any jack, but if it is not designed for a microphone, then it simply will not work, but there will be sound in the headphones. The three-pin plug fits into both a regular and a combination socket; no adapters are required.
Practical adjustment
To properly connect and configure headphones in Windows, you need to perform the following sequence of operations:
- Connect the device to the computer as described above.
- Go to the Start menu -> Control Panel.
- Enable large icon display mode.
- Select the “Sound” task group and in the window that opens, go to the “Playback” tab:
Next to the device name there should be a picture with a green check mark, as in the picture above.
How to connect headphones to a Windows 7 PC
So, first of all, our headphones must be physically connected. That is, if it is a cable, insert it into the system unit. If it's Bluetooth, establish a connection and if it's Wi-Fi, you need to establish a connection too.
Moreover, it is important to understand that there are different connectors for headphones and a microphone (if it is connected via a 3.5 mm jack). Each of them usually has small markings on them, so pay attention to them.
Expert opinion
Daria Stupnikova
WEB programming and computer systems specialist. Editor of PHP/HTML/CSS site os-helper.ru .
Ask Daria
If the sockets are mixed up, nothing bad will happen except that the headphones or microphone will not work.
Next we do this:
- Open the Start menu and select Control Panel.
- Next, switch to equipment and sound by selecting the desired item in the menu.
- In the “Playback” tab, select our headphones and right-click on them. We need to select the device as the default playback device. To do this, click the marked item in the context menu.
Wireless option
Wireless headphones on Windows may require driver installation. If Windows does not see them and the device does not work, be sure to look in the “Device Manager”. Whether the hardware requires drivers or not can be found in the instructions supplied with it. Branded equipment is sold along with disks containing all the necessary software. After installing the drivers, the sequence of our actions will look like this:
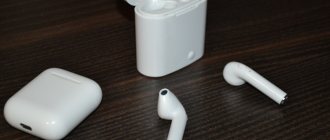
- Connect the device to the USB port.
- An icon for the newly detected wireless equipment should appear in the Windows tray. This means that the device has correctly connected to the computer and is working.
- We right-click on the tray icon - this leads to the appearance of a context menu containing the “Add device” item. Select this item.
- After that, press the power button on the headphones and hold it down for a few seconds. In the meantime, the wireless headset will be searched.
- Once the headset is detected by Windows, you will be prompted to enter a password. To finally connect the equipment to the Bluetooth port, enter the password specified in the instructions.
That's it, now Windows sees our “ears” and they work normally. All that remains is to check the playback quality and, if necessary, fine-tune. Setting up wireless “ears” in Windows is done in the same “Playback” window.
Possible problems
Why might headphones not work? There are several reasons and you will find each of them in the list below:
- Damaged cable. The headphone cord may be damaged. For example, this is an internal break that is invisible to the eye. There can also be, on the contrary, a short circuit. In both cases, it is no longer possible to do anything. These headphones need to be sent for service.
- Damaged plug. Headphones are connected via a special 3.5 connector, however, it can also be USB. In both cases, they can be damaged. And not only headphone plugs, but also computer connectors.
- Incorrect device selected. If our device is not selected as the default in the control panel, this needs to be done. How exactly was described in the first part of this instruction.
- Front or rear panel disabled in the manager. As we have already said, software for them is also supplied along with the motherboard or sound card. It is there that you can make many settings, including activating and deactivating the front and rear panel connectors.
What types of connectors are there and what are their markings?
In our modern times, headphones are used both wired and wireless. The methods of connecting both the first and the latter are inherently clear from the names.
Wireless are connected via air-bluetooth data channels. Here you only need appropriate devices and, in some cases, additional programs.
In a situation with wired headphones, you need the sound units themselves and a computer. The computer must have connectors for connecting headphones. Sound from these sources must be supplied or received from the sound card. In most cases, the sound card is integrated into the motherboard. In those cases where this does not happen, additional connections to the drives are needed. But this is now very, very rare.
On the panel of the system unit, as a rule, there are three connectors in a standard set: a linear output, the same input for digital devices that must operate in the mode of receiving and outputting sound - in the mode of a device with a microphone. In all options, you need to proceed from the orientation of the gadget. Most often, they are connected via a connector that is also suitable for units with a microphone.
Setting up headphones on a computer
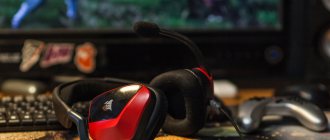
Most often, headphones with a microphone are used for communicating on Skype or in online games. Let's see how to set up headphones with a microphone on your computer.
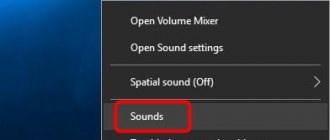
First, connect the headphones and the computer (headphones in the green connector, microphone in the red). Next, by right-clicking on the speaker in the lower right corner of the screen, open the menu and select “Playback devices.”
Here we will answer the question of how to set up sound on a computer through headphones. In the “Sound” window, select “Speakers” and click the “Configure” button. In the next window, select “Stereo” and check how the headphones sound by clicking on the picture of the left or right speakers. If everything is in order, click “Next”. On the next tab, don’t change anything, click “Next” and “Finish”. In the same “Sound” window, check the setting by right-clicking on the “Speakers” icon and selecting “Check”. Let's listen to the sound. That's it, setting up headphones on your computer is complete.
Let's look at how to adjust the headphone volume on a computer. To do this, click on the speaker icon at the bottom right of the screen and move the slider that appears up, increasing the volume, or down, decreasing it. This is the most convenient way to adjust the sound in headphones on a computer.
Let's see how to set up a microphone in headphones on a computer. Right-click on the speaker icon and select “Recording Devices”. A window with a microphone will open. Right-click on it and select “Properties”. Change the settings on the “Levels” tab: use the slider to add volume to the microphone and set the gain level. Click “Apply”. On the “Enhancement” tab, check the boxes for “Noise reduction” and “Echo suppression”. Click OK. Now you know how to set up a headset on a Windows 7 computer.
The normal microphone gain level is no more than 20 dB. Exceeding this value may cause unpleasant noise and background noise.
Connection problems and solutions
Common reasons why sound does not appear in headphones:
- outdated, broken or missing drivers;
- mixed up connectors;
- equipment malfunction.
Problems with the sound card driver are indicated by any extraneous icons next to its model name in the “Device Manager” (except for the downward arrow). To fix this, you need to right-click the component’s context menu and select “Update drivers.” You can first download the necessary software from the laptop manufacturer’s portal and run the installation as an administrator. The changes will take effect after rebooting the OS.
If there is no sound, you need to check that the plugs are connected correctly. The nests are located nearby, so it is easy to confuse them in a hurry.
If the headset is damaged (damaged wires, cracks after falls, broken contacts) or adapters, check by connecting the device to another computer or gadget. If, even though the software is in full working order, sound does not appear from both the headphones and the built-in speakers, it is worth checking the condition of the sound card. It is better to entrust diagnostics, repair and replacement of parts to a specialist.
How to set up a headset in Windows 7
Setting up sound in Windows 7 is no different from newer versions of the operating system.
If the sound does not reach the headphones on its own, you need to open “playback devices” through a special icon in the tray. If the required headset is among the available devices, switch to it and click on “use as default”.
If the situation has not changed, you will need to update the software. The best way to do this is through the sound card manufacturer's website. If it is not in the PC, that is, the headphone output is installed in the motherboard, then the software needs to be updated for the motherboard. The driver most often used is from Realtek. You can go to the manufacturer’s website and download the latest software, taking into account the version and bit depth of Windows.
Realtek website
Why doesn't the PC see wireless headphones?
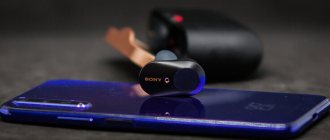
Despite the fact that the sound quality of wired headphones is still in most cases better than that of Bluetooth models, some users stop using the latter. As a rule, the connection does not cause any particular difficulties, but if synchronization fails, then you should know how to deal with it.
Enabling services and adjusting sound does not always solve the problem. Very often, the computer does not see the headphones at all, an error appears when connecting, or Windows 7 simply cannot install drivers for the connected device and, accordingly, the headphones do not work. The system does not see them as a source for audio output. I wrote a separate article on this problem: Bluetooth headphones do not reproduce sound from a laptop. Do not appear on Windows playback devices.
This means that the problem is that the system was unable to select and install the necessary driver that would “show” Windows 7 how to work with the headphones or speaker that we connected. I think this is due to old hardware and drivers. The system itself may also not have a driver for some new device that came out much later than the system itself (which, by the way, is no longer supported by Microsoft).
Checking the correct connection
Before considering complex options for troubleshooting, you should make sure that the pairing was initially done correctly.
- On the headset, use a special button to activate the search mode. Sometimes you just move the switch to the desired position, other times you need to hold the search/play button for a few seconds. The correct option for a particular headset should be found in its instructions.
- Most Bluetooth headphones have an LED that blinks quickly while searching for available devices to pair with.
- On a PC, you need to click on the Bluetooth icon in the tray and open “adding Bluetooth devices.” If there is no icon, then you need to open “settings” - “devices” - “Bluetooth”.
- Select the desired accessory and perform pairing.
Adding a Bluetooth device
The main solution is to update the Bluetooth adapter driver
The new version of the adapter driver may have a driver for the device that we are unable to connect. This is what happened to me with the AirPods connection. After updating the driver, the software for all components in the connection process was installed and the headphones started working.
I am often asked where to download a driver for Bluetooth headphones and which one. I answer - nowhere. The driver for a specific headphone model cannot be downloaded.
Open the device manager and on the “Bluetooth Radios” tab, open the properties of the Bluetooth module. For me it was called Generic Bluetooth Adapter before updating the driver. Open its properties and on the “Driver” tab look at the development date and version.
We see that a standard driver from Microsoft is installed. And it was developed back in 2006!
You need to download and install a new version of the driver. Where? How to do it? We have a specific device: a laptop, or a USB adapter. If it is a laptop, or the same adapter, then it has a manufacturer and model. Moreover, the laptop has a wireless module installed from a specific manufacturer and it also has a model. As a rule, the manufacturer of a laptop, USB adapter, or wireless module has a website where you can download the driver.
For example, I have an Intel Dual Band Wireless-AC 3160 wireless module in my laptop. Using a search, I go straight to the page for this model on the Intel website and download the driver for Bluetooth. It's a 2022 model. Do you feel the difference?
Please note that the driver is specifically for Windows 7. You can download the driver from the laptop manufacturer’s website. If you know the model of the wireless module, then it is better to download from the website of the Wi-Fi/Bluetooth module manufacturer.
After installation:
As you can see, the name of the adapter has also changed. Well, the driver is already from 2022. All devices connect without problems, all drivers are installed. The laptop saw and connected a mouse that it had not seen before at all.