The laptop has a problem such as overheating. Today we will try to solve this problem by increasing the speed of the standard cooler. To do this, we will look at a number of programs that allow you to increase the speed of a laptop cooler.
Well, let's start right away. I want to say that we will consider the programs from the most interesting to the most mediocre.
Notebook Fan Control
This program is perhaps one of the universal ones; it supports many laptops; a list of all supported laptops can be found here, but even if your model is not there, download it anyway and try the configuration file from other models: manufacturers often use similar coolers.
First you need to launch it, the Notebook Fan Contorl program, select your laptop from the list, then switch the service status to Enabled and we can adjust the cooler rotation speed. The speed setting is static and will not change automatically, as you configure it will remain so, even after a reboot systems. I also don’t recommend turning the speed up to 100% - Windows will go into a blue screen. If something goes wrong, you need to switch to the Read-only item, this will return the settings to standard.
Before overclocking
Before overclocking the cooler on a laptop, you should take into account the features of this process. The higher the speed of rotation of the impeller, the more noise it makes, consumes more energy and sucks in more air along with dust, so you will have to clean the laptop more often. However, thanks to the increased air flow, the device cools better.
Accordingly, when the fan speed is reduced, it will make less noise and consume less energy, but it will also cool the system worse. When running high-performance applications and games, the processor is subject to greater load and heats up more than when watching movies or surfing the Internet. In this mode, reducing the cooler rotation speed can be fatal - the processor can overheat too much and fail.
FAN SPEED BY DOTSHOOT
Another interesting program for increasing the speed of the cooler, it has only two operating modes: full and default. Of all the programs listed, this is the only one that helped me.
- Download the FAN SPEED BY DOTSHOOT program itself
- Unzip the downloaded file FAN SPEED BY DOTSHOOT
- Go to the launch_common_exe folder and click on SETUP IS installation begins
- Then we restart the laptop and run the fancontroller file, after which a window will appear with two buttons Full On to start the fan to full and normal to return to its original state.
Universal
SpeedFan
It can be described as an unkillable classic. Displays temperature values from sensors. Allows you to control the speed of connected fans. You can change the speed of the processor cooler, video card, or even the case fan (which is noisy and annoying).
Indicators section displays the cooler speed values. For example, 2 case coolers are connected directly to the motherboard. Here they are signed as Pwm1 and Pwm2 . Actually, to change the speed, you need to specify 60% 100% .
Argus Monitor
Not so popular, but a multifunctional application. It can be used to control all fans that are connected to a supported hardware environment. All by setting certain fixed values or adjusting fan control curves.
Expand the Mat subsection. board > Fan control . Here is the speed of rotation of SYSFAN (the water pump itself) and CPUFAN (fans on the radiator). For example, select for CPUFAN - Manual control . Just drag the speed slider (that's not all).
MSI Afterburner
Allows you not only to control the speed of the fans, but also to overclock or fine-tune the video card. Plus, performance testing and detailed monitoring. It works without connection to MSI video cards and is distributed with a free license.
The main workspace has a Fan Speed (%) . Only after disabling Auto can you drag the speed slider. In the Settings > Cooler , you can Enable software custom auto mode (temperature graph).
AMD Radeon Software
AMD is constantly improving the software for Radeon video cards. This is also proprietary, but it works with all “red” video cards. Specially designed to give you access to all software features from a user-friendly interface.
Under Performance > Tuning, change Tuning Control to Manual . Enable Fan Configuration and Advanced Control . Here, right on the Fan Speed/Temperature , set the values for your tasks (fine tuning).
HWiNFO64
The HWiNFO64 program is suitable for almost all Dell and HP models, as well as some others. To do this, launch it in Sensors mode and click on the cooler icon at the bottom and a window will open where you can set the number of cooler revolutions with the slider.
SpeedFan
This utility does not work on laptops, but you should consider it because it might work with your laptop. Install and run the application, after launching the cooler should be displayed at the bottom; if it is not there, you can try the following: restart the program; if the utility does not detect the cooler, autoload will help, go to the programs and drop the shortcut into the startup folder. If everything worked out, then change the Speed below, thereby changing the speed of the cooler.
Nvidia Inspector
This program does not require installation and works with modern computers that have a GeForce series video card installed. To see all the settings, click on “Show Overclocking”, this will open the panel for changing video card parameters.
This is what the settings window looks like:
The number of rotations of the cooler is adjusted by clicking on “Set Fan”. Uncheck "Auto". In the vertical slider that appears, select the appropriate value. The fan intensity range is from 25 to 100 percent; if the system unit gets very hot below 25, the cooler will not cope with the work.
After that, click on “Set Fan” again.
MSI Control Center
The main purpose of the program is to monitor the condition of the motherboard, its temperature, and compliance of parameters with established standards. But there is an additional function that reduces the number of fan speeds.
- Install the utility and run it via the shortcut.
- In the GreenPower section, select Advanced and then Motherboard
- At the bottom right is the Fan parameter. He is responsible for the performance of coolers.
- Change the corresponding value in the “CPU Fan” column.
The disadvantages of the software are the ability to reduce the rotation speed only to 50% and constant failures that lead to resetting previously saved parameters. Therefore, you will have to change the same values 2-3 times.
This method is ineffective due to the fact that some computers do not have functions for adjusting fan speed, or it is present, but it is very limited or simply not supported. Therefore, the main method is to interfere with the structure of the system unit by replacing devices and components that affect the increase in cooler noise.
AMD OverDrive
It must be installed together with the main package for the operation of components from this company; you can download it on the amd website. After installation, you need to open the application and do the following: Find the Fan Control section in the main menu. Find the Performance Control submenu. The cooler overclocking program will offer you one or more sliders. Increase by the required value, usually 70-100%, and click Apply. Go to Preferences and select Settings. Make the Apply my last settings item active. This will force the program to set your fan speed level every time you boot. Click OK and close the utility.
SpeedFan program
A well-known utility, it can be used to control a laptop fan, regulate speed at certain temperatures, and monitor the status of the hard drive. A few more big pluses are that it’s free, a simple and clear interface and support for the Russian language, so feel free to use it.
So, let's look in more detail at how to configure the cooler on a laptop using SpeedFan:
- First of all, download, install and launch the application.
- After launch, in the “Readings” tab, on the left we see information about the fan rotation speed, on the right the temperature of the main components is displayed.
- To adjust the cooler, go to the “Configure” section.
- Open the “Temperatures” tab and click on the required component, for example the “GPU” video card.
- And in the line below, in the “Desired” option, set the temperature mode (within 40-44 degrees) that the cooling system will have to support, and click “OK”.
Also in the “Speeds” tab you can set additional parameters for changing the speed of rotation of the blades. There are only two options here; by changing them, you can easily change the lower and upper speed limits.
Samsung laptops increase cooler speed
To increase the speed of revolutions on Samsung laptops, there is a radical way, you just need to cut the white wire that comes from the cooler, and it will start working at full capacity. Of course, after you disconnect this wire, the fan will not spin before starting your laptop, but do not be alarmed , and wait until the laptop warms up to 40 degrees. The fan will automatically start operating at maximum speed. There is also the Easy Settings program, it comes as standard; with it you can only lower the speed.
In what cases can you not increase the cooler speed?
There are situations when it is simply impossible to change the potential speed of the computer. For example, if the laptop has a video card that does not have external cooling.
The same problem can be encountered by users who almost never clean the insides of their computer, which leads to crumbs, dust and hair clogging every possible place. Accumulated dirt prevents the blades from rotating.
If the device is very old, then the program AMD OverDrive may come to the rescue.
If none of the advice helps, it is better to seek advice from a specialist, or purchase a paste and a special stand that reduces the processor temperature by 10-12 degrees.
Increasing speed through BIOS
As for the BIOS, unfortunately, in most modern laptops the BIOS is cut down and there are no functions for regulating the cooler speed. But it’s worth a try; to do this, you need to enter the BIOS when the system starts, press F2 or delete, if that doesn’t work, search the network for the model of your laptop and how to enter its BIOS. After entering the BIOS, you need to find something like Power - Hardware Monitor, where you can configure the fan. Find the option with the value “Fan Speed” and select the fan rotation speed, it is indicated as a percentage. Then press F10 and then ok.
Other programs to increase cooler speed
1. eeectl (Asus EEE series) 2. I8kfanGUI (Dell Inspiron, Latitude, Precision) 3. Smart Fan (Acer Aspire One series and after reworking Timeline 1810/1410) 4. a1ctl (Acer Aspire One series) 5. TPFanControl - ( Lenovo ThinkPad X/T/R series) 6. 1810tray (Acer Timeline 1410/1810) 7. [3820tray] Hardware Control PowerProfiles CPUMonitor (Acer TimelineX 3820) 8. Acer Aspire One (AA1) Fan Control (Acer Aspire One) 9. ACFanControl (Acer Aspire 5235 / 5635) 10. Lenovo S10 Fan Control 11. HP Notebook Fan Control in HWiNFO32 (HP 8740w and 8530w) target=»_blank» rel=»nofollow noopener»>
Fan control methods
The latest models of personal computers have three built-in coolers - for the processor, video card and hard drive. Older laptops and PCs are forced to work with one fan. You can increase the strength of the cooling device by increasing the strength of the cooler.
There are only two ways to solve the problem of fan overheating:
- BIOS Settings
- Cooler management programs
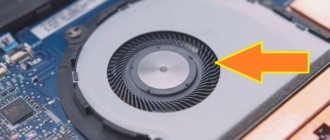
Before you start using one of the methods, you must first prepare your computer. To do this, open the lid of the laptop or system unit and carefully clean the fan between the blades, then all the elements of the motherboard. Make sure the device is not clogged with dust.
Mechanical contamination of the computer impairs the heat transfer process, which automatically increases the heating temperature of the device. If you can’t clean your laptop or PC from dust yourself, contact a service center.
Advice: clean your computer from dust at least once every six months.
On CPU
All methods for adjusting coolers indicated for a laptop also work perfectly for desktop processors. In addition to software adjustment methods, desktops also have a physical one - connecting fans via rheobass.
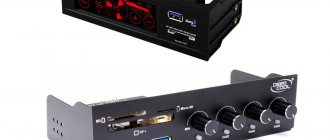
Reobas allows you to adjust the speed without using software
Reobass or fan controller is a device that allows you to control the speed of coolers directly. Control elements are most often placed on a separate remote control or front panel. The main advantage of using this device is direct control over the connected fans without the participation of the BIOS or additional utilities. The disadvantage is that it is cumbersome and redundant for the average user.
On purchased controllers, the speed of the coolers is adjusted via an electronic panel or mechanical knobs. The control is implemented by increasing or decreasing the frequency of pulses supplied to the fan.
The adjustment process itself is called PWM or pulse width modulation. You can use the rheobass immediately after connecting the fans, before starting the operating system.