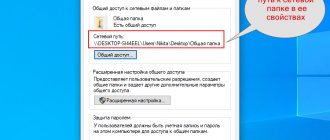
In this article we will set up a local network between two or more computers with Windows 7 (Windows 8) installed, which are connected via a Wi-Fi router. In fact, setting up a local network in Windows 7, Windows 8, and Windows 10 is practically no different. Windows XP does have its own nuances; there are always some problems when setting up a network between Windows 7 and XP. But, more on this in a separate article, and it’s time to switch from Windows XP, it’s outdated.
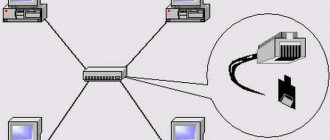
It is clear that in order to set up a local network and share files, computers need to be somehow connected to each other. This can be done using a network cable; I will introduce a direct connection between two computers. But it is much more interesting to connect all computers through a router, which is now installed in almost every home and office. When connecting via a router, you can already set up a local network not only between two computers. You can connect all computers, and even mobile devices that are connected to one router, into a local network
For example, desktop computers can be connected to the router via a network cable, and laptops can be connected via a Wi-Fi network. It’s up to you what’s more convenient for you, and how it works out for you. It doesn’t matter whether the computer is connected to the router via Wi-Fi or cable, the local network will work. And it doesn’t matter what operating system you have installed, but I will show you using Windows 7 as an example.
And I will configure and display the network through the Asus RT-N18U router, to which I have a laptop and a desktop computer connected via Wi-Fi. Both run on Windows 7. Now we will set up a local network between these two computers. We will also open shared access to folders and files. What is a local network between computers for? Mainly for file sharing. If you often need to transfer some files from one computer to another, then instead of running around with a flash drive, you can do this over the network. Well, you can play games online.
If your network also has a TV with a Smart TV, then you can configure access to movies on your computer from the TV. Read more in this article.
Home local network capabilities in Windows 10
The local network is supported in all versions of Windows, including the latest “tens” releases. The difference concerns only some of the restrictions allowed for the “home” versions, but they also have solutions for connecting network equipment (via wire or via Wi-Fi). Both computers and smartphones or tablets are usually connected to the home network.
Local network capabilities:
- Shared access from all devices to a shared folder or external drive.
- Sharing the functionality of a printer, scanner, MFP.
- Connecting to multimedia devices, setting up online games.
How exactly to use the network's capabilities depends on the user. Some people put movies on an external drive and watch them on a TV with Wi-Fi, others create backup copies of corporate data or print photos from smartphones. The main thing is to initially set up the network and achieve visibility of the necessary equipment from all connected devices.
What is needed to create a network
First of all, to create a local network of a certain number of computers, we need equipment:
- Computers or laptops that we will combine.
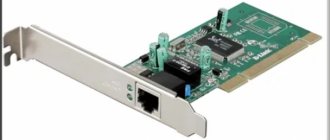
- Connection cable (twisted pair) or adapters Wi—Fi for PC. If you plan to build a network by connecting a cable to a PC, then you do not need an adapter. In laptops this adapter is built-in, so it can be connected in any way.
Wi-Fi adapter - Crimper (in colloquial speech - swage or crimping pliers). A tool that allows you to install an RJ-45 connector on a twisted pair cable. This is the crimping method used to connect devices. Again, if a wireless connection is not used
Crimper - Connectors R.J.-45. As in the point above, they are needed for connecting with a cable.
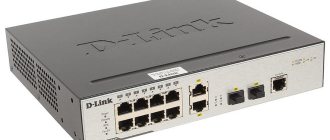
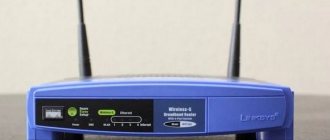
RJ45 connectors - Switch or router with Wi-Fi. The connection itself will be made through these devices.
Router
Wi-Fi router
Please note : if a direct connection is used (i.e. we insert a twisted pair cable into both devices without using a router), then not a standard cable will be required, but cross - over , except in cases where modern network cards with support are installed MDI-X. In this case, you can use the standard crimping method.
Selecting a Static IP Address
The first step to setting up a network is to set a permanent (static) IP address for each computer that will be connected to it. In principle, most applications and devices work with a dynamic address, but there is no guarantee of a stable connection. Moreover, choosing “static” only takes a couple of minutes.
Sequencing:
- Using the built-in search, find and open the “Settings” utility.
- Select “Network and Internet”, go to the Ethernet or Wi-Fi section.
- Click on the name of the current network connection.
- Scroll down the window to the “IP Settings” section.
- Change the value from Automatic (DHCP) to Manual.
- Enable IPv4 or IPv6 mode depending on the task.
- Enter the IP address, subnet prefix length and gateway.
Here you can also specify a DNS server (preferred and additional). After clicking the “Save” button, it is recommended to restart your computer. One value from the range 192.168.0.1-192.168.255.255 is selected as the IP address. The main thing is that each device acquires a unique address (starting with the router, which often “hangs” at 192.168.0.1 or 192.168.1.1).
In the “Subnet Prefix Length” field you need to enter the value 24, and as the DNS address of the service host or public server from Google - 8.8.8.8 and 8.8.8.4. The same is indicated when choosing IPv6, although the “legacy” IPv4 protocol remains practically a de facto standard. It is guaranteed to be supported by equipment purchased even 5-10 years ago.
Checking the functionality of the created network
A nick generator
It is enough to use one command for the corresponding line. The instructions are as simple as possible, as in all previous cases:
- Search strings are filled with the letter combination cmd to launch the command line itself.
- Next, enter the Ping command. Parameters are added to it to fix the device’s IP addresses.
The delay time along with the number of packets sent is displayed when the correct settings are specified. Usually it's 4 seconds. without loss.
Setting up a local network in Windows 10
The second step, after assigning computers a unique IP, is to assign the same “workgroup”, as well as an individual name, which will make it easier to determine which PC is being accessed. On all releases of Windows, the following command is used - sysdm.cpl .
In the window that opens, you need to click the “Change” button and enter the selected names, and then confirm them by clicking “OK” in both tabs. After a reboot, the equipment is guaranteed to be part of a common work group and will be able to exchange files, connect to network devices and use their functionality.
How to connect devices to the router?
I propose to list as much as possible the devices that will be used in our home local network and how to connect them.
Composition of the local network : computer, laptop, tablet, smartphone, network storage, printer, other devices working with the network (DLNA media player, TV with Smart TV support, satellite receiver).
A computer can be connected to the router, either over the air (Wi-Fi) or via cable (twisted pair). Since the computer is stationary, it is better to connect it to the router via a network cable using direct twisted pair crimp.
A laptop, like a computer, also has two options for connecting to a router, but it is better to choose the Wi-Fi protocol. If you are going to work with large amounts of information, use a network cable, since the Wi-Fi channel width of 300 Mbit/s, for example, is clearly inferior to an Ethernet connection of 1 Gbit/s. You will need this speed when copying files rather than when using the Internet.
Whatever you say, a tablet or smartphone will have to be connected to the router via a Wi-Fi connection.
The network storage is equipped with a high-speed Ethernet port, so it is connected to the router, usually via a network cable, which is included in the kit. If it is not there, then you can make the cable yourself; just use direct crimping of the twisted pair.
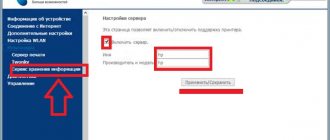
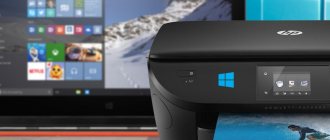
A printer (MFP), if Wi-Fi is available, can independently “join” the home local network, after appropriate settings for access to it. If there is no Wi-Fi, it doesn’t matter, the printer can be connected to the router via a USB cable, after which you need to configure the print server in the router itself. If there is no print server support or the USB port is busy, you need to connect the printer to your computer (laptop) and share it. The disadvantage of this method is that the computer to which the printer will be connected must be constantly turned on so that other users on the local network can print information.
Other devices are also connected via a network cable or via the Wi-Fi protocol.
As a result, we get the following structure of a home local network.
Folder Sharing
The user has the right to open access to all drives connected to the computer, but this is not safe. It is optimal to share access only to a specially created directory in which publicly accessible files are stored. This is especially important if “outsiders” – guests, neighbors, etc. – gain access to the local network.
Sequencing:
- Open the menu by right-clicking on “Start”.
- Select “Network Connections”.
- Click the “Network and Sharing Center” section.
- Go to the “Change advanced sharing settings” subsection.
- Enable network discovery and file and printer sharing.
- Go to the “All Networks” section and disable password protection.
All that remains is to click on the “Save Changes” button and restart the computer. Now all available devices will be visible in the “Network” section of Explorer. But for now, the resources are not “shared” on them: when you try to access them, the system will generate an error and you will not be able to use the network functions. To activate the same printer, you need to configure network access separately for it.
Problems with the network environment
After setting up the network, you may find that your network environment does not open or devices in it disappear. Let's figure out the reason for such problems.
Devices are not displayed in the network environment
If the device does not appear in the network environment, then the reason is most likely due to incorrect configuration of one of the computers on the network. Check the following points:
- On none of the computers the network type should be “public”. This choice is guaranteed to prevent this computer from being detected on the local network;
- the antivirus on each machine should not interfere with the connection of computers. To identify the cause of the problem, try pausing your antivirus programs for a short period of time;
- The computer may not appear on the network immediately. After connecting the computer and until it appears in the Network Neighborhood window, up to twelve minutes may pass;
- Another reason could also be a disruption of a system service. The solution is to disable your network browser (computer browser). Due to a version conflict, this utility may cause connection problems. This is done through the “Services” window, which is very easy to access through the “Start” menu.
You can open the Services section through the Start menu
If devices in a network environment begin to disappear spontaneously, without changing the settings on both computers, it is worth checking the integrity of the cable. Damage to it can disrupt the network between devices.
Properties do not open in Network Neighborhood
Without the ability to open the properties of the created network, it is impossible to perform normal configuration for its correct operation. The reasons for this may be the following:
- the virus has damaged the files necessary for the operation of this service;
- the user (or again the virus) completely deleted the necessary dlls;
- The files are fine, but access to them has been restricted by malware.
That is, the matter is probably that the computer is infected with a virus. First you need to get rid of it. The Dr.Web CureIt utility can help us in this matter. Do the following:
- Download the utility from the official website. To do this, click on the “Download for free” button.
Click the “Download for free” button on the Dr.Web CureIt! - It is available there completely free of charge if you agree to collect some data when you use it. In addition, according to the terms of the agreement, the free version can only be used on a home computer. After reading the terms and conditions of the program, click “Next”.
Read the agreement and click "Next" on the download page - In the next window we are just notified that statistics have been sent. Agree to these requirements to receive the free version.
Select “Download Dr.Web CureIt! with the function of sending statistics" - When the program is downloaded, run it. When starting, you must once again agree to send statistical data.
Accept the agreement and click "Continue" - Click the "Start Scan" button in the next window.
After launching the utility, click “Start scan” - Wait until the anti-virus scan finishes, during which threats should be detected.
Wait for the results of the virus scan
If the anti-virus scan did not find anything, and the “Properties” of the network environment still does not open, all that remains is to reinstall or restore the system. To do this, you need to select the appropriate option and have a Windows 7 installation disk.
You can select "System Restore" when using a Windows 7 boot disk
Devices periodically disappear in the network environment
If, when using a network, all devices appear there until a certain time, and then begin to disappear, then you should check the computers on the network for viruses. Usually the characteristic disappearance of computers for some time is associated with them. We have already written above how to do this. If this does not help, then you should perform the following settings:
- On each computer that goes missing, open the connection status. To do this, double-click on the active connection in the Network Neighborhood window.
- Go to the properties of this connection.
- In the general settings, among other components, find the Eset Personal Firewall item. Uncheck this item.
Uncheck Eset Personal Firewall - Accept the changes and restart your computer.
Once you complete these steps on all devices, they will no longer disappear from the network.
Setting up a network printer
The pre-printer is connected and configured on one of the local PCs. Ideally, this is a computer that is constantly turned on during the day, because when turned off, access to the network device will be lost. It is accessed using a previously specified IP address with a static value.
Sequencing:
- Launch the Printers and Scanners application.
- Click on the “Add a printer or scanner” button.
- Select “The printer you need is not in the list.”
- Switch detection mode to TCP/IP.
- Go to the next window and enter the required IP address.
All that remains is to click on the “Next” button and wait for the Windows message about the completion of the search and connection procedure. You can now print a test page to ensure the quality of your work and the desired settings. If the system does not automatically detect the printer, a list of supported models will be offered for manual connection.
How to make shared folders
After everything is configured, you need to create shared folders for exchanging information.
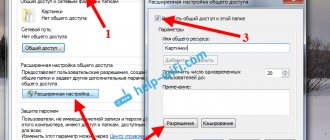
- Create any folder and click on it right clickby selecting properties. Then go to the bookmark Access.
- Click General access and in the next window choose user who will be allowed to read this folder. If there are no secrets, then just enter or select a word from the list All and press Add.
- Next you need to select Permission level. Need to set read and write, or read only, if other users will not copy anything into the folder.
- Once you click the Share , the permissions process will begin.
However, this is not yet enough. Now on the folder properties window you need to find the security . And then click sequentially Edit - Add .
In the window, enter the word All and click OK
Let’s make sure that in the permissions the All Allow checkboxes are at the bottom .
Click OK OK too . Now the shared folder will be available to all users.
What is Ethernet - technology features and operating principles
How to forcefully disable a network connection
In practice, sometimes situations arise when you have to urgently interrupt the connection through the local network. For example, when neighbors started using a shared disk or the printer “suddenly” started printing spontaneously. This often happens in apartment buildings, where the power of the Wi-Fi router is often enough to connect even “across the floor.”
Options:
- Disconnect the network cable or power to the router.
- Perform the “reverse” setup with access disabled.
- Enable password protection for critical resources.
There is also the option of manually editing the system registry. This will allow you to see a list of all previously connected devices and manually delete resources to which you want to block external access. You need to launch the registry editor and find the branch:
HKEY_LOCAL_MACHINE\SOFTWARE\Microsoft\Windows NT\CurrentVersion\NetworkList\Profiles
Two routers on the same network
In this case, the user chooses one of two options:
Wi-Fi connection
The bridge mode is used, which is also referred to as WDS. This function will allow you to install equipment at a large distance from each other. An additional advantage is that there is no need to lay cables. But Wi-Fi connections are often unstable. Speed over wireless networks may also drop.
Note! The option with a wireless connection is suitable if the cable cannot be used for one reason or another. And not all routers support WDS mode, especially when it comes to older models.
Preparation
A local network at home can be created without much difficulty. You will need to perform the following sequence of actions:
- Choose a suitable router. It is advisable to take a device that supports the 802.11n standard. It provides better coverage and overall performance.
- Choose a connection type that is suitable for your Internet service provider and does not create conflicts. If you do not understand the issue, contact the provider or look at the contract.
- Configure the router to access the World Wide Web.
- Connect all necessary devices.
Laying a network cable in an apartment
The most difficult thing in the process of organizing a wired local network is to lay the cables so that they do not interfere and do not spoil the appearance of the premises.
Inside the walls
The difficulty with this type of cable installation is that it is very dusty, noisy and labor-intensive. And it’s simply irrational to start doing this outside of repairs.
In addition, when laying cables in the walls (in the floor, above the ceiling), you need to be sure that the location of the Internet outlets will correspond to the location of the furniture in the rooms. Otherwise, an socket is connected to the table, and then it turns out that it is more convenient to place the table against another wall, and put a cabinet in its place. And all the work done to hide the cables in the walls becomes meaningless, because in the end the cable from the new location of the table still openly reaches out to this outlet across half the room.
With an expensive and meticulously polished apartment renovation, especially if it is done in a neoclassical style, hidden cable routing is the only way not to spoil the design.
Cable channels
If there is no desire and opportunity to lay the cable in the walls, floor or above the suspended ceiling, you can run it along the walls in cable channels.
Cable channels come in plastic, metal and wood-like designs. They are built into baseboards: both floor and ceiling. They are easy to install and dismantle, and the cheapest plastic models will cost several hundred rubles for the entire apartment.
Open on the walls
As a last resort, you can not hide the cables at all, but carefully run them behind the furniture and along the walls, carefully securing them above the baseboard (or under the ceiling) with tape or clamps.
The advantages of this option are that it requires a minimum of time and labor. And with due diligence, even a cable fixed in the open will not be very noticeable.
Selecting a network type
Open the router settings, go to the Internet or WAN section, select the connection type. The latter must be included in the provider's contract. If this option does not suit you, you can contact technical support by phone. After this, the necessary access information is entered according to the selected connection type. It must also be indicated in the relevant instructions of the provider.
Next we perform the following steps:
- Go to the “Wireless Network” section (go to its settings) and give the network name (SSID).
- Open the security section and set the encryption type to WPA2/PSK.
- Specify the password to connect to Wi-Fi.
- We activate the DCHP virtual server mode, which provides distribution of a dynamic IP address from the designated range.
After completing the operations, all that remains is to save all the changes made.