Hi all! Today we will look in detail at how to create a local network via a wifi router. We will set up a connection to the local network of computers and laptops with Windows 7 or 10 operating systems via cable or WiFi. A local network is convenient because it can be used to open public access and share folders, then exchange files between computers and laptops, transfer the screen of one device to another, manage a video surveillance system, for online games and much more.
How to create a local network via a wifi router?
Actually, the concept of “local network” means that all computers, laptops, smartphones, tablets, TV set-top boxes and other devices that are connected to one wifi router will see each other and data can be exchanged between them. This is the basis for the technologies for creating an FTP server, a DLNA media server, access to a shared printer, a video surveillance system, and so on.
The main task is to understand the principle of how to create a connection between computers and open shared access to folders, files and other network resources. It doesn’t matter how you connected your computer to the router - via wifi or cable.
In fact, to install a local network, you just need to perform the simplest setup of a wifi router to distribute a wireless signal. If you haven’t done this yet, be sure to read the router installation manual, otherwise you won’t understand anything.
General concepts
One of the most important abilities of computers is the transfer of information from one machine to another. Thanks to this, almost endless possibilities open up for users, which everyone has long known about - entertainment, work, communication, and so on.
A local network is a network that connects 2 or more computers, usually located within an apartment or, say, a building. Machines can be connected to each other via network cables or a wireless communication channel (usually Wi-Fi).
In order for each individual computer to “see” any other computer also connected to the local network, two rules must be observed.
Firstly, all machines must be connected to one common communication device - a router (you can do without it - more on that later), which receives information from one computer and transmits it to another.
Secondly, each machine must have a unique network address. Compliance with these conditions is sufficient to connect many PCs into a simple local network.
It is also worth knowing that there are two ways (or types) of connecting computers - a star and a ring.
The first involves using a router (router, switch, hub - whatever is more convenient for you) as a communication device (the principle of operation was described above).
Star structure
A ring-type network does not require the use of such devices, but for it to function, each computer must have at least two network cards. Roughly speaking, one of them will play the role of a receiver of information, the other - a sender.
Ring type structure
This data will be enough for you to move on to the next part of the article.
How to share Windows folders and share them over a local network?
But in order to open general access to a folder on a local network (that is, share) on a computer, you need to make some settings in Windows.
- Right-click on the folder you want to share
- Go to “Properties > Access > Advanced settings”
- Check the box next to “Share this folder”
- Save the setting with the “Apply” button
We do the same with all folders that need to be shared on all computers. After that, going to the “Network” section, you will see the names of these PCs. And if you go inside them - shared Windows shared folders.
Sharing Internet access
If a local network is built without a router, using a direct wired connection of computers, and one machine has Internet access, but the other does not, then this can be quickly corrected. The described actions are performed on the computer that has a connection to the global network.
- Click the connection icon in the notification area. Open Control Center and proceed to change adapter settings.
- In the list of available connections, find the WAN connection. Open its properties, right-click.
- On the Access , allow other members of your home network to use this Internet connection.
Now from one computer the Internet will be distributed to other participants in the network. This will affect the speed, but when accessed from different devices through the router, the speed is also divided in proportion to the load, so this is a common practice for sharing the Internet.
Shared folders for a Windows 7 homegroup on the router's local network
After creating a local network through a router in Windows 7, you can also set up a so-called home group. This is a system in which shared folders, printers and other devices connected to different computers and laptops will be visible and open for work only on those devices that are included in this group, and not for all workstations on the network.
To set such restrictions on folders and files on the local network, the homegroup is usually password protected.
I’ll say right away that creating a home group on the cheapest version of Windows 7 - Home Basic - will not work. It will only be possible to connect to an existing one. Therefore, this can only be done on the version starting with the “Home Extended”.
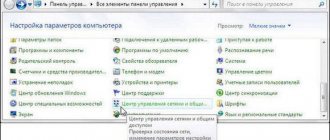
Go to “Start - Control Panel - Network and Sharing Center”. Find the subheading “Home Group” and click on the “Ready to Create” link, and then on the “Create Home Group” button.
After this, we select those folders and devices that are connected to the computer and to which we want to allow access from the network.
Next, we will be given a generated password, which we need to write down somewhere, because... you will need it when connecting other computers to the local network via wifi.
Then in the next window that opens we will find the link “Change additional sharing settings”. Click on it and look for all the items where it says that you need to “Enable shared access with password protection.” It must be disabled, otherwise you will not be able to create a local wifi network. Then save the settings.
That's it on the first computer - the homegroup has been created. Just in case, you can restart your computer so that everything is saved and all settings are applied.
Router settings
So, first of all, when creating a local network, you need to make some settings on the router (router), through which the network interaction of all digital devices will subsequently occur.
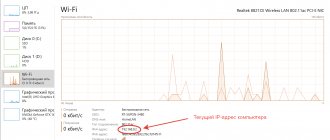
Login to the administrative panel is carried out from a PC using any browser. To do this, you need to enter the IP address of the router into the address bar of your browser and, in the window that appears, enter your username and password.
The IP address can be the following - 192.168.0.1 or 192.168.1.1. Its exact combination can be seen on the plate located on the bottom plane of the device. The standard login and password are also indicated there.
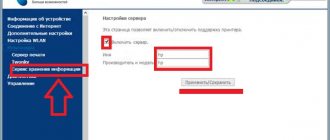
After logging in, open the “Network” section and select the connection type “LAN”.
Next, go to the “DHCP Server” tab and set the setting to “Allow”. This setting will allow you to automatically distribute IP addresses within the network to all devices connected to it, thereby eliminating possible conflicts when their addresses match.
If you have not previously used a Wi-Fi wireless network, you can immediately check whether this connection is activated without leaving the admin panel. To do this, you need to go to the “Wi-Fi” section and check the “Enable wireless connection” checkbox.
This will allow you to access network folders opened on your PC from a tablet, smartphone or other local device to view and edit documents, as well as various types of media content - movies, music, photos, etc. Well, and of course, the previously configured Internet connection via a local network will provide access to the Internet from any mobile device via a Wi-Fi connection. We save the settings after the completed steps and proceed directly to creating a local network in a Windows environment.
How to connect a computer or laptop to a homegroup on a Windows 7 local network?
Now you need to connect another computer or laptop to this group. We connect to our wireless network and go through the chain “Start - Control Panel - Network and Sharing Center - Home Group”. And click the “Join” button.
Next, we set up the second computer in exactly the same way - enter the password, indicate the folders to which we want to open access from other devices. Reboot.
What is your opinion: is WiFi harmful?
Yes
22.92%
No
77.08%
Voted: 36457
If you cannot connect, then disable the third-party firewall that you installed. It may also be built into some antivirus.
That's all. Now, when you log into the network, you will see all devices connected via wifi to the local network. By clicking on the icon of any computer, you will see all the shared folders and devices, such as a printer.
Devices used
As noted above, it is advisable to use the connection of intermediate devices when creating a LAN. Next, we will consider popular equipment for achieving this goal.
Hub
In Russian, this device is called “Repeater”, but, as often happens in our country, the English name “HUB” remains familiar to the user. In colloquial language it sounds like “hub”.
Everything that is connected to this small box is repeated. The repeater is assigned one IP address and connects connected PCs to each other. The hub receives data into one of the ports and transmits it through the remaining ports.
There is a direct correlation between the increase in network load and the number of clients connected to the hub, so this technology is gradually being replaced by more advanced ones. After all, everyone needs a stable and high speed of data reception and transmission, regardless of the number of equipment on the LAN.
However, due to the affordability of such technology, it continues to be used by some users to connect a small number of PCs. Sometimes in the documentation you can find the name of this device as a “hub”.
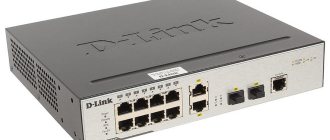
Switch
“Switch” is already more modern equipment compared to “HUB”. It does not have the disadvantages of a hub. Each device that is connected to the Switch has its own IP.
If working in a hub is similar to talking on parallel-connected phones, then a PC connected to the Switch receives information that remains inaccessible to other participants in the LAN. This reduces the load on the network.
However, if the provider cannot provide the required number of IP addresses, then problems immediately arise. Therefore, this method is gradually becoming a thing of the past. Depending on the size of the LAN being created, switches of various models are produced.
Functionally, they are equipped with special ports, for example, for printers and other office equipment.
Hubs and switches cannot share the speed for accessing the global network between PCs; therefore, routers have become widespread.
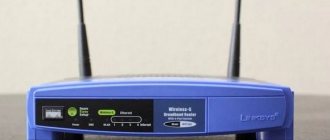
Router
This device no longer has the disadvantages of all the devices described above. There are various modifications of routers, which allows each user to choose a router suitable for their purposes.
Routers are often equipped with internal or external antennas to broadcast a wireless signal to devices equipped with Wi-Fi modules.
Expensive models are equipped with USB ports to which you can connect network printers and USB modems.
The device is configured using the program (firmware) installed in it. Its own interface provides convenient input of network parameters. The router's web configurator provides control and secure operation in subnets.
Currently, routers are used not only by commercial companies, but they can also often be found in home use. Through them, access to the worldwide network of any of the LAN components is organized.
Access point
It differs from a router in that it is like a signal extender (wired or wireless). An “access point” (AP) or “Access Point” (AP) does not have such wide capabilities as a router. Does not create subnets.
“AR” can be purchased as separate equipment, but it should be noted that any router is capable of functioning in AP mode, and computers or mobile devices connected to the Internet that have a Wi-Fi module can be used as APs.
How to share local network and homegroup in Windows 10?
The algorithm for creating a local network and connecting to a homegroup on Windows 10 is similar to a local network on 7, but there is a difference in navigation on how to get into its device. To do this, right-click on the “Start” icon and select “Network Connections”
Next, find the “Home Group” block on the page.
Next we will see everything the same as on Windows 7
- Create a group or connect to an existing one
- Choosing which resources to share
- If necessary, enter a password to connect
But you can also open access to other folders, not just those that we specified when creating a homegroup.
For this:
- Right-click on the folder, select “Properties”, “Access” tab.
- Next is the “Advanced setup” button
- and check the “Share this folder” checkbox.
- After that, click “apply”
Now this folder has appeared among the shared folders and is visible to all participants in the local wifi network.
What is LAN?
These are PCs, office equipment and other similar equipment interconnected into a single network for storing and exchanging information.
They are divided into two categories:
- local;
- global.
The first ones are created within a specific space (apartment, institution, locality, etc.);
The latter allow devices to access the global network and use information from global networks.
“LAN” or for advanced users it is more common to use the abbreviation “LAN” (Local Area Network), which in Russian means “Local Area Network” - PCs, office equipment and other similar equipment interconnected into a single network for storing and exchanging data.
For normal operation, in addition to the listed devices, additional equipment is required. For example, network adapters, routers, switches, etc. They are interconnected by cable and wireless connections.
It should be noted that it is important to use software for LAN operation, that is, an OS and special protocols for data exchange.
In a LAN, PCs are not spatially distant from each other, since the use of, for example, a twisted pair cable leads to signal attenuation as the distance increases.
If it is necessary to combine into one “LAN” several networks that are geographically located far away (even at different ends of the world, tens of thousands of kilometers from each other), VPN is used - virtual private network technology.
To fully understand what “LAN” is, it is recommended to familiarize yourself with its capabilities:
- The network creator has a unified security policy at his disposal. In simple words, the administrator no longer relies on the conscience and caution of LAN clients, but solely controls, records and limits the actions of individual users;
- Efficiency of information and file exchange. There is no need to use external drives (flash drives, floppy disks, USB hard drives, CDs, etc.) to transfer data from one PC to another;
- When using a LAN in offices, collaboration is ensured without taking the employee away from the desk, as well as the introduction of electronic office work;
- Simultaneous work of several users in a single file without duplicating information in each individual PC;
- Use of network office equipment. There is no need to buy and connect your own printer, plotter, scanner and other similar equipment to each PC.
Thanks to the development of wireless information transmission technologies and the use of secure radio channels, there is no need to install cables to network devices.
Using wi-fi routers, mixed systems are organized using wired and wireless methods of information transmission on a LAN.
How to connect an Android smartphone to the local network?
But that's not all. You can create a local network not only between computers and laptops, but also include a tablet or smartphone based on Android into it, after which we can access files on the phone from the laptop and vice versa - from Android we can access Windows folders located on the computer .
For the mobile platform there is such a cool program as ES Explorer. It can be downloaded through the Google Play application. We install it and connect from Android to wifi.
After that, go to the “Menu” and open the “Network” subsection
Open the “LAN” section - Explorer will detect all computers on the local network. Those of them that you can go into and view files from them are highlighted in dark color.
If this PC is part of a password-protected homegroup, an additional authorization window will open
After which we will see all open shared folders of the system
But that’s not all - now you can also directly print documents from this gadget through a printer connected to one of the computers to which shared access is configured.
I hope that after reading this article you have realized all the advantages of setting up a local network via a router and can now exchange documents between computers via wifi. If you have questions, ask in the comments!
Preparatory work
Before setting up a home or office local network, you must first prepare all computers and the communication line for work. If you are using a wired router as a communication device, you will need to connect network cables from each computer to it. If you are creating a home network using a wireless Wi-Fi router, then simply connect each machine to it.
See also: How to select files in a folder for copying: 5 known methods
Building a home local network of the “Ring” type will require pulling cables according to the following diagram (using the example of 4 computers):
- Connect two cables to computer No. 1 into different network card sockets;
- Stretch one of the cables to PC No. 2, the second to PC No. 3;
- Connect the second cable in PC No. 2 to another free slot on the network card and throw it to computer No. 4;
- Do the same for PC No. 3, connecting it to a free board slot from PC No. 4.
You will notice that when connecting the “Ring” type, each computer is connected by wires only to two neighboring ones. In our case, PC No. 1 does not have a cable connection with PC No. 4.
By the way, setting up a “Ring” type network can be done wirelessly, that is, via Wi-Fi. However, this will require that each computer not only be able to “know” how to connect to Wi-Fi, but also be able to create a virtual access point so that other machines can connect to it. But we will not consider this option.
Purpose and capabilities of home LAN
At home, a LAN can be used by adults to work on common projects or to monitor what information is contained on the computers of minors in the household.
For example, if a family actively uses the Internet, parents can block their children’s access to certain sites, as well as monitor the traffic coming to the heirs’ computers. In this case, the server part of the program is launched on the parent’s PC, and the client part on equipment belonging to the children.
Another “advantage” of a local network is that it is undemanding to the power of client machines.
Preparing to connect 2 computers
In order to connect two computers to each other, you need a crimped network cable. If you do not have such a network cable, then you need to make one or buy a ready-made one. If you buy a ready-made one, make sure that it is crimped like a crossover.
To ensure that the cable is properly crimped, pay attention to the conductors in the connectors at both ends of the cable. The orange and green pair of conductors should be sort of mixed up with each other (see picture below).
If you crimp the network cable yourself, you will also need RJ-45 connectors and a crimping tool (crimper). You can read more about how a network cable is crimped in this article.
Connecting two computers via a network cable
This is the easiest stage. You need to plug each end of your network cable into the network card slots on both computers. Immediately after connecting the cable to two computers, the LED inside the connectors should light up, signaling that the network cards have started exchanging data.
If there is no light indication after connecting the cable, this means that the network cards do not see each other. Most likely, you either have one of your network cards turned off or a faulty network cable. This issue must be corrected before moving on to the next step.
We build a network with our own hands and connect it to the Internet, part one
We are starting to publish a series of articles on the topic of deploying a small (within a home or small office) local network and connecting it to the Internet.
I believe that the relevance of this material today is quite high, since just in the last couple of months several of my friends who have a good knowledge of computers in general asked me questions about network topics that I considered obvious. Apparently they are not like that for everyone.
Throughout the article, terms from the networking field will be used, most of them are explained in the mini-FAQ about networks compiled by Dmitry Redko. Unfortunately, this material has not been updated for a long time. Although it has not lost its relevance, there are quite a lot of gaps in it, so if there are volunteers to fill these gaps, write to the email listed at the end of this article. The first time you use a network term, it will provide a hyperlink to an explanation of it in the FAQ. If some terms are not explained throughout the article or in the FAQ, feel free to mention this fact in the conference where this article will be discussed.
So. In the first part, the simplest case will be considered. We have 2 or more computers with a network card built into the motherboard or installed separately, a switch (switch) or even without it, as well as an Internet channel provided by the nearest provider.
Let us note that all computers have the Microsoft Windows XP Professional operating system installed with Service Pack version 1. I will not say that this is the most widespread OS currently installed on computers, but it would take quite a long time to consider all the existing families of the same Microsoft (but if there are many suffering, we will analyze others). OS language version is English. In the Russian version, everything will work in the same way; readers will only need to find the correspondence of the Russian analogues of the names in the screenshots presented below.
If we have only two computers and there is no switch, then to create a network between two computers we need a network card in each of them and a cross-over cable to connect the computers with each other.
Why cross-over and why is a regular cable bad? In the 10 and 100 Mbit Ethernet standards (10Base-T and 100Base-TX), 4 wires are used for a twisted pair (two pairs of wires twisted together). Typically, a twisted pair cable has 8 wires, but only 4 of them are used (all eight are used in Gigabit Ethernet).
In MDI type connectors installed on network cards, pins 1 and 2 are responsible for transmission, 3, 6 for reception. If you combine the contacts of two network cards with a straight cable (one to one), then nothing will work, as is obvious from the figure:
| MDI port of network card1, 1 | transmission + |
| 2 | transmission - |
| 3 | reception + |
| 4 | |
| 5 | |
| 6 | reception - |
| 7 | |
| 8 |
| transmission + | |
| 2 | transmission - |
| 3 | reception + |
| 4 | |
| 5 | |
| 6 | reception - |
| 7 | |
| 8 |
On both network cards, in the case of a direct wire, pairs 3.6 are combined, responsible for receiving (both will wait for transmission, listen to the line) and pairs 1.2, responsible for transmission (both will try to transmit, but no one will hear them). This problem is corrected by a cross-over cable; it crosses pairs of wires 1,2 and 3,4, i.e. swaps them. Thus, a signal from 1.2 pairs will go to 3.6 pairs of the second network card, and from 3.6 to 1.2.
Two switches are connected to each other according to the same principle (the switches have MDI-X connectors, the same crossover cable is required to connect them).
Now let's return to our network of two computers. If we skip the theory, then to connect the above machines we need to either buy a ready-made crossover cable, or crimp it ourselves using a crimping tool.
After receiving the cable, we connect the network cards of the computers using it and voila - everything should work (at the physical level). To check the functionality of the network at the physical level (signal level), it makes sense to look at the indicators (most often green) that are located on the network card near the RJ-45 connector. At least one of them must be responsible for indicating the presence of a link (physical connection). If the indicators on both network cards light up, then there is a physical link and the cable is crimped correctly. A lit indicator on only one of the two cards does not mean that everything is in order at the physical level. The blinking of these (or adjacent) indicators signals data transfer between computers. If the indicators on both cards do not light up, then the cable is most likely incorrectly crimped or damaged. It is also possible that one of the network cards has failed.
Of course, what is described in the previous paragraph does not mean that the operating system sees the network card. The lighting of the indicators only indicates the presence of a physical link between the computers, nothing more. In order for Windows to see a network card, you need a driver for this card (usually, the operating system itself finds the one you need and installs it automatically). Quote from the forum: “Just yesterday I diagnosed a case with a connected network card that was not fully inserted into the PCI connector. As a result, the network “physically” worked, but the OS did not see it.”
Let's consider the second situation. There is a switch and two or more computers. If two computers can still be connected without a switch, then if there are three (or more), then combining them without a switch is a problem. Although the problem can be solved - to combine three computers, you need to insert two network cards into one of them, switch this computer to router mode and connect it to the two remaining machines. But a description of this process is beyond the scope of this article. Let us dwell on the fact that to unite three or more computers into one local network, you need a switch (however, there are other options: you can connect computers using a FireWire interface or a USB DataLink cable; as well as using wireless (WiFi) cards, transferred to Ad Hoc operating mode... but more on that in the next series).
Computers are connected to the switch using a straight cable. Which termination option (568A or 568B) is chosen is absolutely not important. The main thing to remember is that on both sides of the cable it (the termination) matches.
After crimping the cable (or purchasing it in a store) and connecting all existing computers to the switch, you should check the presence of a physical link. The check proceeds similarly to the method described above for two computers. The switch should also have indicators next to the ports to indicate the presence of a physical connection. It may well turn out that the indicators are not located next to the port (top, side, bottom) but are placed on a separate panel. In this case, they will be numbered according to port numbers.
Having reached this paragraph, we already have 2 or more computers physically connected to a local network. Let's move on to setting up the operating system.
First, let's check that the IP addressing settings on the network card are correct. By default, Windows OS (2K/XP) itself assigns the necessary IP addresses to the cards, but it’s better to see for yourself.
Let's go to the network card settings. This can be done in two ways, through the control panel (Start -> Control Panel -> Network Connection)
Or, if the Network Places is on the desktop, then just right-click on it and select Properties.
In the window that appears, select the required network adapter (usually there is only one). The new window tells us quite a lot of information. Firstly, the connection status (in this case - Connected, i.e. there is a physical connection) and its speed (100 Mbit). As well as the number of sent and received packets. If the number of received packets is zero, and there is more than one computer on the network (turned on), then this may indicate a malfunction of our network card or switch port (if the computer is connected to it). It is also possible that the cable itself is faulty.
By selecting the Support tab, you can find out the current IP address and subnet mask assigned to the network card. By default, Windows OS gives adapters IP addresses in the range 169.254.0.0 - 169.254.255.254 with a subnet mask of 255.255.0.0. Discussion of masks, subnet classes, and so on is beyond the scope of this article. The main thing to remember is that the subnet mask of all computers on the same network must be the same, but the IP addresses must be different. But again, the digits of the IP address, which coincide in positions with the non-zero digits of the subnet mask, must be the same on all computers, i.e. in this example, all hosts from the local network in the IP address will have the same first two digit positions - 169.254.
The IP settings of the network card can also be set manually (Network adapter properties -> Properties -> Internet Protocol (TCP/IP) -> Properties). But in most cases, it makes sense to set the settings to the default value (automatic detection of IP address and DNS) and the operating system will configure the network adapters itself.
In addition to network addresses, all computers must be given the same workgroup name. This is configured in the system settings (System Properties). You can get there through the control panel (System -> Computer Name). Of course, you can give different names to workgroups. This is convenient if you have many computers on the network and need to somehow logically divide the working machines among themselves. The consequence of this will be the appearance of several workgroups in the network environment (instead of one).
or, if the My Computer icon was displayed on the desktop, then right-click on this icon and select (Properties -> Computer Name).
In the window that appears (appearing after clicking the Change button), you can change the computer name (each machine has its own unique name). And then you need to enter the name of the working group. All computers on the local network must have the same workgroup name.
After this, the OS will ask you to reboot, which you will need to do.
On any of the computers you can “share” (i.e. put into public access) directories. This is done as follows:
In Explorer, right-click on the directory and select Properties.
Directories are shared in the Sharing tab. For the first time we will be asked to agree that we understand what we are doing.
In all subsequent ones, you just need to check the Share this folder box (the directory will be accessible over the network only in read mode). If you need to allow changing data over the network, you will have to check the box Allow Network User to Change my Files.
After confirmation (clicking OK), the directory icon will change to the one shown in the screenshot.
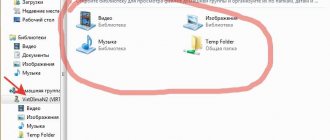
From other computers, you can access shared directories by going to the network environment (My Network Places), located in the Start menu or on the desktop, selecting View Workgroup Computers,
and then click on the desired computer name.
The shared directories will be presented in the window that appears.
After selecting any of them, you can work with them in the same way as if they were located on the local computer (but if the permission to change files when sharing a directory was not activated, then you will not be able to change the files, only view and copy).
Please note that the method described above will work without problems if both computers (on which the directory was shared and which is trying to access it over the network) have the same usernames with the same passwords. In other words, if you, working under the user USER1, have shared a directory, then in order to access it from another computer, the user USER1 must also be created on it with the same password (as on the first computer). The rights of the user USER1 on another computer (the one from which they are trying to access the shared resource) can be minimal (it is enough to give him guest rights).
If the above condition is not met, problems may arise with access to shared directories (drop-down windows with messages like access denied, etc.). These problems can be avoided by activating a guest account. True, in this case, ANY user inside the local network will be able to see your shared directories (and in the case of a network printer, print on it) and, if changes to files by network users were allowed there, then anyone will be able to change them, including deleting them.
Activation of a guest account is done as follows: Start -> control panel -> the control panel looks like in the screenshot after clicking the Switch to Classic View button -> administration -> computer management ->
In the computer management window that appears, select the local user and group management tab, find the Guest account and activate it. By default, in Windows, a guest account is already created in the system, but is blocked.
A few words about adding users to the system (more on this in the following articles). In the same local user and group management manager, right-click on an empty space in the list of users and select New user (add a new user).
In the window that appears, enter the login (in this case, user2 was entered), full name and description, the last two values are optional. Next, assign a password, and in the next field, repeat the same password. Unchecking the User must change password at next logon checkbox allows the user to log in to the system using the specified password and will not require changing it at the first logon. And the checkbox next to Password never expiries (the password will never become outdated) makes it possible to use the specified password indefinitely.
By default, the newly created user is included in the Users group. Those. The user will have fairly limited rights. However, there will be quite a lot of them and you can log in to your local computer under this login and work quite comfortably. You can further limit the rights (to a minimum) of this user by removing him from the Users group and introducing him to the Guests group. To do this, right-click on the user, select Properties,
Member of -> Add, in the window that appears, click on Advanced (additional)
Click Find Now. And in the list that appears, select the desired group (Guest).
The user has been added to the Guest group. All that remains is to remove it from the Users group: select it and click on the Remove button.
More flexible control of access to shared resources can be obtained by disabling the Simple File Sharing mode in Explorer settings. But this is again beyond the scope of the current article.
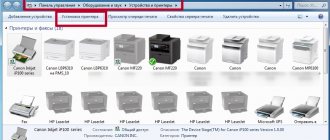
Providing public access (sharing) of printers is done in a similar way. On the computer to which the printer is connected, select its icon (via Start -> Printers), right-click on it, select properties.
Printer sharing is managed in the Sharing tab. You need to select the Shared As item and enter the name of the printer under which it will be visible in the network environment.
On other computers connected to the same local network, the network printer will most likely appear in the printer menu. If this does not happen, launch the Add Printer icon (add printer),
which will call a wizard for connecting printers.
We tell him that we want to connect a network printer.
In the next menu we indicate that we want to find the printer in the network environment. You can also enter a direct UNC to the printer, for example, \computer1printer1, using the Connect to this Printer item. UNC (Universal Naming Convention) - Universal network path, used in operating systems from Microsoft. Represented as \computer_name shared_resource name, where computer_name = NetBIOS machine name, and shared_resource name = name of a shared directory, printer, or other device.
If we selected the item to search for a printer in the network environment, then after clicking the Next button, a network environment viewing window will appear, where you need to select the shared printer. After this operation, you can send documents for printing from the local machine to a remote printer.
So. We now have a working local network. It's time to give her access to the Internet. Later in this article we will tell you how to organize such access using one of the computers as a router. To do this, it must have two network cards. For example, one is built into the motherboard, and the second is external, inserted into the PCI slot. Or two external ones, it doesn’t matter.
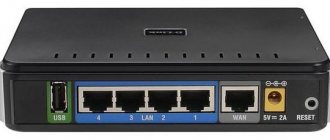
We connect the wire coming from the provider to the second network card of the router (the first one looks into the local network). This could be a twisted pair cable (crossover or straight cable) from an ADSL modem, or a twisted pair cable installed by local network installers in your area, or something else.
It is quite possible that the ADSL modem (or other similar device) is connected to the computer via a USB interface, then a second network card is not needed at all. It is also possible that the router computer is a laptop that has one network card connected by wire to the local network and a WI-FI (wireless) network card connected to the provider’s wireless network.
The main thing is that two network interfaces are visible in the Network Connections window. In this case (see screenshot), the left interface (Local Area Connection 5) is responsible for access to the local network, and the right (Internet) is responsible for access to the global Internet. Of course, the names of the interfaces will differ in each specific case.
Before implementing the following steps, the front end (facing the Internet) must be configured. Those. From the computer-future-router, Internet access should already work. I omit this setting, since it is physically impossible to provide for all possible options. In general, the interface should automatically receive the necessary settings from the provider (via a DHCP server). You can check whether the network card has received any addresses, similar to the method described above in this article. There are options when a representative of the provider gives you a list of parameters for manually configuring the adapter (as a rule, this is an IP address, a list of DNS servers and a gateway address).
To activate Internet access for the entire local network, right-click on the external (facing the Internet) interface.
Select the Advanced tab. And here we check the box next to Allow other Network Users to Connect through this Computer's Internet Connection. If you need this Internet access to be controlled from other computers on the local network, enable Allow other Network Users to Control...
If the machine does not use any additional firewall (firewall), in addition to the one built into Windows (i.e., a program that was additionally installed on the machine), then be sure to turn on the firewall (protecting our router from the outside world) - Protect my Computer and Network . If an additional firewall is installed, then the built-in protection can not be activated, but only the external firewall can be configured. The main thing is that the firewall on the interface facing the Internet must be turned on, built-in or external.
After confirmation (pressing the OK button), the computer activates the router mode, implemented through the NAT mechanism. And above the network interface where this mechanism is activated, a palm symbol appears (a lock on top means that firewall protection is enabled for this interface).
A direct consequence of this mode is a change in the address on the local (facing the local network) interface of the router to 192.168.0.1 with a subnet mask of 255.255.255.0. In addition, on the computer acting as a router, the DHCP service is activated (the router begins distributing the necessary IP addressing parameters to all computers on the local network), and DNS (converting IP addresses to domain names and vice versa). The router becomes the default gateway for all other computers on the network.
And here's what it looks like from the point of view of the rest of the computers on the local network. They all receive the necessary IP addressing settings from the router via DHCP. To do this, of course, their network cards must be configured to automatically obtain an IP address and DNS. If this has not been done, then nothing will work. Setting up automatic acquisition of an IP address and DNS was described above. It is possible that the computer will not receive the necessary addresses from the router immediately; in order not to wait, you can click the Repair button, which will force the DHCP service to provide the necessary information.
If the network card is configured correctly, computers will receive addresses from the range 192.168.0.2—254 with a mask of 255.255.255.0. The default gateway (default gw) and DNS server will be set to 192.168.0.1 (router address).
From this moment on, computers on the local network must have access to the Internet. You can check this by opening a website in Internet Explorer or pinging any host on the Internet, for example, www.ru. To do this, click Start -> Run and in the window that appears, type ping www.ru -t Of course, instead of www.ru, you can select any other host on the Internet that is working and responds to pings. The “-t” switch allows infinite ping (without it, only four packets will be sent, after which the command will complete its work and the window with it will close).
If the Internet channel is operating normally, the screen output from the ping command should be approximately the same as in the screenshot, i.e. replies must go. If the host does not respond (i.e. the Internet channel does not work or something is configured incorrectly on the router), then timeouts will appear instead of replies. By the way, not all providers allow the ICMP protocol, which is used by the ping command. In other words, it is quite possible that “ping does not work”, but there is Internet access (sites open normally).
Finally, I’ll dwell a little more on the NAT mechanism. NAT - Network Address Translation, i.e. technology for broadcasting (converting) network addresses. Using this mechanism, several machines from one network can access another network (in our case, several machines from a local network can access the global Internet) using only one IP address (the entire network is masked under one IP address). In our case, this will be the IP address of the external interface (second network card) of the router. The IP addresses of packets from the local network, passing through NAT (towards the Internet), are rewritten with the address of the external network interface, and returning back, the correct (local) IP address of the machine that sent the original data packet is restored on the packets. In other words, machines from the local network work under their own addresses without noticing anything. But from the point of view of an external observer located on the Internet, only one machine is working on the network (our router with the NAT mechanism activated), and another two, three, hundred machines from the local network located behind the router are not visible to the observer at all.
On the one hand, the NAT mechanism is very convenient. After all, having received only one IP address (one connection) from the provider, you can connect at least a hundred machines to the global network, literally by making a few mouse clicks. Plus, the local network is automatically protected from intruders - it is simply not visible to the outside world, with the exception of the computer-router itself (numerous vulnerabilities of the Microsoft OS family are again beyond the scope of this article, I will only note that to activate the protection, i.e. enable the firewall on external interface of the router, as mentioned above, is required). But there is also another side to the coin. Not all protocols (and therefore not all applications) will be able to work through NAT. For example, ICQ will refuse to transfer files. Netmeeting most likely will not work, there may be problems with access to some ftp servers (working in active mode), etc. But for the vast majority of programs, the NAT mechanism will remain completely transparent. They simply won’t notice it, continuing to work as if nothing had happened.
But. What to do if there is a WEB or some other server inside the local network that should be visible from the outside? Any user contacting the address https://my.cool.network.ru (where my.cool.network.ru is the router address) will be sent to port 80 (by default WEB servers respond on this port) of the router, which is nothing does not know about the WEB server (because it is not located on it, but somewhere inside the local network BEHIND it). Therefore, the router will simply respond with a reply (at the network level), thereby showing that it really has not heard anything about the WEB (or any other) server.
What to do? In this case, you need to configure redirection (redirection) of some ports from the external interface of the router to the local network. For example, let's configure port 80 redirection inward to the web server (which we have on our computer 169.254.10.10):
In the same menu where NAT was activated, click the Settings button and select Web Server (HTTP) in the window that appears.
Since we have chosen the standard HTTP protocol, which was already included in the list before us, there is no need to select the external port (External Port) to which the router will receive connections and the internal port (Internel Port) to which the connection to the local network will be redirected , — the standard value 80 is already set there. The protocol type (TCP or UDP) is also already defined. All that remains is to set the IP address of the machine on the local network, where the incoming Internet connection to the web server will be redirected. Although, as I was correctly corrected in the forum, it is better to set not the IP address, but the name of this machine. Since the IP address (which is issued automatically by the DHCP server) may well change, but the machine name will not (it can only be changed manually).
Now, from the point of view of an external observer (located on the Internet), a web server has appeared on port 80 on the router (the local network behind it is still not visible). He (the observer) will work with it as usual, without assuming that the web server is actually located on a completely different machine. Comfortable? I guess so.
If you need to give external access to some non-standard service (or a standard one, but not included in the list in advance), then instead of selecting services from the list in the above screenshot, you will need to click the Add button and enter all the required values manually.
Instead of a conclusion
In the first part of the series of articles, the possibility of organizing local network access to the Internet using the built-in capabilities of Windows XP from Microsoft was considered. We should not forget that the computer-router obtained as a result of configuration must work constantly, because if it is turned off, other hosts on the local network will lose access to the Internet. But a constantly running computer is not always convenient (it makes noise, gets hot, and also eats up electricity).
Options for organizing access of local networks to the global one are not limited to those described above. The following articles will look at other methods, for example through hardware routers. The latter have already appeared in reviews on our website, but in those articles the emphasis was on testing the capabilities, without much explanation of what these capabilities give the user. We will try to correct this annoying omission.
Navigation
- Part one - building a simple wired network
- Part two - setting up a wireless network
- Part three - using WEP/WPA encryption in wireless networks
- Part four - using a hardware router with a built-in access point
- Part five - combining heterogeneous networks, using bridges
- Part six - using multiple channels on the Internet