Setting up the router
If you already use a wireless connection at home, you can skip this step. If you are still going to configure the router, enter the settings using a browser (192.168.0.1, 192.168.1.1), add a login and password (initially in most cases it is admin/admin, admin/parol).
In the “Wireless Network” tab, change the connection name, password, and encryption protocol. We recommend choosing WPA2-PSK, it is the most secure. Save the settings, reboot the router.
What you need to organize a local group
The task at hand - creating a network through the use of a router - will require certain equipment:
- Directly the router;
- A personal computer, which will serve as the center of all subsequent manipulations;
- Laptop or netbook;
- Tablet computer or smartphone;
- Printer
- Other devices that support data transfer via Wi-Fi
DHCP
Before you do and implement your plan, it is important to make sure that the DHCP : the protocol will allow you to automatically set network parameters for all devices in the group. In the DHCP there is a subsection “DHCP Clients List” in which you will see all the devices connected to the router. Of course, you can do without deploying DHCP, but in the absence of automatic distribution of addresses, to connect to the router, you will have to manually set the network parameters on each device .
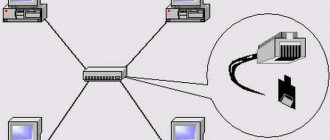
Switch
Appearance of the D-Link switch
The router has ports on the side or back for connecting your devices. One of the ports is highlighted in color (usually yellow) and is intended for connecting an Internet provider cable; it is called the WAN port. LAN ports are intended for connecting devices. If there are not enough sockets to connect all your gadgets, you can purchase a special switch with eight ports . Then you connect the switch to the router, and then connect all your devices to the switch. Switches can be:
- Megabit;
- Gigabit (if you need a higher speed connection to the disk).
Changing the network type
In Windows 7, the network types are “Home”, “Enterprise network” and “Public”, and in Windows 8, 8.1, 10 - “Private” and “Guest or public”. It is possible to create a home group only if the type is “Home” or “Private”. When you connect for the first time, the OS makes a discovery request, agree to it.
- In the tray, right-click the connection icon - Network and Sharing Center.
- In the line “View active networks” you will notice the name of the connection and its type.
- To configure the required type:
- Windows 7
- Click on the Internet icon - “Home Network”.
- Windows 8, 8.1
- Open the side menu by pressing Win+I or moving the mouse cursor to the right edge of the screen.
- Changing computer settings - Network - Connections - name of the connection.
- Activate "Search for devices and content."
- Windows 10
- Start - Settings - Network and Internet - Ethernet (Wi-Fi is the name of your connection).
- If connecting via cable, click on the name of the connection and activate the “Make this computer discoverable” slider.
- When communicating via Wi-Fi, under the list of connections, click “Advanced settings” and make the computer discoverable.
From now on, it is possible to set up a local group through a router at home.
We are building a home network. Router
During the conference, questions often arise about setting up network storage devices and connecting several devices for collaboration. However, information for beginners is rarely provided in articles. With this series of materials, we decided to fill the gap and help users configure their equipment efficiently and conveniently. It does not claim to be exceptionally complete and deep, but we hope it will be useful to a wide range of users.
So, you already have a computer or laptop, but you decided that this is not enough and it’s time to get a few more interesting devices - a wireless router, a network drive, a media player, an IP camera. The idea is certainly not a bad one, but if you have only worked with one PC before, reading numerous instructions will take a lot of time. Yes, and it may require certain preparation. But in reality, it's not all that scary. Many devices have built-in “assistants” for quick setup, and network settings are often set automatically.
General scheme
Let's start with a description of the participants and some general terms. We took the first illustration from the description of the ZyXEL NBG460. Here you can find a PC, network storage and printer, laptop, IPTV set-top box and smartphone. The only thing missing is a game console and a media player.
It is the router (also often called a router) that ensures the connection of all devices into a single home local network and its connection to the Internet. Internet connection options may vary. For example, via Ethernet (“Internet Beeline”, Net-by-Net and others), via Wi-Fi or 3G/4G modem, via ADSL technology via telephone (“STREAM”) or via cable modem (“AKADO”). The last two options require a special modem. It can be made as a separate device with an Ethernet port at the output or built directly into the router. In this case, the latter often has a corresponding prefix in its name.
The Internet connection port itself is usually called “WAN” - from Wide area network. That is, to connect to a “big” network. But the PC, network storage device and other wired devices are located in the local/home segment of the network and are connected to the “LAN” (Local area network) ports. Depending on the router model, there may be a different number of them, most often four.
In addition to wired connections using Ethernet technology, HomePlug can be used to connect devices - a network via standard electrical wiring or Wi-Fi - a wireless connection familiar to everyone (the combination WLAN - Wireless LAN is usually used to designate this network segment). They all differ in speed and other capabilities.
| Technology | Peculiarities | Speed |
| FastEthernet | Cable (two pairs), up to 100 m | 100 Mbit/s |
| Gigabit Ethernet | Cable (four pairs), up to 100 m | 1 Gbit/s |
| HomePlug* | Electrical wiring within an apartment or office | Up to 200 Mbit/s |
| Wi-Fi 802.11g* | Radio, 2.4 GHz, 150 m in open space | 54 Mbit/s |
| Wi-Fi 802.11n* | Radio, 2.4 or 5 GHz, 300 m in open space | 150/300/450 Mbit/s |
| * for these technologies, the operating range is not guaranteed, since it significantly depends on external factors, and the maximum theoretical speed is indicated, in practice it is usually 2-3 times less | ||
Note that to increase the number of wired ports (in some cases, the standard four may not be enough), you must use network switches. By installing an additional model with 8 ports, you connect one of them to the router, and the remaining seven remain for connecting devices. That is, the total number increases by six, since two ports are required to connect the router and switch. The switch can be either 100-megabit or gigabit. The second option can be used if you have a working network and a router with Fast Ethernet that suits its speed, but you want to ensure fast communication between your desktop PC and network storage without changing the router.
In general, today, if we talk about wired ports, then of course it is desirable to use gigabit connections as much as possible (especially if we are talking about a cabling project during a renovation). However, this will not directly affect the “Internet speed” in any way. The only place where a higher speed can be justified is the cable connection of high-performance devices (and there must be more than one of them) that require the rapid exchange of large volumes of information.
As for wireless communications, we would recommend buying routers today that support 802.11n technology, which, compared to 802.11g, shows 2-4 times higher results in performance tests and usually has better coverage.
For providers working via PPPoE/PPTP/L2TP and having a developed network of their own resources, it will be useful for the router to support simultaneous work on the Internet and access to the provider’s network.
A similar note concerns working with IPTV - if you require it, the router must support it. True, there are too many options for implementing the service and this issue needs to be clarified for each specific provider separately.
As for the general comparison of performance in different connection modes, depending on the model and connection type, the user can expect speeds of up to 100 Mbps. Reviews on the site usually provide figures for test results in different modes (do not forget that with the release of new firmware they can change significantly).
In fact, the more significant issue when choosing a router is its compatibility with a specific provider. Unfortunately, it is impossible to answer this question with laboratory tests. In this case, we recommend that you turn to forums and recommendations from users of your network, but the most successful is to consider a purchase with the condition of testing the functionality in your specific apartment. The router option offered by the provider in this case has one undoubted advantage - if something does not work, the provider himself will deal with it. But they usually have a smaller selection of devices, the models themselves are less “interesting”, and the cost is higher.
Setting up the router
As an example, we use the ZyXEL NBG460N Internet center model, connected to the Beeline Internet provider. Before setting up any device of this class, it is advisable to check the manufacturer’s website for the availability of new firmware/firmware. The second important point is changing the administrator password to access the router.
We believe that the Internet itself is already configured on it. There are too many possible configurations to describe them here. We will mention only the main options:
- direct connection with a fixed or dynamic address (usually you need to change the MAC address on the external interface on the router or inform the factory provider);
- connection via PPPoE – username and password required;
- connection via PPTP/L2TP – the address or server name, user name and password are required.
In particular, for ZyXEL equipment, the easiest way to set up is to launch the bundled NetFriend program, specify the region, provider name and account information. In a few minutes your Internet will be working.
What are the next steps to take? Perhaps the very first step will be to set up a secure wireless network. By default, routers usually have an open network radio enabled. This means that anyone can connect to it and not only use your Internet channel, but also possibly gain access to computers.
So we recommend changing the network name to something original and setting the mode to WPA2-PSK AES. This is the safest option today. And for 802.11n equipment, only it provides maximum performance. You should use other options only if some of your wireless equipment does not support it. Also, do not forget that WEP cannot be considered secure today and that the password must be complex - one and a half dozen random characters. Possible difficulties with entering it on mobile devices are compensated by the high level of network security. And for laptops and PCs, you can use WPS technology for a quick connection - you just need to press a button on the router and on the client, and in a few seconds a secure connection will be set up.
To improve 802.11n performance, it is recommended to enable the “40” (or “20/40”) mode in the access point settings, which means operation on two radio channels. You can select the most free channel using the inSSIDer program, launched on a PC with a wireless adapter installed.
Typically, the router has a DHCP server enabled. It “distributes” IP address settings to all devices connected to it. So there is no longer any need to specifically point out anything about them. Despite the fact that the system works automatically, we would recommend programming fixed MAC-IP matches on the router for those devices that will subsequently need to be accessed from the Internet. This is necessary so that their IP addresses are permanent and can be registered in the port translation rules.
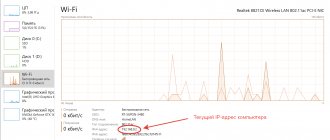
Most often, the range of addresses that is used on a home network is 192.168.0.* or 192.168.1.*, where “*” is any number from 1 (usually for a router) to 254. You can check the current PC address with or in the status network connection or by typing ipconfig at the command line (for Windows systems).
Recall that a MAC address is a physical/hardware identifier that any network device has. Often they are even written on packages and cases. Formally, they are all individual on a global scale, but in many cases they can be changed through the device driver settings. It is represented as six bytes, written in hexadecimal digit format, for example 001020AABBCC or 00:10:20:AA:BB:CC.
The next point that is worth understanding is the permanent/external/white address. These concepts are often confused, so it is imperative to put things in order. If you use a router to connect to the Internet, its WAN interface has a specific IP address. All devices that are outside your home network see exactly this address and know nothing about your internal devices. The network address translation (NAT) technology operating in the router automatically and transparently for the user replaces internal addresses with external ones and vice versa when transmitting and receiving network packets.
In turn, this address, which is issued by the provider or required to be specified in the router during its configuration, can be permanent or dynamic. The only difference between these options follows from their names.
But of greatest interest is the question of the external/white address. These terms usually mean “an address accessible from anywhere on the Internet.” An example is an office PBX with a single external number. All its subscribers can communicate with each other by dialing an internal number. Outside the office, these numbers have no meaning. At the same time, they can call landline phones, but it is impossible to directly reach each specific subscriber simply by dialing a landline number. In turn, this office with its own PBX can be located inside an office building with its own PBX and another switch.
This example shows one of the reasons for using NAT technology - you can have a local network with Internet access of almost any size, but “waste” only one address from the general global list. With the transition to a new version of the IPv6 protocol, this problem may disappear, but no one knows when this will happen.
It would seem that if the Internet works like this, then why might you need an external address? The answer to this question is quite simple - if you want to have access to your local network from the Internet, its use is necessary. For example, you are planning to create an FTP server, host a Web server with a family photo album on your PC, or you want to have access from the office to files on your home network drive. Note that these problems can be solved in other ways, but they are much more complicated and more expensive.
How to determine which address your provider provided you with? First, you need to look at the external address of the router on the corresponding page of its Web interface, if it looks like 10.*.*.* or 172.(16...31).*.* or 192.168.*.*, then it is definitely “ gray" and it is impossible to access your network from the Internet using normal methods.
The second test that can be done is to go to the website https://www.whatismyip.com/ and compare the address that this service shows with your address on the router. If they match, then you're in luck.
Many providers provide users with an external dynamic address. In this case, another problem arises - the address, although external, is not permanent and it is impossible to find it out while outside the network. To solve this, you need to use the dynamic DNS service built into most routers - it allows you to get a permanent domain name that will automatically be configured to the router’s IP address when it changes, and it can be used at any time to access your network.
You can use the DynDNS.org service completely free of charge - one domain name is provided to everyone. A working email address is required to register.
In addition to accessing the local network, an external address can be useful for improving the efficiency of certain services, such as messaging programs or p2p networks. Note that here we are only talking about the fact of the presence of an external address, and the use of DynDNS in this case is not required. However, there are some steps worth taking.
We are talking about broadcasting network ports. This is sometimes called "port forwarding" or "port opening". This setting allows an external recipient to connect to a specific program that is located on your PC behind the router.
Let us remind you that connection to network services occurs by specifying the IP address and port number. For example, for HTTP it is 80, for POP3 it is 110, and so on. But if we are not talking about standard programs, then the numbers can be almost any (from 1025 to 65535) and often they can be specified in the settings of the program itself.
Configuring port translation allows you to transmit a request incoming to the external address of the router and to certain ports to a PC located in the local segment. For example, you can create a Web server on a PC and “forward” port 80 for it. Depending on the router model, external and internal numbers may differ or must be the same. It is also worth mentioning that some of the ports (most often 80, 8080, 23, 25) are blocked by the provider for security reasons. After setting up port translation, the program installed on the PC begins to behave as if it has a direct connection to the Internet past the router. Check the operation of port translation in the program itself, if such an option is provided.
You may encounter the “protocol” parameter when configuring port translation. We are talking here about two protocols within TCP/IP - TCP itself and UDP. In most cases, the first one is used for Internet communications. The need for UDP is usually indicated in the program descriptions. If the router does not have such a parameter, then both protocols are broadcast at once.
Some programs support the UPnP protocol to automatically open ports for themselves. However, from a security point of view, it is better not to do this, since “simplicity” also has a downside - lack of access control.
In some cases, it will also be useful to set up regular sending of device operation log files to your email address. The truth here is that you need to understand that if there is no Internet connection, then nothing can be sent to an external server. To correctly display the date and time in the logs, the router has a built-in clock that can be synchronized via the Internet.
Another rather rarely used option is allowing access to the Web interface for configuring the router from the Internet. This should only be done if absolutely necessary and do not forget to set a really complex password for access.
After completing the router setup, it is recommended to backup its configuration to a file on your PC. Then you won’t have to repeat all the described steps again.
Total at the moment we have:
- router connected to the Internet;
- secure Wi-Fi network;
- service for distributing addresses on a local network;
- configured DynDNS for accessing the network from the Internet;
- translation of ports for running services on a PC or other devices.
In the next article we will talk about setting up network storage drives.
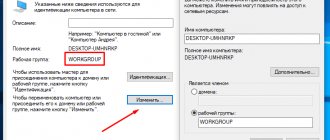
Changing the PC name
This item is optional, but it is better to replace the PC name, since it is automatically assigned in the form of an alphanumeric code, then it will be difficult for you to navigate the names. To configure the laptop name, follow these steps:
- Right-click on the “My Computer” icon on the desktop (Windows 7) or launch Explorer - My Computer (on Windows 8–10).
- System properties - Advanced system settings - Computer name - Edit.
- Come up with a convenient name - OK - Apply, and then restart Windows.
- Repeat the procedure on each device.
- Create a HomeGroup
- Go to Network Sharing Center.
- In the “Home Group” line, select “Ready to Create”.
- Create a homegroup - Next - Select files and devices to share - Next.
- Write down the password and click "Done".
The group with access via the router is ready. You can connect other devices.
Purpose of the local network
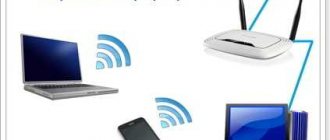
Let's say a few more words about the local network and why we might need it. A wireless local network is essentially a kind of networked data storage, which is formed as a result of connecting several computer devices via Wi-Fi, a wifi router in this case as a server. Its purpose is not only to transfer files, but also to communicate with each other of all devices connected to it, you can communicate using it from neighboring rooms, play online games, for example Counter-Strike, and also connect other digital devices, for example create a connection to a network printer, scanner, camera and other devices that can connect to the router via Wi-Fi.
Connecting to a homegroup
To add other devices to the newly created group via Wi-Fi, on the connected PC in the Network Control Center in the lower left corner, click on “Home Group” - Join. Enter the password and specify the shared folders. Restart all connected devices.
To make sure that the connection between laptops is working at home, go to Explorer and all available devices will be presented in the “Network” tab. If you have a printer at home, you can even print documents from any connected device.
Main problems and methods for solving them
There are several typical problems with setting up a local network through a router and accessing shared resources.
- The router is configured, the network and connections of all computers are created according to all the rules, the equipment is fully working, and there is no exchange between network nodes. The most common reason for this situation is the influence of third-party programs on the network connection. For example, ESET integrates an additional traffic filter into the list of active network services and protocols for a particular connection. Similar actions are typical for other antivirus programs, firewalls and firewalls. Simply deleting entries from the list does not help - after the next reboot of the computer, they will appear again and continue filtering packets. The best option is to disable the source of the problems directly in the defender program interface or configure it correctly.
- One or more computers cannot see shared resources located on another computer(s). Most likely, the issue is in the sharing settings - the permissions on the owner’s PC are incorrectly set. There may be other variations of this problem, such as read-only access. There is another reason - not all resources can have shared access configured using simple steps. For example, it will not be possible to share access to the entire disk with the operating system using a simple method. Additional configuration required. In short, to fix the problem you need to check the permissions and, if necessary, make additional settings.
- After creating a local network, it is not always possible to connect to applications (for example, games or databases) on one of the PCs in the group. The main reason is that the connection is established not by the LAN host name, but by IP address, and their dynamic distribution from the router. The solution is quite simple - a static IP is reserved for the server computer on the router.
- LAN nodes from other PCs are not visible. A typical reason is incorrect configuration of the router or network on several computers. It is possible that during the configuration process, not all machines were set to the same network profile (remained “Public” instead of “Home”), the PCs belong to different groups, and network discovery is not enabled. To correct the situation, they check the settings, ranging from the router configuration and connection properties to the sharing settings.
In general, the question of how to create a local network on Windows 7 or 10 using a router is solved quite simply. Configuring the router, creating and setting up network connections and workgroups, and distributing access rights are well documented by the developers, the action algorithms are as formalized as possible, which allows you to practically avoid mistakes when building a home or office LAN. For other operating systems, the procedure is practically similar, with the exception of the sequence and content of some steps.
Disable password
If you fully trust all participants in your network, you can disable the password for access to network resources, which will allow computers and users to exchange the necessary information as quickly as possible.
To do this you need:
- Go to the homegroup settings section.
- Select the “Change additional parameters” subsection.
- Enable network discovery using the corresponding icon.
- Share folders by checking the box.
- Disable access password request.
Content
Connecting several computers and gadgets into a single local network allows users to exchange information, play games and organize Internet access in the Taldomsky district of the Moscow region for all devices included in such a network. But in order to make full use of the capabilities of local networks, it is worth studying the general principles of their construction and becoming familiar with the features of setting them up for different configurations. Therefore, it’s worth figuring out how to build a network at home with and without a wireless router.
How to protect your network?
When sharing access to personal or work data, you need to be sure that outsiders will not be able to obtain it. Since the Wi-Fi signal is distributed over several tens of meters, both neighbors and passers-by can “catch” it (if the apartment is on the 1st floor).
To improve network security, you need to:
- Set a complex password and change it several times a year.
- Disable WPS. This technology can be used for hacking. This cannot be done by accident, but if a knowledgeable person sets such a goal, turning on WPS can cause harm.
- Hide SSID. Together with a complex password, this is the most effective way to protect against accidental connections. A network with a hidden SSID will not be visible to users unless they enter its name manually.
- Enable MAC address filter. Only devices with an “allowed” address will be able to connect to the network.
- Create a separate guest network. If you need to protect your data as much as possible, but at the same time give access to Wi-Fi to others (visiting guests, relatives, neighbors), you can create separate guest access.
- Change access to router settings.
If you use at least 2-3 methods from the list, a random user will definitely not connect to your network, and even intentionally hacking access will also be difficult, and most likely impossible.
Useful
Connecting a printer via a network.
To connect the printer to the network, open the “Devices and Printers” directory through the Control Panel. Right-click on the device and select “Properties...”.
Share it and save the settings.
Administration.
To create virtual private networks, configure them, and administer them, applications like:
- Radmin is a free and secure utility for creating a VPN, remotely managing workstations, and exchanging files between computers on the Windows platform.
- Hamachi is popular among gamers; it allows you to create a VPN over the Internet and organize file sharing based on the P2P principle.
- Anyplace Control is an application for remote control of a PC via LAN and the Internet. Allows you to control the Desktop, share files, and intercept control of the computer.
Why do you need network storage or personal cloud?
Network-attached storage is a personal cloud as part of your home local network that has a large amount of memory and can accommodate exactly those files that you most often need (documents, music, graphics, videos). Network storage, as a rule, has its own operating system based on the Linux kernel and includes: a web interface, a media center, a device manager, a remote access manager... If you have sufficient experience working with Linux systems, you can install on network storage torrent client. As a rule, the transmission program is used, which has a convenient web interface that allows you to manage download tasks, and the network storage turns into an autonomous device for downloading information from the network.
Smartphone
To connect your phone to the local network, you need additional software. It is better to use the ES Explorer utility, which can be found on the Internet.
After installing the Internet at a dacha in the Moscow region, you need to configure:
- go to the Network section;
- press the “LAN” button;
- activate scanning mode.
This will allow other devices to access the data located on the smartphone, and will also provide the gadget with access to external network resources.
A little theory
First, let's figure out what a local wireless network is, why it's needed, and then we'll look at ways to create and configure it through a Wi-Fi router.
What is it? A local area network is the connection of at least two devices via a wired or wireless interface. To create it, Wi-Fi routers, modems, and wireless access points can be used. Less commonly done using converters, repeaters, and signal amplifiers.
To connect two computers via a twisted pair network, no additional equipment is required; you only need network adapters on both devices.
The demand for local Wi-Fi networks has been growing in recent years. They are used to solve problems in business, everyday life, government activities and education:
- High-speed file exchange between nodes.
- Providing shared access to resources: files, equipment, for example, a WiFi-enabled printer.
- Providing Internet access to multiple devices.
- Collaboration on projects within a department, office, laboratory, company.
On Microsoft operating systems, there are three types of local wireless networks, based on the security level settings. Using a Wi-Fi router and between two computers (laptops), you can create the following types:
- Home (also called private) - computers in it are detected by each other, the function of organizing shared access to printing devices, files, and directories is available. It has a low level of security, so creating such connections is recommended if trusted devices are connected to a local area, for example, at home or in a dorm.
- Working - more suitable for small enterprises, company divisions, offices, workshops. Each element of the association is discovered by others, and shared access to the contents of the drives is provided. Unlike the previous one, the home group is disabled, the remaining parameters are identical, including security settings.
- Public (or public) - the devices in it are invisible to one another, you can work with them only with direct access. The connection guarantees a high level of information security. Mainly used to create wireless networks in public places: subway, recreation parks, libraries, educational institutions and other institutions.
For the correct functioning of the created wireless connection, the device must be configured correctly, make sure there is no damage, and exclude computers with the same names, which is important when installing Windows builds with the same machine names.
After configuring the parameters, you need to check all devices for connection to the same network. You should make sure that there are no duplicate IP addresses of its components. It is also worth making sure that each computer has a unique name.
Access to folders and files
You can get permission to view folders and files like this:
- Open "My Computer".
- Go to the section with network parameters.
- Right-click on the folder and open its properties.
- Select a section with access parameters.
- Open a subsection with advanced settings.
- Allow sharing by checking the appropriate checkboxes for read and write permissions.
After this, you must save the changes using the “OK” button. If everything is done correctly, home network users will have access to all data stored on the PC.
Preparation
Creating a home network through a router is not difficult; to do this, you need to follow these steps:
- Select the desired device - a router, preferably one that supports the 802.11n standard and operates in the 2.4 and 5 GHz range. Routers with a 5 GHz band are much less common. 802.11n provides better overall performance and coverage.
- Select the connection type that is suitable for your Internet provider. Details can be obtained from your Internet service provider or in the contract.
- Set up a router to access the Internet.
- Connect the necessary devices.