In this article I will tell you how you can access your computer from the network. Open access to a computer over a network to exchange information with it. For example, you need to share a folder. Let’s say you’ve done this, you’re trying to access this folder from another computer, and you’re given a window asking you to enter your “login” and “password,” or it gives you an error that you don’t have enough rights, asking you to contact your system administrator. You have two computers connected to each other, and you have a need to exchange files with each other. Available:
- First computer: its IP address is 192.168.0.2
- Second computer: its IP address is 192.168.0.3
Create a shared folder on the first computer
Right-click on the desktop, a context menu appears => create => folder. A “New Folder” will appear on the desktop, rename it “shared”. Right-click on it and a context menu will appear => property. Switch to the “Access” tab.
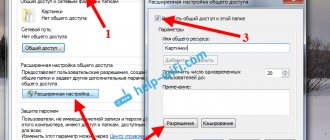
Click on the “Sharing” button, a window appears that looks like this:
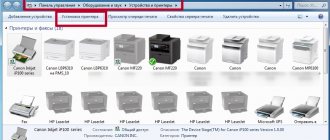
In the line where I write “Everyone”, you also write this word, then click on the “Add” button. Then below you will see the inscription “Everyone”, opposite it there will be a value “Reading”, click on this word “Reading” and select “Read and Write”, then click on the button “Sharing” - “Done”. Next you need to click on the “Advanced settings” button, the following window will open:
In this window, you need to check the box “Share this folder” and click on the “Permissions” button, after which a new window will appear:
In the “Allow” column you need to check all the boxes and click on the “Ok”, “Ok”, “Close” buttons. This completes adding sharing for the folder.
Set sharing options in Windows 10
We need to open the "Advanced sharing options" window. This can be done through the “Network and Sharing Center”, or in the settings, in the “Network and Internet” section - “Sharing settings”.
For the “Private (current profile)” we need to set the following settings:
- Enable network discovery - if network discovery is enabled, then our computer will see other computers on the network, and will be visible to other computers.
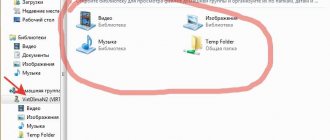
- Enable file and printer sharing - after enabling, all folders and printers that are allowed to be shared will be available to other devices on this local network. By default, these are standard shared folders (Shared Music, Shared Documents, Shared Videos, etc.). Later in the article I will show you how to share any folder on your computer.
We also change the following settings for the “All networks” :
- Enable sharing to allow network users to read and write files in shared folders.
- Disable password protected sharing. As for sharing with or without password protection, the difference is whether you need to enter a password when accessing a shared folder on a given computer. On a home network, as a rule, a password is not needed. But if necessary, you can leave password protection. Then on other computers you will be prompted for a username and password (for the user of the remote computer).
Be sure to click on the “Save Changes” !
All! Setting up a local network in Windows 10 is complete.
Accessing shared folders from another computer on the local network
After setting up shared access, we can access shared folders from other computers that are on the same network (connected through the same router or switch).
On other computers, it is advisable to perform the same sharing settings as I showed above. If you do this, a computer from the network environment will immediately appear in Explorer on the “Network” tab. Otherwise, network discovery will have to be enabled from Explorer itself (screenshots below).
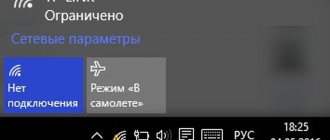
You can immediately go to Explorer, to the “Network” tab. If network discovery is disabled on this computer, you will see the message: “Network discovery is disabled. Networked computers and devices are not visible .
Click “OK” and a yellow bar will appear at the top where you can “Enable network discovery and file sharing.”
And if the network to which you are connected is assigned the “Public” status, then another window will appear. Select the following option: “No, make the network this computer is connected to private.”
After that, “Computers” will immediately appear on the “Network” tab in Explorer. Our computer will also be displayed along with other computers from the local network.
All is ready!
If you cannot access a shared folder on another computer, then you need to check whether sharing of files and folders is allowed in the firewall (antivirus) settings for a private network on the computer on which we shared access to these folders. You can temporarily stop the firewall (antivirus) to check. We also have a separate, detailed article on this topic: shared folders, network computers, flash drives, and drives are not displayed on the “Network” tab of Windows Explorer.
We have just set up a local network between two computers on Windows 10. Both computers have access to each other via the network (in my case via Wi-Fi, through a router). By default, access is allowed only to individual shared folders. To exchange files between computers, you can use these folders (copy files into them, view, delete), or manually share access to other folders located on the computer’s hard drive. Next, I will show in more detail how to share a folder in Windows 10.
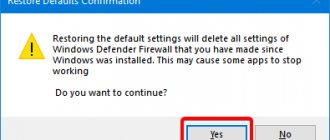
Disable Windows Firewall
Go to Control Panel => Administration => Windows Firewall with Advanced Security.
Click on the “Actions” => “Properties” button, the following window will appear:
On the “Domain Profile” tab there is a “Firewall” item, by default it is “Enable (recommended)”, you select “Disable” and click “OK”. This completes disabling Windows Firewall.
What is a network drive
A network drive is a designated logical drive. It is a data storage device that can be accessed by different participants on the local network. It stores files that are most often called “shared” (in slang - “shared”, from English to share - “to share”). A network participant with access to this device can add files to it, edit existing ones, or delete them, depending on the configured rights.
The average user may not notice the difference in using a regular or network drive. However, the latter will transmit data at a lower speed, which is determined by the speed of the local network connection.
A network drive in the work environment is most often used to exchange and store important files and data that many people need in their work and which need to be regularly updated and replenished. At home, this device can be used to avoid storing the same files on different computers and to run them freely.
For example, my family had a network drive set up on which my parents stored movies and TV series. We could run them in any room, on any device.
Local Security Policy
Configuring the “Local Security Policy”. Go to the control panel => administration => local security policy. The following window will appear on your screen:
In this window on the left there are security items “Local Policies” => “User Rights Assignment”. A list of policies will open on the right side, at this point we are interested in two items, in the screenshot they are highlighted in red “Access to this computer from the network” and “Deny access to this computer from the network”.
Logging into your local home network
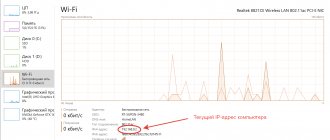
Open Explorer, in the “Network” section you will see all available computers connected to your local home network. To log into another computer, click on the computer name, and then click on the shared folder name to access the files and folders located in the shared folder.
The local network in Windows 10 has been created and configured.
You may also be interested in:
- Check and repair Windows system files with sfc scannow
- Restoring the Windows Component Store: How to solve the problem
Accessing a computer from the network
Double-click on this line and the following window will open:
You need to add the “Guest” account to this window; to do this, click on the “Add user or group...” button, you will see a new window:
In which you click on the “Advanced” button and go to the following window:
In this window, you click “search”, after which “search result” will appear: in which you should find the “Guest” account, then click on the button “Ok”, “Ok”, “Ok”.
But if, nevertheless, Windows requires a network password
Despite the fact that the settings described above have been made, when you log into this computer, another computer may request a network password. This is possible in two cases.
Local users with the same name (login)
Both computers have local users with the same name but different passwords.
Example
. There are Comp1 and Comp2. Each of them has a user named User. But on Comp1 the user's password is 123, and on Comp2 his password is 456. When trying to log in to the network, the system will ask for a password.
Solution
. Or remove matching user logins. Or for users with the same login, specify the same password. An empty password is also considered the same.
There are no local users on Windows 10
On Windows 10, you can log in and work with a Microsoft account if you have Internet access. At the same time, it is possible that when installing Windows 10, a local user was not created at all (the login was via a Microsoft account). In this case, Windows will also require a password when logging in via the local network.
Solution
. Create a local user on your Windows 10 computer.
Via Command Line
The Windows 10 operating system has a tool for processing user requests. It allows you to connect a network storage device by entering a command that may seem quite long and complicated to many. Therefore, it is recommended to carefully read the proposed instructions and act in accordance with each step:
- Right-click on the Start icon.
- From the dialog box, select Run Command Prompt with Administrator rights.
- Enter the query “net use Z:\192.168.1.235\test”. This is an example type of command. You need to replace "Z" with your drive letter, the same goes for the IP address and folder name. In our case – “test”.
- Press the "Enter" key.
Using Command Line tools, you can not only create, but also delete a network drive. Instead of the above command, the request “net use z: /delete” will be used. To process, you will also need to press the “Enter” key.
Possible problems
If your network drive cannot be connected, be sure to check that the following conditions are met:
- opening shared access for the computer;
- “Private” is selected as the network type;
- local network is pre-configured.
Separately, it is worth considering the problem when, when trying to connect, the message “Incorrect folder name” appears on the screen. For a solution, please refer to the instructions:
- Open the Run window (Win + R).
- Search for "regedit".
- In the Registry Editor that opens, go to the path “HKEY_LOCAL_MACHINE\SYSTEM\CurrentControlSet\Services\WebClient\Parameters”.
- Double-click LMB to open the “BasicAuthLevel” parameter settings.
- Set it to "2" and save changes.
As a rule, problems are resolved after the next restart of the computer. If you ignore this recommendation, not all changes will take effect.
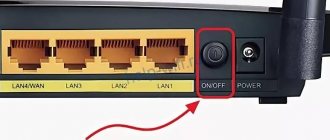
How to create and configure a wireless network via Wi-Fi connection
A wireless connection is more convenient for most users, although the connection may be less stable than we would like. To create it in Windows 10 you will have to use the command line. But to simplify the process, which must be repeated every time you turn on the computer, we will immediately consider creating an executable file that will reproduce this command. To do this, create a text file and enter the following block of commands there:
netsh wlan set hostednetwork mode=allow ssid=”network-name” key=”connection-password”
netsh wlan start hostednetwork
In this case, the name of the network and its password must be entered without quotes.
Next, when saving the file, we change the .txt format to .bat simply by changing the file format signature after the dot in its name. The executable file is ready. It is worth running every time you start your device.
Tell the connecting device your network password
After the network has been launched with this series of commands, another device can connect to it using the connection password and network name you set.